
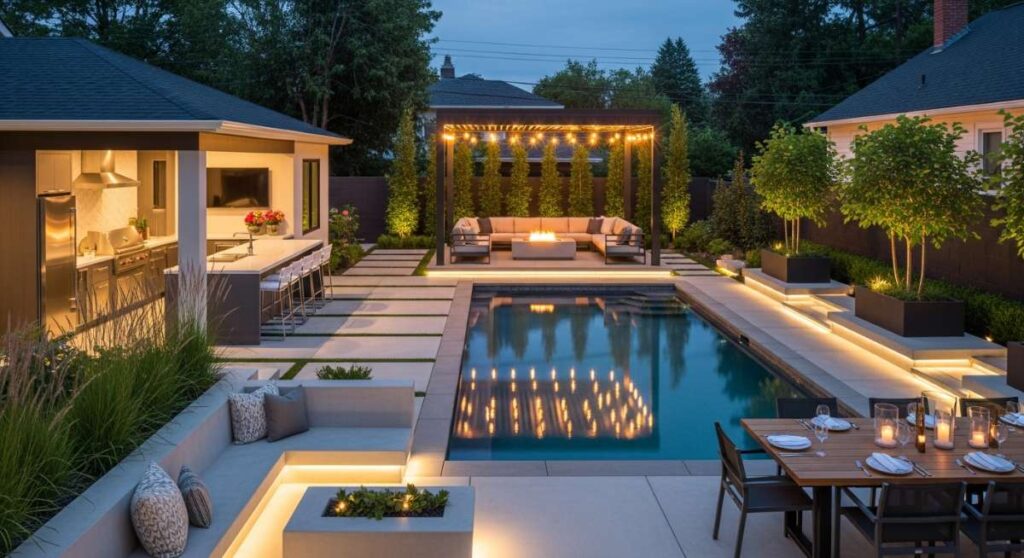
I think we’ve all had those moments where we look out the back window and see nothing but a patch of grass and a few forgotten folding chairs. But honestly, your backyard is so much more than just an outdoor space—it’s an extension of your home, a sanctuary for your soul, and the place where your favorite summer memories are waiting to happen. There is something truly magical about transforming a blank canvas of dirt and weeds into a curated escape that reflects your personal style and rhythm of life.
Lately, I’ve been obsessed with the idea of ‘slow living’ outdoors. Whether it’s the smell of fresh cedar from a new planter box or the sound of water trickling in a quiet corner, these transformations aren’t just about curb appeal; they are about creating a feeling. Today, I’m sharing ten of the most viral, swoon-worthy backyard projects from our Garden Board that will make you want to cancel all your plans and just stay home forever. Grab a glass of iced tea and let’s get inspired!
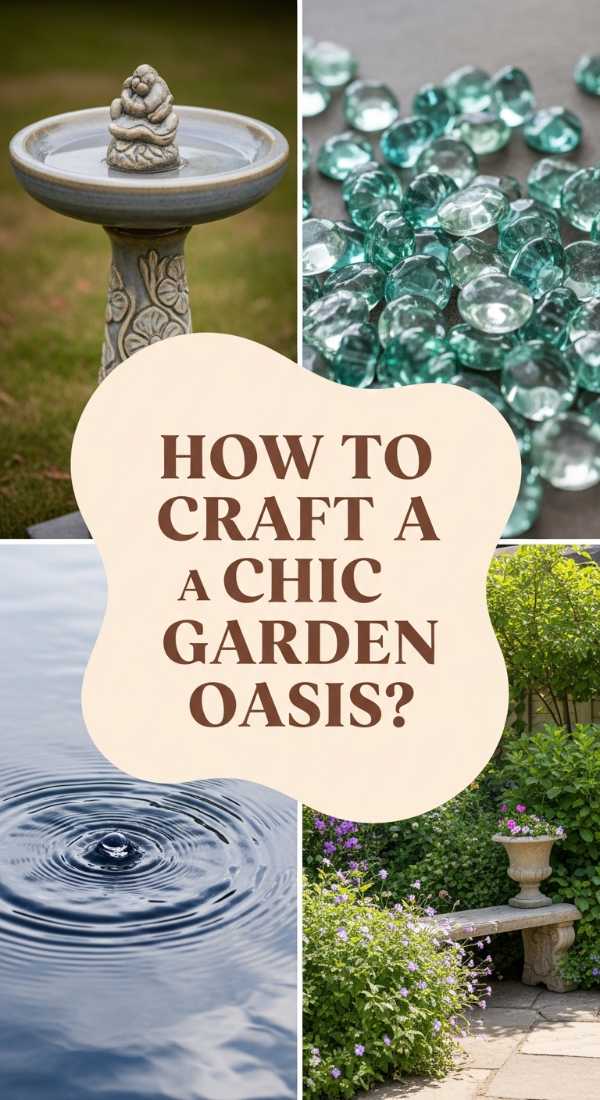
How to Craft a Chic Garden Oasis for a Peaceful Sanctuary
Why we love this
There is nothing quite like the feeling of stepping into a hidden garden that feels miles away from the noise of the world. This oasis uses layered textures and soft, ambient lighting to create a cocoon of tranquility. The air feels cooler here, scented with the delicate fragrance of climbing jasmine and damp earth, while the gentle rustle of ornamental grasses provides a natural soundscape that instantly lowers your heart rate. It’s the ultimate spot for morning meditation or a quiet evening with a good book.
Essential Elements:
- Climbing vines or trellises for vertical privacy
- Comfortable weather-resistant lounge seating
- Soft-glow string lights or solar lanterns
- A central water feature like a bubbling urn
- A mix of evergreen shrubs and flowering perennials
How to make it
- Begin by defining the boundaries of your sanctuary; use tall wooden trellises or fast-growing hedges like Privet to create a sense of enclosure and privacy from neighbors.
- Level the ground where your seating will go and lay down a base of pea gravel or flagstone for a rustic, organic feel that allows for natural drainage.
- Install a focal point, such as a self-contained recirculating water fountain; ensure the pump is set to a low, rhythmic flow to maximize the ‘Zen’ audio effect.
- Layer your planting beds starting with the tallest elements in the back (like Japanese Maples) and working forward to ground covers (like Creeping Thyme) to create visual depth and a lush, overflowing look.
- String warm-toned LED lights across the space, ensuring they are draped loosely to mimic the stars, and add solar-powered spotlights at the base of your focal trees for a dramatic upward glow at night.
How to Design a Dreamy Entrance for the Ultimate Curb Appeal

Why we love this
First impressions are everything, and a dreamy entrance sets the tone for the entire home experience before you even step through the front door. We love how a well-designed walkway invites you in with the sweet aroma of blooming flowers and the crisp, clean lines of a perfectly maintained path. It feels intentional, welcoming, and high-end, turning a standard chore like fetching the mail into a mini-promenade through a botanical dreamscape that glows under the soft hue of lantern light.
Essential Elements:
- Symmetrical planting beds flanking the walkway
- High-quality house numbers and modern hardware
- Consistent color palette for flowers (e.g., whites and purples)
- Low-voltage path lighting for safety and ambiance
- A statement front door color or natural wood finish
How to make it
- Evaluate your current path and clear away any overgrown weeds or cracked concrete; if starting fresh, use curved edges for the walkway to create a more natural, inviting flow toward the door.
- Select a high-contrast material for the path, such as charcoal pavers or reclaimed brick, and lay them in a herringbone pattern for a sophisticated, designer touch.
- Plant a mixture of boxwood globes for year-round structure and surround them with seasonal bloomers like white hydrangeas or lavender to add softness and a heavenly scent.
- Upgrade your front door hardware to a matte black or brushed gold finish, ensuring the style matches your home’s architecture for a cohesive, ‘designer’ look.
- Install hardwired or high-quality solar path lights every 3 to 4 feet along the walkway, angling them slightly downward to highlight the texture of the pavers and guide visitors safely.
How to Build Modern Cedar Planters for a Stylish Herb Garden

Why we love this
There’s something so grounding about running your fingers through fresh soil and harvesting your own rosemary or mint for a home-cooked meal. These cedar planters are a minimalist’s dream, combining the warm, honey-toned grain of raw wood with the vibrant green of culinary herbs. The scent of the cedar itself is intoxicating, especially when it’s warmed by the afternoon sun, and the elevated design means you can tend to your garden without the backache, making the whole experience feel like a luxury spa treatment for your kitchen.
Essential Elements:
- Rot-resistant Western Red Cedar boards
- Exterior-grade deck screws
- Heavy-duty landscape fabric liner
- Organic potting mix specialized for herbs
- A variety of sun-loving herbs (basil, thyme, sage)
How to make it
- Measure and cut your cedar boards into four equal sides and a bottom panel; for a modern look, keep the lines clean and avoid ornate trim or unnecessary decorative caps.
- Pre-drill holes to prevent the cedar from splitting and assemble the box using exterior-grade screws, ensuring the corners are perfectly square for a professional finish.
- Drill several half-inch drainage holes in the bottom panel to prevent root rot, then staple heavy-duty landscape fabric to the interior walls to protect the wood from direct soil contact.
- Fill the boxes with a high-quality organic potting mix, leaving about two inches of space at the top to allow for easy watering without overflow.
- Plant your herbs, placing taller varieties like rosemary in the center and cascading ones like creeping thyme near the edges, then finish with a light layer of mulch to retain moisture.
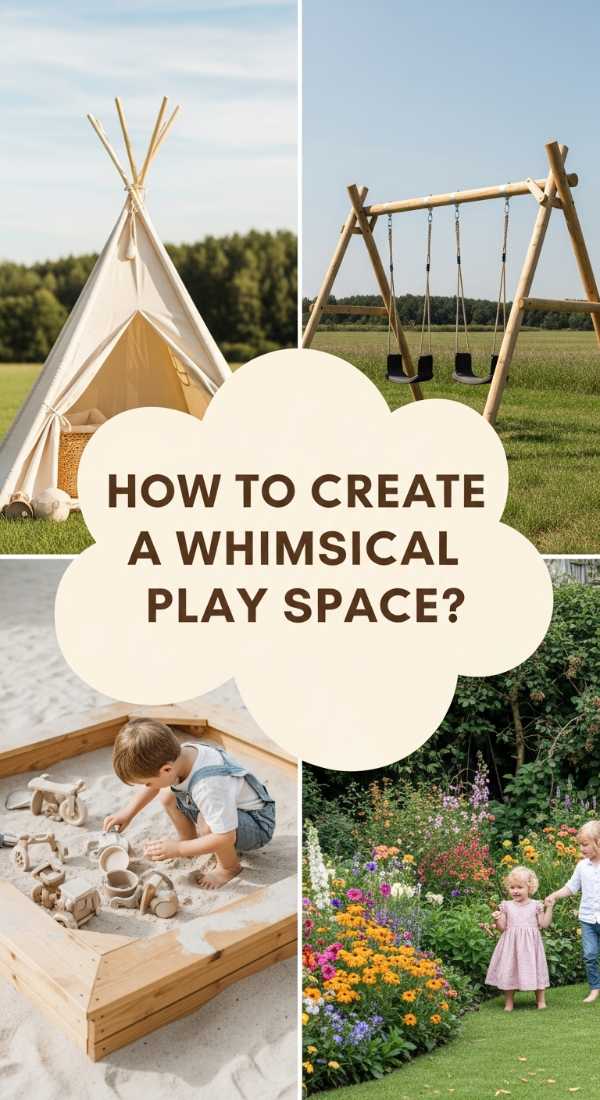
How to Create a Whimsical Play Space for Endless Summer Memories
Why we love this
This isn’t just a playground; it’s a portal to a world of imagination where kids can spend hours lost in their own stories. We love the way this setup blends into the landscape, using natural materials and whimsical touches like fairy lights and colorful buntings. The feeling of soft grass underfoot and the sight of children giggling in a secret willow teepee is enough to melt any parent’s heart. It’s a space that encourages movement, creativity, and the kind of screen-free play that defines the best parts of childhood.
Essential Elements:
- A natural wooden swing set or climbing frame
- Weatherproof outdoor rugs for ground-level play
- String lights or ‘fairy’ lanterns for evening magic
- Soft landing zones made of rubber mulch or grass
- Interactive elements like a chalkboard wall or sandpit
How to make it
- Select a level area in the yard that offers a mix of sun and natural shade, then clear away any rocks or debris to create a safe foundation for play.
- Build or install a high-quality wooden play structure, ensuring all anchors are deeply set in concrete or heavy-duty ground stakes for maximum stability during active use.
- Surround the play area with a defined border of pressure-treated timber and fill the interior with 3-4 inches of certified playground mulch to provide a soft landing for falls.
- Add a ‘whimsy’ layer by hanging solar-powered globe lights from nearby tree branches and installing a weather-resistant chalkboard on the side of the fence for outdoor art.
- Include a designated ‘quiet zone’ with a small canvas teepee and outdoor floor cushions where kids can retreat for snacks or reading after high-energy activities.
How to Style a Coastal Mud Kitchen for Creative Outdoor Play

Why we love this
The coastal mud kitchen brings the beachy, relaxed vibes of the shore right to your backyard, turning messy play into a chic design statement. We adore the seafoam and driftwood color palette that feels so fresh and airy. There’s a wonderful sensory experience here: the grit of the sand, the coolness of the water in the little stainless steel sink, and the sound of wooden spoons clinking against metal pots. It’s the perfect way to let kids explore their ‘culinary’ skills with mud pies while keeping the mess outside and looking beautiful all the while.
Essential Elements:
- A repurposed wooden potting bench or custom frame
- Small stainless steel inset sink or plastic basin
- Functional water tap or a simple gravity-fed jug
- Outdoor-rated paint in coastal hues (blue, sage, sand)
- Assorted metal pots, pans, and wooden utensils
How to make it
- Construct a sturdy frame using heat-treated pallets or cedar, designing the counter height to be roughly 20-24 inches for toddlers or higher for older children.
- Cut a hole in the countertop to fit a standard stainless steel mixing bowl or a drop-in bar sink, ensuring the edges are sanded smooth to prevent splinters.
- Paint the structure using an exterior-grade satin paint in a muted coastal color like sea salt or misty blue, applying at least two coats for weather protection.
- Install a series of small hooks along the backsplash to hang measuring cups and spoons, and add a lower shelf to store ‘ingredients’ like pinecones, stones, and shells.
- Connect a simple garden hose attachment to a small faucet or place a large water dispenser on the counter so kids have a controlled ‘running water’ source for their mud creations.
How to Curate a Spa Retreat for Total Backyard Relaxation

Why we love this
Imagine coming home after a long day and stepping into a space that feels like a five-star resort tucked away in your own trees. This spa retreat is all about luxury and sensory indulgence. The steam rising from the hot tub, the scent of eucalyptus hanging in the air, and the plushness of oversized Turkish towels make this a true sanctuary. It’s a place where the world slows down, the tension leaves your shoulders, and you can truly reconnect with yourself under the glow of the moon.
Essential Elements:
- A hot tub or cedar soaking tub
- Slatted wood privacy screens
- Potted aromatic plants (lavender, eucalyptus, mint)
- Waterproof outdoor speakers for ambient sound
- A dedicated station for towels and robes
How to make it
- Choose a secluded corner of the yard and pour a reinforced concrete pad or build a heavy-duty deck to support the weight of a filled hot tub.
- Erect tall, horizontal-slat cedar privacy screens around the perimeter to block views from neighbors while still allowing for air circulation and a modern aesthetic.
- Position the hot tub and surround it with large planters filled with aromatic herbs; the heat from the water will help release the essential oils into the air for natural aromatherapy.
- Set up a nearby weather-proof storage bench or a stylish bamboo rack to keep dry towels, robes, and slippers within easy reach of the water.
- Incorporate dimmable outdoor lighting and a small side table for drinks or a book, ensuring all electrical components are installed by a professional for safety.
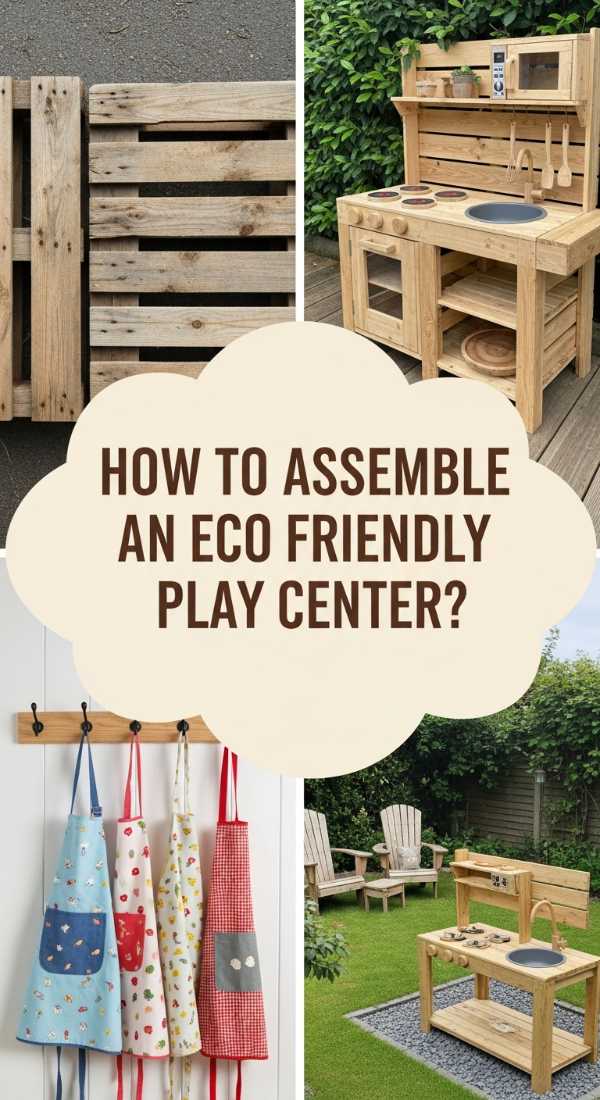
How to Assemble an Eco Friendly Play Center for Active Little Learners
Why we love this
This project is a win-win: it’s great for the kids and even better for the planet. We love the use of sustainable, reclaimed materials that give the play center a rugged, adventurous character. The textures are raw and real—rough-sawn timber, woven hemp ropes, and recycled rubber tires. It smells like the deep woods and encourages kids to engage with nature in a way that feels organic and educational, fostering a love for the environment while they burn off all that extra energy.
Essential Elements:
- Reclaimed wood or FSC-certified timber
- Natural hemp or sisal ropes for climbing
- Recycled rubber mats or tires for obstacles
- Native plants and a small ‘pollinator’ garden nearby
- Solar-powered task lighting for evening discovery
How to make it
- Source reclaimed wood that has not been treated with toxic chemicals (look for heat-treated marks) and sand it thoroughly to ensure a smooth, child-safe finish.
- Design a series of ‘stations’ including a climbing wall with recycled plastic grips, a balance beam made from a fallen log, and a rope bridge for coordination.
- Secure all structural posts at least 2 feet deep in the ground, using eco-friendly gravel for drainage instead of traditional concrete where possible.
- Plant a border of native wildflowers around the play center to attract butterflies and bees, creating a live ‘learning lab’ for the children to observe as they play.
- Finish the space with a small solar-powered charging station for kids’ walkie-talkies or nature-exploring gadgets, emphasizing the theme of renewable energy.
How to Construct a Sensory Splash Zone for Cool Afternoon Fun
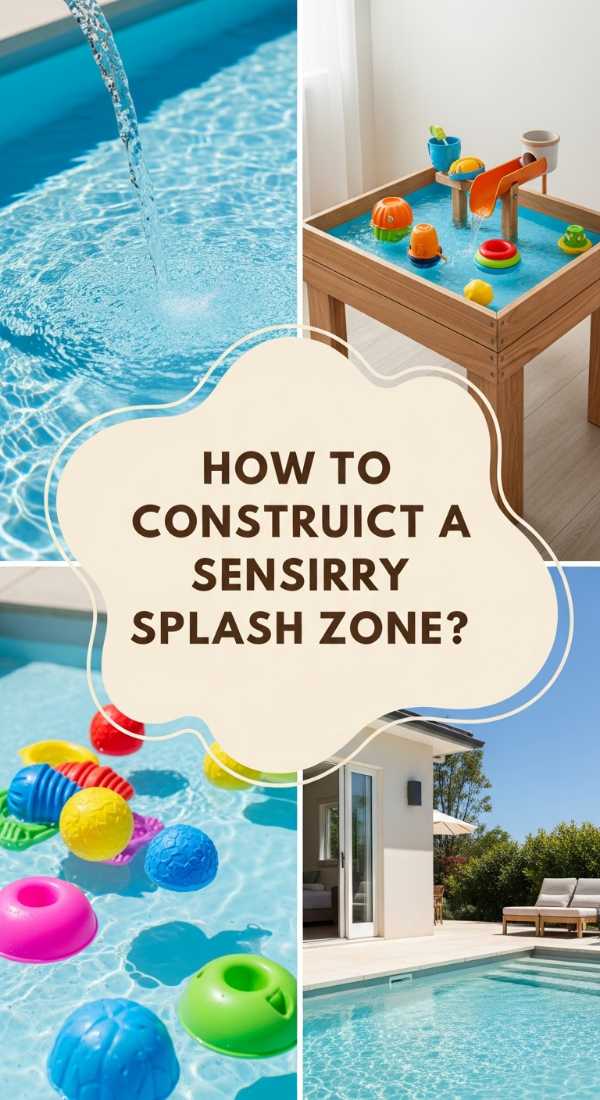
Why we love this
When the sun is blazing, there is no better place to be than the splash zone. We love how this setup turns water play into a visual and tactile feast with bright colors and different water patterns. The sound of splashing water is universally joyful, and the cool mist on your skin is the ultimate relief from the summer heat. It’s a dynamic, ever-changing space that keeps everyone—from toddlers to pets—entertained and refreshed during those long, humid afternoons.
Essential Elements:
- A non-slip outdoor surface (like textured concrete or rubber)
- Adjustable spray nozzles or a DIY PVC ‘car wash’
- Low-profile water basins or a recirculating splash pad kit
- Colorful waterproof toys and buckets
- A nearby shaded area for ‘drying off’ with comfy seating
How to make it
- Identify a sloped area for natural drainage or install a simple underground basin with a pump to create a recirculating water system that saves on your utility bill.
- Construct a ‘water tunnel’ using PVC pipes; drill small holes at different angles and connect the structure to a standard garden hose for a variety of spray patterns.
- Lay down a colorful, non-slip rubber surface to prevent slips and falls, ensuring the area is large enough for multiple kids to run through at once.
- Add sensory elements like a water table with different spinning wheels and floating toys to encourage tactile exploration alongside the active splashing.
- Ensure the water source has a timer or an easy-to-reach shut-off valve to conserve water when the zone isn’t in active use.
How to Arrange Perennial Flower Beds for a Year Round Glow

Why we love this
Perennial beds are the gift that keeps on giving, and we love the way they evolve with the seasons, offering a new ‘performance’ every few months. There is a deep satisfaction in watching the first green shoots of peonies emerge in spring, followed by the vibrant riot of coneflowers in summer and the moody hues of sedum in the fall. The garden is alive with the hum of pollinators and the changing scents of earth and bloom, creating a living tapestry that makes your home feel grounded and timeless.
Essential Elements:
- A mix of early, mid, and late-season bloomers
- High-quality organic compost and mulch
- Varying heights (tall delphiniums to low creeping phlox)
- Evergreen shrubs for winter structure
- Natural stone edging for a clean border
How to make it
- Map out your beds using a garden hose to visualize the curves, then remove the grass and till the soil to a depth of 12 inches, mixing in plenty of organic compost.
- Plan your layout following the ‘thriller, filler, spiller’ rule: tall plants like Foxgloves in the back, medium ones like Salvia in the middle, and low growers like Iberis at the edge.
- Check the sunlight requirements for each plant and group them by their ‘thirst’ levels to make watering more efficient and keep all species thriving.
- Plant your perennials at the same depth they were in their nursery pots, then apply a 2-inch layer of bark mulch to suppress weeds and lock in moisture for the roots.
- Include a few ‘winter interest’ plants like Hellebores or Red Twig Dogwood so that even when the flowers fade, your garden still has color and architectural shape.
How to Elevate Your Patio Vibe with Minimalist Garden Boxes

Why we love this
Minimalist garden boxes are the secret weapon of modern outdoor design. We love how their clean, geometric lines create a sense of order and sophistication against the organic chaos of a yard. Usually finished in dark stains or sleek metals, they make the green of the plants absolutely ‘pop.’ The feeling is curated and intentional—like an outdoor art gallery—where the focus is on the architectural beauty of the plants, from the spiky leaves of an agave to the soft plumes of fountain grass.
Essential Elements:
- Large, geometric planters (square or rectangular)
- Black or dark charcoal exterior stain or powder-coating
- Architectural plants (ornamental grasses, succulents, or topiary)
- Polished river stones for a finished top layer
- Under-planter drainage trays to protect the patio
How to make it
- Select or build large-scale boxes using a smooth-faced wood like pine (sealed well) or fiber-cement for a high-end, industrial aesthetic.
- Apply a deep, matte black or charcoal stain to the exterior; the dark color provides a striking contrast against green foliage and helps the boxes disappear into the shadows at night.
- Fill the bottom third of the containers with lightweight drainage filler (like empty plastic bottles or lava rocks) to reduce the overall weight and amount of soil needed.
- Choose ‘architectural’ plants with strong shapes, such as horsetail reed or ‘Karl Foerster’ grass, planting them in a repeating pattern for a formal, modern look.
- Top the soil with a thick layer of smooth, black river stones to hide the dirt and provide a clean, finished appearance that matches the minimalist theme.
The Final Word on Your Backyard Journey
Transforming your backyard doesn’t have to happen overnight, and it doesn’t have to cost a fortune. Whether you start with a single cedar planter or go all-in on a spa retreat, the goal is to create a space that makes you feel at peace. These projects are more than just home improvement; they are an investment in your lifestyle and your well-being. So, pick the one that speaks to your heart, get your hands a little dirty, and start building the sanctuary you deserve. Your future self, lounging in that garden oasis, will definitely thank you!