

Why You Need to Try the Viral Simple Food Board Trend This Weekend
There is something inherently magical about a table filled with an abundance of textures and colors, where the formal constraints of a plated dinner melt away into a relaxed, communal grazing experience. Lately, my social media feeds have been overflowing with the ‘Simple Food Board’ trend, and honestly, it’s the lifestyle shift we all needed. It’s not just about the food; it’s about the slow Saturday afternoons spent assembling beautiful ingredients and the way a shared board naturally invites deeper conversation and laughter among friends and family.
The beauty of this trend lies in its versatility. Whether you are hosting a cozy movie night or a sophisticated brunch, the food board serves as a curated canvas for your favorite flavors. It’s an invitation to be creative, to play with seasonal produce, and to celebrate the art of the ‘snack dinner’ in a way that feels intentional and luxurious. This weekend, I’m encouraging you to clear off your largest wooden platter and join me in creating a masterpiece that tastes even better than it looks.
Below, I’ve rounded up the ultimate components for your viral board, ranging from savory roasted delights to decadent sweet treats. Each of these recipes is designed to be the star of your spread, ensuring your weekend is filled with cozy vibes and incredible bites.
How to roast perfect pumpkin?
Why we love this
There is nothing quite like the aroma of pumpkin roasting in a hot oven, filling the kitchen with a scent that whispers of autumn and home. When done right, the edges become wonderfully caramelized and slightly chewy, while the interior transforms into a velvety, melt-in-your-mouth puree of natural sweetness. It provides a gorgeous pop of deep orange to any food board, offering a rustic elegance that pairs beautifully with salty cheeses or a drizzle of spicy honey. Every bite is a comforting reminder of the simple beauty found in seasonal produce.
Ingredients
- 1 medium Hokkaido or Butternut pumpkin
- 3 tablespoons extra virgin olive oil
- 1 teaspoon sea salt flakes
- 1/2 teaspoon cracked black pepper
- 2 sprigs of fresh rosemary
- 1/2 teaspoon smoked paprika
How to make it
- Begin by preheating your oven to 200°C (400°F). This high temperature is crucial for achieving that sought-after caramelization without turning the pumpkin into mush.
- Prepare the pumpkin by slicing it in half and scooping out the seeds. For the best texture on a board, cut the pumpkin into 1-inch thick wedges or cubes; keeping the skin on for Hokkaido adds a lovely bite.
- In a large mixing bowl, toss the pumpkin pieces with the olive oil, sea salt, pepper, and smoked paprika. Use your hands to ensure every single surface is thinly coated in oil, as this conducts the heat evenly.
- Spread the pumpkin in a single layer on a parchment-lined baking sheet. Do not overcrowd the pan; if the pieces are touching, they will steam rather than roast. Tuck the rosemary sprigs between the pieces for an infused aroma.
- Roast for 25-30 minutes. Halfway through, use a metal spatula to flip the pieces. You are looking for deep golden-brown edges and a tender center that offers no resistance when pierced with a fork.
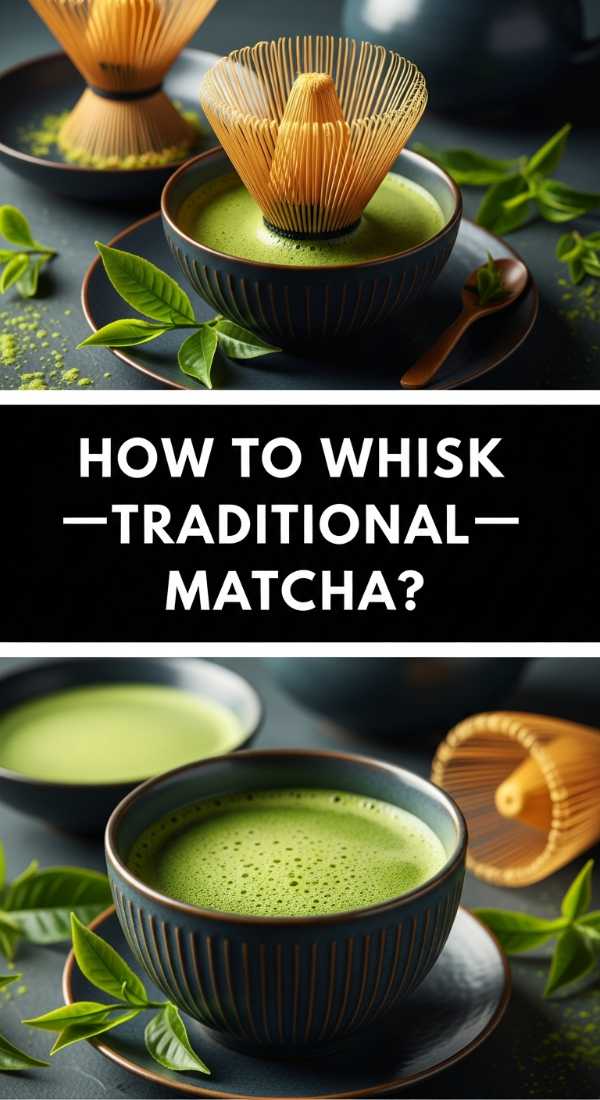
How to whisk traditional matcha?

Why we love this
The ritual of preparing matcha is a sensory journey that starts with the vibrant, electric green hue of the finely milled tea leaves. As you begin to whisk, the earthy, grassy aroma rises in a gentle cloud, signaling a moment of mindfulness and calm in a busy day. The final result is a creamy, frothy elixir with a complex balance of umami and subtle sweetness that lingers on the palate. Serving a small bowl of traditional matcha on your board adds an element of sophisticated ceremony that your guests will find absolutely enchanting.
Ingredients
- 1.5 teaspoons ceremonial grade matcha powder
- 60ml (2 oz) hot water (filtered)
- A traditional bamboo whisk (Chasen)
- A wide ceramic tea bowl (Chawan)
- Fine-mesh sifter
How to make it
- Sift the matcha powder through a fine-mesh strainer into your dry tea bowl. This step is non-negotiable; matcha clumps easily, and sifting ensures a perfectly smooth, lump-free beverage.
- Heat your water to exactly 80°C (175°F). Never use boiling water, as it will scald the delicate tea leaves and result in a bitter, unpleasant taste. If you don’t have a thermometer, let boiling water sit for 2 minutes before pouring.
- Pour a small splash (about 1 tablespoon) of the hot water into the bowl over the powder. Use the bamboo whisk to gently paste the matcha into a smooth green liquid, ensuring no dry spots remain.
- Add the remaining hot water. Hold the whisk vertically and use your wrist to create a rapid ‘W’ or ‘M’ motion rather than a circular one. This movement incorporates air into the tea.
- Continue whisking vigorously for about 20-30 seconds until a thick, frothy layer with tiny, uniform bubbles forms on the surface. Lift the whisk slowly from the center to finish.
How to bake caramel slice?
Why we love this
A caramel slice is the ultimate indulgence, featuring three distinct layers that harmonize in every bite. The base is a crisp, buttery shortbread that provides a sturdy foundation for the star of the show: a thick, gooey layer of golden caramel that is both salty and sweet. Topping it off is a snap of dark chocolate that balances the richness of the center. When you slice into it, the contrast between the velvety caramel and the crunch of the biscuit is pure bliss, making it a high-demand item for any dessert-leaning food board.
Ingredients
- 125g unsalted butter, melted
- 150g plain flour
- 50g desiccated coconut
- 100g light brown sugar
- 395g sweetened condensed milk
- 2 tablespoons golden syrup
- 60g butter (for caramel)
- 200g dark chocolate (70% cocoa)
- 1 tablespoon coconut oil
How to make it
- Preheat your oven to 180°C (350°F) and line a square baking tin with parchment paper, leaving an overhang on the sides for easy removal later.
- In a bowl, combine the melted butter, flour, coconut, and brown sugar. Press this mixture firmly into the bottom of the tin to create an even layer. Bake for 12-15 minutes until lightly golden, then set aside.
- To make the caramel, combine the condensed milk, golden syrup, and 60g of butter in a small saucepan over medium-low heat. Stir constantly for about 6-8 minutes. You must be vigilant here; the sugar can burn quickly. Look for the mixture to thicken and turn a deep amber color.
- Pour the caramel over the baked base and return to the oven for another 10-12 minutes until the caramel is bubbling and set. Allow it to cool completely in the fridge.
- Melt the dark chocolate and coconut oil together in a microwave-safe bowl in 30-second bursts. Pour over the cold caramel, smoothing it with a spatula. Refrigerate for at least 3 hours before using a hot knife to slice into perfect squares.
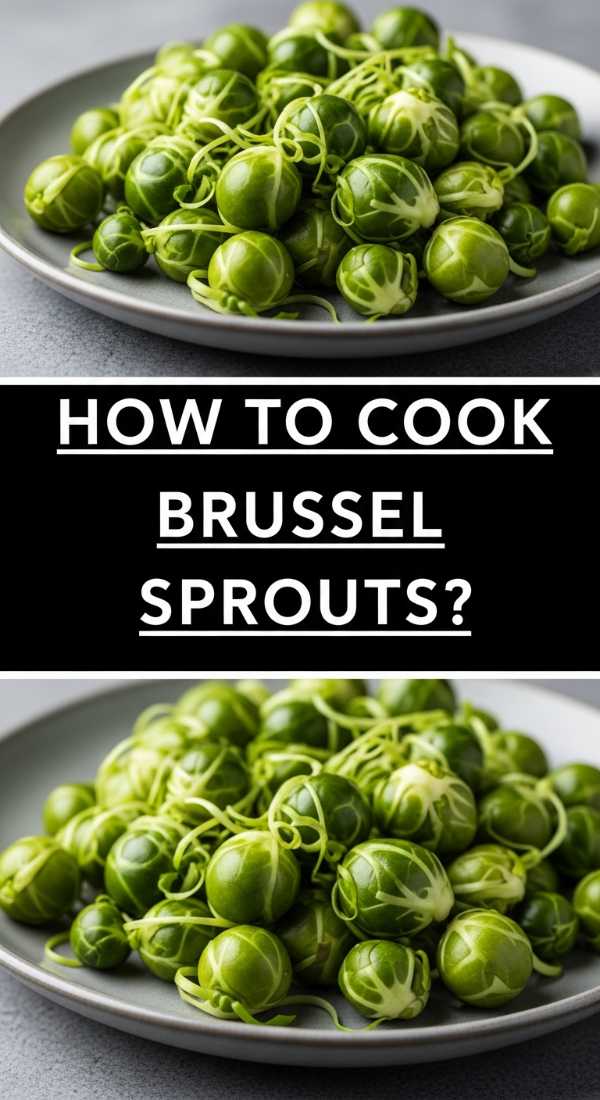
How to cook brussel sprouts?

Why we love this
Brussels sprouts have undergone a massive culinary glow-up, and when cooked correctly, they are the savory highlight of any board. We love them for their ability to transform from a misunderstood vegetable into crispy, salty morsels that burst with flavor. The outer leaves become thin and chip-like in the oven, while the centers remain tender and nutty. Tossed with a bit of acidity or sweetness, they provide a sophisticated crunch that balances out heavier meats or cheeses, making them an essential addition to your weekend spread.
Ingredients
- 500g Brussels sprouts, trimmed and halved
- 2 tablespoons avocado oil or olive oil
- 1/2 teaspoon sea salt
- 2 tablespoons balsamic glaze
- 30g toasted walnuts, crushed
- Pinch of red pepper flakes
How to make it
- Preheat your oven to 220°C (425°F). A high heat is essential to achieve the crispy exterior and deep brown char that defines a well-cooked sprout.
- In a large bowl, toss the halved sprouts with oil and salt. Ensure the cut sides are well-coated, as these will be placed face-down on the baking sheet to maximize surface contact with the heat.
- Place the sprouts on a dark baking sheet (which absorbs more heat) with the flat side down. Do not crowd the pan; give them space to roast rather than steam.
- Roast for 20-25 minutes. Check them at the 15-minute mark; the outer leaves should be dark brown and crispy. If they aren’t charred yet, let them go a few minutes longer.
- Once removed from the oven, immediately drizzle with the balsamic glaze and sprinkle with toasted walnuts and red pepper flakes. The residual heat will slightly thicken the glaze, creating a glossy, flavor-packed coating.
How to make apple crumble?
Why we love this
Apple crumble is the culinary equivalent of a warm hug on a rainy day. There is something deeply nostalgic about the sound of a spoon breaking through a buttery, oat-filled crust into a treasure trove of softened, cinnamon-spiked apples. The contrast of the hot, bubbling fruit against a cold scoop of vanilla bean ice cream is a sensory delight that never gets old. It’s the perfect centerpiece for a dessert board, offering a rustic charm and an aroma that makes your entire home feel welcoming and full of love.
Ingredients
- 6 large Granny Smith apples, peeled and sliced
- 1 tablespoon lemon juice
- 100g granulated sugar
- 1 tablespoon ground cinnamon
- 150g rolled oats
- 120g plain flour
- 150g cold unsalted butter, cubed
- 100g brown sugar
How to make it
- Preheat your oven to 190°C (375°F). In a large bowl, toss the sliced apples with the lemon juice, granulated sugar, and half the cinnamon. The lemon juice prevents browning and adds a necessary acidic brightness to the dish.
- Transfer the apple mixture into a buttered baking dish. Spread them out evenly so they cook at the same rate.
- In a separate bowl, combine the oats, flour, brown sugar, and the remaining cinnamon. Add the cold, cubed butter. Use your fingertips to rub the butter into the dry ingredients until the mixture resembles coarse breadcrumbs with some pea-sized lumps of butter remaining.
- Sprinkle the crumble mixture generously over the apples. Do not pack it down; keeping it loose allows for more surface area to become crispy.
- Bake for 35-45 minutes. You are looking for the fruit juices to be bubbling up around the edges and the topping to be a deep, golden brown. Let it stand for 10 minutes before serving to allow the juices to thicken.
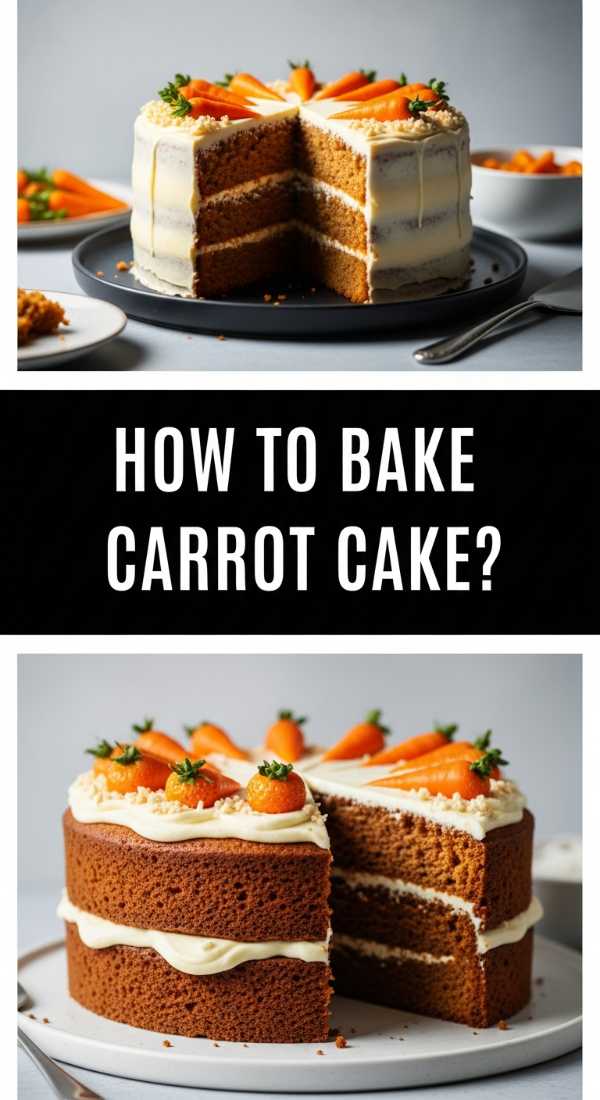
How to bake carrot cake?
Why we love this
Carrot cake is a masterpiece of textures, blending a moist, spice-infused crumb with the crunch of walnuts and the velvety smoothness of cream cheese frosting. It’s a cake that feels wholesome yet decadent, with the natural sweetness of the carrots deepened by nutmeg and ginger. We love it because it’s surprisingly versatile—it feels just as right at a morning tea as it does as the grand finale of a dinner party. A few slices tucked onto a board with fresh berries and nuts create a beautiful, rustic aesthetic.
Ingredients
- 250g grated carrots
- 200g plain flour
- 1 teaspoon baking soda
- 1.5 teaspoons ground cinnamon
- 200g brown sugar
- 150ml vegetable oil
- 3 large eggs
- 100g chopped walnuts
- 250g cream cheese (softened)
- 100g powdered sugar
- 1 teaspoon vanilla extract
How to make it
- Preheat your oven to 175°C (350°F) and grease a 9-inch round cake pan. In a medium bowl, whisk together the flour, baking soda, and cinnamon to ensure the leavening agent is evenly distributed.
- In a large bowl, beat the eggs and brown sugar until pale and fluffy. Slowly stream in the vegetable oil while continuing to whisk. This creates an emulsion that ensures a moist, tender crumb.
- Gently fold the dry ingredients into the wet ingredients using a spatula. Once just combined, stir in the grated carrots and chopped walnuts. Do not overmix, or the cake will become tough.
- Pour the batter into the prepared pan and bake for 35-40 minutes. Test with a skewer; it should come out clean or with a few moist crumbs. Allow the cake to cool completely on a wire rack.
- For the frosting, whip the softened cream cheese, powdered sugar, and vanilla until smooth and airy. Spread a thick layer over the cooled cake, using a palette knife to create rustic swirls.
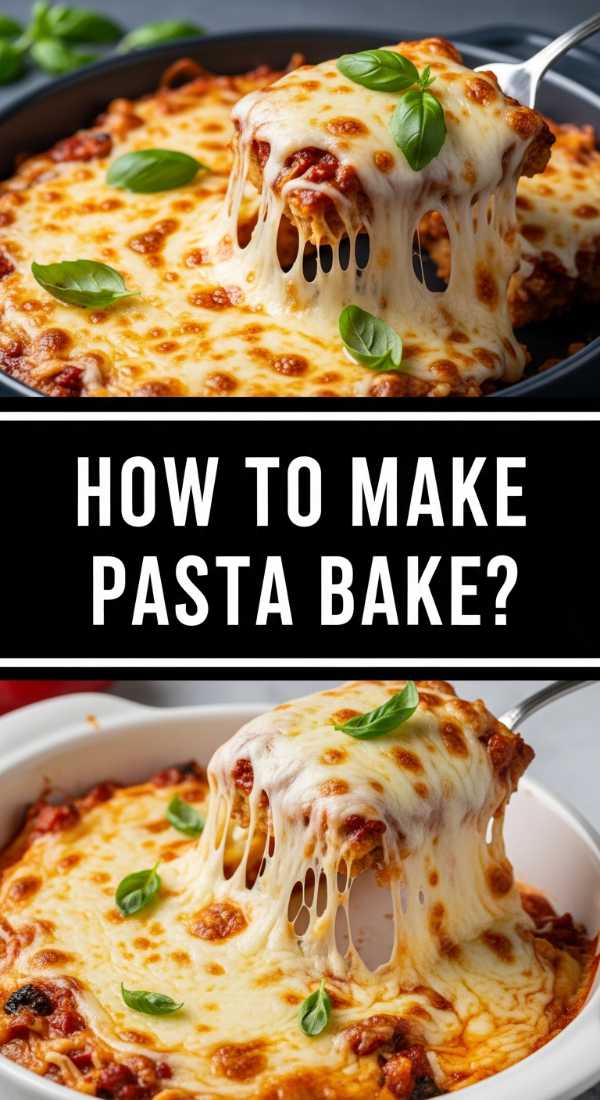
How to make pasta bake?

Why we love this
Pasta bake is the ultimate comfort food, a warm and bubbling dish of cheesy goodness that brings an instant sense of satisfaction. There is something irresistible about the golden, crispy cheese topping that gives way to tender pasta swimming in a rich, savory sauce. It’s a crowd-pleaser that’s easy to serve and always disappears quickly. Adding a small dish of pasta bake to your food board provides a hearty, savory element that makes the spread feel like a complete, nourishing meal.
Ingredients
- 500g penne or rigatoni pasta
- 700ml marinara or bolognese sauce
- 250g mozzarella cheese, shredded
- 50g parmesan cheese, grated
- 1 tablespoon olive oil
- 2 cloves garlic, minced
- Fresh basil leaves for garnish
How to make it
- Preheat your oven to 190°C (375°F). Bring a large pot of salted water to a boil and cook the pasta for 2 minutes less than the package instructions for ‘al dente’. The pasta will finish cooking in the oven, so this prevents it from becoming mushy.
- In a large ovenproof skillet or baking dish, sauté the minced garlic in olive oil over medium heat until fragrant (about 1 minute). Pour in your sauce and bring it to a gentle simmer.
- Drain the pasta and toss it directly into the sauce. Stir in half of the mozzarella and half of the parmesan, ensuring every tube of pasta is coated in sauce and cheese.
- Level the pasta in the dish and top with the remaining mozzarella and parmesan. For an extra touch, you can add a few dollops of ricotta cheese or a sprinkle of breadcrumbs for crunch.
- Bake for 20-25 minutes until the cheese is melted and bubbling, and the edges are starting to brown. Switch to the broiler for the last 2 minutes if you want a truly crispy, golden crust. Garnish with fresh basil before serving.
How to prepare street tacos?
Why we love this
Street tacos are a celebration of vibrant flavors and textures in a compact, easy-to-eat format. We love the combination of warm, charred corn tortillas, tender and savory fillings, and the bright, zesty notes of fresh lime and cilantro. They offer a playful, customizable element to any food board, allowing guests to build their own perfect bite. The balance of spicy, salty, and acidic flavors makes street tacos an addictive addition that keeps everyone coming back for more.
Ingredients
- 12 small corn tortillas
- 500g protein (flank steak, chicken, or sautéed mushrooms)
- 1 small white onion, finely diced
- 1/2 cup fresh cilantro, chopped
- 2 limes, cut into wedges
- 1 tablespoon vegetable oil
- Salt and pepper to taste
- Optional: salsa verde or crumbled cotija cheese
How to make it
- Prepare your protein by cutting it into small, bite-sized pieces. Season generously with salt and pepper. In a heavy skillet or cast-iron pan over high heat, add the oil and sear the protein until deeply browned and cooked through. High heat is key to getting those crispy, charred edges.
- While the protein rests, warm your corn tortillas. This is best done directly over a gas flame for a few seconds per side until they are soft and slightly charred. Alternatively, use a dry skillet over medium-high heat. Keep them warm by wrapping them in a clean kitchen towel.
- Prepare the garnish by mixing the finely diced white onion and chopped cilantro in a small bowl. This simple combination is the hallmark of authentic street tacos.
- Assemble the tacos by placing a generous spoonful of the protein onto each warm tortilla. Top with a sprinkle of the onion-cilantro mix and a squeeze of fresh lime juice.
- Serve immediately on your food board with extra lime wedges and your favorite salsa on the side for guests to add as they like.
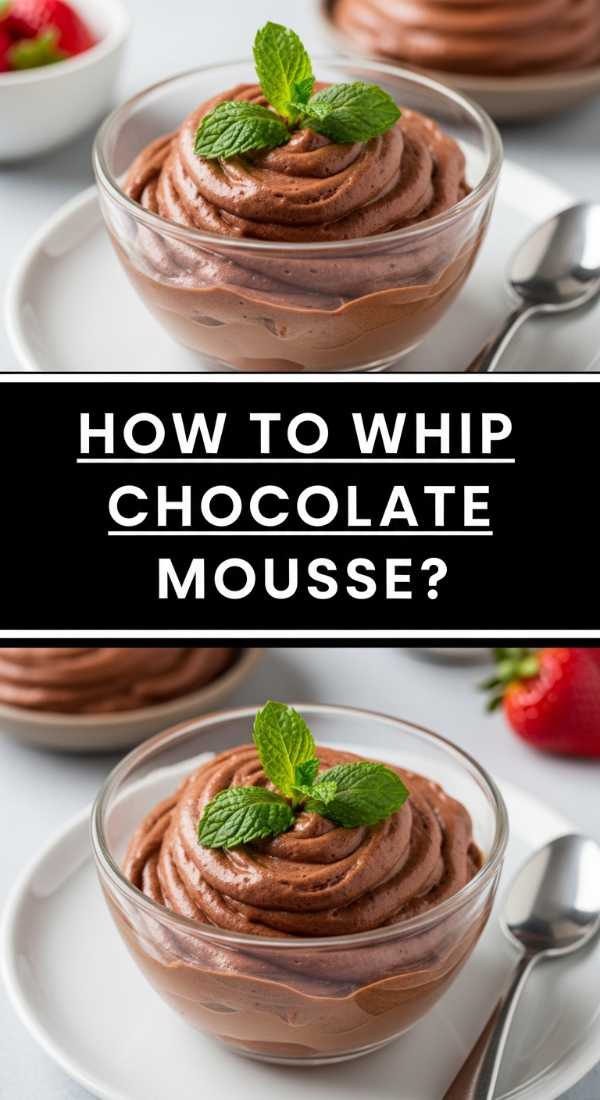
How to whip chocolate mousse?

Why we love this
Chocolate mousse is a sophisticated, airy dessert that feels incredibly luxurious yet is surprisingly simple to make. We love the way its cloud-like texture dissolves on the tongue, leaving behind an intense, rich chocolate flavor. It’s the perfect elegant touch for a dessert board, offering a decadent contrast to fresh fruit or crisp cookies. The deep, dark cocoa notes and the silky smoothness of the mousse make it a timeless favorite that always impresses.
Ingredients
- 200g high-quality dark chocolate (60-70% cocoa), chopped
- 3 large eggs, room temperature, separated
- 1/2 cup heavy cream, chilled
- 2 tablespoons granulated sugar
- 1 teaspoon vanilla extract
- Pinch of salt
How to make it
- Melt the chopped chocolate in a heatproof bowl set over a pot of gently simmering water (double boiler). Ensure the bottom of the bowl doesn’t touch the water. Once smooth, remove from heat and let it cool slightly so it’s warm to the touch but not hot.
- In a separate bowl, whisk the egg yolks into the melted chocolate one at a time until well combined. Stir in the vanilla extract.
- In a clean bowl, beat the egg whites with a pinch of salt until soft peaks form. Gradually add the sugar and continue beating until stiff, glossy peaks form. Be careful not to overbeat, or the mousse will be grainy.
- In another chilled bowl, whip the heavy cream until stiff peaks form.
- Gently fold a third of the whipped cream into the chocolate mixture to lighten it. Then, very carefully fold in the egg whites and the remaining whipped cream in two batches. Use a slow, sweeping motion to maintain the air bubbles. Chill in the fridge for at least 4 hours before serving.
How to make potato gnocchi?
[IMAGE_10]
Why we love this
Handmade potato gnocchi are like tiny, pillowy clouds of comfort. There is something deeply satisfying about the process of transforming humble potatoes and flour into delicate, tender dumplings. We love them for their light texture and their ability to soak up flavorful sauces, whether it’s a simple sage butter or a robust tomato sauce. Serving freshly made gnocchi on a food board adds a touch of rustic, artisanal charm and a delicious, homemade element that guests will truly appreciate.
Ingredients
- 1kg starchy potatoes (like Russet or Yukon Gold)
- 250g-300g ’00’ flour or plain flour
- 1 large egg, lightly beaten
- 1 teaspoon sea salt
- Pinch of nutmeg
How to make it
- Boil the whole, unpeeled potatoes in salted water until tender (about 25-30 minutes). Drain and peel them while still warm using a clean towel to protect your hands. Pass the warm potatoes through a potato ricer or food mill onto a clean work surface. This ensures a light, lump-free texture.
- Let the riced potatoes cool slightly, then create a well in the center. Add the beaten egg, salt, nutmeg, and about half of the flour. Gently fold the ingredients together using your hands or a bench scraper.
- Gradually add more flour as needed, kneading very lightly until a soft, smooth dough forms. Do not overwork the dough, or the gnocchi will become tough and gummy. The dough should be slightly tacky but not stick to your hands.
- Divide the dough into smaller pieces and roll each into a long rope about 1/2 inch thick. Cut the rope into 1-inch pieces. You can leave them as is or roll them over a gnocchi board or the tines of a fork to create ridges that hold sauce.
- Cook the gnocchi in a large pot of boiling salted water. They are done when they float to the surface (usually 1-2 minutes). Remove them with a slotted spoon and toss immediately with your favorite sauce or pan-fry in butter until golden and crispy for your board.
Conclusion: The Art of the Shared Table
Creating a viral-style food board is about more than just aesthetics; it’s about the joy of sharing a meal in a way that feels relaxed and abundant. By incorporating a mix of these carefully crafted dishes—from the crispy Brussels sprouts to the delicate chocolate mousse—you’re not just serving food; you’re creating an experience. So, gather your favorite people, put on some music, and enjoy the beautiful, delicious chaos of a weekend food board.
Frequently Asked Questions
You’ve got questions, and I’ve got answers! Here are the most common queries about mastering the food board trend.
What is the best board to use for a food spread?
A large wooden cutting board or a specialized charcuterie platter works best. Look for something with a bit of a lip if you are serving things that might roll away, like grapes or nuts. Ensure it is food-safe and well-seasoned with mineral oil.
Can I make these components in advance?
Absolutely! The caramel slice and chocolate mousse actually benefit from being made a day ahead. You can also roast the pumpkin and prepare the gnocchi dough in advance to save time on the day of your gathering.
How do I keep the hot items warm on the board?
The trick is to use small, pre-warmed ceramic dishes for things like the pasta bake or gnocchi. Place these on the board last, just before serving. The communal nature of the board means things are usually enjoyed quickly anyway!