
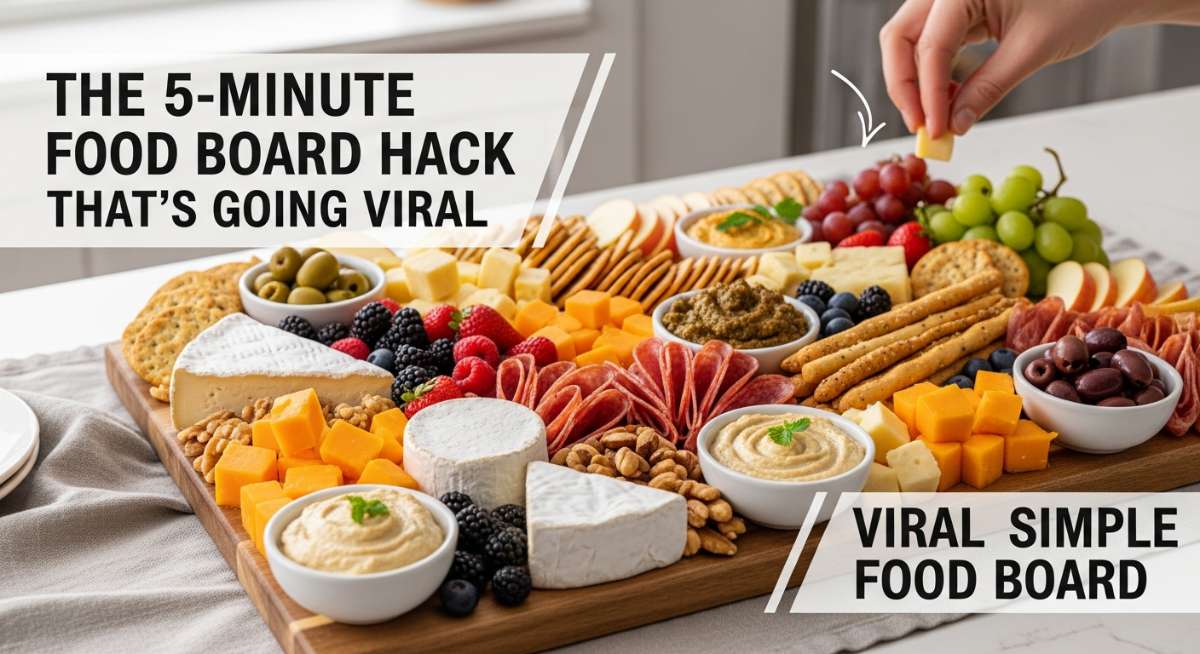
We’ve all been there: the sun is beginning to set, your favorite playlist is humming in the background, and you realize you have friends coming over in exactly twenty minutes. There’s a frantic energy that usually takes over, but lately, I’ve found a secret weapon that has completely transformed how I host. It’s not about spending hours over a hot stove or perfectly plating individual hors d’oeuvres; it’s about the art of the ‘Viral Simple Food Board.’ This hack has taken over my feed and my kitchen, turning the most basic ingredients into a centerpiece that feels like a warm hug for your guests.
The magic of a food board lies in its casual elegance. It invites people to lean in, share stories, and graze at their own pace. Whether it’s a lazy Sunday morning or a bustling Friday night, these boards are about more than just food—they are about creating a moment of connection that feels effortless and deeply personal. Today, I’m sharing my favorite components to build the ultimate spread, from whipped treats to savory bites that will have everyone asking for your secrets.
How to whip matcha latte?

Why we love this
There is something incredibly meditative about the ritual of whisking matcha until it transforms into a vibrant, emerald-green froth. The aroma is earthy and grounding, instantly transporting you to a serene tea garden. When you sip a perfectly whipped latte, the texture is velvety and light, offering a gentle caffeine boost without the jitters. It’s the ultimate aesthetic addition to any brunch board, providing a pop of color and a sophisticated flavor profile that balances perfectly with sweeter treats.
Ingredients
- 1 teaspoon ceremonial grade matcha powder
- 2 ounces hot water (about 175°F)
- 1 cup milk of choice (oat or soy works best for froth)
- 1 teaspoon honey or maple syrup
How to make it
- Begin by sifting your matcha powder through a fine-mesh strainer into a small bowl to ensure there are no clumps, which is the key to a smooth mouthfeel.
- Pour in the hot water—ensure it is not boiling, as scalding water will make the tea bitter—and use a bamboo whisk to move in a fast ‘W’ or ‘M’ motion until a thick, frothy layer forms on top.
- In a separate small saucepan or milk frother, heat your milk until it is steaming but not boiling, then froth it vigorously until you have dense, micro-foam bubbles.
- Pour the matcha base into your glass, add your sweetener, and slowly pour the frothed milk over the top, allowing the green and white layers to marble beautifully.
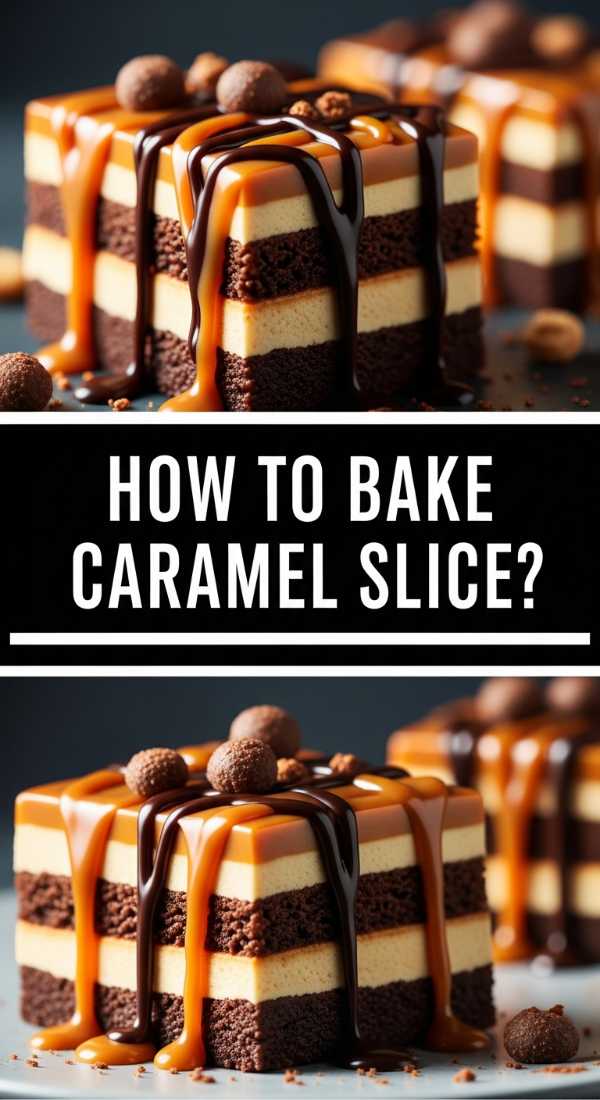
How to bake caramel slice?
Why we love this
A caramel slice is the triple threat of the dessert world: a buttery, crumbly shortbread base, a gooey, rich center of golden caramel, and a snappy layer of dark chocolate on top. The way the caramel pulls slightly when you take a bite, contrasted with the crunch of the base, is pure indulgence. It smells like toasted sugar and vanilla, filling the whole house with a scent that feels like a celebration. It’s the kind of treat that looks professional but feels like home, making it the star of any dessert board.
Ingredients
- 1 cup plain flour
- 1/2 cup brown sugar
- 1/2 cup desiccated coconut
- 125g melted butter
- 395g sweetened condensed milk
- 2 tablespoons golden syrup
- 60g butter (for caramel)
- 200g dark chocolate
- 1 tablespoon coconut oil
How to make it
- Preheat your oven to 350°F (180°C) and line a square baking tin with parchment paper, ensuring it overhangs for easy removal later.
- Mix the flour, brown sugar, coconut, and melted butter until combined, then press the mixture firmly into the base of the tin and bake for 15 minutes until lightly golden.
- While the base bakes, combine the condensed milk, golden syrup, and extra butter in a saucepan over medium-low heat; whisk constantly for 8-10 minutes until the mixture thickens and turns a deep golden caramel color.
- Pour the caramel over the hot base, return to the oven for 10-12 minutes until the edges are bubbling, then remove and let cool completely.
- Melt the dark chocolate and coconut oil together in 30-second bursts in the microwave, pour over the set caramel, and refrigerate for at least 3 hours before slicing with a hot knife.
How to make apple crumble?

Why we love this
Apple crumble is the epitome of comfort food, evoking memories of rainy afternoons and family gatherings. The apples become soft and syrupy, infused with the warmth of cinnamon and nutmeg, while the topping provides a satisfying, buttery crunch. The contrast between the bubbling fruit juices and the golden oats is visually stunning and tastes like pure nostalgia. Serving this warm on a board with a side of cold cream creates a sensory experience that is both rustic and deeply satisfying.
Ingredients
- 6 large Granny Smith apples, peeled and sliced
- 1/2 cup granulated sugar
- 1 tablespoon cinnamon
- 1 cup rolled oats
- 1 cup all-purpose flour
- 1/2 cup brown sugar
- 1/2 cup cold salted butter, cubed
How to make it
- Preheat your oven to 375°F (190°C) and toss your sliced apples with the granulated sugar and cinnamon in a large baking dish until every slice is evenly coated.
- In a medium bowl, combine the oats, flour, and brown sugar, then use your fingertips or a pastry cutter to rub the cold butter into the dry ingredients until it resembles coarse breadcrumbs.
- Sprinkle the crumble mixture evenly over the apples, making sure not to pack it down too tightly so that heat can circulate and create those crispy peaks.
- Bake for 35 to 45 minutes; you are looking for the apple juices to be bubbling up around the sides and the topping to be a deep, toasted golden brown.
- Remove from the oven and let it stand for 10 minutes before serving to allow the fruit juices to thicken slightly.
How to make pasta bake?

Why we love this
There is nothing quite as inviting as a pasta bake with its golden, bubbling crust of melted cheese and the rich, savory aroma of garlic and herbs. Each bite is a mixture of al dente pasta cradled in a thick, velvety sauce that has been intensified by the heat of the oven. It’s hearty, soul-warming, and perfect for feeding a crowd directly from a communal board. The way the cheese pulls and stretches as you serve it adds a playful, interactive element to any meal.
Ingredients
- 500g penne or rigatoni pasta
- 2 jars of high-quality marinara sauce
- 2 cups shredded mozzarella cheese
- 1/2 cup grated parmesan
- 2 cloves garlic, minced
- 1 tablespoon Italian seasoning
- Fresh basil for garnish
How to make it
- Boil a large pot of salted water and cook the pasta for two minutes less than the package directions specify; it should be slightly too firm as it will continue cooking in the oven.
- Drain the pasta and return it to the pot, tossing it with the marinara sauce, minced garlic, and Italian seasoning until every noodle is well-coated.
- Transfer half of the pasta to a greased baking dish, sprinkle with half of the mozzarella, then add the remaining pasta and top with the rest of the mozzarella and parmesan.
- Bake at 375°F (190°C) for 20-25 minutes until the cheese is melted and starts to develop brown, crispy spots, then garnish with fresh basil and serve immediately while the cheese is molten.
How to bake carrot cake?

Why we love this
Carrot cake is a masterpiece of textures and spices, offering a moist, dense crumb that is punctuated by the sweetness of fresh carrots and the warmth of cinnamon and nutmeg. The tanginess of the cream cheese frosting provides the perfect foil to the spiced cake, creating a balance that is neither too sweet nor too heavy. It feels sophisticated yet wholesome, and when sliced onto a food board, its beautiful orange hue and creamy white topping make it an instant visual highlight.
Ingredients
- 2 cups all-purpose flour
- 2 teaspoons baking soda
- 2 teaspoons cinnamon
- 1/2 teaspoon nutmeg
- 1 1/2 cups vegetable oil
- 2 cups sugar
- 4 eggs
- 3 cups grated raw carrots
- 8 oz cream cheese, softened
- 1/2 cup butter, softened
- 3 cups powdered sugar
How to make it
- Preheat your oven to 350°F (175°C) and grease a 9×13 inch pan. In a medium bowl, whisk together the flour, baking soda, cinnamon, and nutmeg.
- In a large bowl, beat the oil, sugar, and eggs until the mixture is light and well-incorporated, then gradually fold in the dry ingredients until just combined.
- Gently stir in the grated carrots—ensure they are finely grated so they melt into the batter during baking—and pour the mixture into the prepared pan.
- Bake for 35-40 minutes or until a toothpick inserted into the center comes out clean, then let the cake cool completely in the pan to prevent the frosting from melting.
- Whip the softened cream cheese and butter together until fluffy, gradually add the powdered sugar, and spread a thick layer over the cooled cake before slicing.
How to make tasty tacos?

Why we love this
Tacos are the ultimate food board star because they are vibrant, customizable, and burst with fresh flavors. The sizzle of seasoned protein combined with the zesty kick of lime and the crunch of fresh vegetables creates a fiesta for the senses. You get the smoky aroma of cumin and paprika, the coolness of sour cream, and the bright pop of cilantro in every bite. They encourage everyone to get their hands dirty and build their own perfect mouthful, making the meal an active experience.
Ingredients
- 1 lb ground beef or black beans
- 2 tablespoons taco seasoning (cumin, chili powder, garlic powder)
- Small corn or flour tortillas
- Shredded cabbage or lettuce
- Pico de gallo or salsa
- Avocado slices
- Fresh lime wedges
How to make it
- In a large skillet over medium-high heat, brown your protein (beef or beans) and drain any excess fat before adding the taco seasoning and a splash of water to create a light sauce.
- Simmer the protein for 5-7 minutes on low heat to allow the spices to penetrate deep into the meat or beans, ensuring a rich flavor profile.
- While the meat simmers, lightly char your tortillas over an open gas flame or in a dry pan for 30 seconds per side until they are warm and pliable with small brown spots.
- Assemble the board by placing the tortillas in a warm cloth, the protein in a central bowl, and surrounding them with small dishes of cabbage, salsa, avocado, and limes for guests to help themselves.
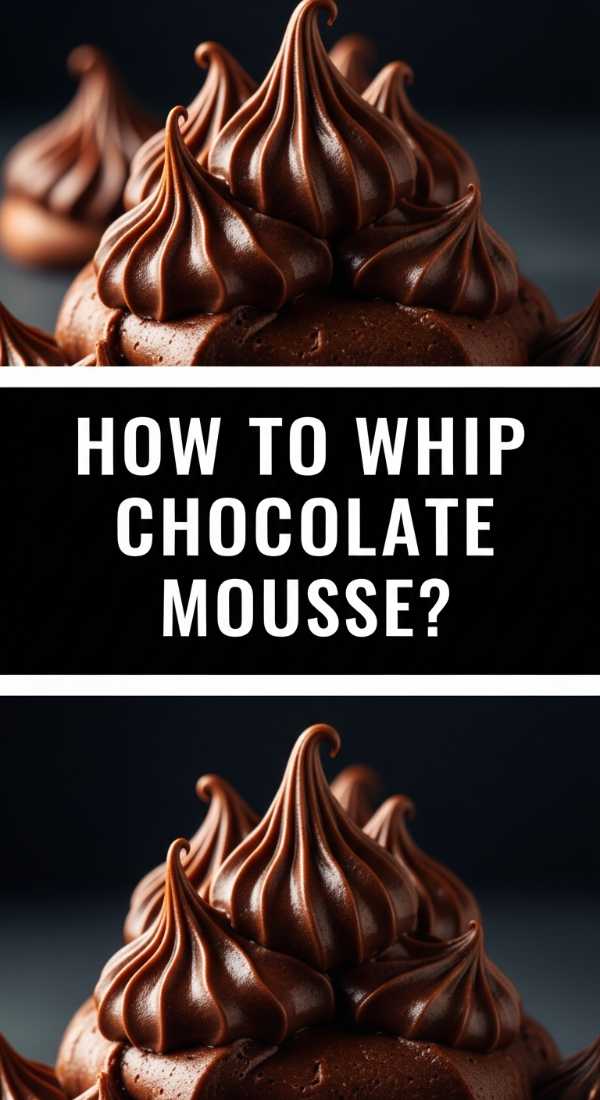
How to whip chocolate mousse?
Why we love this
Chocolate mousse is a cloud of pure decadence, offering an airy yet intense cocoa experience that melts the moment it touches your tongue. It’s light enough to follow a heavy meal but rich enough to satisfy the deepest chocolate cravings. The glossy finish and the deep, dark aroma of high-quality chocolate make it feel incredibly luxurious. When served in small jars on a board, it looks like a high-end bistro dessert that required hours of effort, despite its simple preparation.
Ingredients
- 200g high-quality dark chocolate (70% cocoa)
- 3 large eggs, separated
- 1/4 cup granulated sugar
- 1 cup heavy whipping cream
- 1 teaspoon vanilla extract
How to make it
- Melt the chocolate in a heatproof bowl over a pot of simmering water (double boiler method), making sure no water touches the chocolate, then set aside to cool slightly.
- In a clean bowl, whisk the egg whites until soft peaks form, then gradually add the sugar and continue whisking until stiff, glossy peaks are achieved.
- In another bowl, whip the heavy cream and vanilla until it reaches soft peak consistency; do not over-whip or it will become grainy.
- Gently fold the egg yolks into the cooled chocolate, then fold in a third of the whipped cream to lighten the mixture before very gently folding in the egg whites to maintain the air bubbles.
- Spoon the mixture into serving dishes and chill for at least 4 hours to allow the mousse to set into its signature light and airy texture.
How to roast brussel sprouts?

Why we love this
Forget the boiled sprouts of the past; roasting these mini cabbages turns them into caramelized, crispy gems that are absolutely addictive. The outer leaves become thin and crunchy like chips, while the centers remain tender and nutty. Drizzled with a bit of balsamic glaze, they offer a perfect harmony of salty, sweet, and savory notes. They bring an earthy, rustic vibe to a food board and are often the first thing to disappear because people can’t believe how good they taste.
Ingredients
- 1 lb Brussels sprouts, halved
- 2 tablespoons olive oil
- 1/2 teaspoon sea salt
- 1 tablespoon balsamic glaze
- 1/4 cup toasted walnuts
How to make it
- Preheat your oven to 400°F (200°C) and place a baking sheet inside to get hot, which helps sear the sprouts the moment they touch the pan.
- Toss the halved sprouts in a bowl with olive oil and salt until they are well-coated; you want every nook and cranny to have a bit of oil for maximum crispiness.
- Carefully spread the sprouts onto the hot baking sheet, cut-side down, in a single layer to ensure they roast rather than steam.
- Roast for 20-25 minutes, tossing halfway through, until the outer leaves are dark brown and crispy and the centers are tender when pierced with a fork.
- Remove from the oven, drizzle immediately with balsamic glaze, and sprinkle with toasted walnuts for an extra layer of texture.
How to make creamy cheesecake?

Why we love this
A truly creamy cheesecake is a triumph of texture—dense, velvety, and smooth, sitting atop a buttery graham cracker crust that provides a hint of salt and crunch. It’s the ultimate canvas for flavors, yet it’s stunning in its simplest form. The aroma of vanilla and sweet cream is subtle and inviting, and the way the cake holds its shape while remaining soft is a culinary marvel. It’s a showstopper on a dessert board, promising a rich, indulgent experience in every slice.
Ingredients
- 1 1/2 cups graham cracker crumbs
- 1/3 cup melted butter
- 24 oz cream cheese, room temperature
- 1 cup sugar
- 1 cup sour cream
- 3 large eggs
- 1 tablespoon vanilla extract
How to make it
- Mix the graham cracker crumbs and melted butter, then press firmly into the bottom of a 9-inch springform pan and bake at 350°F for 10 minutes to set the crust.
- In a large bowl, beat the room-temperature cream cheese and sugar on medium speed until completely smooth, ensuring you scrape the sides to avoid any lumps.
- Add the sour cream and vanilla, mixing just until combined, then add the eggs one at a time on low speed, being careful not to over-mix and incorporate too much air.
- Pour the batter over the crust and bake in a water bath (place the pan in a larger tray of hot water) at 325°F for 60-70 minutes until the edges are set but the center still has a slight jiggle.
- Turn off the oven and leave the door cracked for an hour to let it cool slowly, preventing cracks, then refrigerate for at least 6 hours before serving.
How to make pumpkin soup?

Why we love this
Pumpkin soup is liquid gold, a silky and warming dish that feels like the essence of autumn in a bowl. It has a beautiful, vibrant orange color that brightens up any spread and an aroma filled with ginger, nutmeg, and roasted vegetables. The flavor is naturally sweet but grounded by savory stock and a hint of spice, making it incredibly comforting on a cold day. When served in small mugs on a board, it provides a cozy, sippable element that ties all the other flavors together.
Ingredients
- 1 kg pumpkin, peeled and chopped
- 1 large onion, quartered
- 2 cloves garlic
- 3 cups vegetable or chicken stock
- 1/2 cup heavy cream
- 1/2 teaspoon ground nutmeg
- Salt and pepper to taste
How to make it
- Place the pumpkin, onion, and garlic on a baking tray, drizzle with oil, and roast at 400°F (200°C) for 30 minutes until the pumpkin is soft and slightly caramelized at the edges.
- Transfer the roasted vegetables into a large pot, add the stock and nutmeg, and bring to a gentle simmer for 10 minutes to let the flavors meld.
- Use an immersion blender (or a standard blender in batches) to liquidize the soup until it is completely smooth and velvety with no remaining chunks.
- Stir in the heavy cream and season with salt and pepper, heating gently on low until it reaches your desired serving temperature.
- Ladle into small bowls or mugs and garnish with a swirl of cream or a few toasted pumpkin seeds for a professional finish.
The Final Flourish
Building a food board isn’t just about the recipes; it’s about the feeling of abundance and the joy of sharing. By combining these viral-worthy dishes, you create an environment where the food is the conversation starter. Whether you are whipping up a quick matcha or layering a complex caramel slice, remember that the best ingredient is always the love you put into the preparation. So, grab your biggest platter, choose a few of these favorites, and get ready to host a gathering that everyone will be talking about for weeks!
Frequently Asked Questions
Got questions? We’ve got answers to help you master your viral food board.