
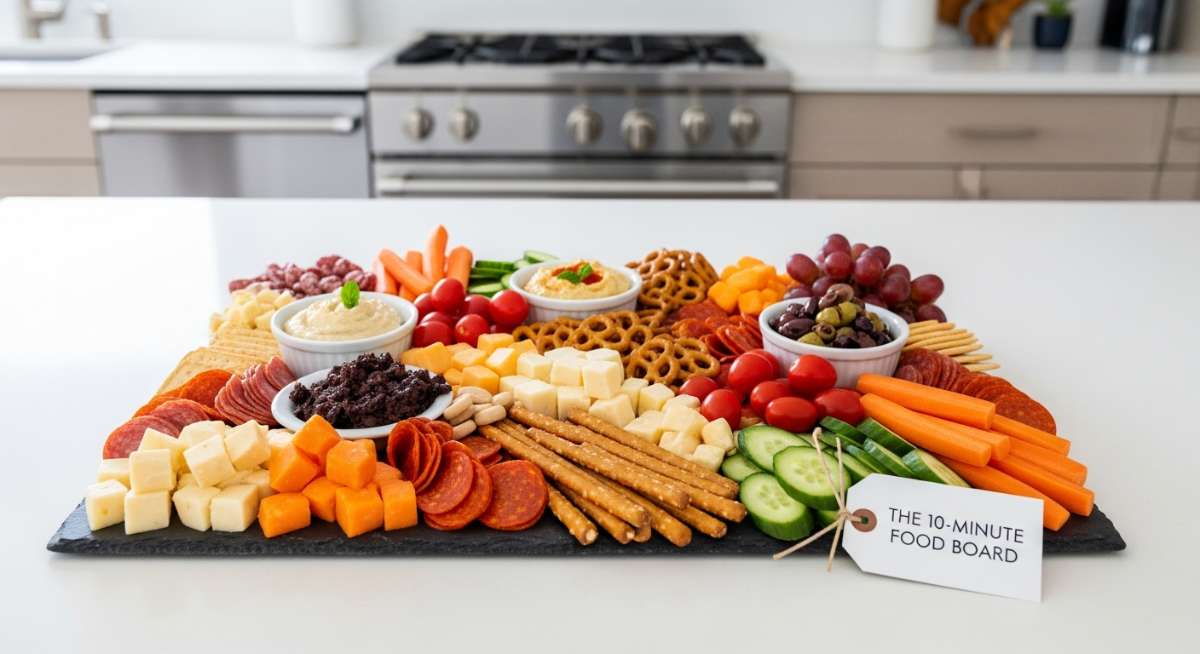
There is something inherently magical about gathering around a table where the food isn’t just a meal, but a curated experience. Lately, my social media feeds have been flooded with these gorgeous, sprawling boards that look like they belong in a high-end editorial, yet they feel so much more intimate than a stiff three-course dinner. I’ve always believed that the best memories are made when the barriers between the cook and the guests are broken down, and these viral food boards do exactly that by inviting everyone to pick, graze, and linger over their favorite flavors.
Today, I’m sharing the ultimate 10-minute secret to that viral aesthetic: a hybrid board that blends sweet comforts with savory bites. Whether you are hosting a cozy brunch or a rainy-day get-together, these recipes are designed to be the stars of your spread. From the earthy whisk of a perfect matcha to the nostalgic scent of cinnamon-spiked apple crumble, each element here is chosen to evoke a sense of home, warmth, and effortless elegance that will have your followers—and your guests—begging for the secret sauce.
How to make creamy matcha latte?
Why we love this
A perfectly prepared matcha latte is like a warm hug for your soul, offering a vibrant, grassy sweetness that balances the creamy richness of frothed milk. The aroma is distinctly earthy and fresh, reminiscent of a dew-covered garden at dawn, while the texture is silk-smooth and airy on the tongue. There is a ritualistic peace in whisking the bright green powder into a frothy paste, creating a beverage that feels both like a healthy boost and a decadent treat. It’s the ultimate aesthetic drink to center your board around, providing a pop of color and a sophisticated caffeine kick.
Ingredients
- 1 teaspoon ceremonial grade matcha powder
- 2 ounces hot water (not boiling, approx. 175°F)
- 1 cup oat milk or whole milk
- 1 teaspoon honey or maple syrup (optional)
- A pinch of cinnamon for dusting
How to make it
- Begin by sifting your matcha powder through a fine-mesh strainer into a small bowl. This step is crucial because matcha is prone to clumping, and sifting ensures a perfectly smooth, lump-free texture.
- Add the hot water to the bowl. It is vital that the water is not boiling (around 80°C/175°F is best), as boiling water will scald the delicate leaves and create a bitter, unpleasant taste.
- Using a traditional bamboo whisk (chasen) or a handheld milk frother, whisk the matcha and water vigorously in a ‘W’ or ‘M’ motion for about 30 to 60 seconds until a thick, frothy layer of tiny green bubbles forms on the surface.
- In a separate small saucepan or milk frother, heat your milk until it is steaming but not boiling. If you want a thick foam, use a frother to create a velvety micro-foam texture.
- Pour the matcha base into your serving glass, then slowly pour the frothed milk over the top. The green and white should swirl beautifully. Sweeten to taste and finish with a light dusting of cinnamon.
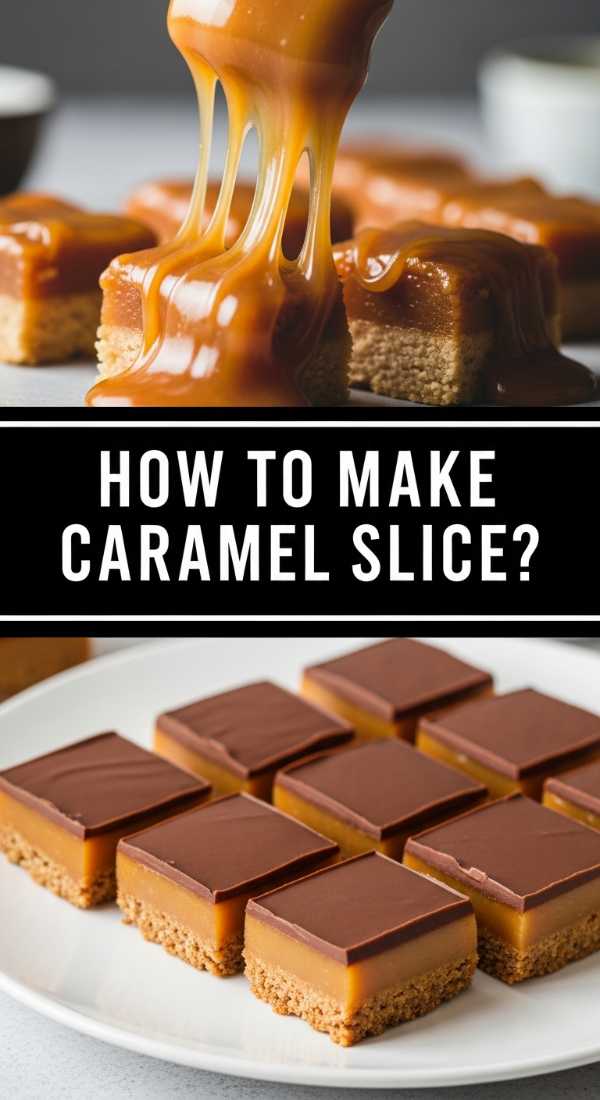
How to make perfect caramel slice?
Why we love this
This caramel slice is a masterclass in contrasting textures, featuring a buttery, crumbly shortbread base topped with a thick, gooey layer of golden caramel and finished with a snap of rich dark chocolate. As you take a bite, the caramel melts against the roof of your mouth, releasing notes of toasted sugar and sea salt that linger long after the last crumb is gone. The scent of browning butter and cooked condensed milk fills the kitchen, creating an atmosphere of pure indulgence. It’s the kind of treat that looks professionally made but tastes like the very best version of a childhood favorite.
Ingredients
- 1 cup plain flour
- 1/2 cup desiccated coconut
- 1/2 cup brown sugar
- 125g melted butter
- 395g sweetened condensed milk
- 2 tablespoons golden syrup
- 60g butter (for caramel)
- 200g dark chocolate, melted
- 1 tablespoon coconut oil
How to make it
- Preheat your oven to 180°C (350°F) and line a square baking tin with parchment paper, leaving an overhang on the sides for easy removal later.
- In a medium bowl, combine the flour, desiccated coconut, brown sugar, and melted butter. Stir until the mixture resembles wet sand, then press it firmly and evenly into the bottom of your prepared tin using the back of a spoon.
- Bake the base for 12-15 minutes or until it is lightly golden brown. Set it aside to cool slightly while you prepare the caramel layer.
- In a small saucepan over medium-low heat, combine the condensed milk, golden syrup, and the 60g of butter. Whisk constantly for about 8-10 minutes. This requires patience; you are looking for the mixture to thicken and turn a deep, rich amber color. Do not let it sit, or the bottom will burn.
- Pour the hot caramel over the baked base and return it to the oven for another 10-12 minutes until the edges are bubbling and the top is slightly set. Let it cool completely in the fridge.
- Once the caramel is cold, melt the dark chocolate and coconut oil together in the microwave in 30-second bursts. Pour the chocolate over the caramel, smooth it out, and refrigerate for at least 2 hours before slicing into sharp squares with a hot knife.
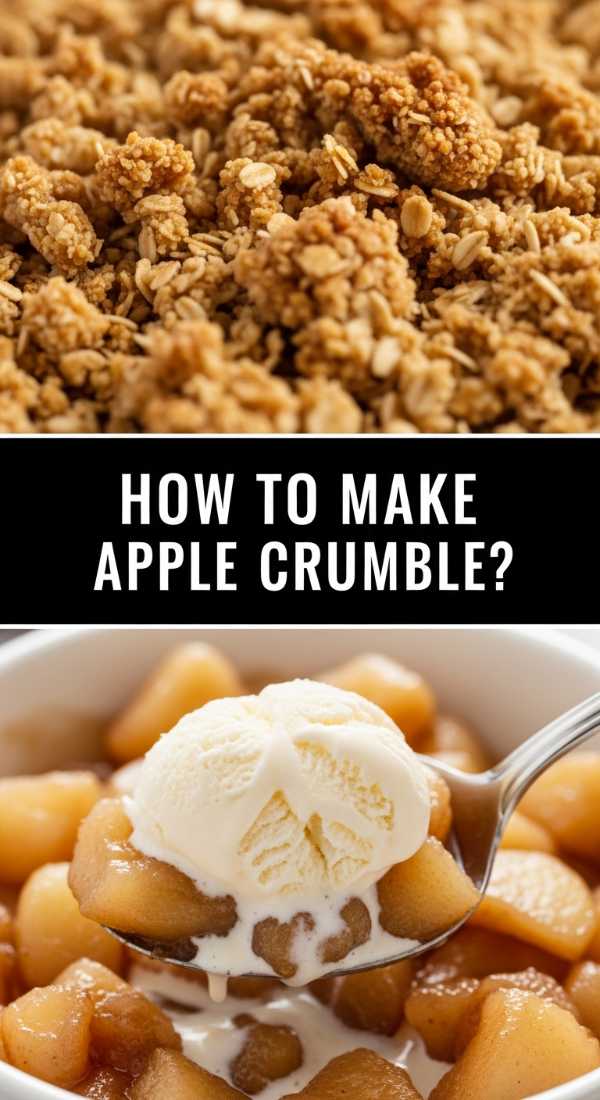
How to make warm apple crumble?

Why we love this
Nothing says “comfort” quite like the sight of bubbling fruit juices peeking through a golden, craggy landscape of toasted oats and cinnamon-spiced flour. The aroma of tart Granny Smith apples softening in the oven, combined with the spicy scent of nutmeg and cloves, creates an olfactory experience that feels like a warm blanket on a cold day. The contrast between the soft, jammy fruit and the crunch of the buttery topping is addictive, especially when served with a melting scoop of vanilla bean ice cream. It is the rustic, unpretentious centerpiece that every dessert board needs.
Ingredients
- 6 Granny Smith apples, peeled and sliced
- 1/2 cup granulated sugar
- 1 tablespoon ground cinnamon
- 1 cup all-purpose flour
- 1/2 cup rolled oats
- 1/2 cup packed brown sugar
- 1/2 cup cold salted butter, cubed
How to make it
- Preheat your oven to 190°C (375°F). In a large bowl, toss the sliced apples with the granulated sugar and half of the cinnamon until every slice is evenly coated in the sweet spice.
- Transfer the apples into a buttered baking dish, pressing them down slightly so they lay flat and cook evenly.
- In another bowl, combine the flour, rolled oats, brown sugar, and the remaining cinnamon. Add the cold, cubed butter to the dry ingredients.
- Using your fingertips or a pastry cutter, work the butter into the flour mixture until it forms coarse, pea-sized crumbs. You want to see distinct chunks of butter remaining, as these create the ‘crunch’ once baked.
- Spread the crumble mixture evenly over the apples, making sure not to pack it down too tightly; you want air to circulate.
- Bake for 40-45 minutes. Watch for the juices to bubble vigorously at the edges and the top to turn a deep, golden mahogany. Let it stand for 10 minutes before serving so the fruit juices can thicken into a syrup.
How to make crispy brussel sprouts?
Why we love this
If you think you don’t like sprouts, this recipe is here to change your mind with its incredible charred exterior and tender, savory heart. These sprouts are transformed in a high-heat oven until the outer leaves become as crisp as potato chips, glistening with a balsamic glaze that balances salt and tang. The smell of roasting brassicas is surprisingly nutty and sweet, providing a savory anchor to a board that might otherwise lean too sweet. It’s a sophisticated, salty snack that guests find themselves reaching for again and again, surprised by how addictive a vegetable can be.
Ingredients
- 1 lb Brussels sprouts, halved
- 3 tablespoons olive oil
- 1/2 teaspoon sea salt
- 1/4 teaspoon black pepper
- 2 tablespoons balsamic glaze
- 1/4 cup grated parmesan cheese
How to make it
- Preheat your oven to 220°C (425°F). A high temperature is essential for achieving the crispiness without turning the centers into mush.
- Place the halved sprouts on a large sheet pan. Drizzle with olive oil and sprinkle with salt and pepper. Toss them thoroughly with your hands to ensure every nook and cranny is coated.
- Arrange the sprouts cut-side down on the pan. This direct contact with the hot metal is the secret to getting that deep, dark caramelization that provides the best flavor.
- Roast for 20-25 minutes. At the halfway mark, use a spatula to toss them gently, but try to keep as many cut-sides down as possible for the remainder of the time.
- Remove the pan from the oven when the sprouts are dark brown and crispy on the edges. Immediately drizzle with the balsamic glaze while they are still sizzling.
- Finish with a generous dusting of grated parmesan cheese, which will melt slightly into the warm crevices of the sprouts. Serve immediately while the crunch is at its peak.
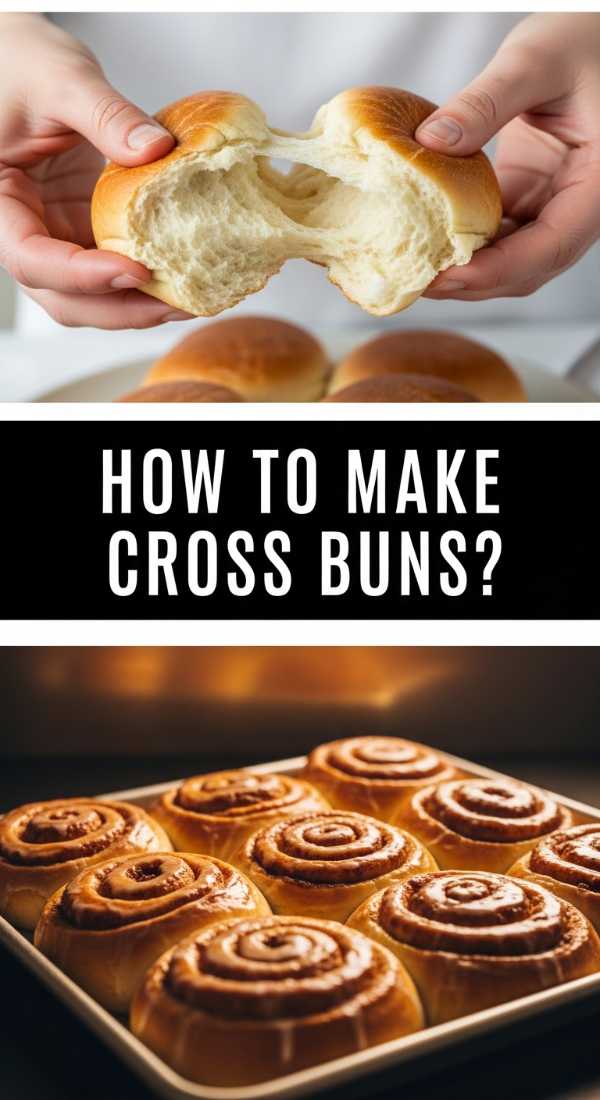
How to make soft hot cross buns?

Why we love this
There is a unique joy in tearing apart a pillowy, spice-infused hot cross bun that is still radiating heat from the oven. These buns are incredibly soft, with a tight yet tender crumb that is punctuated by bursts of sweet raisins and zesty citrus peel. The fragrance of allspice, cinnamon, and ginger wafting through the house is purely nostalgic, evoking Sunday mornings and festive gatherings. Topped with a sticky apricot glaze that makes them shine like jewels, these buns are as beautiful to look at as they are satisfying to eat, especially when slathered in salted butter.
Ingredients
- 4 cups bread flour
- 2 teaspoons instant yeast
- 1/4 cup sugar
- 1 teaspoon salt
- 1.5 tablespoons ground mixed spice
- 1 cup warm milk
- 50g melted butter
- 1 egg
- 1 cup raisins or sultanas
- For the cross: 1/2 cup flour + 5 tablespoons water
How to make it
- In the bowl of a stand mixer, combine the flour, yeast, sugar, salt, and mixed spice. Whisk briefly to distribute the yeast evenly.
- Add the warm milk, melted butter, and egg. Using the dough hook attachment, knead on low speed for about 5-7 minutes until the dough is smooth, elastic, and pulls away from the sides of the bowl.
- Fold in the raisins and knead for another minute until they are evenly distributed. Cover the bowl with a damp cloth and let the dough rise in a warm, draft-free spot for 1-1.5 hours or until doubled in size.
- Punch the dough down and divide into 12 equal pieces. Roll each piece into a smooth ball and place them in a lined rectangular baking dish, spaced about 1cm apart. Cover and let rise again for 45 minutes.
- Preheat oven to 190°C (375°F). Mix the flour and water for the cross into a thick paste and pipe a line across each row of buns in both directions.
- Bake for 20-25 minutes until the tops are a deep golden brown. While hot, brush with warmed apricot jam or a simple sugar syrup to create that signature sticky, professional shine.
How to make creamy pumpkin soup?
Why we love this
This soup is pure liquid gold, boasting a velvety, thick consistency that coats the spoon and warms you from the inside out. The flavor profile is a sophisticated balance of roasted pumpkin sweetness, the sharp kick of fresh ginger, and the savory depth of sautéed garlic and onions. Its vibrant orange hue adds a stunning visual element to any food board, especially when served in small artisanal bowls with a swirl of white cream. The aroma is earthy and comforting, making it the perfect savory sipper to accompany crusty bread or salty crackers.
Ingredients
- 1kg pumpkin (peeled and chopped)
- 2 medium potatoes (peeled and chopped)
- 1 large onion, diced
- 2 cloves garlic, minced
- 1 tablespoon fresh ginger, grated
- 3 cups vegetable stock
- 1/2 cup heavy cream
- Salt, pepper, and nutmeg to taste
How to make it
- In a large heavy-bottomed pot, heat a splash of olive oil over medium heat. Add the diced onion and sauté for 5 minutes until translucent and soft. Add the garlic and ginger, cooking for another minute until fragrant.
- Add the chopped pumpkin and potatoes to the pot. Stir well to coat the vegetables in the aromatics. For extra depth of flavor, you can roast the pumpkin in the oven beforehand, but simmering works beautifully for a brighter taste.
- Pour in the vegetable stock, ensuring the vegetables are mostly submerged. Bring the liquid to a boil, then reduce the heat to low and simmer for 20-25 minutes until the pumpkin and potatoes are fork-tender.
- Use an immersion blender to puree the soup directly in the pot until it is completely smooth and silk-like. If you use a standard blender, work in small batches and be careful with the hot liquid.
- Stir in the heavy cream and season generously with salt, pepper, and a pinch of nutmeg. The nutmeg is the secret ingredient that heightens the natural sweetness of the pumpkin.
- Gently reheat the soup if needed, but do not let it boil once the cream is added. Serve with a swirl of extra cream and toasted pumpkin seeds on top.
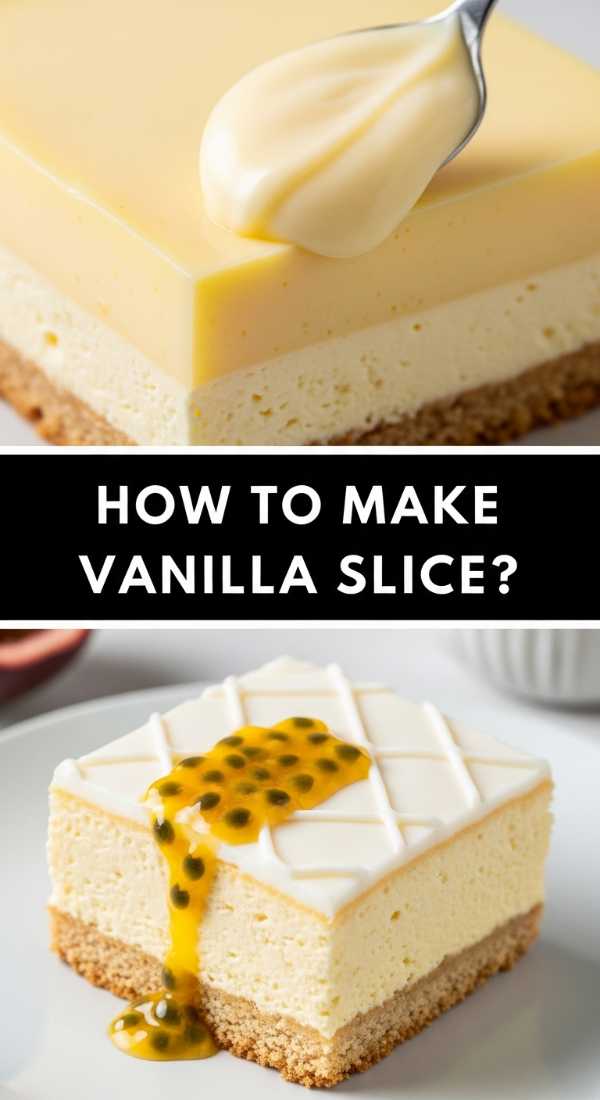
How to make classic vanilla slice?
Why we love this
Often referred to as the “snot block” in a loving, nostalgic way, the classic vanilla slice is a triumph of bakery engineering featuring a thick, stable custard sandwiched between layers of shattered puff pastry. The custard is heavy with real vanilla bean specks, offering a floral sweetness that isn’t cloying, while the pastry provides a buttery, salty crunch. Watching the middle wobble as you move the board is half the fun. It is a messy, joyful dessert that requires a bit of technique but rewards you with a texture that is simultaneously light and incredibly rich.
Ingredients
- 2 sheets frozen puff pastry, thawed
- 2 cups whole milk
- 1/2 cup heavy cream
- 1/2 cup sugar
- 1/2 cup cornstarch
- 4 egg yolks
- 2 teaspoons vanilla bean paste
- 50g butter
- Icing sugar for dusting
How to make it
- Preheat your oven to 200°C (400°F). Place the puff pastry sheets on baking trays, prick them all over with a fork, and place another tray on top of them to keep them flat while baking. Bake for 15 minutes until golden and crisp. Trim them to fit a square 20cm tin.
- In a medium saucepan, whisk together the milk, cream, sugar, and cornstarch until smooth. Add the egg yolks and vanilla bean paste.
- Place the pan over medium heat and whisk constantly. This is the critical stage: as the mixture heats, the cornstarch will activate and thicken the custard significantly. Keep whisking until it is very thick and starts to bubble.
- Remove from heat and whisk in the butter until melted and glossy. This adds a richness and helps the custard set with a smooth mouthfeel.
- Place one pastry sheet in the bottom of your lined tin. Pour the hot custard over it and smooth the top. Place the second pastry sheet on top and press down gently.
- Refrigerate for at least 6 hours, or preferably overnight. The long chill time is essential for the custard to firm up enough to be sliced cleanly. Dust heavily with icing sugar before serving.
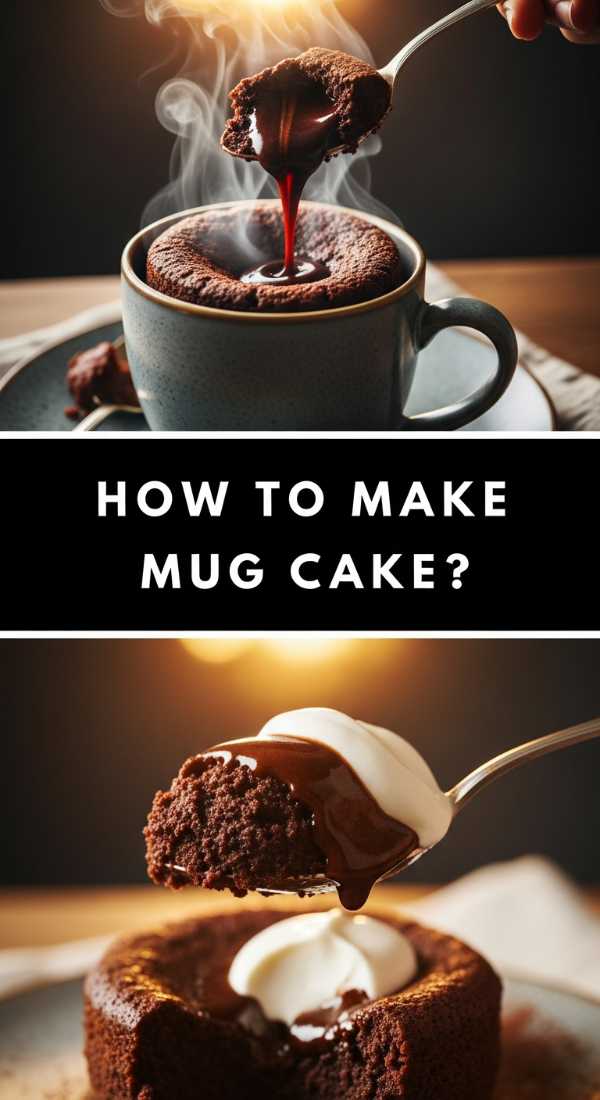
How to make chocolate mug cake?
Why we love this
The chocolate mug cake is the ultimate viral “hack” that actually delivers, providing a molten, gooey chocolate fix in under two minutes. It smells like a professional brownie and has a texture that is surprisingly light and spongy if cooked correctly. It’s the perfect addition to a food board for those who want a personalized, warm dessert that can be customized with toppings. When you dig your spoon in, a puff of chocolate-scented steam rises up, revealing a center that is just on the edge of being underbaked and perfect. It’s instant gratification in a cup.
Ingredients
- 4 tablespoons all-purpose flour
- 3 tablespoons sugar
- 2 tablespoons cocoa powder
- 1/2 teaspoon baking powder
- 3 tablespoons milk
- 2 tablespoons melted butter or oil
- 1/4 teaspoon vanilla extract
- 1 tablespoon chocolate chips
How to make it
- Select a microwave-safe mug (at least 12oz capacity) to prevent the cake from overflowing as it rises.
- Add the dry ingredients—flour, sugar, cocoa powder, and baking powder—directly into the mug. Use a small fork to whisk them together until no white streaks of flour remain.
- Pour in the milk, melted butter (or oil), and vanilla extract. Stir vigorously, making sure to scrape the bottom edges of the mug where dry pockets like to hide. Mix until the batter is smooth.
- Drop the tablespoon of chocolate chips into the center of the batter. Do not stir them in; they will sink naturally and create a molten chocolate core.
- Microwave on high for 70 to 90 seconds. The timing depends on your microwave’s wattage. The cake is done when the top looks set but still slightly shiny.
- Let it rest for 1 minute before eating. This allows the steam to redistribute so the cake becomes moist rather than rubbery. Top with a dollop of cream or a sprinkle of sea salt.
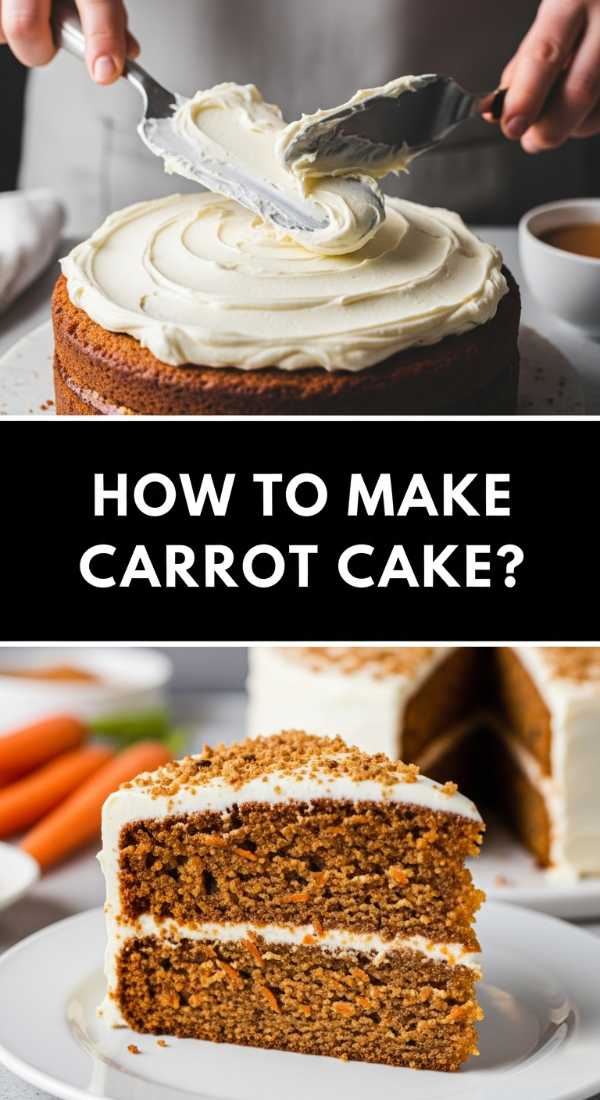
How to make moist carrot cake?
Why we love this
This carrot cake is a celebration of moisture and spice, featuring a dense, tender crumb that is packed with finely grated carrots and crunchy walnuts. The flavor is complex, with the warmth of cinnamon and nutmeg cutting through the tang of a thick, velvety cream cheese frosting. It’s the kind of cake that actually tastes better the next day as the spices meld, making it a reliable and hearty addition to a lifestyle board. The contrast between the rustic, dark sponge and the snow-white frosting decorated with orange zest is visually stunning and deeply appetizing.
Ingredients
- 2 cups all-purpose flour
- 2 teaspoons baking soda
- 1.5 teaspoons ground cinnamon
- 1/2 teaspoon salt
- 1.5 cups vegetable oil
- 1 cup granulated sugar
- 1 cup brown sugar
- 4 large eggs
- 3 cups finely grated carrots
- 1/2 cup chopped walnuts
- Frosting: 250g cream cheese, 100g butter, 2 cups icing sugar
How to make it
- Preheat your oven to 175°C (350°F) and grease a 9×13 inch baking pan. In a medium bowl, whisk together the flour, baking soda, cinnamon, and salt.
- In a large bowl, whisk the vegetable oil, granulated sugar, and brown sugar until well combined. Add the eggs one at a time, whisking well after each addition to ensure the oil and sugar are fully emulsified.
- Gradually fold the dry ingredients into the wet ingredients using a spatula. Be careful not to overmix, as this can lead to a tough cake.
- Stir in the grated carrots and walnuts. Ensure the carrots are grated finely so they melt into the batter during baking, providing maximum moisture without large chunks.
- Pour the batter into the pan and bake for 35-40 minutes. Test with a toothpick; it should come out clean or with just a few moist crumbs. Let the cake cool completely in the pan.
- For the frosting, beat the room-temperature cream cheese and butter until very pale and fluffy. Gradually add the icing sugar until smooth. Spread a thick layer over the cooled cake and top with extra walnuts.
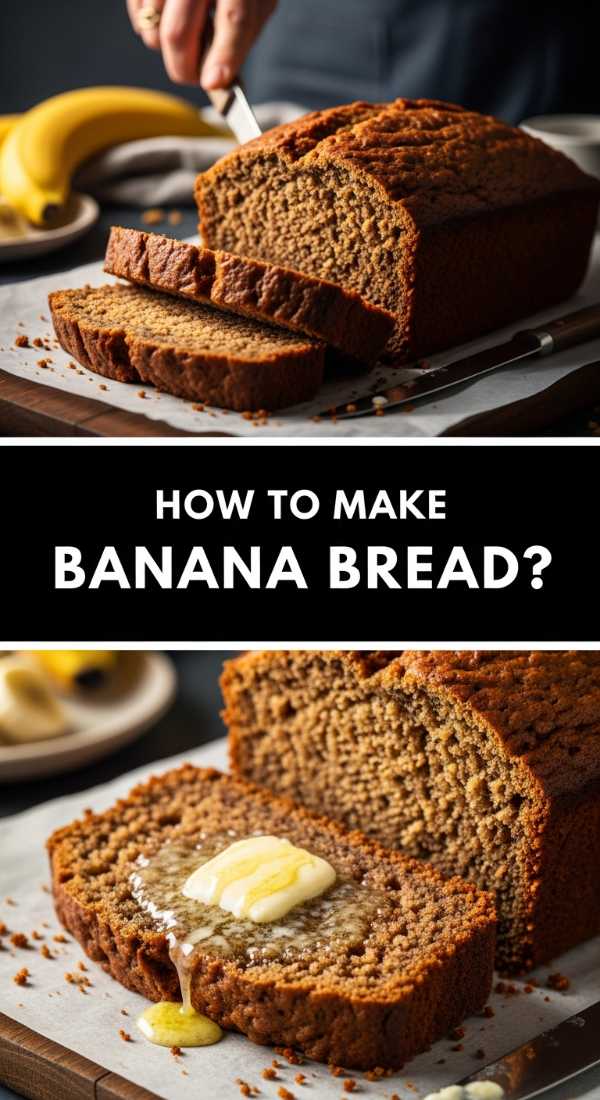
How to make sweet banana bread?
[IMAGE_10]
Why we love this
A loaf of sweet banana bread is the ultimate kitchen staple, offering a fragrance of caramelized fruit and toasted sugar that makes any house feel like a home. This version is incredibly moist with a deep mahogany crust that has a slight crunch, while the interior remains soft and loaded with banana flavor. It is the perfect “bridge” food on a board, pairing equally well with a smear of salty butter or a drizzle of honey. There is something deeply satisfying about the dense, cake-like texture that manages to be filling without being overly heavy.
Ingredients
- 3 very ripe bananas (the blacker the better!)
- 1/2 cup melted butter
- 3/4 cup brown sugar
- 1 egg, beaten
- 1 teaspoon vanilla extract
- 1.5 cups all-purpose flour
- 1 teaspoon baking soda
- Pinch of salt
How to make it
- Preheat your oven to 175°C (350°F) and grease a standard loaf pan. The key to the best flavor is using bananas that are overripe—look for skins covered in brown or black spots.
- In a large mixing bowl, use a fork to mash the bananas until they are a smooth liquid with only a few small lumps remaining.
- Stir the melted butter into the mashed bananas. Add the brown sugar, beaten egg, and vanilla extract. Whisk until the mixture is uniform and the sugar has started to dissolve into the wet ingredients.
- Sift the flour, baking soda, and salt directly over the wet mixture. Use a wooden spoon to fold the ingredients together just until no more dry flour is visible. Over-mixing at this stage will activate the gluten and make the bread rubbery.
- Pour the batter into the prepared loaf pan. If you want a professional look, slice an extra banana lengthwise and lay it on top of the batter before baking.
- Bake for 50-60 minutes. Check at the 45-minute mark; if the top is browning too quickly, tent it loosely with foil. Let it cool in the pan for 10 minutes before transferring to a wire rack to slice.
The Art of the Board
Creating a viral food board is less about perfection and more about the abundance of textures and the stories the food tells. When you arrange these ten items together, you aren’t just serving snacks; you’re creating a landscape of flavors that range from the bitter notes of matcha to the salty crunch of brussel sprouts. Remember to fill the gaps with fresh berries, sprigs of mint, or a handful of nuts to give it that ‘overflowing’ look that the internet loves. Now, grab your favorite platter, light a candle, and enjoy the process of bringing people together through these simple, beautiful dishes.