
From Drab to Dreamy: 10 DIY Projects to Transform Your Space
We’ve all been there—sitting on the sofa, looking at the same four walls, and feeling a little spark of ‘blah’ settle in. Your home should be your sanctuary, a place that reflects your wildest dreams and your most relaxed self, but sometimes life (and a busy schedule) gets in the way of that vision. The good news is that you don’t need a massive renovation budget to turn your space into a Pinterest-worthy retreat.
In this guide, I’m sharing ten of my favorite DIY projects that bridge the gap between ‘ordinary’ and ‘extraordinary.’ Whether you have a sprawling backyard or a tiny apartment balcony, these ideas are designed to infuse your surroundings with warmth, texture, and a touch of luxury. Let’s roll up our sleeves and start creating the home you’ve always wanted!
How to Design an Island Theme Paradise for Ultimate Relaxation
Why we love this
There is something inherently healing about the tropics—the way the air feels heavy with the scent of hibiscus and the sound of rustling palm leaves instantly lowers your cortisol levels. By bringing an island theme into your own space, you create a permanent vacation spot right in your backyard. We love the mix of organic textures like jute and bamboo against lush, oversized greenery that makes every afternoon feel like a sunset in Maui. It’s all about creating a multisensory experience where the warmth of the sun meets the cool, breezy aesthetic of a beachside cabana.
Essential Elements:
- Large potted palms (Majesty or Areca)
- Rattan or bamboo outdoor furniture
- Outdoor-rated string lights with warm Edison bulbs
- Neutral-toned jute rugs and linen outdoor pillows
- Small water feature or tabletop fountain
- Tiki torches or bamboo lanterns
How to make it
- Start by defining your zone with a large jute or seagrass rug to ground the space and provide that sandy, organic texture underfoot.
- Position your largest palms in the corners of the space to create a ‘living wall’ that provides privacy and that signature jungle canopy feel.
- Arrange your rattan seating in a conversation circle, ensuring each chair has access to a small side table for drinks and books.
- String your lights overhead in a ‘zig-zag’ pattern rather than a straight line; this creates a more whimsical, canopy-like effect that mimics a tropical resort.
- Incorporate a small water feature—the sound of trickling water is crucial for masking neighborhood noise and enhancing the island atmosphere.
- Finish by layering in soft textiles; use linen covers in shades of sand, seafoam, and coral to add comfort without sacrificing the breezy, open-air aesthetic.
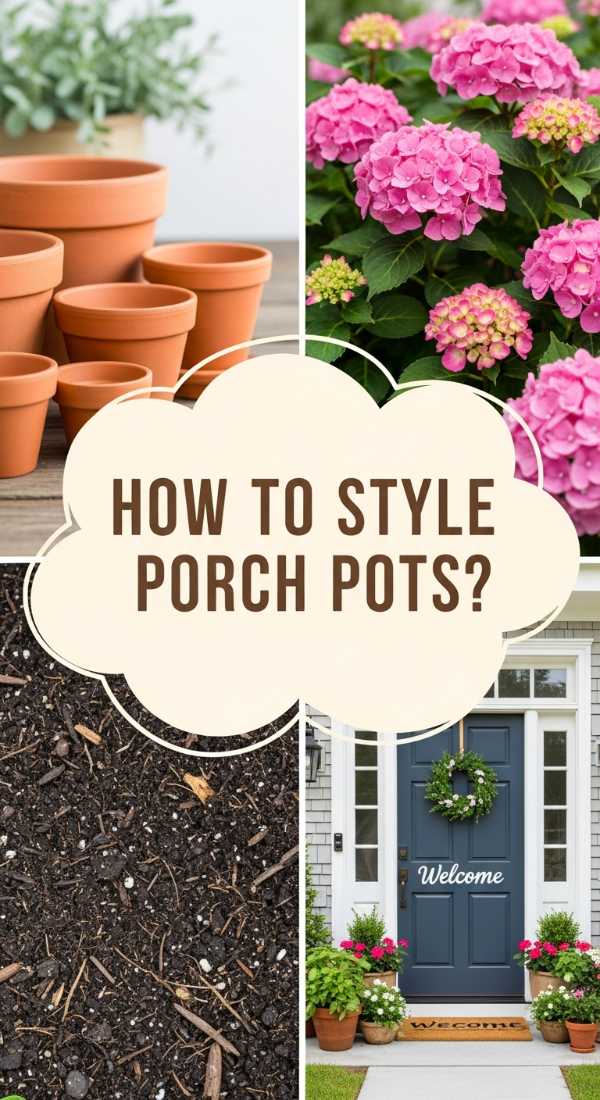
How to Style Front Porch Flower Pots for Gorgeous Curb Appeal
Why we love this
Your front porch is the handshake of your home—it’s the first thing guests see and the first thing that greets you after a long day. Styling flower pots is an art form that adds instant life, color, and fragrance to your entrance, creating a welcoming atmosphere that says, ‘someone lovely lives here.’ We adore the ‘Thriller, Filler, Spiller’ method because it creates a professional, tiered look that feels abundant and intentional. The smell of fresh petunias and the vibrant sight of trailing ivy against a clean doorstep can truly transform your mood before you even turn the key.
Essential Elements:
- Over-sized resin or ceramic planters in varying heights
- High-quality potting mix with moisture-retaining crystals
- ‘Thriller’ plants: Dracaena, Canna Lily, or ornamental grasses
- ‘Filler’ plants: Geraniums, Marigolds, or Petunias
- ‘Spiller’ plants: Sweet Potato Vine, Creeping Jenny, or Lobelia
- Slow-release fertilizer beads
How to make it
- Select three pots of different heights but a unified color palette to create visual interest and a sense of depth on your porch.
- Fill the bottom third of large pots with empty plastic water bottles or packing peanuts to save on soil and keep the pots lightweight.
- Add high-quality potting soil until it reaches about two inches below the rim, mixing in your slow-release fertilizer at this stage.
- Plant your ‘Thriller’ (the tallest plant) in the center or the back of the pot; this provides the architectural height and focal point of the arrangement.
- Surround the thriller with ‘Fillers’—bushy, flowering plants that hide the soil and provide a mass of color and texture.
- Tuck your ‘Spillers’ around the edges of the pot; ensure they are angled slightly outward so they can easily trail down the sides as they grow.
- Water deeply until water runs out of the drainage holes, and place them in a spot that matches their sun-exposure requirements.
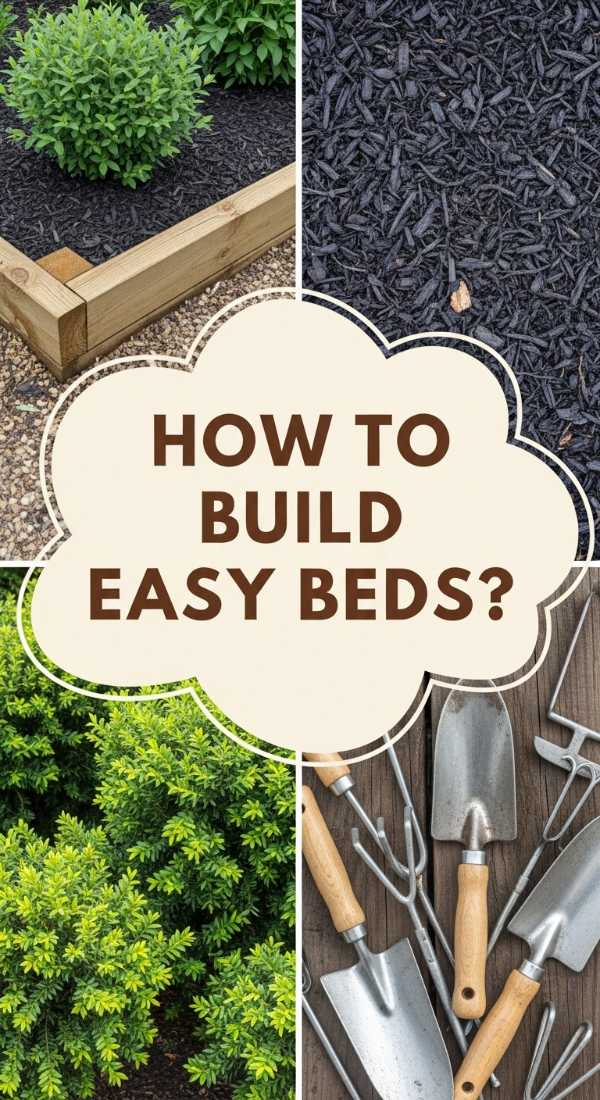
How to Create a DIY Flower Bed for Low Maintenance Beauty
Why we love this
A well-designed flower bed is the foundation of a dreamy garden, but nobody wants to spend every single weekend weeding and pruning. This low-maintenance approach allows you to enjoy the lush, earthy aroma of damp mulch and the sight of perennial blooms year after year without the constant toil. We love using perennials because they are the gift that keeps on giving, returning with more vigor each spring. The contrast between dark, rich mulch and vibrant green foliage creates a clean, professional landscape look that makes your entire yard feel curated and high-end.
Essential Elements:
- Long-handled shovel and garden rake
- Heavy-duty landscape fabric or cardboard
- Professional-grade garden edging (metal or stone)
- Drought-tolerant perennials (Lavender, Coneflower, Hosta)
- Premium dark wood mulch
- Soaker hoses (optional but recommended)
How to make it
- Mark your bed’s perimeter using a garden hose to create soft, organic curves; avoid straight lines for a more natural, professional look.
- Remove the grass within the marked area using a sharp spade, or use the ‘no-dig’ method by laying down overlapping layers of cardboard to smother weeds.
- Install your edging material along the perimeter, burying it at least 2 inches deep to prevent grass roots from creeping into your new bed.
- Amend the soil with organic compost, tilling it in to a depth of 6 inches to ensure your plants have plenty of nutrients.
- Arrange your plants while they are still in their nursery pots; place taller plants in the back and shorter, spreading varieties in the front.
- Dig holes twice as wide as the root ball, tease the roots gently, and plant them at the same depth they were in the pots.
- Install a soaker hose system for easy watering, then cover the entire bed with a 3-inch layer of mulch, keeping it a few inches away from the plant stems.
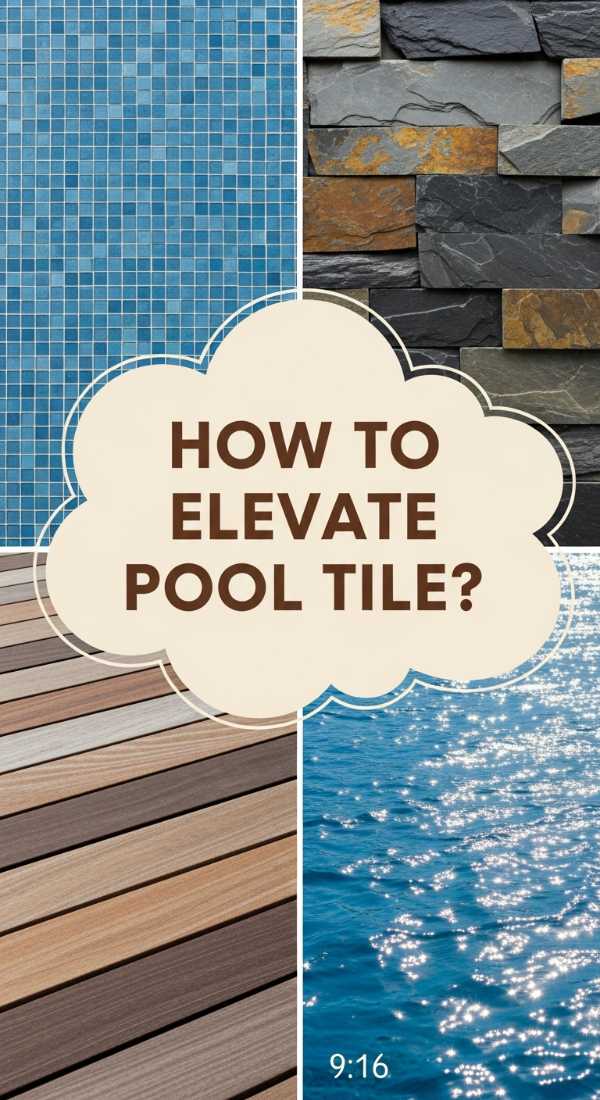
How to Upgrade Pool Stone and Tile for a Luxury Backyard Vibe
Why we love this
Nothing says ‘luxury retreat’ like a pristine pool area with high-end finishes that feel cool and smooth underfoot. Upgrading your pool stone and tile is like giving your backyard a facelift; it changes the entire color of the water and the way light reflects off the surface. We love the aesthetic of natural travertine or modern porcelain pavers paired with shimmering glass mosaic tiles. The tactile experience of stepping onto high-quality stone, combined with the visual sparkle of updated tiling, turns a standard swimming hole into a five-star resort experience that smells of sunblock and summer bliss.
Essential Elements:
- Natural stone pavers (Travertine, Limestone, or Slate)
- Glass or ceramic pool waterline tiles
- Waterproof thin-set mortar and pool-grade grout
- Wet saw for precision cutting
- Polymeric sand for paver joints
- High-gloss or matte stone sealer
How to make it
- Begin by thoroughly cleaning the existing pool coping and waterline area to remove all calcium deposits and old mortar.
- For the tiles, apply a thin layer of waterproof thin-set to the pool beam, then press your new tiles into place, using spacers to keep lines perfectly straight.
- Allow the tile mortar to cure for 24 hours before applying pool-grade grout; wipe away excess grout with a damp sponge for a clean finish.
- For the stone pavers, ensure your base is perfectly leveled with crushed stone and sand to prevent future shifting or tripping hazards.
- Lay the pavers in your chosen pattern (french pattern or running bond), using a rubber mallet to tap them into place and ensure they are level with one another.
- Fill the joints with polymeric sand, sweep away the excess, and mist with water to activate the binding agent.
- Once dry, apply two coats of stone sealer to protect against chlorine and UV damage, giving the stone a rich, finished glow.
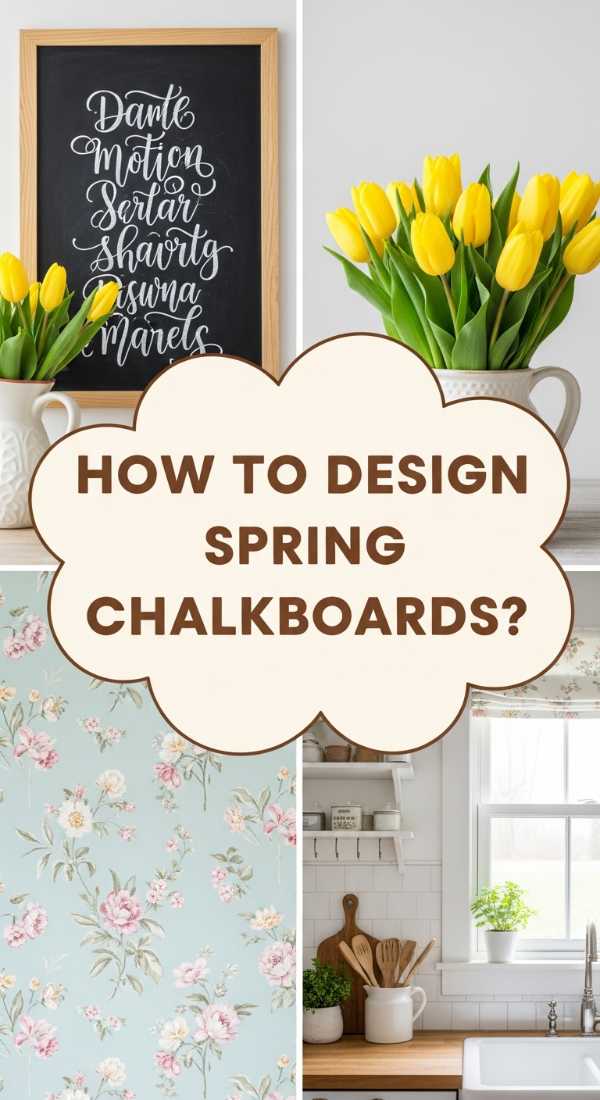
How to Refresh Spring Chalkboard Ideas for a Bright Home Aesthetic
Why we love this
Chalkboard art is one of the easiest ways to rotate your home decor with the seasons without spending a dime. It brings a touch of whimsy and hand-drawn charm to kitchens or entryways, acting as a canvas for your creativity. We love the dust-free look of chalk markers combined with traditional shading techniques that make simple quotes pop. The process of drawing floral wreaths and uplifting messages is therapeutic, and the end result provides a visual anchor that feels both rustic and modern. It’s the perfect way to welcome the ‘newness’ of spring into your daily routine.
Essential Elements:
- Large framed chalkboard or chalkboard-painted wall
- High-quality chalk markers (various tip sizes)
- Traditional white stick chalk (for ‘seasoning’ and shading)
- Stencils or carbon paper (for beginners)
- Microfiber cloth and a small spray bottle of water
- Q-tips for fine detail erasing
How to make it
- Season your chalkboard first by rubbing the side of a piece of traditional chalk over the entire surface and wiping it off; this prevents ‘ghosting’ of your designs.
- Sketch your layout lightly with regular chalk first; focus on a central quote surrounded by a wreath of spring flowers like tulips or daisies.
- Use a broad-tip chalk marker to fill in your main text, using consistent pressure to ensure the ink flows smoothly and opaque.
- Once the main text is dry, use a fine-tip marker to add delicate floral details, vine tendrils, and small dots to mimic pollen or stars.
- For a professional look, use traditional chalk to add soft shadows behind your letters or to create a ‘smudged’ background glow.
- Correct any mistakes by dipping a Q-tip in water for precision erasing without ruining the surrounding art.
- Let the design dry completely for 30 minutes before displaying, ensuring the colors stay vibrant and crisp.
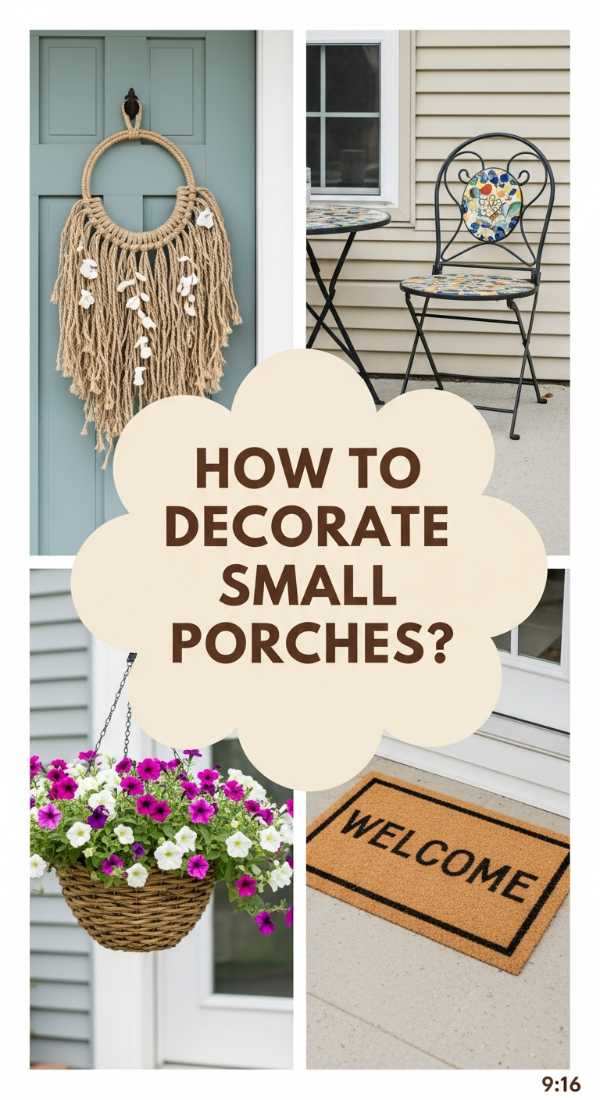
How to Decorate a Cute Small Porch for a Welcoming Summer Entrance

Why we love this
Small porches offer a unique opportunity to create a cozy, ‘hug-like’ entrance that feels intimate and curated. When space is limited, every design choice matters, from the texture of the doormat to the glow of the lantern. We love the challenge of maximizing functionality while maintaining a breezy, summer aesthetic. A well-decorated small porch uses vertical space and light colors to feel larger than it is, creating a tiny oasis where you can sip lemonade and watch the neighborhood go by. It’s all about those small, thoughtful details that make a house feel like a home.
Essential Elements:
- Layered rugs (a large patterned outdoor rug under a coir doormat)
- Vertical wall planter or hanging baskets
- Slim-profile bistro set or a single accent chair
- Battery-operated LED lanterns with timers
- Seasonal wreath with bright summer colors
- Small outdoor side table
How to make it
- Start by clearing everything off the porch and giving the floor and walls a deep clean to provide a fresh, bright canvas.
- Layer your rugs: place a 3×5 patterned rug first, then center a smaller, high-texture coir doormat on top for a designer look.
- Choose furniture with a small footprint; a metal bistro chair with an open-weave back allows light to pass through, keeping the porch feeling airy.
- Utilize your vertical space by hanging a lush fern or a colorful flower basket from the ceiling or mounting a planter box on the railing.
- Add a pop of color with a bright summer wreath featuring lemons, sunflowers, or eucalyptus to draw the eye toward the door.
- Place two lanterns of different heights in a corner; set the timers so they automatically illuminate at dusk, creating a warm, safe glow.
- Add a final touch with a small side table topped with a weather-resistant candle or a small bowl for keys and mail.
How to Build a DIY Grill Station for Epic Backyard Cookouts
Why we love this
For the home chef, a dedicated grill station is the ultimate backyard upgrade. It moves the heat of the kitchen outdoors and creates a social hub where guests can gather around the delicious aromas of charred cedar and grilled vegetables. We love the industrial-meets-rustic look of a wood-framed station with a sleek stone or stainless steel countertop. Having a dedicated space for prep work and tool storage makes outdoor cooking feel organized and professional rather than a chaotic scramble. It’s the heart of the summer party, where the sounds of laughter and sizzling steaks define the weekend.
Essential Elements:
- Pressure-treated 4×4 posts and 2×4 framing lumber
- Weather-resistant countertop (Granite remnant, concrete, or tile)
- Stainless steel hooks for utensils
- Exterior grade wood stain or paint
- Heavy-duty locking casters (for mobility)
- Built-in bottle opener and towel rack
How to make it
- Build the base frame using pressure-treated lumber, creating a ‘box’ structure that is the standard counter height (36 inches).
- Reinforce the corners with metal L-brackets to ensure the station can handle the weight of a heavy stone countertop or a large grill.
- Install a bottom shelf using wood slats; leave small gaps between the slats to allow for water drainage and airflow.
- Sand all wood surfaces thoroughly with 80-grit then 120-grit sandpaper to prevent splinters and prepare for staining.
- Apply two coats of high-quality exterior stain or deck paint to protect the wood from grease spills and rain.
- Secure your countertop to the frame using construction adhesive; if using concrete, ensure you have a helper as it is extremely heavy.
- Attach your hardware: add a row of hooks for tongs and spatulas, a sturdy bottle opener on the side, and a towel bar for easy cleanup.
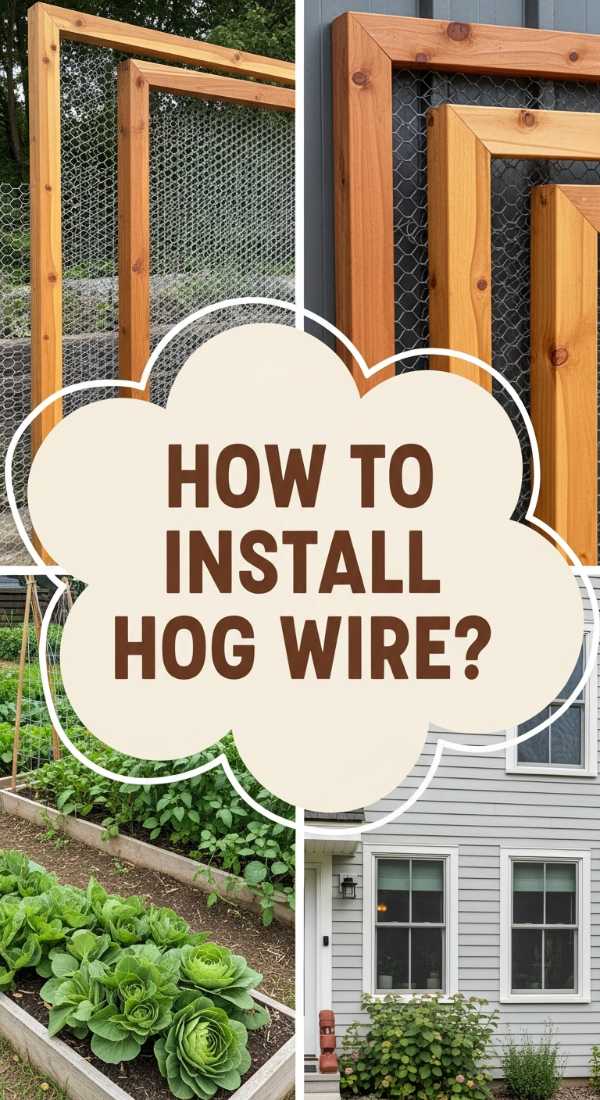
How to Install Hog Wire Fence Ideas for a Modern Rustic Look
Why we love this
Hog wire fencing is the perfect solution for homeowners who want to define their property without blocking the view. It offers a ‘modern rustic’ aesthetic that feels clean, architectural, and surprisingly sophisticated. We love the way the silver or black metal grid contrasts with warm cedar frames, allowing your garden to be the star of the show. It’s sturdy enough to keep pets in but transparent enough to keep your yard feeling expansive and connected to the landscape. The smell of fresh-cut cedar and the sight of a perfectly level fence line add instant value and style to any property.
Essential Elements:
- 4×4 Cedar posts and 2×4 cedar rails
- 4-gauge hog wire panels (usually 4ft x 16ft)
- Galvanized staples or specialized fence clips
- Power miter saw and drill
- Post-hole digger and quick-set concrete
- Wire snips or a small angle grinder
How to make it
- Set your 4×4 cedar posts 6 to 8 feet apart, burying them at least 2 feet deep and securing them with quick-set concrete; ensure they are perfectly plumb.
- Measure and cut your 2×4 horizontal rails to fit between the posts; you will need a top rail, a bottom rail (about 4 inches off the ground), and side cleats.
- Create a ‘frame within a frame’ by attaching small cedar cleats to the inside of the posts and rails; this is where the wire panel will sit.
- Measure the interior of your frame and cut the hog wire panel to size using an angle grinder, ensuring there are no sharp ‘pokey’ bits left on the edges.
- Slide the wire panel into the frame and secure it to the cleats using galvanized staples every 6 inches.
- Cap the top rail with a flat 2×6 board to create a finished look and provide a ‘shelf’ for drinks or decorative potted plants.
- Finish the wood with a clear UV-protectant sealer to keep the cedar from turning gray and maintain its warm, golden hue.
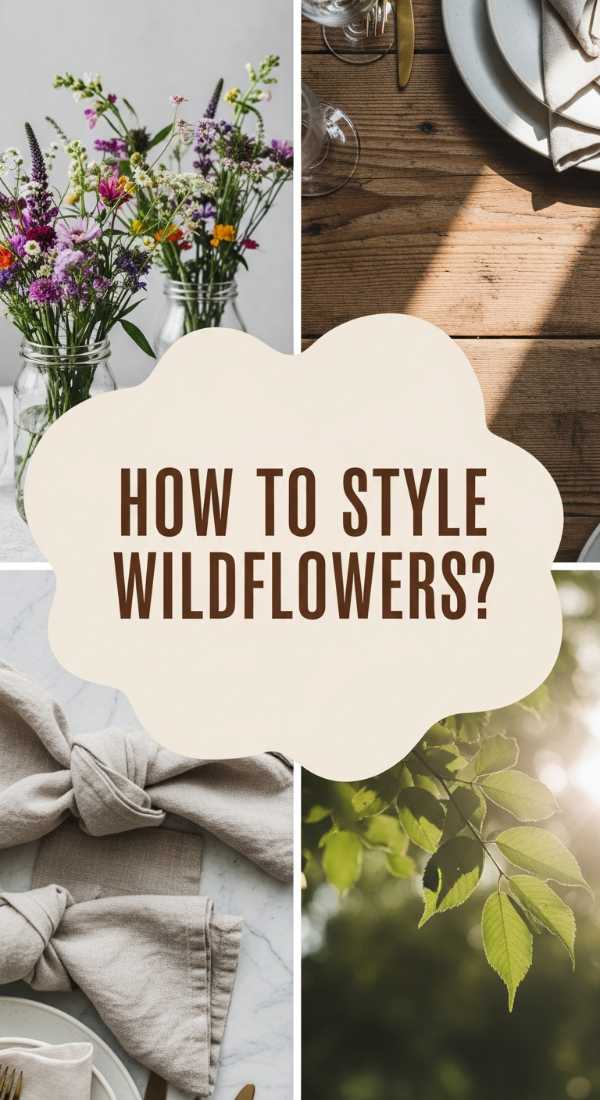
How to Arrange Wildflower Centerpieces for a Dreamy Event Tablescape

Why we love this
Wildflowers bring an effortless, romantic energy to any table, smelling like a fresh meadow after a spring rain. Unlike stiff, formal arrangements, wildflower centerpieces are airy, whimsical, and full of personality. We love the ‘gathered-from-the-field’ look that uses varied textures like delicate Queen Anne’s Lace, bold Sunflowers, and wispy grasses. These arrangements encourage conversation because they aren’t overly perfect; they feel lived-in and natural. Sitting at a table adorned with these organic beauties makes every meal feel like a special occasion, bathed in the soft colors of nature.
Essential Elements:
- A collection of mismatched glass jars or vintage milk bottles
- Fresh-cut wildflowers (Zinnias, Cosmos, Snapdragons, Chamomile)
- Greenery fillers (Eucalyptus, Ferns, or Mint)
- Floral shears or sharp scissors
- Clear floral tape or chicken wire (for larger vessels)
- Flower food packets
How to make it
- Clean your glass vessels thoroughly and fill them halfway with lukewarm water mixed with a packet of flower food.
- Strip all foliage from the bottom half of your flower stems; leaves sitting in water create bacteria that will kill your flowers prematurely.
- Start with your ‘greenery’ first to create a structural base; cross the stems in the water to create a natural grid that holds the flowers in place.
- Add your ‘focal’ flowers (the biggest, brightest blooms) at varying heights, ensuring they are distributed evenly around the arrangement.
- Fill in the gaps with ‘airy’ fillers like Chamomile or Baby’s Breath; let some stems poke out further than others to maintain that ‘wild’ look.
- Incorporate some trailing elements or tall grasses to add movement and height to the tablescape.
- Group your jars in clusters of three or five down the center of the table, mixing different heights to create a dynamic, flowing visual path.
How to Curate a Pink Layout for a Refreshing Spring Phone Aesthetic
[IMAGE_10]
Why we love this
Our phones are the accessories we carry most, so why not make the digital space as dreamy as your physical home? A curated pink layout feels soft, refreshing, and incredibly organized, turning every glance at your screen into a moment of ‘ahhh.’ We love the use of custom icons and widgets that replace the chaotic, mismatched colors of standard apps with a unified, rosy palette. It’s like a digital sunset in your palm. The tactile joy of a well-organized screen makes your tech feel less like a tool of stress and more like a beautiful extension of your personal style.
Essential Elements:
- A high-resolution aesthetic wallpaper (think clouds, silk, or petals)
- Icon pack in shades of blush, rose, and cream
- Widget apps (like Widgetsmith or Color Widgets)
- Shortcuts app (for iOS) or a custom launcher (for Android)
- Coordinated ‘Focus Mode’ filters
How to make it
- Select a ‘hero’ wallpaper that isn’t too busy; a soft pink gradient or a minimalist floral photo works best as a background.
- Download a set of pink aesthetic icons or create your own using a design app like Canva; ensure the ‘vibe’ (line art vs. solid) is consistent.
- On iOS, use the ‘Shortcuts’ app to create a new action for ‘Open App,’ then add it to your home screen using your custom pink icon.
- Open your widget app and create three different sizes of widgets: a large photo widget, a medium calendar, and a small motivational quote.
- Arrange your apps by frequency of use, but keep the color flow in mind; place the lightest pinks at the top and deeper shades at the bottom.
- Use ‘invisible’ or ‘blank’ widgets to create negative space, preventing the screen from looking cluttered and keeping the aesthetic ‘clean.’
- Apply a matching pink-tinted lock screen and coordinated font styles for the clock to complete the seamless, dreamy transformation.
Conclusion
Transforming your space from ‘drab to dreamy’ isn’t about how much money you spend, but how much heart you put into the details. Whether you’re building a massive grill station or simply refreshing your phone’s home screen, these DIY projects allow you to take ownership of your environment and infuse it with your unique personality. Remember, the best homes are never ‘finished’—they are always evolving, just like you. So, take these ideas, make them your own, and enjoy every second of the creative process!