

Stop Scrolling! This Simple Food Board is Taking Over the Internet
Have you ever seen something so beautiful, so incredibly inviting, that you almost didn’t want to touch it—but your stomach had other plans? That is exactly how I felt the first time I laid eyes on the ‘Ultimate Chicken Grazing Board.’ It’s the trend that’s currently breaking the internet, and for a good reason! Gone are the days of boring dinner plates; we are officially in the era of abundance, textures, and communal eating that feels like a hug for the soul.
As someone who spends most of my time looking for ways to make weeknight dinners feel like a special occasion without the stress, this concept changed my life. It’s about more than just food; it’s about the way the golden-brown skins of roasted chicken catch the light, the way the steam rises from a perfectly glazed thigh, and how a variety of cooking methods can turn a humble bird into a culinary masterpiece. This board is my love letter to comfort food, and today, I’m showing you exactly how to master every single component.
How to bake chicken thighs?
Why we love this
Baking chicken thighs is the quintessential method for achieving that ‘fall-apart’ tenderness while maintaining a beautiful, rustic presentation. There is a deep, savory aroma that fills the kitchen as the dark meat slowly renders its juices, mingling with rosemary and garlic. The skin transforms into a delicate, crackling layer that shatters perfectly with every bite, revealing a succulent interior that practically melts on your tongue. It is the heart of any good food board, providing a robust base that pairs beautifully with crunchy vegetables and tangy dips.
Ingredients
- 4-6 Bone-in, skin-on chicken thighs
- 2 tablespoons extra virgin olive oil
- 1 tablespoon sea salt
- 1 teaspoon cracked black pepper
- 2 sprigs fresh rosemary, chopped
- 3 cloves garlic, minced
How to make it
- Preheat your oven to 400°F (200°C). This high temperature is vital for rendering the fat quickly and ensuring the skin doesn’t become rubbery.
- Pat the chicken thighs completely dry with paper towels. Any moisture on the surface will create steam instead of a crisp crust.
- In a small bowl, whisk together the olive oil, salt, pepper, rosemary, and minced garlic to create a paste-like rub.
- Generously coat each thigh with the herb mixture, making sure to rub some under the skin for maximum flavor penetration into the meat.
- Arrange the thighs on a wire rack set over a rimmed baking sheet. This allows hot air to circulate under the chicken, cooking it evenly from all sides.
- Bake for 35 to 45 minutes. You are looking for an internal temperature of 165°F (74°C) and skin that is taught, golden-brown, and visibly bubbling.
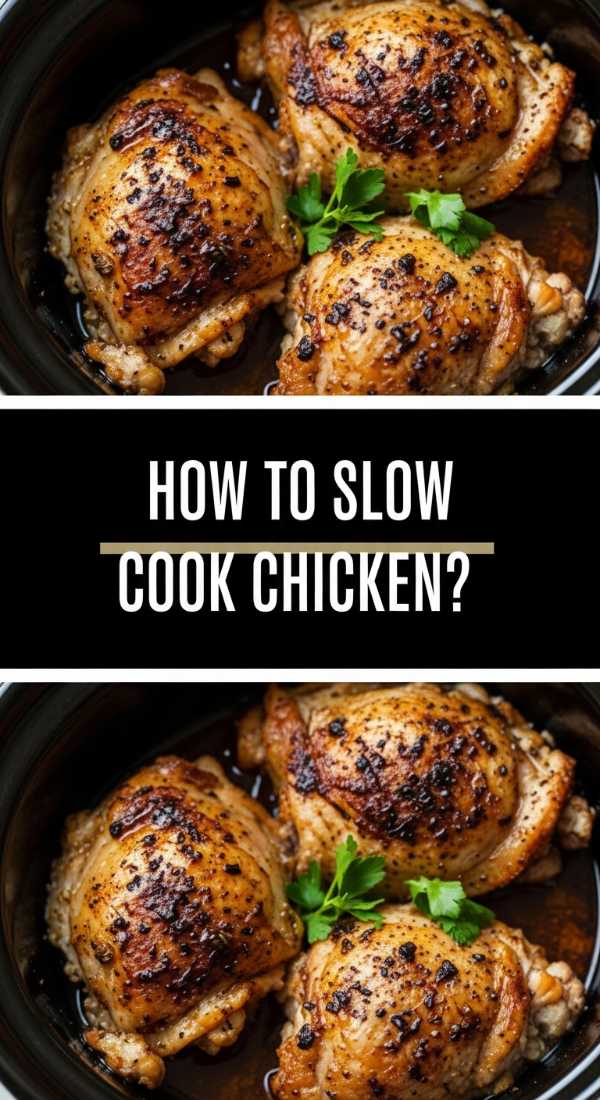
How to slow cook chicken?

Why we love this
Slow-cooked chicken is the ultimate ‘set it and forget it’ luxury that results in meat so tender it requires only a gentle nudge from a fork to shred. The long, low-heat process allows the collagen to break down into a silky, rich gelatin that coats every fiber of the meat, creating a texture that is incredibly moist and decadent. It smells like home—a warm, inviting scent of slow-cooked aromatics and savory broth that lingers in the air. On a food board, this shredded goodness serves as the perfect topping for crusty bread or a filling for mini sliders.
Ingredients
- 1 lb chicken breast or thighs
- 1 cup low-sodium chicken broth
- 1 yellow onion, sliced thin
- 2 teaspoons smoked paprika
- 1 teaspoon onion powder
- Salt and pepper to taste
How to make it
- Layer the sliced onions at the bottom of your slow cooker to create a ‘flavor bed’ that prevents the meat from sticking to the bottom.
- Season the chicken generously on all sides with the smoked paprika, onion powder, salt, and pepper before placing it on top of the onions.
- Pour the chicken broth around the sides of the meat, being careful not to wash off the seasoning you just applied.
- Cover and set the slow cooker to ‘Low’ for 6 to 8 hours. Avoid the temptation to use the ‘High’ setting, as the lower temperature ensures the proteins don’t toughen up.
- Once the time is up, the chicken should look opaque and slightly translucent in parts where the juices have permeated.
- Remove the chicken to a clean bowl and use two forks to shred the meat into long, juicy strands, incorporating a few spoonfuls of the remaining liquid for extra moisture.
How to roast chicken legs?

Why we love this
Roasting chicken legs brings a certain nostalgic charm to the table, offering a ‘grab-and-go’ convenience that is essential for a viral food board. The dark meat of the leg is naturally juicy, and when roasted at the right temperature, it develops a deep, mahogany hue that is visually stunning. The aroma is intensely savory, with hints of caramelized skin and toasted spices. Every bite offers a satisfying contrast between the crisp, salty exterior and the tender, dark meat that pulls cleanly away from the bone with a rich, buttery finish.
Ingredients
- 6 chicken drumsticks
- 3 tablespoons melted butter
- 1 teaspoon dried thyme
- 1 teaspoon paprika
- 1/2 teaspoon lemon zest
- Coarse kosher salt
How to make it
- Set your oven racks to the center position and preheat to 425°F (218°C). The high heat is necessary to crisp the skin before the meat overcooks.
- Combine the melted butter with thyme, paprika, and lemon zest. The butter provides a richer flavor and better browning than oil for drumsticks.
- Brush each drumstick thoroughly with the butter mixture, ensuring the entire surface is covered.
- Place the legs on a parchment-lined baking sheet, leaving at least two inches of space between each piece to allow for proper airflow and browning.
- Roast for 25 to 30 minutes, turning the legs once halfway through the process to ensure the underside gets just as crispy as the top.
- The legs are done when the juices run clear and the skin has a slight ‘snap’ when poked with a fork.
How to cook boneless thighs?

Why we love this
Boneless thighs are the unsung heroes of the kitchen, offering the flavor of dark meat with the quick cooking time of a breast. Because they lack the bone, they cook evenly and rapidly, making them perfect for those nights when you want the ‘wow’ factor of a food board without the wait. They have a beautiful, marbled texture that remains succulent even under high heat, absorbing marinades like a sponge. When sliced thin, they reveal a glistening, tender interior that looks elegant and feels like a gourmet treat.
Ingredients
- 1.5 lbs boneless, skinless chicken thighs
- 2 tablespoons avocado oil
- 1 tablespoon soy sauce
- 1 teaspoon honey
- 1/2 teaspoon ginger powder
- Black pepper
How to make it
- Pat the thighs dry and trim away any excessive large pockets of fat, though leave some for flavor.
- Whisk together the avocado oil, soy sauce, honey, and ginger to create a light marinade. Avocado oil is preferred here for its high smoke point.
- Toss the chicken in the marinade and let it sit for at least 15 minutes at room temperature to take the chill off the meat.
- Heat a large heavy-bottomed skillet or cast iron pan over medium-high heat until a drop of water sizzles instantly.
- Place the thighs in the pan, smooth side down. Sear for 5-6 minutes without moving them to develop a deep brown crust.
- Flip and cook for another 5 minutes. Use a meat thermometer to ensure they reach 165°F. Let them rest for 5 minutes before slicing to keep the juices locked in.
How to make juicy legs?
Why we love this
The secret to the perfect food board is variety, and nothing beats the succulent, ‘dripping-with-flavor’ experience of a perfectly juicy chicken leg. The texture is smooth and velvety, a result of careful temperature control that prevents the natural moisture from evaporating. There is a specific fragrance to juicy chicken—clean, light, and perfectly seasoned—that invites you to reach for seconds. These are the pieces that disappear first, usually accompanied by satisfied sighs as people realize just how tender chicken can actually be when treated with care.
Ingredients
- 6 chicken legs (thigh and drumstick attached)
- 1/4 cup apple juice or cider
- 2 tablespoons olive oil
- 1 teaspoon garlic powder
- 1 teaspoon salt
- 1/2 teaspoon poultry seasoning
How to make it
- To ensure maximum juiciness, start by ‘brining’ the legs in a mixture of salt and apple juice for 30 minutes. The acidity helps tenderize the fibers.
- Preheat the oven to 375°F (190°C). A slightly lower temp than roasting helps retain more internal moisture.
- Remove the chicken from the brine, pat dry, and rub with olive oil and the dry seasonings (garlic powder and poultry seasoning).
- Place in a baking dish just large enough to hold them. Crowding them slightly actually helps retain moisture by reducing the surface area exposed to dry air.
- Bake for 45-50 minutes. Periodically baste the legs with the juices accumulating at the bottom of the dish using a spoon or brush.
- Check the thickest part of the thigh for an internal temp of 170°F—for bone-in legs, a slightly higher temp than the standard 165°F ensures the meat pulls away from the bone easily while remaining incredibly juicy.
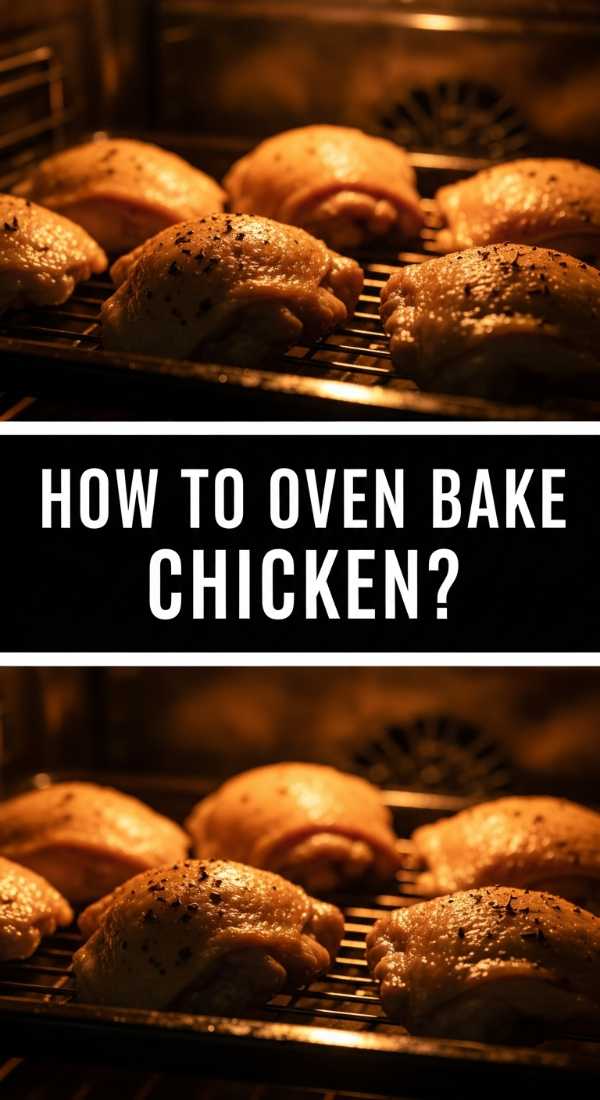
How to oven bake chicken?

Why we love this
Oven-baking is the gold standard for creating a balanced dish that is healthy yet indulgent. It’s about that clean, roasted profile where the natural flavors of the chicken are heightened by the dry heat of the oven. The result is a gorgeous, matte-finish golden skin and a firm, yet yielding texture that feels substantial and satisfying. It provides a neutral, savory backbone to your food board, allowing the vibrant colors of fresh berries, grapes, and cheeses to pop against the rustic tones of the baked poultry.
Ingredients
- 1 whole chicken, spatchcocked (backbone removed)
- 3 tablespoons olive oil
- 1 tablespoon lemon juice
- Salt, pepper, and dried oregano
- 1 lemon, sliced into rounds
How to make it
- Preheat the oven to 400°F (200°C). Spatchcocking the chicken is the secret professional tip for even, fast baking.
- Rub the entire surface of the chicken with olive oil and lemon juice. This creates a bright, acidic foundation for the skin to crisp up.
- Season heavily with salt, pepper, and oregano, pressing the spices into the skin so they don’t fall off during the bake.
- Place the chicken flat on a sheet pan lined with lemon slices. The lemon slices act as a natural rack and infuse the underside with citrus steam.
- Bake for 45-55 minutes. You’ll see the skin start to pull back from the drumstick bone and the breast will be firm to the touch.
- Allow the chicken to rest for at least 10 minutes before carving into pieces for your board. This allows the internal juices to redistribute.
How to glaze chicken thighs?

Why we love this
A glazed chicken thigh is a work of art—a shiny, lacquered masterpiece that adds a sweet and savory dimension to your grazing board. The texture is delightfully sticky, with the glaze caramelizing into a thick, syrupy coating that clings to every curve of the meat. The aroma is intoxicating, usually a mix of honey, soy, or balsamic reducing into an umami-rich fragrance. It’s the perfect ‘accent’ piece for a food board, offering a complex flavor profile that cleanses the palate and keeps guests coming back for ‘just one more bite.’
Ingredients
- 4 boneless chicken thighs
- 1/2 cup honey or apricot preserves
- 2 tablespoons balsamic vinegar
- 1 tablespoon Dijon mustard
- 1/2 teaspoon red pepper flakes
How to make it
- Season the thighs with a tiny pinch of salt (the glaze will provide most of the flavor) and sear them in a pan over medium heat for 5 minutes per side until almost cooked through.
- While the chicken sears, whisk together the honey, balsamic vinegar, mustard, and red pepper flakes in a small saucepan over low heat.
- Simmer the glaze for 3-4 minutes until it thickens slightly and looks glossy.
- Pour the glaze over the chicken in the pan, turning the heat up slightly to medium-high.
- Use a spoon to continuously baste the thighs with the bubbling glaze for another 2-3 minutes. You are looking for the glaze to reduce into a thick ‘lacquer’ that doesn’t run off the meat.
- Remove from heat immediately once the glaze is dark and sticky to avoid burning the sugars.
How to season chicken thighs?

Why we love this
Seasoning is where the magic happens; it’s the difference between a ‘good’ chicken and a ‘viral-worthy’ experience. A well-seasoned thigh has a multi-dimensional flavor profile where the heat of spices, the earthiness of herbs, and the sharpness of salt all work in harmony. The visual appeal of a spice-crusted thigh—flecked with green herbs and red pepper—adds an artisanal feel to your board. It’s an evocative experience that starts with the nose and ends with a lingering, complex warmth that makes the simple act of eating feel like a celebration.
Ingredients
- 1 lb chicken thighs
- 1 tablespoon smoked paprika
- 1 teaspoon cumin
- 1 teaspoon coriander
- 1 teaspoon brown sugar
- 1/2 teaspoon chili powder
- Generous pinch of sea salt
How to make it
- Start with ‘dry’ chicken. Use paper towels to remove all surface moisture so the spices stick directly to the skin or meat rather than floating in water.
- In a small bowl, combine all the dry spices. The addition of brown sugar is a pro tip—it helps the spices caramelize and creates a beautiful crust.
- Apply a very thin coating of oil to the chicken to act as ‘glue’ for your seasoning.
- Dredge the chicken in the spice mix, pressing down firmly to ensure a thick, even coating on all sides.
- Let the seasoned chicken sit for 10-15 minutes before cooking. This ‘dry brine’ allows the salt to penetrate the meat, seasoning it from the inside out.
- Cook according to your preferred method (bake or pan-sear), ensuring you don’t use high heat that might burn the sugar in the rub.
How to crisp chicken skin?

Why we love this
There is arguably no sound more satisfying in the culinary world than the loud ‘crunch’ of perfectly crisped chicken skin. It’s the ultimate sensory reward—the golden, salty, crackling layer that protects the tender meat beneath. The texture is thin and glass-like, shattering upon impact to release a burst of savory flavor. When you arrange these on a food board, they act as the ‘chips’ of the meal, providing that essential crunch that balances out softer elements like cheeses or mashed potatoes. It’s pure, unadulterated food joy.
Ingredients
- 4 skin-on chicken thighs or breasts
- 1 tablespoon baking powder (the secret ingredient!)
- 1 teaspoon kosher salt
- 1 tablespoon high-heat oil (like grapeseed)
How to make it
- The absolute secret to viral-level crispiness is mixing a teaspoon of baking powder with your salt. This raises the pH level of the skin, allowing it to brown and crisp much more effectively.
- Ensure the skin is bone-dry. If you have time, leave the chicken uncovered in the fridge for 2 hours before cooking to air-dry the skin.
- Rub the baking powder and salt mixture into the skin thoroughly.
- Heat a heavy skillet with oil over medium heat. Do not go to high heat immediately or the skin will burn before the fat renders.
- Place chicken skin-side down. Place a heavy weight (like another pan or a foil-wrapped brick) on top to ensure maximum surface contact.
- Cook for 8-10 minutes undisturbed. You will see the fat pooling in the pan; this is good! Once the skin is deep golden and hard to the touch, flip for 2 minutes to finish the meat.
How to slow cook thighs?
[IMAGE_10]
Why we love this
Slow-cooking thighs specifically is a game-changer because of their high fat content, which prevents them from ever drying out, unlike breasts. The result is a ‘confit-like’ quality—meat that is incredibly silky, rich, and deeply infused with whatever aromatics you choose. It’s a rustic, humble way of cooking that feels incredibly sophisticated when presented on a wooden board with sprigs of fresh thyme and scattered peppercorns. The aroma is heavy and satisfying, the kind of smell that makes everyone gravitate toward the kitchen the moment they walk through the door.
Ingredients
- 6 boneless, skinless chicken thighs
- 1/2 cup chicken stock
- 4 cloves smashed garlic
- 2 bay leaves
- 1 teaspoon salt
- 1/2 teaspoon black peppercorns
How to make it
- Place the thighs in a single layer in the slow cooker. Avoid stacking them if possible to ensure even heat distribution.
- Add the smashed garlic, bay leaves, and peppercorns directly onto the meat.
- Pour in just enough chicken stock to cover the bottom of the pot. In slow cooking, less is more, as the chicken will release its own juices.
- Set the temperature to ‘Low’. Cook for 5 hours. At the 4-hour mark, check the texture; it should be tender but still holding its shape.
- If you want a more ‘pulled’ texture, go the full 6 hours until the fibers separate easily.
- Pro tip: To serve on a board, remove the thighs carefully with a slotted spoon and let them rest for 3 minutes so they firm up just enough to be handled without falling apart instantly.
Wrapping Up Your Ultimate Food Board
Building this viral chicken food board is about more than just following a recipe; it’s about the joy of creating a shared experience. Whether you’re crisping up skin to that perfect golden crunch or slow-cooking thighs until they’re silky smooth, you’re crafting a meal that people will remember. Don’t be afraid to get creative—add some grapes, a wedge of brie, or some toasted baguette slices to the gaps on your board. The internet may have started the trend, but you’re the one bringing it to life in your own kitchen. Happy hosting!