

Bloom Your Best Mani: A Step-by-Step Spring Nail Art Guide
Oh, my loves, can you feel it? That soft, golden whisper of sunlight dancing through the window, telling us the earth is finally waking up. There is something so profoundly healing about the first bloom of spring, isn’t there? It’s a time for shedding the heavy layers of winter and stepping into a world that feels light, airy, and full of possibility.
As we refresh our wardrobes and our spirits, there’s one little ritual I find so incredibly grounding: the art of the manicure. Our hands do so much for us—they hold tea mugs, they hug friends, they create beauty. Giving them a little seasonal love feels like a cloud-soft embrace for the soul. Today, I’m inviting you into my little sanctuary for the Ultimate Spring Nail Design Masterclass. Let’s paint some joy onto our fingertips together!
5 Easy Steps to Get Bright Spring Nails
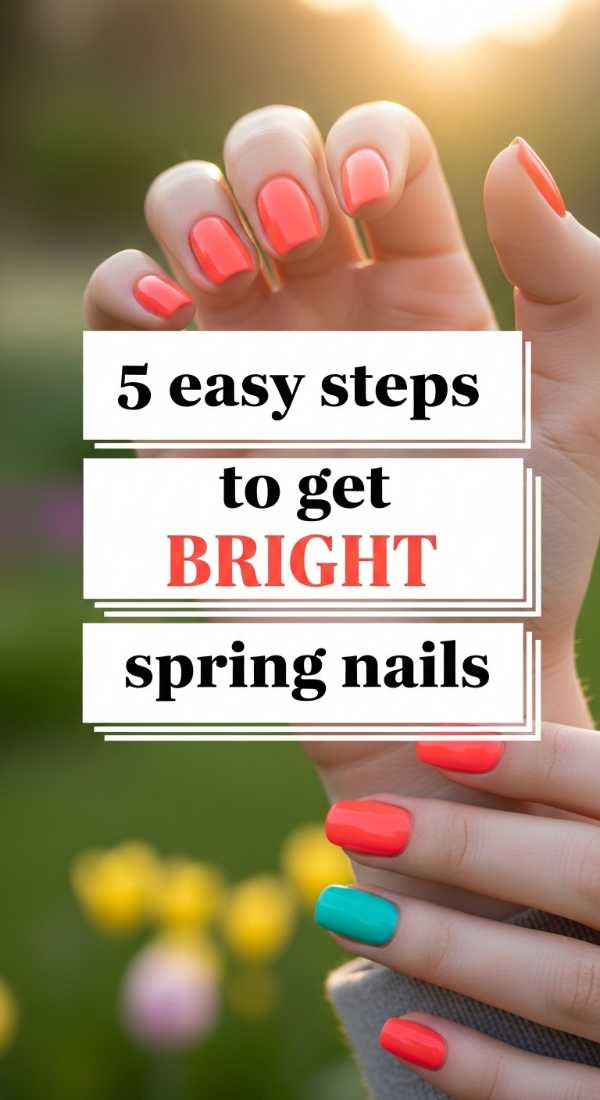
Why to love this Design:
Bright spring nails are like a shot of espresso for your mood! They capture that vibrant energy when the tulips first pop their heads out of the soil. It’s all about high-contrast cheerfulness that makes you smile every time you look down at your keyboard.
Essential Elements:
- Electric Peach polish
- Mint Green accent
- High-shine top coat
- Buffer block
- Precision brush
How to Prepare:
- Shape your nails into a soft almond to elongate the fingers.
- Apply a sticky base coat to prevent staining from bright pigments.
- Apply two thin coats of your brightest pastel neon.
- Use a sponge to lightly dab a secondary color at the tips for a soft gradient.
- Seal with a UV-protectant top coat to keep the brightness from fading.
Budget Range
- Essie ‘Sway in Sashay’ ($10)
- OPI ‘The Pass is Always Greener’ ($11.50)
- Seche Vite Dry Fast Top Coat ($9)
7 Unique Ways to Style Nail Ideas Spring

Why to love this Design:
Styling your nails is an extension of your heart’s creative rhythm. These unique approaches move away from the standard ‘pink’ and lean into artistic textures and unexpected pairings that tell a story of a garden in transition.
Essential Elements:
- Matte top coat
- Gold foil flakes
- Lavender cream polish
- Dotting tools
- Dried pressed flowers
- Striping tape
- Clear builder gel
How to Prepare:
- Cleanse the nail plate with alcohol to ensure a smooth canvas.
- Mix matte and glossy textures on different fingers for a modern look.
- Place gold foil near the cuticle for an ‘earth-gold’ vibe.
- Use a dotting tool to create tiny ‘baby’s breath’ clusters.
- Encapsulate dried flowers under a thick layer of clear gel.
- Try a diagonal split with two contrasting spring shades.
- Finish with a nourishing hand cream to make the skin glow.
Budget Range
- Holo Taco Matte Top Coat ($13)
- Nail Art Gold Foil Flakes ($6)
- Zoya ‘Abby’ Lavender ($12)
4 Simple Tricks for Natural Spring Nails
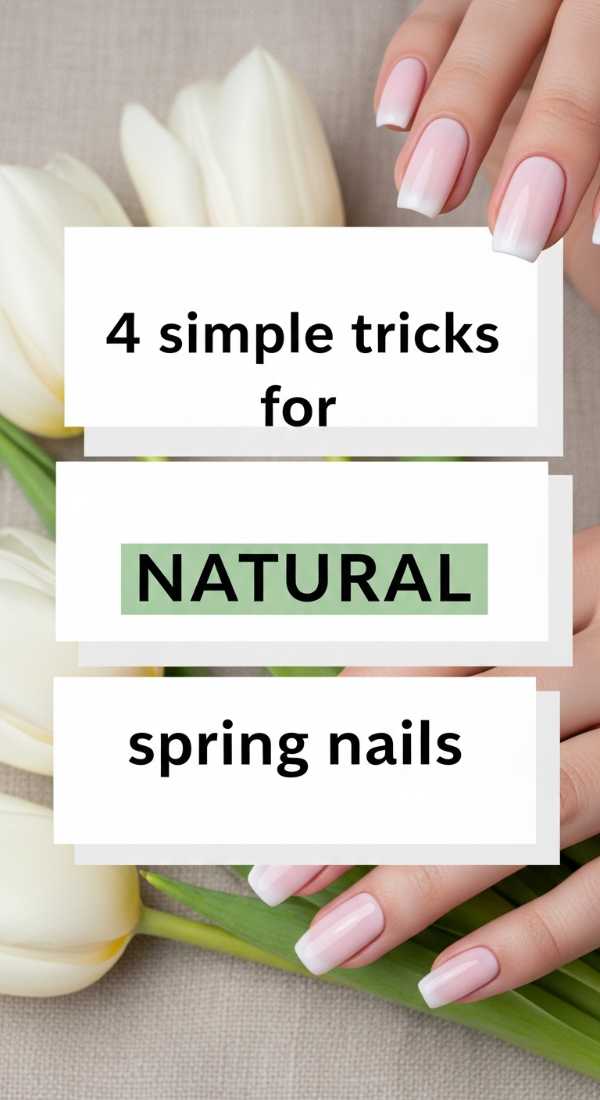
Why to love this Design:
Sometimes, the loudest statement is the softest one. Natural spring nails celebrate the ‘clean girl’ aesthetic—it’s about health, hydration, and a subtle glow that looks like your nails, but just a little more magical.
Essential Elements:
- Sheer ‘milky’ white polish
- Cuticle remover gel
- Glass nail file
- Nail strengthener
How to Prepare:
- Use a glass file to prevent peeling and keep edges silky smooth.
- Apply cuticle remover and gently push back—never cut—for a clean frame.
- Buff the surface to a natural shine before applying one sheer coat of milky pink.
- Apply a strengthening base as a top coat for a breathable, healthy finish.
Budget Range
- Dior Nail Glow ($30)
- Sally Hansen Hard as Nails ($4)
- Germanikure Glass File ($12)
3 Fast Methods for Spring Chrome Nails
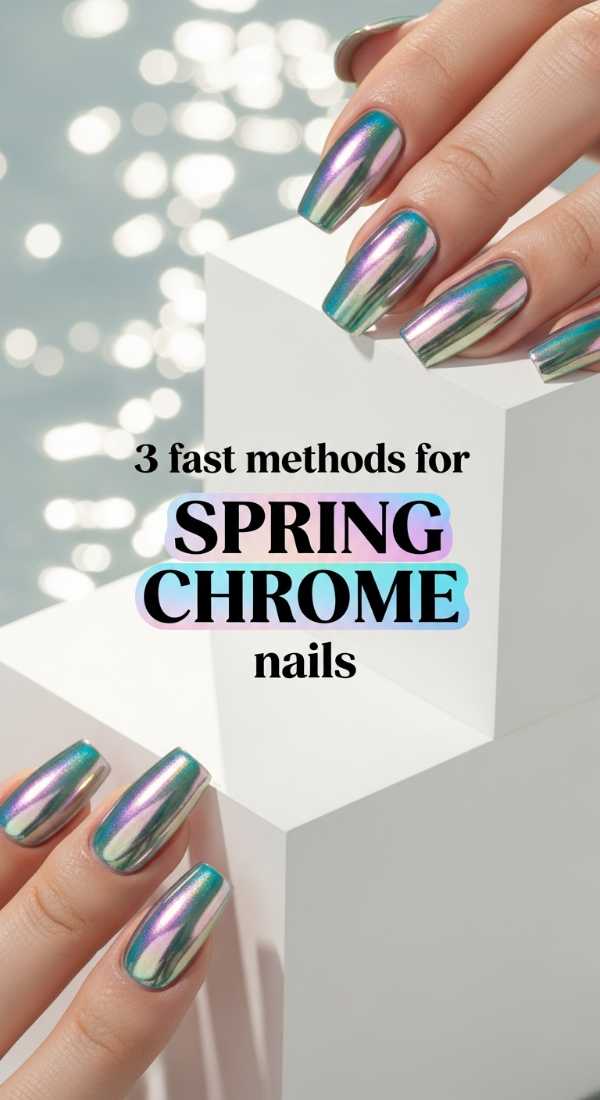
Why to love this Design:
Spring chrome is like the morning dew on a leaf—shimmering, ethereal, and reflecting all the colors of the sky. It adds a futuristic touch to a soft season, making your hands look like they belong to a fairy queen.
Essential Elements:
- White pearl chrome powder
- No-wipe top coat
- Sponge applicator
How to Prepare:
- Apply a pale base color and cure or dry completely.
- Apply a ‘No-Wipe’ top coat and cure for only 30 seconds so it remains slightly tacky.
- Burnish the chrome powder into the nail with a sponge until it mirrors back at you.
Budget Range
- Artdone Pearl Chrome Powder ($8)
- Beetles No Wipe Top Coat ($7)
- Modelones White Gel Polish ($6)
6 Cute Ways to Paint Spring Nails Fruit
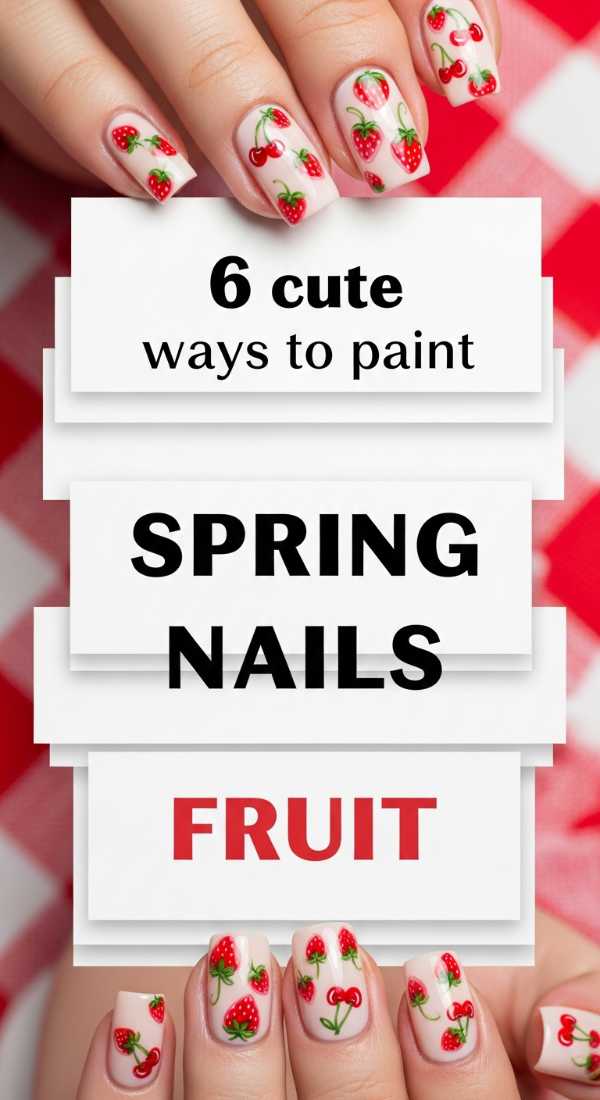
Why to love this Design:
Is there anything more darling than tiny strawberries or little lemons on your nails? It’s playful, whimsical, and reminds us of picnics in the park. It’s pure, unadulterated sunshine captured in art.
Essential Elements:
- Primary red and yellow polishes
- Ultra-fine liner brush
- Green ‘leaf’ polish
- Matte finish for a ‘peel’ effect
- White detail paint
- Small gems for ‘seeds’
How to Prepare:
- Paint a soft base of nude so the fruit ‘pops’.
- Use a dotting tool to create the fruit body (a circle for cherries, a teardrop for berries).
- Add tiny green V-shapes for leaves using a liner brush.
- Dot tiny white or black seeds for realism.
- Add a tiny swipe of white for a ‘highlight’ or shine.
- Apply a plump top coat to give the fruit a 3D juicy look.
Budget Range
- Olive & June ‘Cherry’ Polish ($9)
- Winstonia Berry Wine Liner Brush ($7)
- Orly ‘Lemonade’ ($15)
5 Pro Techniques for Bright Spring Nails
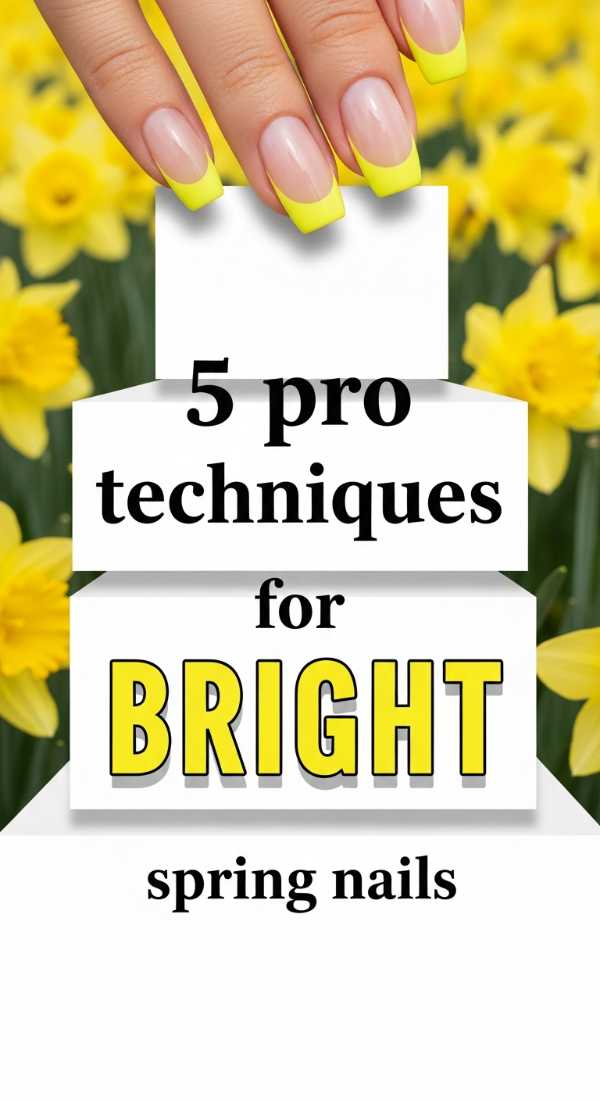
Why to love this Design:
This is for my loves who want that salon-quality finish at home. These techniques ensure your bright colors aren’t just loud, but sophisticated and perfectly executed, like a masterpiece in a gallery.
Essential Elements:
- White base color (for color pop)
- Liquid latex barrier
- Makeup sponge
- Angled clean-up brush
- Acetone
How to Prepare:
- Layer a coat of white polish first to make your bright spring neons truly ‘sing’.
- Use liquid latex around the skin to allow for messy, perfect gradients.
- Use the ‘dab and roll’ method with a sponge for seamless ombre transitions.
- Clean the cuticles with an angled brush dipped in acetone for a sharp edge.
- Apply two layers of top coat for a ‘gel-like’ plumpness.
Budget Range
- Pueen Liquid Latex ($9)
- Butter London ‘Cotton Buds’ ($18)
- Pure Acetone ($5)
8 Creative Paths to Nail Ideas Spring
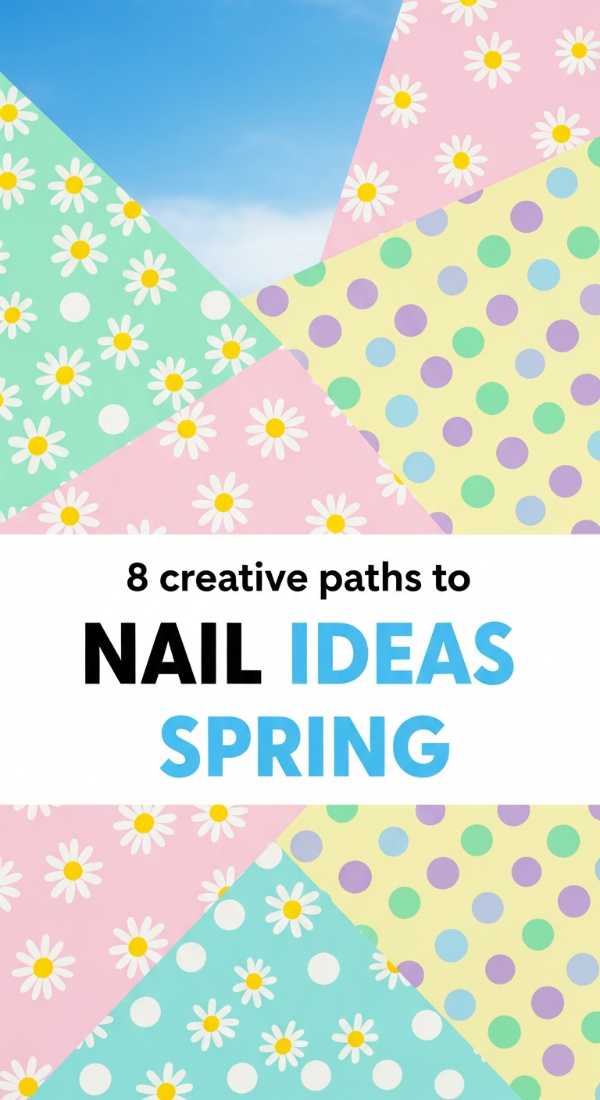
Why to love this Design:
Spring is a journey, not a destination. These creative paths encourage you to experiment with negative space, marble effects, and abstract swirls that mimic the flowing energy of a running brook.
Essential Elements:
- Water marbling cup
- Toothpicks
- Pastel palette
- Gold leaf
- Negative space stickers
- Velvet magnetic polish
- Iridescent flakes
- Matte/Glossy split coat
How to Prepare:
- Try ‘dry marbling’ by swirling drops of polish on a silicone mat first.
- Apply stickers then paint over them to create negative space ‘windows’.
- Use a magnet to pull shimmer into a ‘cat-eye’ spring sky effect.
- Drop polish into water and swirl for a marble dip.
- Mix top coat with a color to create a ‘jelly’ stained-glass look.
- Paint only the tips in alternating pastel shades.
- Add a single ‘statement’ nail with 3D pearls.
- Apply iridescent flakes over a dark sage green.
Budget Range
- Cirque Colors Magnetic Polish ($16)
- Born Pretty Water Marble Tools ($5)
- Lights Lacquer ‘Spring Collection’ ($13/bottle)
2 Essential Habits for Natural Spring Nails
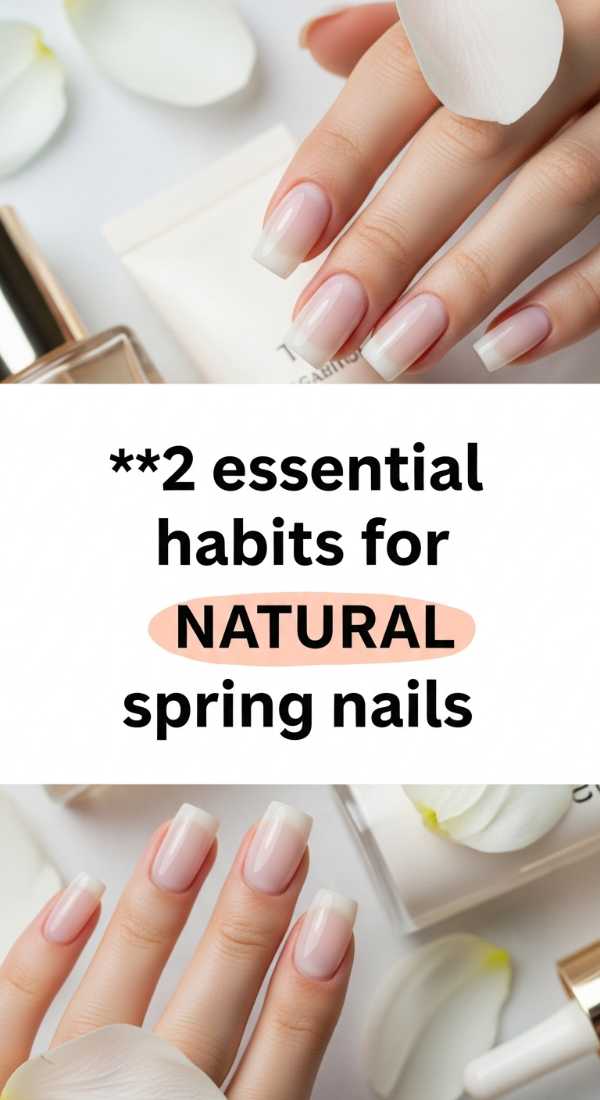
Why to love this Design:
This is the foundation of all beauty. Natural habits create a canvas that doesn’t need hiding. It’s a love letter to your body, ensuring your nails are strong enough to withstand all your spring gardening and adventures.
Essential Elements:
- Jojoba-based cuticle oil
- Silk nail wraps (for repairs)
How to Prepare:
- Apply cuticle oil every single night before bed—massage it in with intention.
- Keep nails at a ‘workable’ length to prevent snapping while your strength rebuilds.
Budget Range
- Bliss Kiss Cuticle Oil Pen ($9)
- Burt’s Bees Lemon Butter Cuticle Cream ($6)
4 Secret Steps to Spring Chrome Nails
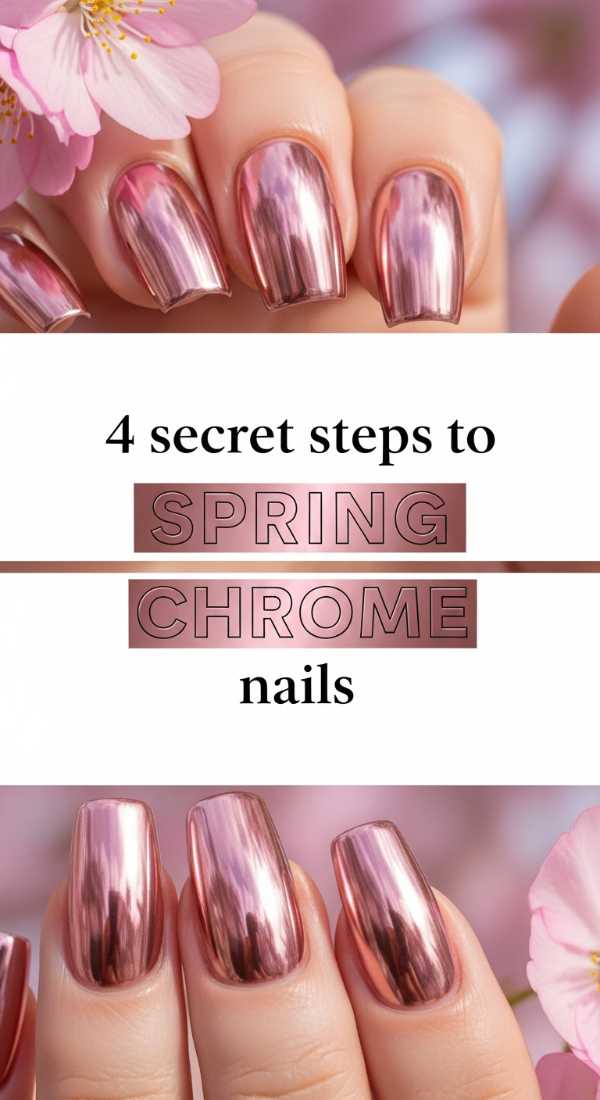
Why to love this Design:
The secret to that ‘glazed donut’ look isn’t just the powder; it’s the layering. It’s a whisper of shimmer that looks like moonlight caught in a bottle. Perfectly subtle for everyday elegance.
Essential Elements:
- Lavender-toned base
- Silicon applicator
- Dusting brush
- Long-wear top coat
How to Prepare:
- Apply a very thin, almost translucent layer of lavender or blue.
- Rub the chrome powder in using a silicone tool—it’s smoother than a sponge.
- Vigorously brush off excess powder with a fluffy brush so it doesn’t ‘glitter’.
- Seal the free edge (the tip) twice to prevent the chrome from peeling.
Budget Range
- Kiara Sky Chrome Powder ($15)
- Sinful Colors ‘Sugar Sugar’ ($3)
- Real Techniques Small Setting Brush ($8)
10 Fun Designs for Spring Nails Fruit
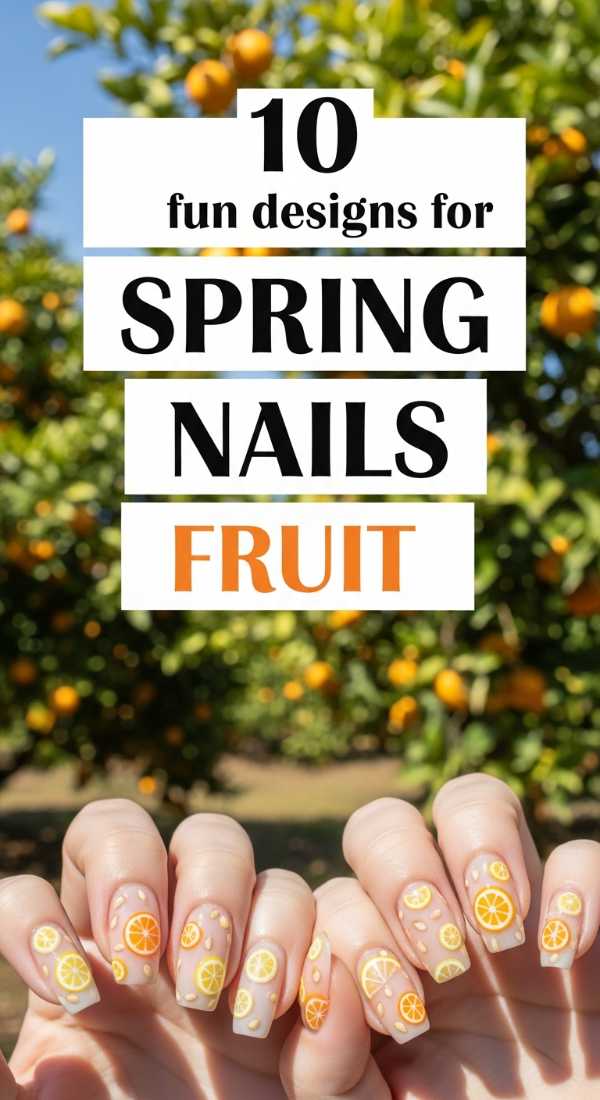
Why to love this Design:
We are going for the full fruit salad! This is the ultimate expression of spring joy. It’s high-energy, conversation-starting, and purely fun. Why choose one fruit when you can have a whole orchard on your hands?
Essential Elements:
- Watermelon pink
- Kiwi green
- Dragonfruit magenta
- Pineapple yellow
- Grape purple
- Peach cream
- Fine detail pens
- Matte green (for rinds)
- Black ‘seed’ polish
- Glossy finish
How to Prepare:
- Assign one fruit to each finger (Thumb: Watermelon, Index: Lemon, etc.).
- Use a matte top coat on the ‘skin’ of the fruit and glossy on the ‘flesh’.
- Create a ‘dripping’ juice effect with clear builder gel.
- Use a white pen to draw the intricate lines of a kiwi center.
- Add ‘pitted’ textures with a needle for oranges.
- Mix peach and cream for a fuzzy texture effect.
- Create a ‘grape bunch’ using various sized purple dots.
- Use a thin line of white between fruit rinds and fruit centers.
- Add tiny ‘dew drops’ with top coat.
- Finish with a citrus-scented oil to match the theme!
Budget Range
- Sally Hansen Insta-Dri Fruit Colors ($6/each)
- Nail Art Pens Set ($12)
- Revlon Scented Top Coat ($8)
Bloom Brightly, My Darlings
As you sit down to paint your nails, I hope you feel a sense of peace. Whether you choose the bold citrus of a fruit design or the quiet grace of a natural glow, remember that this time is for you. Your hands are the tools with which you touch the world—let them be beautiful, let them be colorful, and let them be uniquely yours. Happy spring, loves!
Frequently Asked Questions
Q: How do I make my spring manicure last longer?
A: The secret is in the prep! Always dehydrate the nail with a little alcohol before applying polish, and remember to ‘cap the free edge’ by swiping the brush along the very tip of your nail to lock the color in.
Q: Can I do chrome nails without a UV lamp?
A: Yes! You can use ‘chrome-effect’ polishes, though for the true mirror finish, most powders work best over a gel top coat. However, some brands now offer air-dry ‘tacky’ base coats specifically for powders.
Q: What is the best nail shape for spring 2024?
A: We are seeing a huge return to ‘Squoval’ and ‘Soft Almond’. These shapes look natural and provide a great canvas for both minimalist and intricate art.