
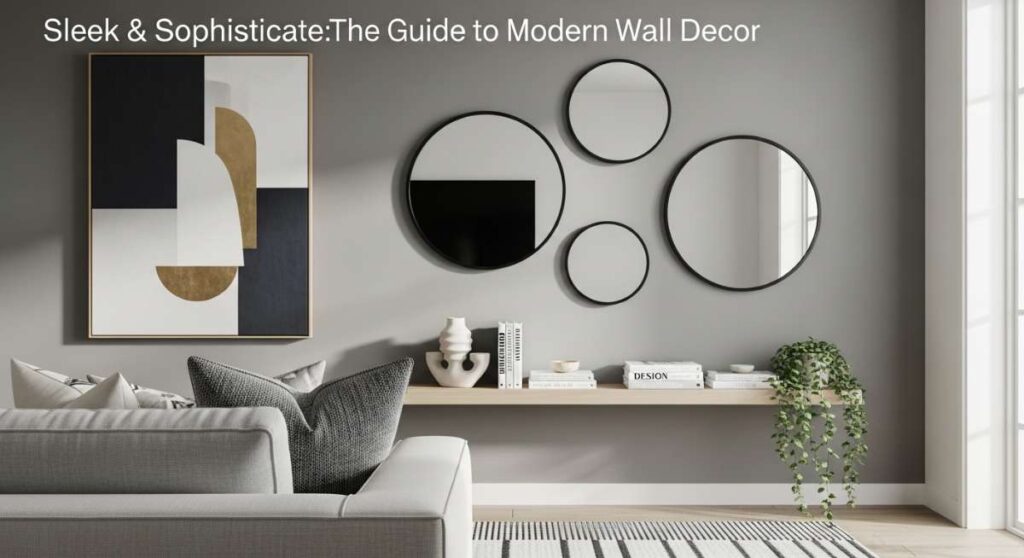
Sleek & Sophisticated: The Ultimate Guide to Modern Wall Decor
There is a profound, quiet magic that happens when you walk into a room that just feels *right*. It isn’t just about the furniture or the rug under your feet; it’s the way the walls whisper a story of who you are and where you’ve been. For the longest time, I treated my walls like an afterthought—just white canvases waiting for a single, lonely frame. But once I realized that our walls are the literal backbone of our home’s soul, everything changed. Creating a sophisticated home isn’t about spending a fortune; it’s about intentionality, texture, and the way light dances across a well-placed accent.
In this guide, I’m pulling back the curtain on how to transform those barren stretches of drywall into breathtaking focal points. Whether you’re craving the earthy scent of a living moss wall or the crisp, urban precision of a floating media display, we’re diving deep into the art of the vertical. Let’s turn your home into a sanctuary that doesn’t just look like a magazine spread, but feels like a warm embrace every time you turn the key in the lock.
How to Create Living Art for Fresher Air
Why we love this
Imagine waking up every morning to a vibrant, breathing tapestry of emerald and sage right in your living room. There is something deeply grounding about bringing the outdoors in; the subtle, earthy aroma of damp soil and the soft rustle of leaves create a sensory experience that no painting can replicate. This living installation doesn’t just look stunning—it actively purifies your air, acting as a natural humidifier that makes the entire room feel crisp, cool, and incredibly alive. It turns a static wall into a shifting, growing masterpiece that evolves with the seasons.
Essential Elements:
- Modular vertical planter trays with built-in irrigation
- High-quality moisture-retentive potting mix
- A variety of low-light indoor plants (Pothos, Philodendron, Ferns)
- A moisture-resistant backing board (PVC or treated wood)
- Level and power drill
- Waterproof sealant
How to make it
- Begin by measuring your desired wall space and installing a waterproof backing board. This is crucial to prevent mold; apply a generous layer of waterproof sealant to the edges where the board meets the wall to ensure a moisture-tight seal.
- Map out your grid for the modular trays. Use a laser level to mark your horizontal lines, ensuring each row is perfectly straight. Drill pilot holes into the wall studs—if you miss the studs, use heavy-duty toggle bolts to support the weight of the water and soil.
- Secure the planter trays from the bottom row upward. Ensure each tray clicks firmly into the one below it, checking the alignment frequently. If your system includes a gravity-fed irrigation line, thread the tubing through the designated channels now, ensuring there are no kinks.
- Prepare your plants by gently loosening the root balls. Place a layer of moisture-retentive soil in each pocket, then tuck the plants in at a 45-degree angle. Pack the soil firmly but don’t crush the roots; you want a snug fit that prevents soil erosion during watering.
- Give the entire wall its first thorough misting. Watch for the ‘run-off’ visual cue; water should slowly trickle down to the bottom collection tray without spilling onto your floors. Adjust the placement of any plants that look ‘sunken’ or loose.
How to Curate Stylish Shared Spaces for Meaningful Connection
Why we love this
The heart of the home is where we gather, and a curated gallery wall acts as the ultimate conversation starter, weaving together memories and aesthetics. We love this approach because it replaces the coldness of a sterile room with the warmth of shared history and curated beauty. The texture of different frame materials—brushed gold, matte black, and natural oak—adds a tactile richness that invites people to linger and look closer. It’s about creating a visual rhythm that guides the eye and settles the spirit, making the space feel both grand and intimately personal.
Essential Elements:
- A cohesive color palette (e.g., black and white photos or warm earth tones)
- An assortment of frames in varying sizes and depths
- Archival-quality matting
- Paper templates of each frame
- Painter’s tape and a spirit level
- Picture hanging hooks rated for various weights
How to make it
- Start by selecting your ‘anchor’ piece—the largest or most striking item. This will be the gravitational center of your arrangement. Lay all your frames out on the floor first to experiment with spacing; aim for a consistent 2-to-3-inch gap between each frame for a professional, balanced look.
- Trace each frame onto kraft paper and cut out templates. Tape these templates to the wall using low-tack painter’s tape. This allows you to visualize the scale and flow without committing to a single nail hole. Step back frequently to check the sightlines from different areas of the room.
- Use a spirit level to ensure every paper template is perfectly horizontal. Mark the exact spot for the nail on the paper template by measuring the distance from the top of the frame to its hanging hardware.
- Hammer your hooks directly through the paper templates. This prevents the wall from scuffing and ensures precision. Once the hook is secure, gently peel the paper away from around the nail.
- Hang your pieces starting from the center and working outward. As you finish, use a tiny dab of adhesive putty on the bottom corners of each frame to keep them from shifting when doors slam or people walk by.
How to Construct Rugged Garden Barriers for Timeless Texture
Why we love this
There is a raw, architectural power in stone that brings an instant sense of permanence and luxury to a landscape. We love these rugged barriers because they play with the contrast between hard, cold stone and the soft, swaying greenery of a garden. The texture is incredibly tactile—the cool touch of granite or the rough porousness of limestone—offering a sensory grounding that modern plastics simply can’t provide. As the sun moves across the sky, the shadows in the stone crevices change, making the wall look like a living, breathing part of the earth itself.
Essential Elements:
- Galvanized steel gabion baskets or stone cladding
- Crushed angular stone or river rock (for filling)
- Leveling gravel for the base
- Landscape fabric to prevent weed growth
- Heavy-duty wire snips and pliers
- Protective gloves and eyewear
How to make it
- Excavate a shallow trench approximately 4-6 inches deep where the barrier will sit. Fill this with a layer of leveling gravel and compact it thoroughly with a hand tamper until it is rock-hard and perfectly level; this prevents the wall from leaning over time.
- Assemble your galvanized wire baskets according to the manufacturer’s instructions. Use pliers to twist the spiral binders or C-rings tightly, ensuring the structure is rigid. Place the empty baskets on your prepared gravel base.
- Line the back of the baskets with landscape fabric if they are being used as a retaining wall. This allows water to drain through the stones while keeping soil from washing into the crevices, which would eventually cause the wall to look muddy.
- Hand-place the ‘face’ stones. Choose the flattest, most attractive stones for the visible front layer, fitting them together like a puzzle to minimize gaps. Pour the remaining filler stone into the center of the basket in stages, ensuring the weight is distributed evenly.
- Close the lid of the basket once it is filled to the brim. Use your wire snips to trim any excess and secure the top tightly. The final visual cue is a wall that looks solid and monolithic, with no bulging wires or loose stones.
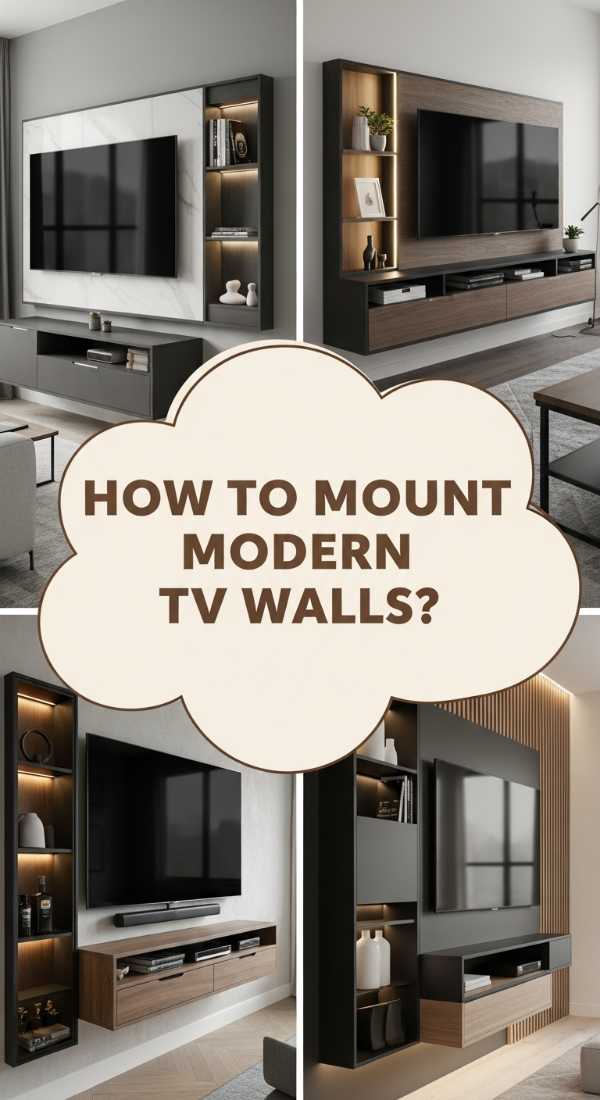
How to Arrange Contemporary Media Units for Streamlined Viewing

Why we love this
In a world of digital clutter, a streamlined media unit is a breath of fresh air for the eyes. We love the way a floating console creates an illusion of more floor space, making even a modest living room feel like a high-end penthouse. The clean lines and hidden cables remove visual noise, allowing you to focus entirely on the cinematic experience. It’s about the marriage of form and function—where the smooth, matte finish of the cabinetry meets the glow of the screen, creating a sophisticated hub for relaxation that feels organized and intentional.
Essential Elements:
- Floating media console or minimalist shelving
- Heavy-duty wall anchors or French cleats
- Cable management sleeves or in-wall cord kits
- Stud finder
- Power drill and long wood screws
- Integrated LED backlighting (optional but recommended)
How to make it
- Locate the wall studs using an electronic stud finder. Mark their centers clearly with a pencil. For a floating unit, you must secure the mounting bracket into at least two studs to handle the weight of the unit and your electronics.
- Hold the mounting bracket or French cleat to the wall at your desired height—typically, the bottom of the unit should sit 10-12 inches off the floor. Use a long level to ensure the bracket is perfectly horizontal before drilling your pilot holes.
- Drive your heavy-duty screws into the studs, securing the bracket. If you are using an in-wall cable management kit, now is the time to cut the holes for the recessed boxes behind the TV and the console. Pull your HDMI and power cables through the wall for a totally ‘cordless’ look.
- Lift the media unit onto the bracket. Most modern units ‘clip’ into place. Once seated, tighten any locking screws provided by the manufacturer. Check the level one last time; even a 1/4 inch tilt will be visible once the TV is mounted above it.
- Apply LED light strips to the back edge of the unit. Position them about 1 inch from the edge so the light reflects softly off the wall rather than creating a harsh ‘hot spot’ of light. This adds a sophisticated ambient glow.
How to Curate Opulent Screen Surroundings for Elite Entertainment
Why we love this
This isn’t just about watching TV; it’s about creating a private theater that rivals the most exclusive lounges. We love the opulence of combining high-contrast textures—like a charcoal slatted wood wall or a polished marble slab—behind a sleek screen. It creates a ‘stage’ for your entertainment, making the TV look like a piece of integrated art rather than a black plastic box. The way the light catches the metallic accents or the deep grain of the wood adds a layer of luxury that makes every movie night feel like a red-carpet event.
Essential Elements:
- Decorative wall panels (slatted wood, 3D tiles, or stone veneer)
- High-strength construction adhesive
- Finish nailer or headless pins
- Articulating or ultra-slim TV wall mount
- Ambient cove lighting strips
- Matte black trim pieces
How to make it
- Prepare the wall by cleaning it with TSP (trisodium phosphate) to remove any oils. If you are using heavy stone veneer, scuff the paint with 80-grit sandpaper to ensure the adhesive creates a permanent bond.
- Install your TV mount first. By mounting the bracket directly to the studs before adding the decorative panels, you ensure the heaviest component is safely anchored. Mark the perimeter of the mount so you can cut your panels to fit around it.
- Apply the decorative panels starting from one bottom corner. If using slatted wood, apply a bead of construction adhesive to the back and use a finish nailer to secure the slats into the drywall. Use a spacer tool to ensure the gap between every slat is identical to the millimeter.
- Carefully cut the panels around your TV mount and any electrical outlets using a jigsaw or miter saw. Use matte black trim or matching edge banding to hide the raw cut edges for a professional, ‘built-in’ appearance.
- Mount the television and connect the ambient lighting. The visual cue for success is a seamless backdrop where the TV appears to ‘float’ within the texture of the wall, with the backlighting highlighting the depth of the panels.
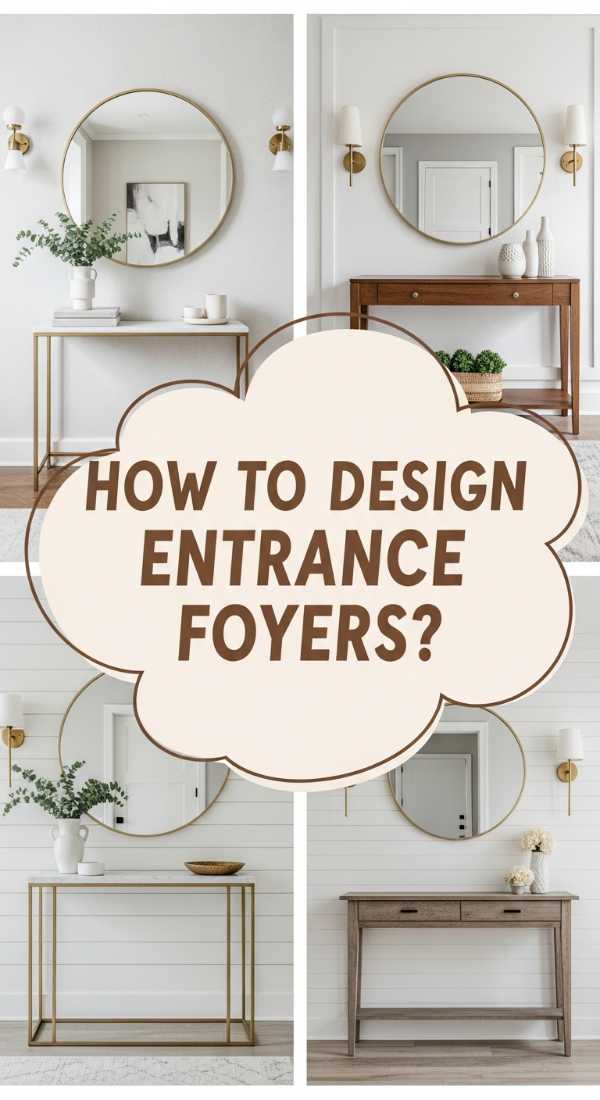
How to Style Inviting Entryway Accents for Warm Welcomes
Why we love this
The entryway is the ‘handshake’ of your home—it sets the tone for everything that follows. We love using wall accents here because they serve as a functional yet beautiful transition from the outside world. Think of the smooth, cool surface of a circular mirror reflecting the soft glow of a nearby lamp, or the tactile warmth of handcrafted wooden pegs holding a linen scarf. It’s a space that should feel airy and organized, instantly lowering the heart rate of anyone who steps through the door and signaling that they are finally home.
Essential Elements:
- Oversized statement mirror (round or arched)
- Sleek wall-mounted coat hooks or a minimalist rail
- Narrow floating ledge or console
- Small decorative tray for ‘EDC’ (Everyday Carry) items
- Warm-toned wall sconce or battery-operated light
How to make it
- Position your statement mirror so that its center is at eye level (roughly 60 inches from the floor). This is the focal point. Ensure it reflects something beautiful—like a piece of art or a window—rather than a cluttered closet. Use heavy-duty D-ring hangers and wall anchors.
- Install a floating ledge about 30-36 inches from the floor. This provides a ‘landing strip’ for keys and mail. Use a level to ensure it’s straight, and secure it into at least one stud if you plan on placing a heavy vase or lamp on it.
- Mount your hooks or rail to the side of the mirror, not directly under it, to avoid a ‘crowded’ look. Space the hooks at least 8 inches apart so that bulky coats don’t overlap and look messy.
- Add a warm-toned light source. If you don’t have a hardwired outlet, use a high-quality rechargeable LED sconce. The light should wash downwards, highlighting the texture of the wall and making the space feel cozy and inviting.
- Style the ledge with a small tray and a single botanical element, like a dried eucalyptus branch. The visual cue here is ‘minimalism’; if the ledge feels cluttered, remove one item until the space feels open and breathable.
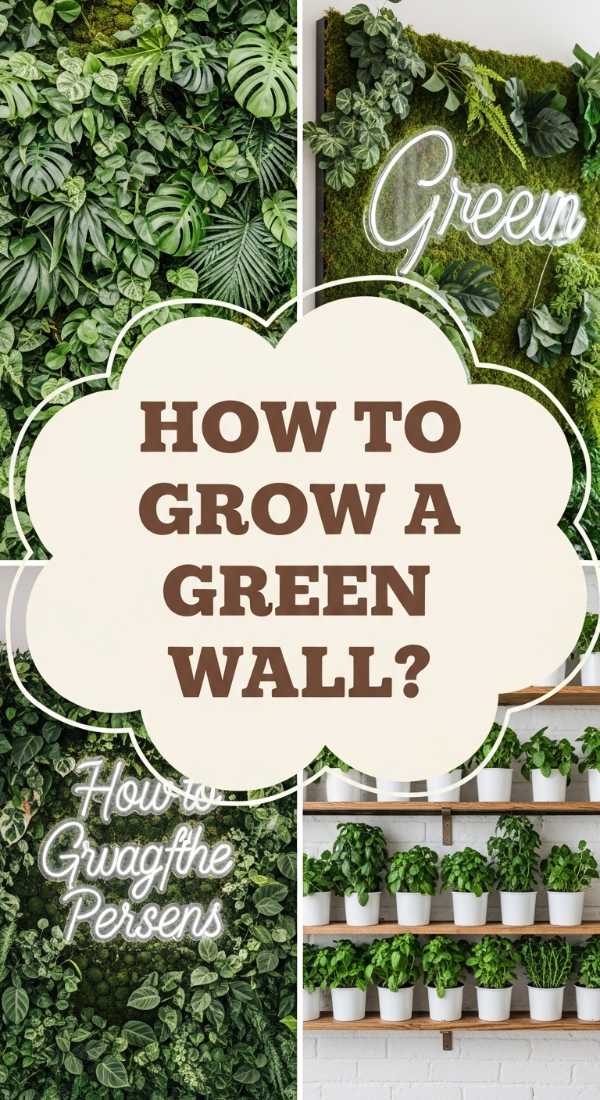
How to Install Verdant Botanical Backdrops for Natural Serenity
Why we love this
There is a unique stillness that comes with a botanical backdrop, especially one crafted from preserved moss or high-end faux foliage. We love this because it offers the visual lushness of a forest floor without the maintenance of a traditional garden. The deep, multi-tonal greens provide a restful focal point for the eyes, which is scientifically proven to reduce stress. It feels like a secret garden hidden within the walls of a modern apartment—a soft, velvet-textured sanctuary that stays vibrant and green regardless of the weather outside.
Essential Elements:
- Preserved Reindeer, Sheet, and Mood moss
- High-density foam or plywood backing panels
- Non-toxic floral adhesive or hot glue gun
- Framing timber (for a ‘shadow box’ effect)
- Assorted dried elements (driftwood, fern fronds, bark)
How to make it
- Construct a shallow wooden frame (a shadow box) to contain your botanical art. Paint the inside of the box a dark forest green or black; this ensures that any tiny gaps in the moss will look like natural shadows rather than bright plywood.
- Lay the frame flat on a work table. This is much easier than trying to glue elements onto a vertical surface. Sort your moss by color and texture, creating small piles of light, medium, and dark greens.
- Apply a generous amount of adhesive to the back of the moss and press it firmly into the frame. Start with your ‘hero’ elements first—like a piece of gnarled driftwood or a large patch of Mood moss—to create a sense of movement across the panel.
- Fill in the remaining gaps with smaller tufts of Reindeer moss. Vary the heights and densities to mimic a natural forest floor; don’t make it too flat. The goal is a rich, 3D texture that catches the light from different angles.
- Allow the adhesive to cure for at least 24 hours while lying flat. When you tilt it upright, gently shake the panel; if any pieces fall off, re-apply adhesive. Mount it to the wall using a French cleat to support the weight of the frame and the dense moss.
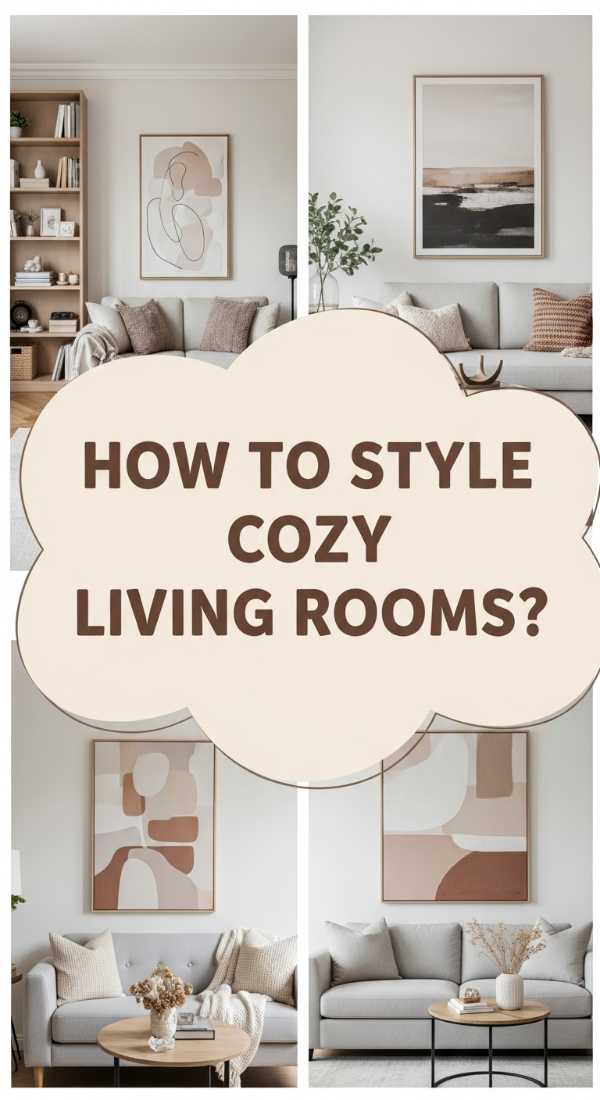
How to Perfect Communal Interior Walls for Visual Harmony
Why we love this
In open-concept homes, the communal walls are the thread that pulls disparate zones together. We love the challenge of creating visual harmony through symmetry and scale. By using oversized triptychs or perfectly aligned architectural moldings, you can define a ‘dining zone’ or a ‘lounging zone’ without the need for physical barriers. It creates a sense of rhythmic calm—a visual ‘exhale’ that makes the entire home feel more expansive and cohesive. It’s about the elegance of repetition and the power of a well-balanced silhouette.
Essential Elements:
- Oversized triptych art (three matching panels)
- Wall molding kits or picture rail
- Laser level for precision alignment
- Neutral, high-pigment wall paint
- Adhesive shims (to keep frames flat)
How to make it
- Identify the central axis of the wall. If the wall is behind a dining table, the center of the art must align with the center of the table, not necessarily the center of the wall. Use a laser level to project a vertical line.
- If installing molding, measure and mark your rectangles with light pencil lines. Apply a bead of wood glue to the back of the molding strips and use a pin nailer to secure them. The key is the ‘miter’ at the corners; they must be a perfect 45 degrees with no visible gaps.
- Fill any nail holes with wood filler and sand smooth once dry. Paint the molding the same color as the wall for a sophisticated, ‘architectural’ look, or a contrasting shade for a bolder statement.
- When hanging triptych art, ensure the spacing between the panels is exactly 2 inches. Even a half-inch discrepancy will break the visual harmony. Use two hooks per frame to prevent them from tilting over time.
- Check the ‘horizon’ of the pieces. All three frames must have their top edges perfectly aligned. The visual cue for harmony is when the grouping looks like one single, massive architectural element rather than three separate pieces.
How to Craft Polished Television Displays for Urban Apartments

Why we love this
In tight urban spaces, every square inch has to work overtime. We love this approach because it turns a bulky television into a polished, intentional design feature rather than a space-hogging necessity. By using dark, moody paint colors or clever ‘Frame’ style TVs that display art when off, you can make the tech disappear into the decor. It’s about achieving that high-end, ‘curated’ look in a small footprint, proving that you don’t need a sprawling mansion to have a home that feels sophisticated and expensive.
Essential Elements:
- ‘The Frame’ style TV or a slim-profile mount
- Dark accent paint (Navy, Charcoal, or Forest Green)
- Floating shelf (same width as the TV)
- Recessed cable box
- Minimalist soundbar with wall-mount bracket
How to make it
- Paint the ‘TV zone’ a dark, matte color. This creates a ‘black hole’ effect that allows the screen to blend in seamlessly when it’s turned off, rather than standing out as a stark black rectangle on a white wall.
- Install an ultra-slim wall mount. For urban apartments, every inch of depth matters; look for a mount that allows the TV to sit less than an inch from the wall. Ensure the center of the screen is at seated eye level (usually about 42 inches from the floor).
- Mount a floating shelf approximately 4-6 inches below the TV. This shelf should be the exact same width as the TV or slightly wider to provide visual ‘weight’ and grounding. This is where you can place a single, high-quality decorative object to soften the tech.
- Use an in-wall power bridge to hide all cables. In an apartment, you can’t always fish wires through the studs, so use paintable D-line trunking if necessary, painting it the exact same color as your accent wall.
- Configure the TV’s ‘Art Mode’ to display a high-resolution oil painting or sketch. Adjust the brightness and warmth of the screen to match the ambient light in the room; the visual cue is that the screen should look like paper, not a glowing monitor.
How to Design Grand Hallway Features for Memorable Arrivals
[IMAGE_10]
Why we love this
Hallways are often the most neglected parts of a home, but they have the potential to be the most dramatic. We love grand hallway features because they transform a ‘passageway’ into a ‘destination.’ Whether it’s a series of oversized portraits or a bold, textured wallpaper, these features create a sense of rhythm and momentum as you move through the house. It’s about making a lasting impression on guests and providing a daily sense of wonder as you navigate your own home—a reminder that beauty exists in every corner.
Essential Elements:
- Large-scale art or high-contrast wallpaper
- Picture lights (brass or matte black)
- Decorative wall plinths or corbels
- Long, narrow runner rug to complement the wall
- High-quality wallpaper paste and smoothing tools
How to make it
- If using wallpaper, start in the center of the hallway and work your way out. This ensures the pattern is symmetrical on both ends of the hall. Apply the paste evenly with a roller, ensuring no ‘dry spots’ which lead to bubbles later.
- Smooth the paper from the center outward using a plastic smoother. Pay extra attention to the seams; they should be butt-jointed (touching but not overlapping) for a seamless, high-end look.
- Install ‘over-picture’ lights. Even if you don’t have hardwiring, battery-operated LED picture lights can be mounted to the top of your frames. This creates a ‘museum’ effect that makes the hallway feel grand and expensive.
- Space your art or features at regular intervals. In a long hallway, use the ‘rule of three’ or ‘rule of five’—odd numbers are more pleasing to the eye and create a natural sense of movement.
- Add architectural interest with wall corbels or a thin picture rail at the 3/4 mark of the wall height. This breaks up the vertical space and adds a layer of ‘old world’ sophistication to a modern home. The final visual cue is a hallway that feels like a curated gallery rather than just a way to get from room to room.
Conclusion
Wall decor is so much more than just filling a void; it’s about creating an atmosphere that nurtures your soul. From the vibrant life of a vertical garden to the sleek precision of a modern media unit, each choice you make is a brushstroke on the canvas of your life. Don’t be afraid to experiment, to mix textures, and to let your personality shine through. Your home is your sanctuary—make sure every wall tells a story worth hearing. Happy decorating!