

From Cap to Claw: Top 2026 Graduation Nail Trends You Need to See
Oh, my loves, can you feel that shift in the air? It’s that bittersweet, beautiful hum of a chapter closing and a whole new world waiting just beyond the stage. Graduation isn’t just about the diploma; it’s about the person you’ve become while chasing it. I remember sitting in those heavy wooden chairs, my heart racing, looking down at my hands and feeling a surge of quiet confidence because even my fingertips felt ready for the future.
As we look toward the class of 2026, the trends are leaning into that exact feeling—a soft, ethereal glow mixed with bold, unapologetic statements of self. We are moving away from the basic and stepping into ‘The Era of You.’ Whether you’re walking across that stage in a classic black gown or something vibrant and custom, your nails are that final, shimmering period at the end of a very long, very beautiful sentence.
So, grab a cup of tea, wrap yourself in your favorite blanket, and let’s dream up your perfect graduation look together. From the softest aura blends to the zestiest summer vibes, here is your ultimate guide to the nails that will make those ‘handing over the degree’ photos absolutely iconic.
5 Simple Steps for College Graduation Nails

Why to love this Design:
This look is all about timeless elegance with a collegiate twist. It honors your hard work while keeping things sophisticated enough for those first professional interviews right after the ceremony.
Essential Elements:
- School-specific primary color
- Translucent nude base
- Gold or silver foil accents
- Ultra-glossy top coat
How to Prepare:
- Shape your nails into a soft almond to elongate the fingers for photos.
- Apply a sheer nude base to keep the growth line invisible.
- Use a fine liner brush to add a ‘French tip’ in your school’s main color.
- Apply a single fleck of gold leaf to the ring finger for that ‘honor society’ sparkle.
- Seal with a thick gel-effect top coat for maximum durability.
Budget Range
- Essie ‘Limo-Scene’ Nude – $10
- Beetles School Color Gel Set – $15
- Gold Foil Flakes (Amazon) – $6
7 Easy Ways to Style May Birthday Nails
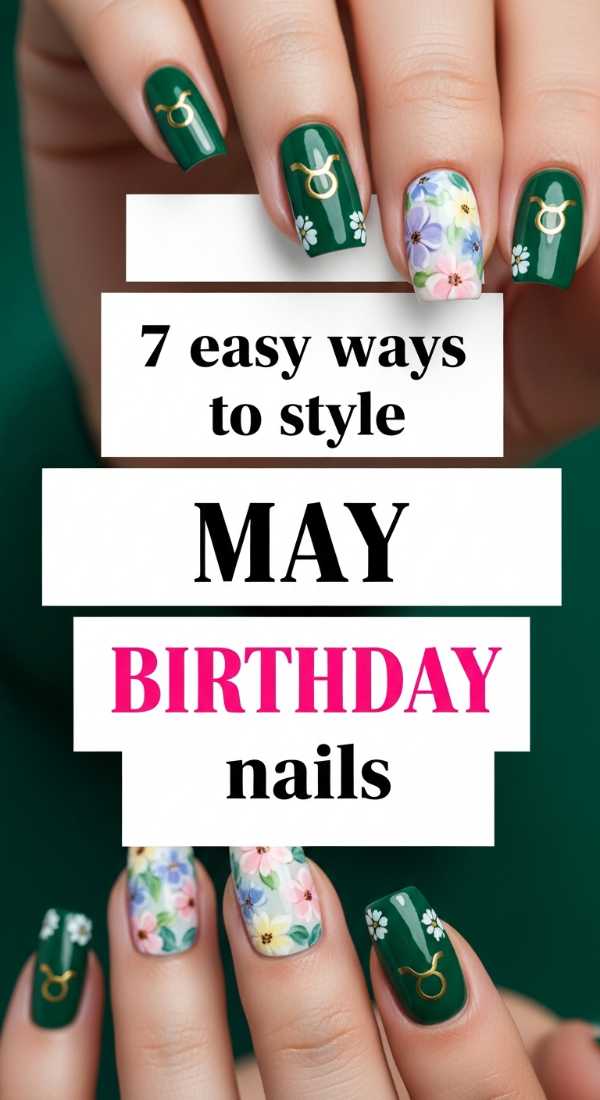
Why to love this Design:
For my May babies, your graduation is a double celebration! These designs bridge the gap between ‘I graduated’ and ‘It’s my party,’ featuring the lush, botanical vibes of late spring.
Essential Elements:
- Emerald green (May birthstone)
- Lily of the valley decals
- Pearlescent finishes
- Soft mossy textures
How to Prepare:
- Start with a clean, buffed nail bed for a natural look.
- Paint three fingers in a deep, rich emerald green.
- Use a ‘milky white’ polish on the remaining fingers.
- Apply delicate floral stickers to the white nails.
- Add a tiny pearl stud at the base of the thumb.
- Use a matte top coat on the green nails for a velvet effect.
- Finish with a cuticle oil that smells like fresh rain.
Budget Range
- Zoya Emerald Polish – $12
- Floral Nail Decals – $5
- Nail Art Pearls – $7
6 Quick Steps to Achieve Sunset Aura Nails
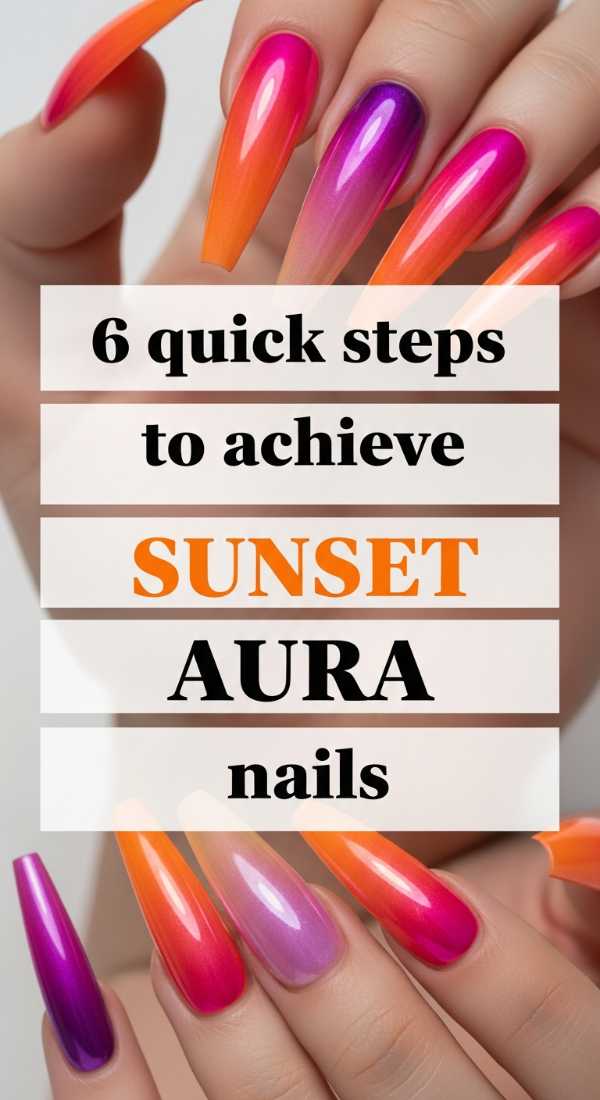
Why to love this Design:
Aura nails are the ultimate ‘vibe’ for 2026. They represent your energy and the glowing horizon of your future. The sunset palette is particularly warm and inviting.
Essential Elements:
- Makeup sponge for blending
- Hot pink, orange, and soft yellow polishes
- White polish for the base
- High-gloss finish
How to Prepare:
- Apply two coats of solid white to make the colors pop.
- Dab a small circle of orange onto a makeup sponge.
- Surround the orange with a ring of hot pink on the sponge.
- Gently press the sponge onto the center of the nail, repeating for depth.
- Softly blend the edges with a clean corner of the sponge.
- Apply a quick-dry top coat to smooth out the texture instantly.
Budget Range
- OPI ‘Big Apple Red’ and ‘Sun, Sea and Sand’ – $22
- Wedge Makeup Sponges – $4
- Seche Vite Top Coat – $9
4 Fun Ways to Create Lemon Nails Designs

Why to love this Design:
When life gives you lemons, you graduate! This design is incredibly cheerful, perfect for those outdoor June ceremonies where the sun is shining as bright as your smile.
Essential Elements:
- Bright canary yellow
- Crisp white
- Leaf green for accents
- Dotting tool
How to Prepare:
- Paint your base in a soft, creamy white.
- Use a dotting tool to create two yellow semi-circles side-by-side.
- Take a fine brush and add a tiny green ‘v’ at the top for leaves.
- Add a few ‘pips’ of white inside the yellow for dimension.
Budget Range
- Sally Hansen ‘Mellow Yellow’ – $7
- Nail Art Brushes – $8
- White Striper Pen – $6
8 Steps to Master Summer Goth Nails
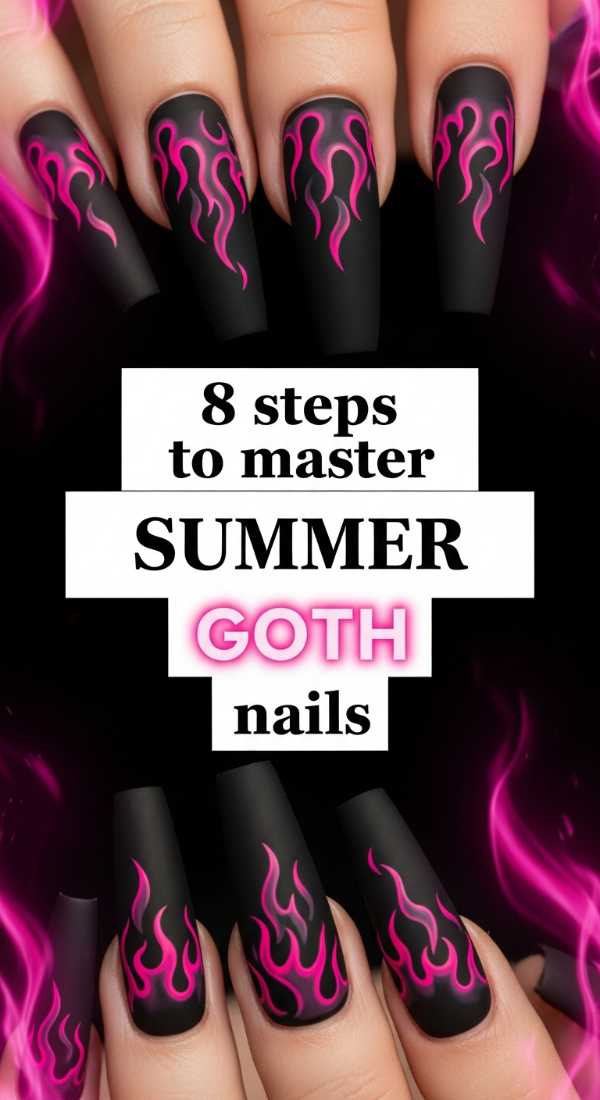
Why to love this Design:
Who says you can’t be edgy in the heat? Summer goth is for the graduate who loves a bit of mystery and wants to stand out against the sea of pastels.
Essential Elements:
- Sheer black ‘stocking’ polish
- Chrome silver stars
- Opaque black
- Pointed stiletto shape
How to Prepare:
- File nails into a sharp stiletto or coffin shape.
- Apply one very thin coat of black mixed with clear base (the ‘jelly’ look).
- Paint the tips opaque black for a ‘shadow French.’
- Use a silver chrome pen to draw tiny four-pointed stars.
- Add a small silver stud at the cuticle of the middle finger.
- Apply a second layer of jelly black over the stars for a ‘trapped’ look.
- Clean the edges with an acetone-dipped brush.
- Finish with a ‘glass-look’ top coat.
Budget Range
- Cirque Colors ‘Rose Jelly’ (Black) – $14
- Chrome Nail Pen – $10
- Stiletto Nail Tips – $12
3 Tips for Perfect Neon Yellow Nails Designs
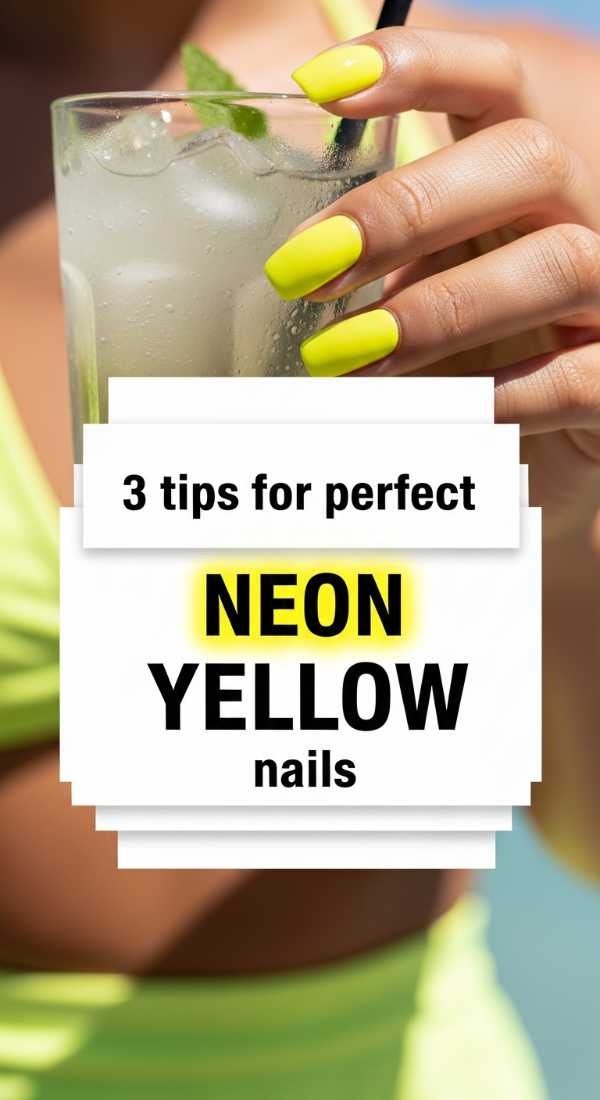
Why to love this Design:
Neon yellow is the ultimate ‘look at me’ color. It’s high-energy, sporty, and looks incredible against a graduation gown of any color.
Essential Elements:
- White base coat (crucial for neon!)
- Neon pigment or polish
- Matte or gloss finish
How to Prepare:
- Always apply a bright white base coat first; neons are translucent and need the white to glow.
- Apply the neon in three very thin layers rather than one thick one to avoid bubbles.
- Pair with a matte top coat to make the neon look more ‘modern’ and less ‘highlighter.’
Budget Range
- Orly Neon Heat Collection – $15
- White Undercoat – $8
- Matte Finish Top Coat – $10
5 Ideas to Mix Teal and Coral Nails
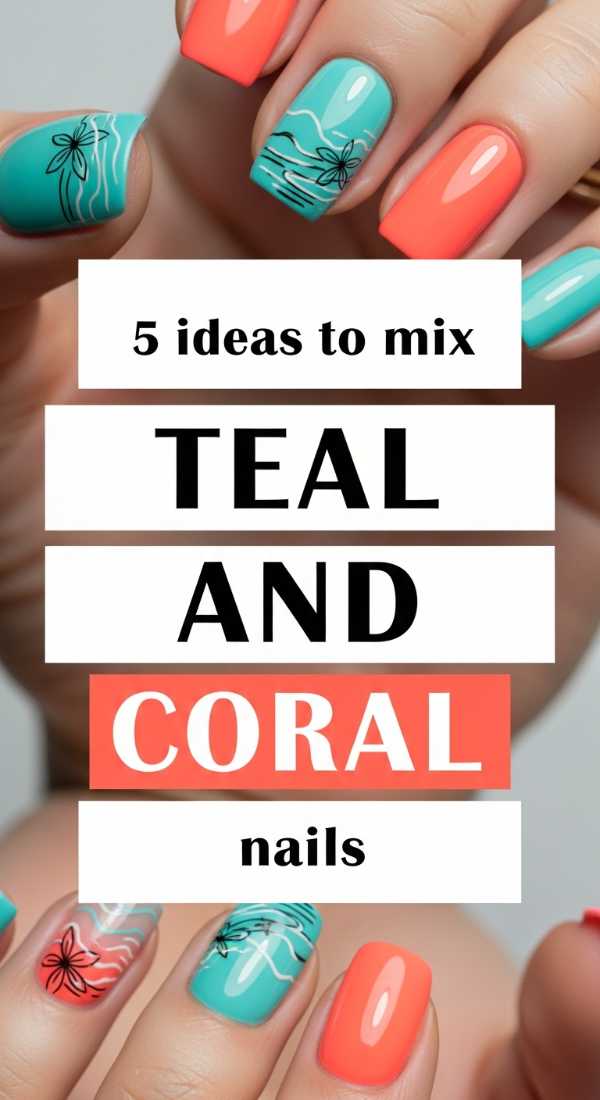
Why to love this Design:
This is the quintessential ‘Vacation Mode: Activated’ look. It’s perfect for the grad who is hopping on a plane to a tropical beach the second the ceremony is over.
Essential Elements:
- Tropical teal
- Creamy coral
- Gold striping tape
- Abstract shapes
How to Prepare:
- Paint alternating nails in teal and coral for a high-contrast look.
- On the ‘feature’ nail, paint a diagonal split of both colors.
- Cover the seam with a piece of gold striping tape.
- Add a single matte coral dot on the teal nails for a ‘pop art’ feel.
- Seal with a UV-protectant top coat to prevent fading in the sun.
Budget Range
- Holo Taco Teal/Coral Duo – $26
- Gold Striping Tape – $4
- Sun-Shield Top Coat – $12
9 Steps to Paint Retro Pucci Nails
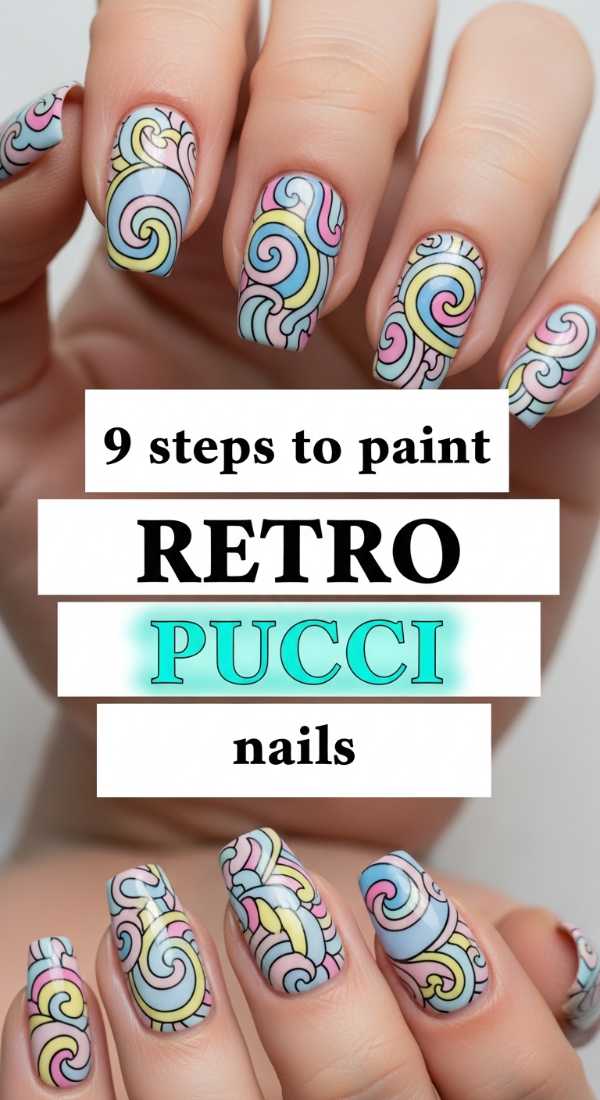
Why to love this Design:
Inspired by the 60s and 70s, Pucci prints are sophisticated, artistic, and incredibly high-fashion. It’s for the graduate heading straight into a creative career.
Essential Elements:
- Pastel lavender, mint, and peach
- Black detail liner
- Abstract swirling patterns
- Patience!
How to Prepare:
- Start with a clean nude base.
- Apply a large ‘blob’ of mint green in one corner.
- Add a peach ‘blob’ that slightly overlaps the mint.
- Fill in the gaps with lavender.
- Use a very fine black liner brush to outline each color ‘blob.’
- Add thin, wavy lines within the colors to create movement.
- Add a few white ‘highlight’ lines to mimic silk fabric.
- Ensure all layers are dry before top coating to avoid smearing the black.
- Finish with a high-shine gel topper.
Budget Range
- Pastel Polish Bundle – $20
- Detail Liner Brush Set – $10
- Precision Acetone Pot – $8
4 Ways to Match Hands and Toes Nails
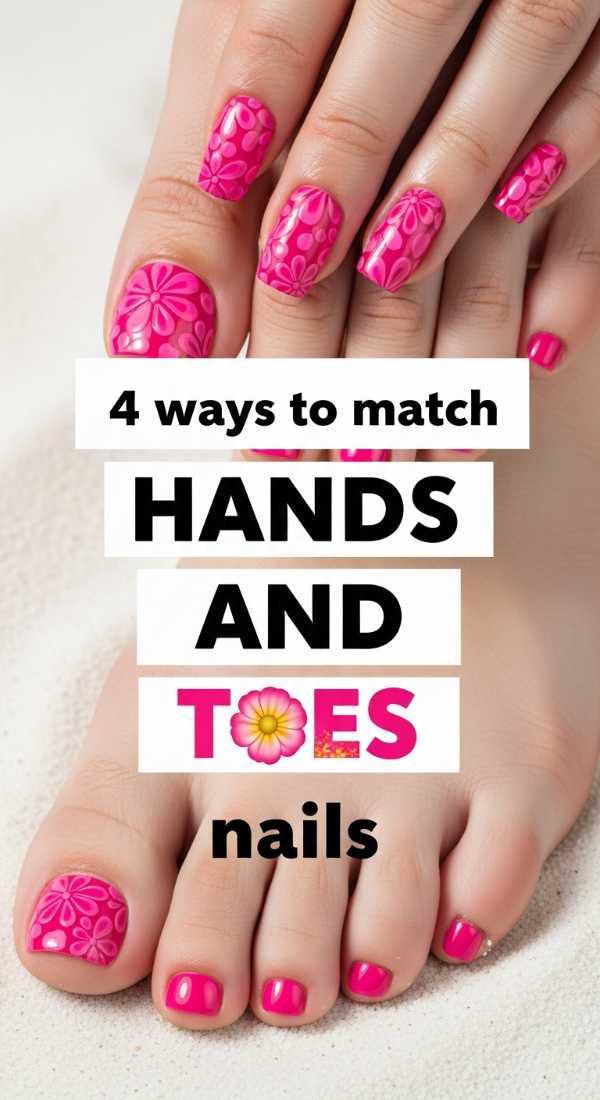
Why to love this Design:
There is nothing more satisfying than a coordinated mani-pedi. For graduation, you want to look polished from head to toe (literally!).
Essential Elements:
- Matching color palette
- Differing textures (one matte, one gloss)
- Shared accent motif
- Long-lasting formula
How to Prepare:
- Use the same ‘hero’ color on both fingers and toes for a cohesive look.
- Apply a glitter version of the color on the toes to handle the wear-and-tear of sandals.
- Keep the fingers simple with a solid cream finish in the same shade.
- Add a tiny rhinestone on the big toe and the pinky finger to link them.
Budget Range
- Matching Polish & Glitter Set – $18
- Rhinestone Kit – $9
- Pumice Stone/Pedicure Kit – $15
6 Steps to Get Viral Sunset Chrome Nails
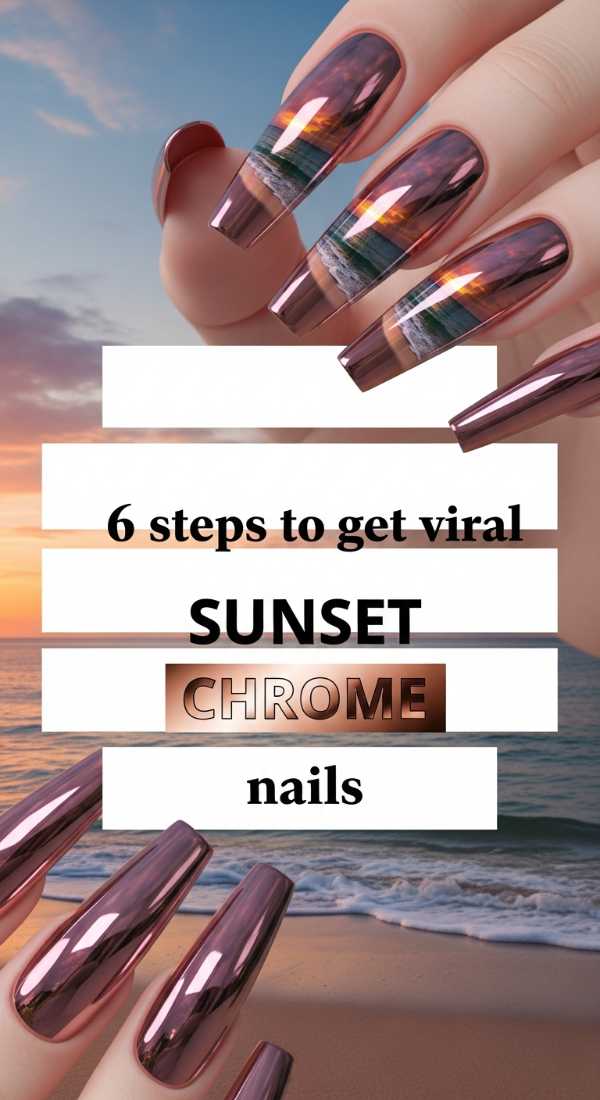
Why to love this Design:
This is the trend of the year. It combines the warmth of a sunset with the futuristic glow of chrome. It’s mesmerizing when you’re holding your diploma!
Essential Elements:
- Orange/Pink ombre base
- Pearlescent chrome powder
- No-wipe top coat
- Eyeshadow applicator
How to Prepare:
- Create a soft ombre from orange to pink using a sponge.
- Apply a ‘no-wipe’ top coat and cure/dry until just slightly tacky.
- Use an eyeshadow applicator to rub pearl chrome powder over the entire nail.
- Buff until it shines like a mirror.
- Dust off excess powder with a soft brush.
- Seal with a final layer of high-gloss top coat to lock in the chrome.
Budget Range
- Pearl Chrome Powder – $12
- No-Wipe Gel Top Coat – $14
- Ombre Sponges – $5
Congratulations, Class of 2026!
My loves, as you prepare to walk across that stage, remember that these nails are just the icing on the cake of your incredible achievements. Whether you chose a subtle glow or a neon shout, I hope every time you look at your hands, you’re reminded of how hard you worked and how bright your future truly is. You’ve got this, and you’re going to look absolutely stunning doing it. Go out there and change the world, one beautiful step at a time!