
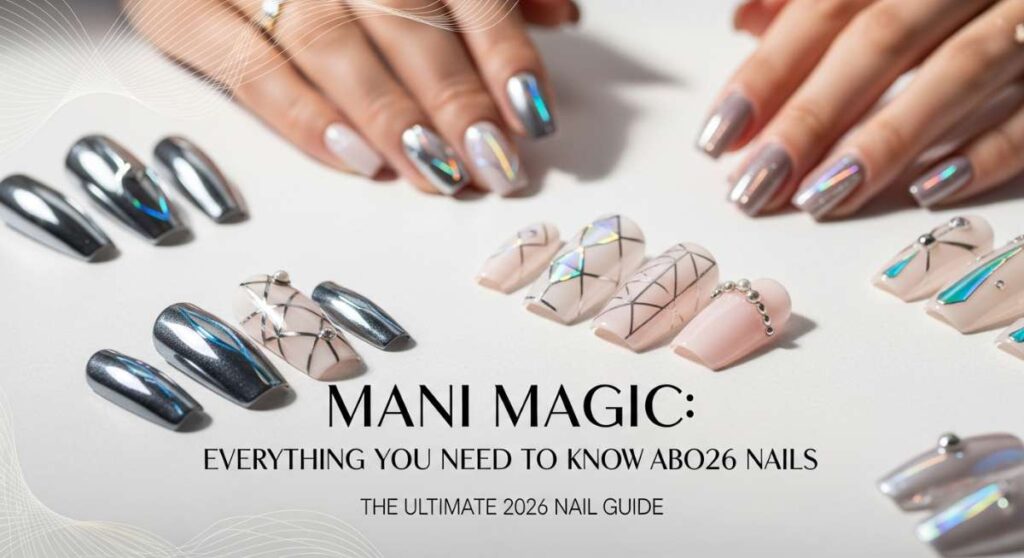
Mani Magic: Everything You Need to Know About 2026 Nails
Hello, my sweet loves! There is something so profoundly healing about sitting down, taking a deep breath, and letting your hands be transformed. As we step into 2026, I’ve been thinking so much about how our nails aren’t just a fashion choice—they are a gentle whisper of our inner world, a soft canvas where we paint our dreams, our milestones, and our moods.
I’ve spent the last few weeks exploring the trends that are making my heart flutter this year, and I am so excited to share this cloud-soft embrace of a guide with you. Whether you are celebrating a massive life win or just want to feel a little more ‘you’ during your morning coffee, these designs are here to hold your hand—literally. Let’s dive into the magic together, shall we?
The Ultimate 2026 College Graduation Nails

Why to love this Design:
Oh, my darling graduate, this is your moment! You’ve worked so hard, and these nails are like a tiny, sparkling standing ovation for your soul. They balance the sophistication of your new journey with the soft joy of accomplishment.
Essential Elements:
- Sheer ‘milky’ base coat
- Delicate gold leaf flakes
- Micro-pearl accents
- A subtle ‘2026’ accent nail
How to Prepare:
- Gently push back cuticles for a clean, professional look.
- Apply a strengthening base coat to protect your natural nails.
- Paint two thin layers of sheer milky white or soft nude.
- Using tweezers, place gold leaf near the cuticle of your ring finger.
- Add a single micro-pearl to your index finger for elegance.
- Seal everything with a high-shine, long-lasting top coat.
- Apply cuticle oil daily to keep that ‘walking across the stage’ glow.
Budget Range
- OPI Soft Shades Nail Lacquer ($11)
- Nail Art Gold Leaf Set ($6)
- Essie Gel Setter Top Coat ($10)
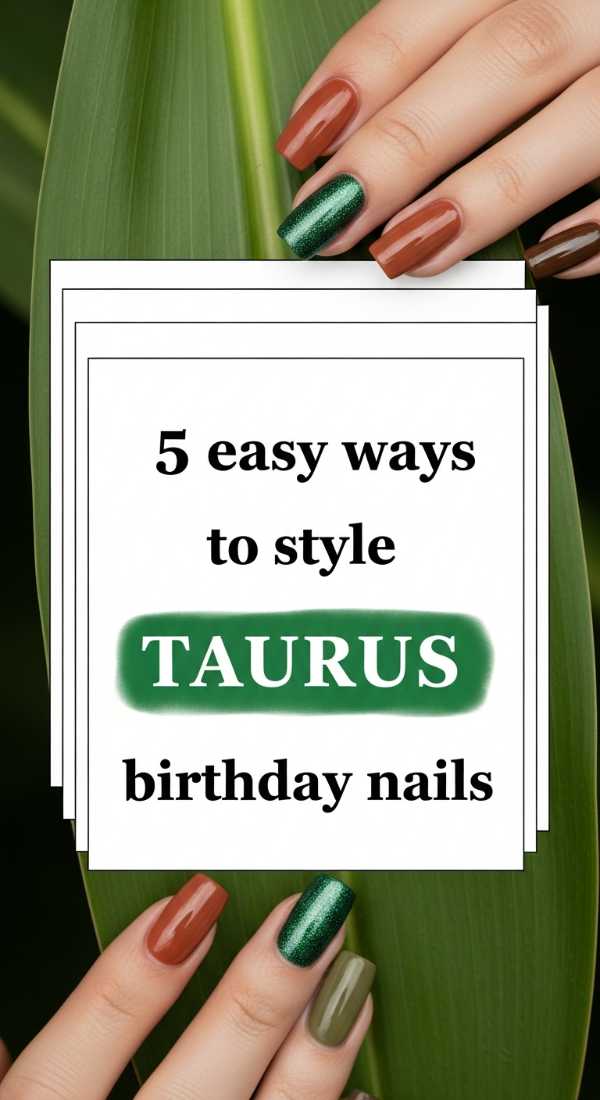
Taurus Birthday Nails: Earthy Elegance
Why to love this Design:
For my grounded, luxury-loving Taurus queens, this look is all about texture and the soothing energy of the earth. It feels like a warm hug from nature, reminding you to stay rooted while you bloom.
Essential Elements:
- Deep forest green hues
- Velvet magnetic finish
- Pressed flower decals
- Matte and gloss contrasts
How to Prepare:
- Choose a rich, mossy green as your primary color.
- Apply magnetic ‘velvet’ polish to create depth and movement.
- Use a matte top coat on the middle finger for a stone-like texture.
- Carefully place a tiny pressed daisy on the pinky for a touch of whimsy.
- Finish with a hydrating hand mask to honor the Taurus love for self-care.
Budget Range
- Holo Taco Magnetic Polish ($14)
- Pressed Flower Nail Stickers ($5)
- Zoya Professional Lacquer in ‘Danica’ ($12)
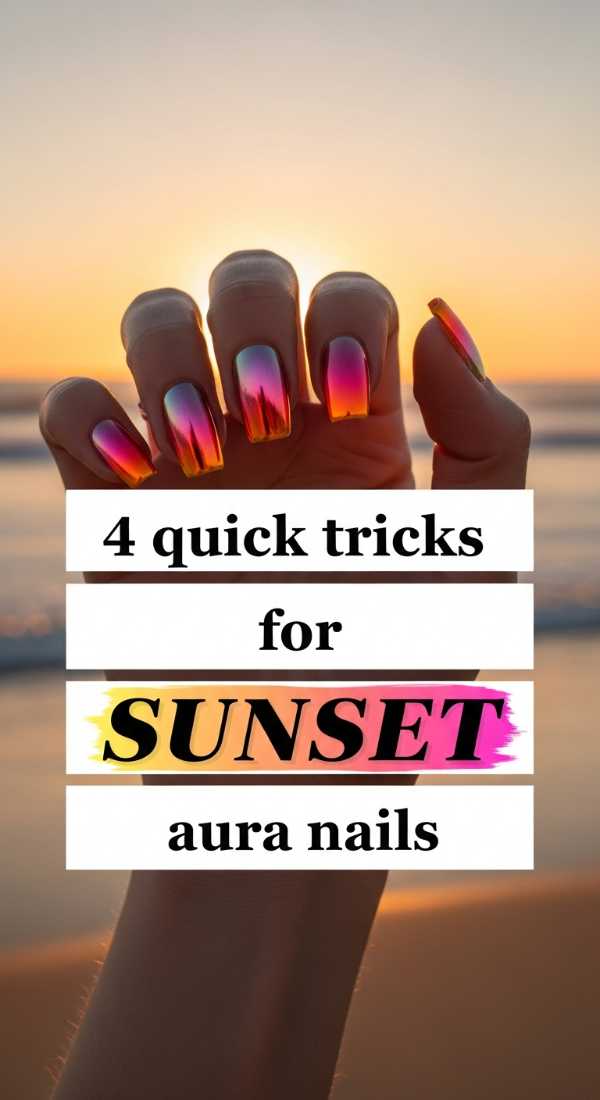
Sunset Aura Nails: A Quick Dreamscape
Why to love this Design:
These nails feel like that perfect moment when the sun kisses the horizon and everything turns into a soft pink and orange glow. It’s pure, unadulterated peace in a manicure.
Essential Elements:
- Airbrushed gradient effect
- Soft peach and lilac tones
- Center-focused ‘aura’ glow
- Ultra-glossy finish
How to Prepare:
- Sponge a soft peach color onto the center of a dry lilac base.
- Lightly blend the edges with a clean makeup sponge for a seamless transition.
- Add a tiny iridescent flake in the very center of the ‘aura’ for sparkle.
- Apply two layers of clear top coat to give it that ‘glassy’ sunset look.
Budget Range
- Essie ‘Solis Resurface’ Peach ($9)
- Sally Hansen ‘Lilac Cloud’ ($7)
- Makeup Sponges for Blending ($3)
Mastering Lemon Nail Designs

Why to love this Design:
Sweet friends, there is nothing quite as cheerful as lemon nails! They are like a sip of cold lemonade on a porch swing—bright, zesty, and full of sunshine energy that is absolutely contagious.
Essential Elements:
- Vibrant lemon yellow
- Crisp white details
- Tiny green leaf accents
- Clear 3D ‘juice’ droplets
How to Prepare:
- Start with a clean, clear or soft white base.
- Use a dotting tool to create two yellow circles side-by-side for the fruit body.
- Take a fine liner brush and add a tiny white ‘highlight’ to each lemon.
- Dab a single speck of green for the leaf at the top.
- Use a thick builder gel to create a tiny 3D ‘water droplet’ on the fruit.
- Finish with a UV lamp to cure and set your citrus masterpiece.
Budget Range
- Modelones Gel Polish in ‘Lemonade’ ($8)
- Nail Art Liner Brushes ($7)
- IBD Builder Gel ($15)
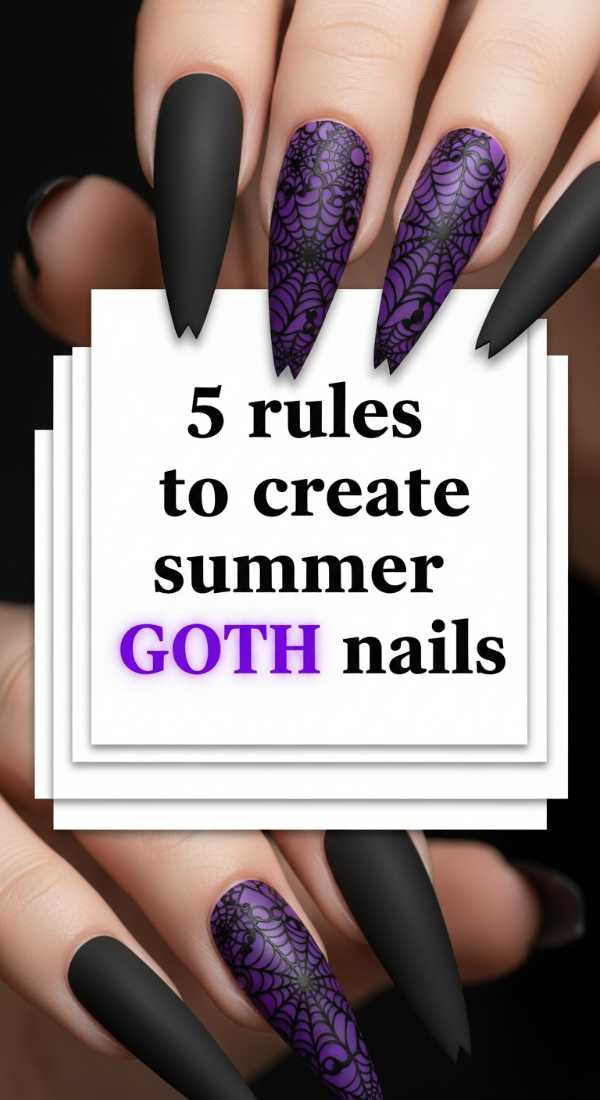
The 5 Rules of Summer Goth Nails
Why to love this Design:
Who says we can’t be moody in the sunshine? Summer goth is for the loves who embrace the shadows even when it’s 90 degrees out. It’s edgy, mysterious, and incredibly chic.
Essential Elements:
- Sheer black ‘veil’ polish
- Chrome silver hardware details
- Star and moon motifs
- Pointed stiletto shape
How to Prepare:
- Rule 1: Always start with a sheer black base; it keeps the look light enough for summer.
- Rule 2: Incorporate negative space to let the nail ‘breathe’ visually.
- Rule 3: Use silver chrome powder for a metallic, futuristic edge.
- Rule 4: Keep the length long but the shape sharp to maintain the goth aesthetic.
- Rule 5: Pair with a matte top coat on at least two nails for textural contrast.
Budget Range
- Cirque Colors ‘Spotted’ Black ($12)
- Silver Chrome Nail Powder ($9)
- Kiss Salon Acrylic Stiletto Tips ($8)
3 Ways to Match Your Hands and Toes
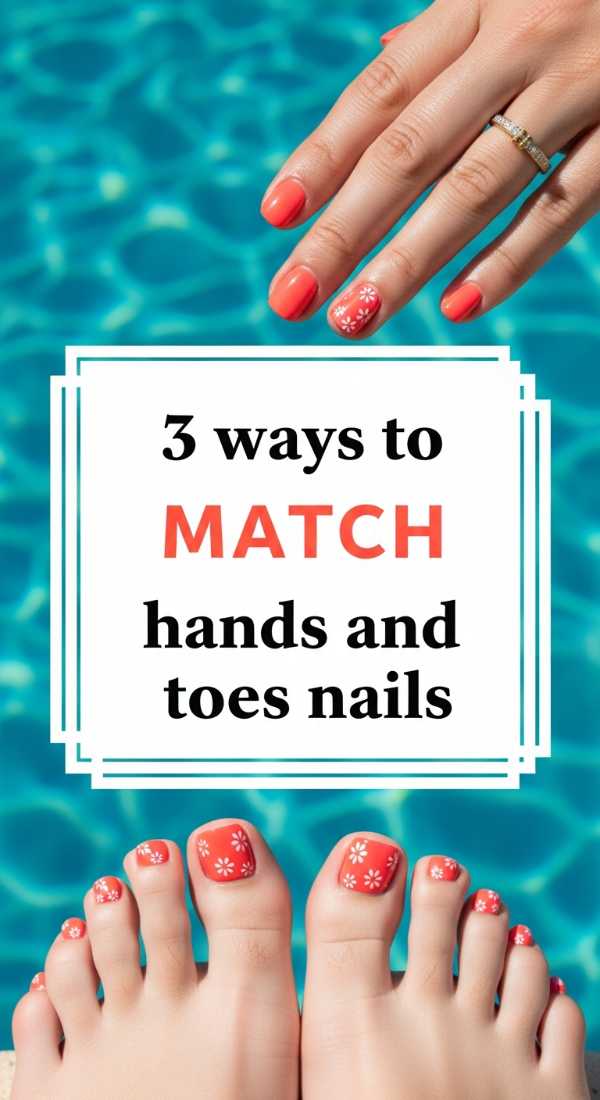
Why to love this Design:
There is a special kind of harmony when your mani and pedi sing the same song. It makes you feel so put together, like your whole life is in beautiful alignment.
Essential Elements:
- Complementary color palettes
- Consistent finish (all matte or all gloss)
- Matching accent charms
How to Prepare:
- The ‘Exact Match’: Use the same shade on both for a classic, high-fashion look.
- The ‘Inverted Look’: If your hands are white with blue tips, make your toes blue with white tips.
- The ‘Texture Link’: Use a glitter topper on your ring fingers and your big toes only.
Budget Range
- Revlon Super Lustrous Polish Duo ($12)
- Olive & June Mani-Pedi System ($50)
- Beetles Gel Polish Set ($20)
8 Steps to Retro Pucci-Inspired Nails

Why to love this Design:
Oh, the 70s vibes! These nails are a vintage dream. The swirling patterns and bold colors feel like a luxury scarf flowing in the wind. It’s sophisticated yet so incredibly fun.
Essential Elements:
- Abstract swirling lines
- Pastel pink, orange, and teal combo
- Thin black outlines
- High-gloss finish
How to Prepare:
- Apply a solid base color of creamy white.
- Using a long striping brush, paint an ‘S’ shape in pastel pink.
- Follow the curve of the ‘S’ with a parallel line of orange.
- Add a teal geometric block in the corner of the nail.
- Fill in any remaining white spaces with a soft lavender.
- Use a very fine liner brush and black paint to outline every shape precisely.
- Clean up the edges with an acetone-dipped brush for sharpness.
- Seal with a thick layer of top coat to level out the different polish layers.
Budget Range
- Orly Pastel Collection ($15)
- Long Striping Nail Brush ($6)
- Gelish Top It Off ($13)
4 Easy Steps for Neon Cheetah Print
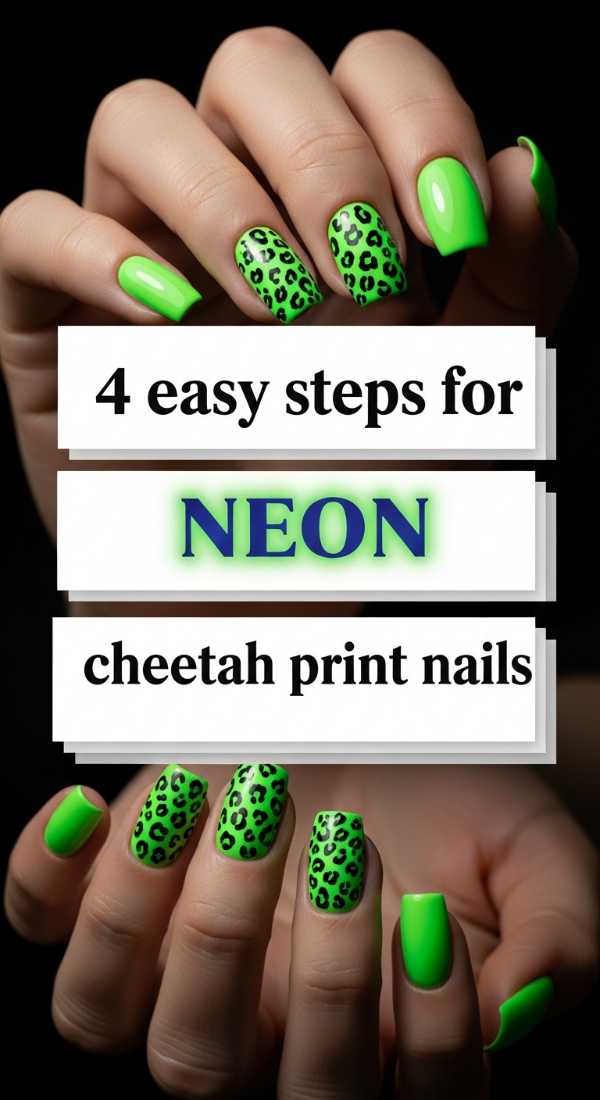
Why to love this Design:
Bring out your wild side, loves! Neon cheetah is for the days when you feel bold and unstoppable. It’s a loud, proud celebration of your vibrant personality.
Essential Elements:
- Neon pink or lime green base
- Chocolate brown ‘spots’
- Black ‘c-curve’ outlines
- Glow-in-the-dark top coat
How to Prepare:
- Paint two coats of your brightest neon polish.
- Dab irregular brown blobs across the nail with a dotting tool.
- Enclose the blobs with two black ‘C’ shapes that don’t quite touch.
- Add a few small black dots in the empty spaces to fill out the pattern.
Budget Range
- China Glaze Electric Nights Set ($18)
- Dotting Tool Kit ($5)
- Kupa High Gloss Top Coat ($12)
5 Tips to Blend Teal and Coral Nails
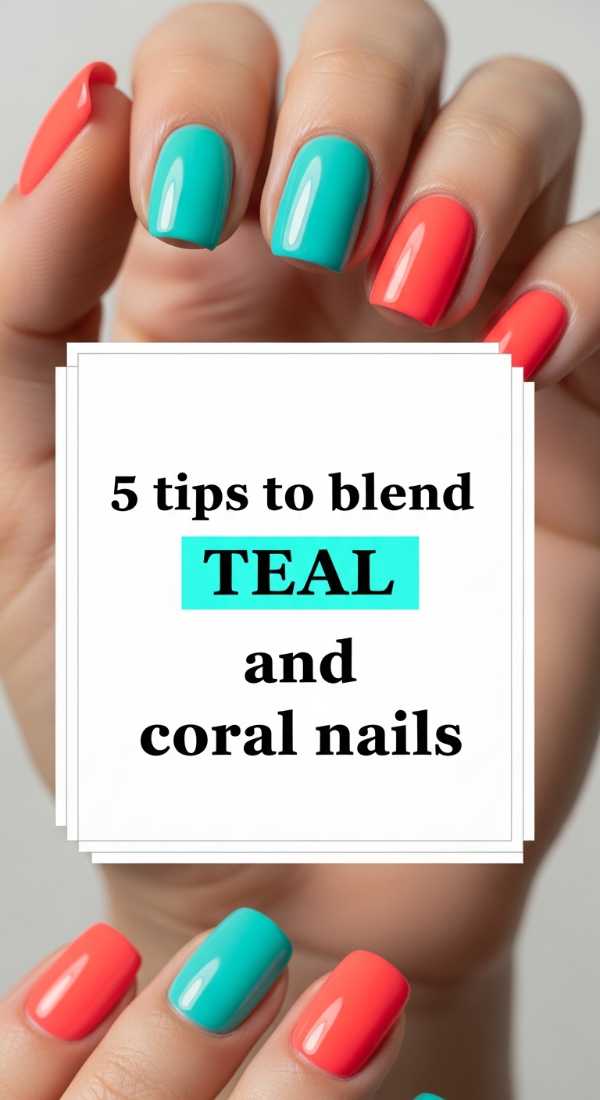
Why to love this Design:
Teal and coral are the ultimate soulmates of the color wheel. This combination feels like a tropical vacation, balancing the cool depth of the ocean with the warmth of a reef.
Essential Elements:
- Turquoise teal
- Soft coral pink
- Gold divider tape
- Marble blending technique
How to Prepare:
- Tip 1: Use a ‘dry brush’ technique to layer teal over coral for a textured look.
- Tip 2: Apply teal on one half and coral on the other, separated by a gold stripe.
- Tip 3: Create a marble effect by swirling the two colors together while wet.
- Tip 4: Keep the teal more dominant on the thumb and the coral on the pinky.
- Tip 5: Use a pearl top coat to soften the transition between these two bold colors.
Budget Range
- Butter London ‘Teal’ ($18)
- Essie ‘Tart Deco’ Coral ($9)
- Gold Nail Striping Tape ($4)
6 Ways to Rock Morgan Wallen Inspired Nails

Why to love this Design:
For my country-loving darlings, this is all about that ‘7 summers’ vibe. It’s rustic, a little bit ‘whiskey glasses,’ and perfectly aesthetic for a night under the stars or a stadium concert.
Essential Elements:
- Denim blue textures
- Cowboy boot decals
- Flannel plaid patterns
- Silver glitter ‘stardust’
How to Prepare:
- Way 1: Paint a denim blue base and use a dry brush with white for a ‘faded jeans’ look.
- Way 2: Add a tiny silver guitar silhouette on your thumb.
- Way 3: Use a stamping plate to create a red and black flannel pattern.
- Way 4: Write ‘7’ on one nail in a vintage font.
- Way 5: Apply a ‘sand’ textured polish for a rustic, earthy feel.
- Way 6: Finish with a chunky silver glitter to represent the stage lights.
Budget Range
- ILNP Denim Blue Holographic ($12)
- Country Theme Stamping Plate ($10)
- OPI ‘Textured’ Sand Polish ($11)
Closing Thoughts for my Loves
As you head out to your favorite salon or pull out your kit at home, remember that these nails are just an extension of the beautiful person you already are. 2026 is a year for bravery, for softness, and for choosing the colors that make your soul sing. I hope this guide helps you find your magic. Stay beautiful, stay kind, and keep those hands looking as lovely as your hearts!