
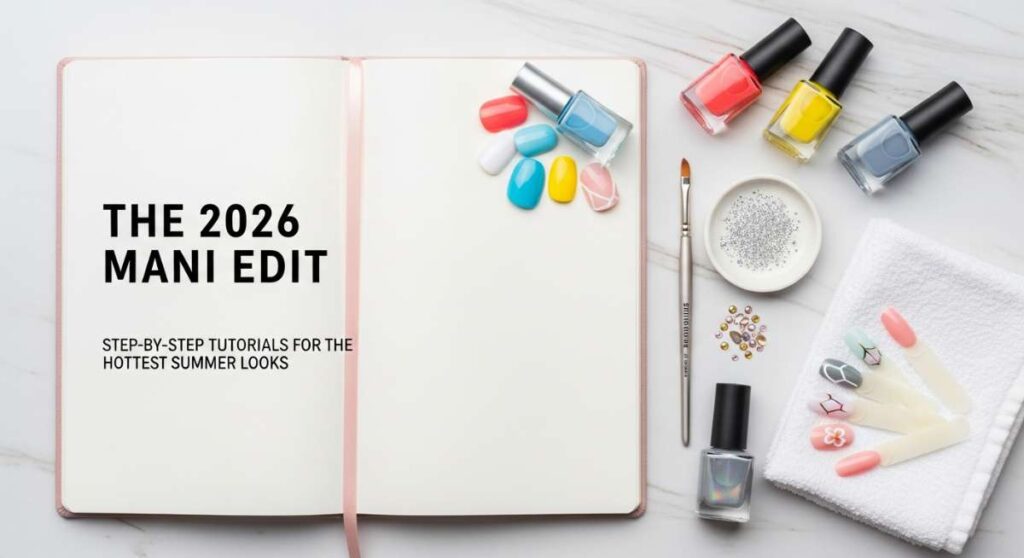
The 2026 Mani Edit: Step-by-Step Tutorials for the Hottest Summer Looks
Hello, my beautiful loves! Can you feel it? The air is finally carrying that golden, honey-sweet warmth that can only mean one thing: Summer 2026 is officially here. It’s the season of sun-drenched afternoons, spontaneous road trips, and finding joy in the smallest details. For me, there is nothing quite like the ritual of sitting down with a fresh palette of colors, a chilled glass of sparkling water, and giving my hands the love they deserve. Our nails are like little canvases that carry our mood wherever we go, and this season, the vibes are all about expression and soft, radiant energy.
I’ve spent the last few weeks experimenting with the dreamiest textures and brightest pigments to curate this guide just for you. Whether you’re celebrating a milestone, lounging by the shore, or just want to feel a bit more ‘put together’ while grabbing your morning iced latte, these looks are designed to be your summer companions. Think of this as a soft embrace for your creative soul—let’s dive into the trends that are making my heart flutter this year.
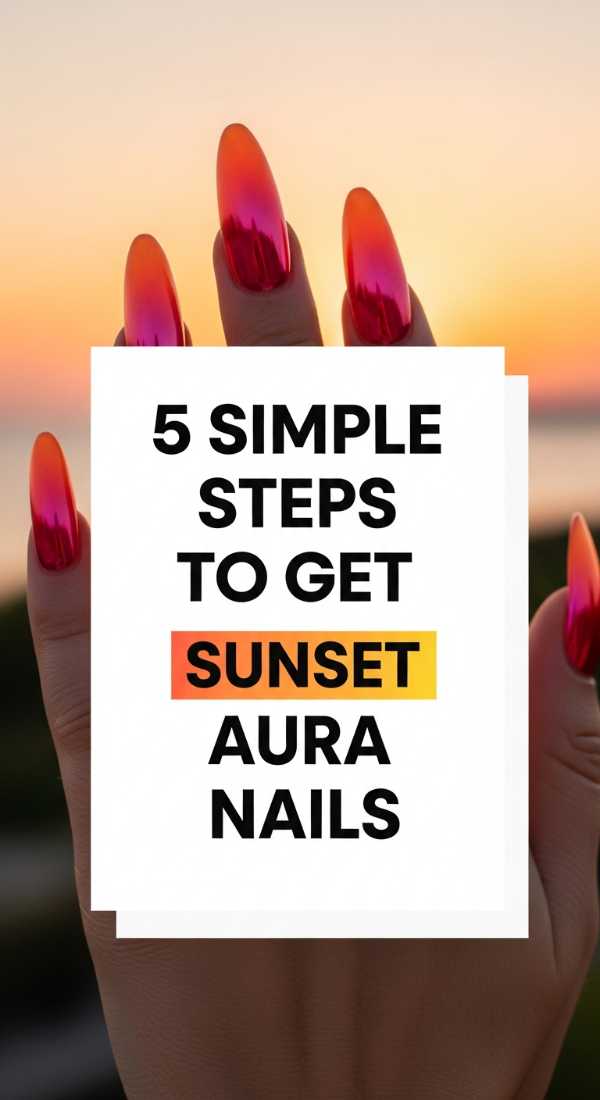
Sunset Aura Nails
Why to love this Design:
There is something truly magical about capturing the transition of the sky on your fingertips. Sunset aura nails use a soft, diffused gradient that mimics the hazy glow of a July evening. It’s ethereal, romantic, and looks absolutely stunning when the light hits it just right during golden hour.
Essential Elements:
- Sheer peach base polish
- Vibrant orange and soft pink pigment powders
- A tiny sponge or eyeshadow applicator
- High-gloss top coat
How to Prepare:
- Apply two coats of a sheer peach base and let dry completely.
- Using a sponge, dab a small circle of orange pigment in the center of the nail.
- Blend a ring of soft pink pigment around the orange, feathering the edges outward.
- Gently dust off any excess powder with a fluffy brush.
- Seal the design with a thick layer of high-gloss top coat to create that ‘lit-from-within’ glow.
Budget Range
- OPI Infinite Shine in ‘Data Peach’ – $14
- Daily Charme Aura Pigment Set – $22
- Seche Vite Dry Fast Top Coat – $9
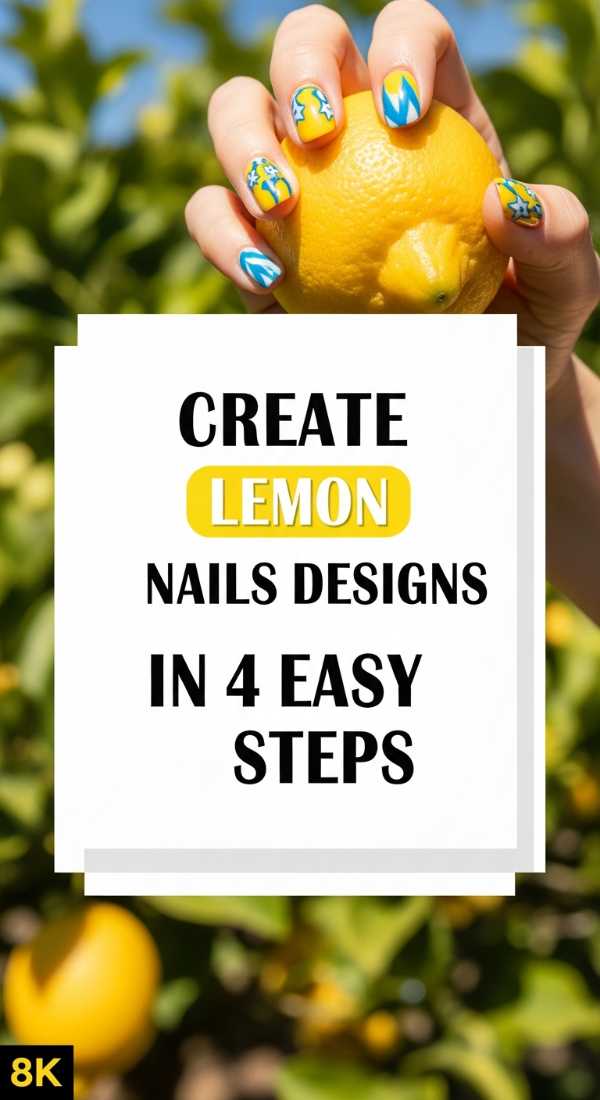
Zesty Lemon Designs
Why to love this Design:
Lemon nails are like a cold glass of lemonade for your soul—bright, refreshing, and undeniably cheerful. This look is perfect for the loves who want a pop of color that feels crisp and clean against a summer tan. It’s a playful nod to Mediterranean summers and citrus groves.
Essential Elements:
- Opaque white polish
- Primary yellow liner gel or polish
- Fine detail brush
- Matte or glossy finish
How to Prepare:
- Paint your nails with two coats of crisp white to make the yellow pop.
- Using a fine brush, draw two semi-circles (the lemon slices) at the base or tip of the nail.
- Add tiny white ‘pulp’ lines and a few green dots for leaves.
- Protect your art with a long-wearing top coat once the detail work is dry.
Budget Range
- Essie ‘Blanc’ – $10
- Holler and Glow ‘Yellow Submarine’ – $8
- Winstonia Fine Detail Brush Set – $12
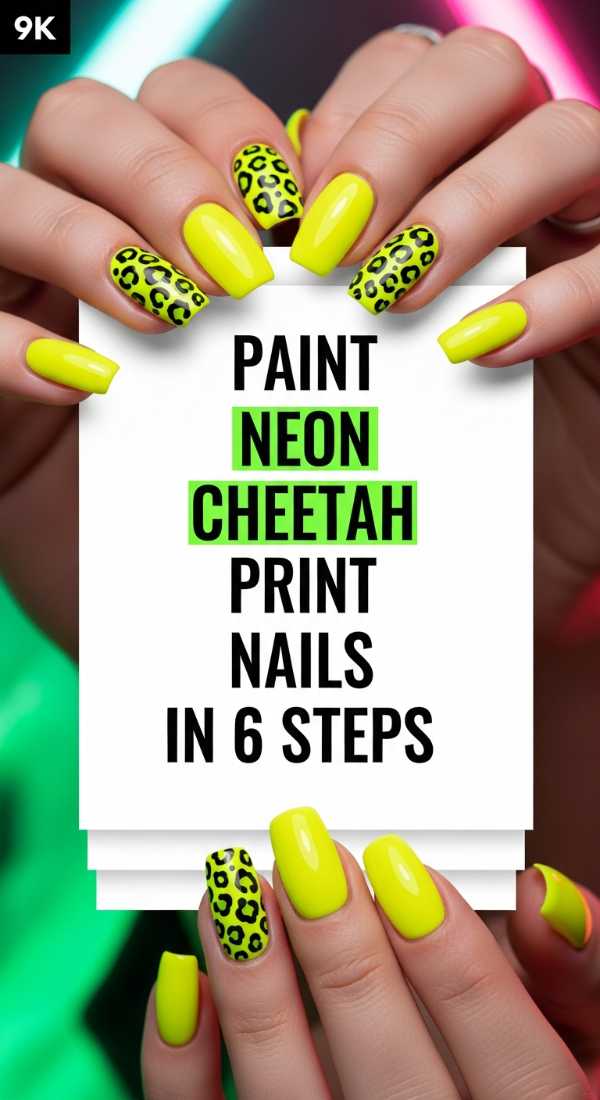
Neon Cheetah Print
Why to love this Design:
For my bold loves who want to roar this season, neon cheetah is the ultimate high-energy vibe. We’re taking a classic animal print and electrifying it with 2026’s favorite neon hues. It’s fierce, fun, and makes a massive statement at every summer festival.
Essential Elements:
- Neon lime or pink base
- Black nail art pen or liner
- Metallic gold or contrasting neon for the spots
- Steady hand or dotting tool
How to Prepare:
- Prep with a neon lime base for maximum impact.
- Place irregular ‘blobs’ of metallic gold or a contrasting neon pink across the nail.
- Use your black liner to partially outline the blobs with two or three ‘C’ shapes.
- Add a few tiny black dots in the empty spaces to fill out the print.
- Wait five minutes to ensure the black ink is set.
- Finish with a smudge-free top coat.
Budget Range
- Orly Retrowave Neon Collection – $15
- Sally Hansen Insta-Dri Black – $7
- Nail Art Dotting Tool Kit – $6
Teal and Coral Fusion
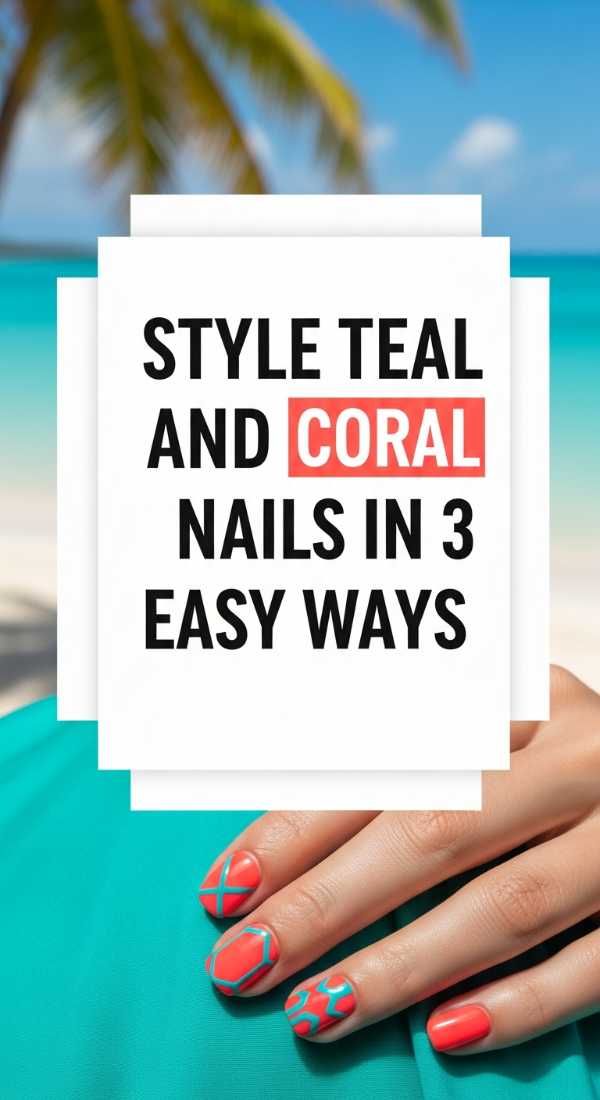
Why to love this Design:
Teal and coral are the soulmates of the color wheel. This combination feels like a tropical vacation in a bottle—balancing the coolness of the ocean with the warmth of a reef. It’s a sophisticated way to wear bright colors without feeling too ‘neon.’
Essential Elements:
- Deep teal cream polish
- Vibrant coral cream polish
- Gold foil flakes
How to Prepare:
- Style 1: Paint alternating fingers teal and coral for a simple, chic look.
- Style 2: Try a diagonal half-and-half split, using a striping tape for a clean line between the two colors.
- Style 3: Apply a teal base and use a sponge to ‘cloud’ coral onto the tips, then press gold foil onto the transition line for a luxury finish.
Budget Range
- Zoya ‘Cecilia’ (Teal) – $12
- Essie ‘Coral Coast’ – $10
- Gold Leaf Nail Flakes – $5
College Graduation Elegance

Why to love this Design:
Graduation is such a beautiful milestone, and your hands will be holding that diploma for a lifetime of photos. This look focuses on ‘Your Nails But Better’—sophisticated, clean, and timeless with just a hint of celebratory sparkle to mark the occasion.
Essential Elements:
- Neutral nude polish matching your skin tone
- Ultra-fine silver or white glitter
- Nail strengthener
- Buffing block
How to Prepare:
- Start by shaping nails into a soft almond or square-oval.
- Buff the surface for a perfectly smooth canvas.
- Apply a strengthening base coat to prevent wedding-day/grad-day breaks.
- Apply two coats of your perfect nude.
- Add a ‘micro-french’ tip using the ultra-fine silver glitter.
- Apply a second coat of top coat for extra durability.
- Massage cuticle oil in for that healthy, photo-ready glow.
Budget Range
- Olive & June ‘BEB’ Nude – $9
- CND RescueRXx Treatment – $20
- Holo Taco ‘Silver Flake’ – $11
Summer Goth Minimalism
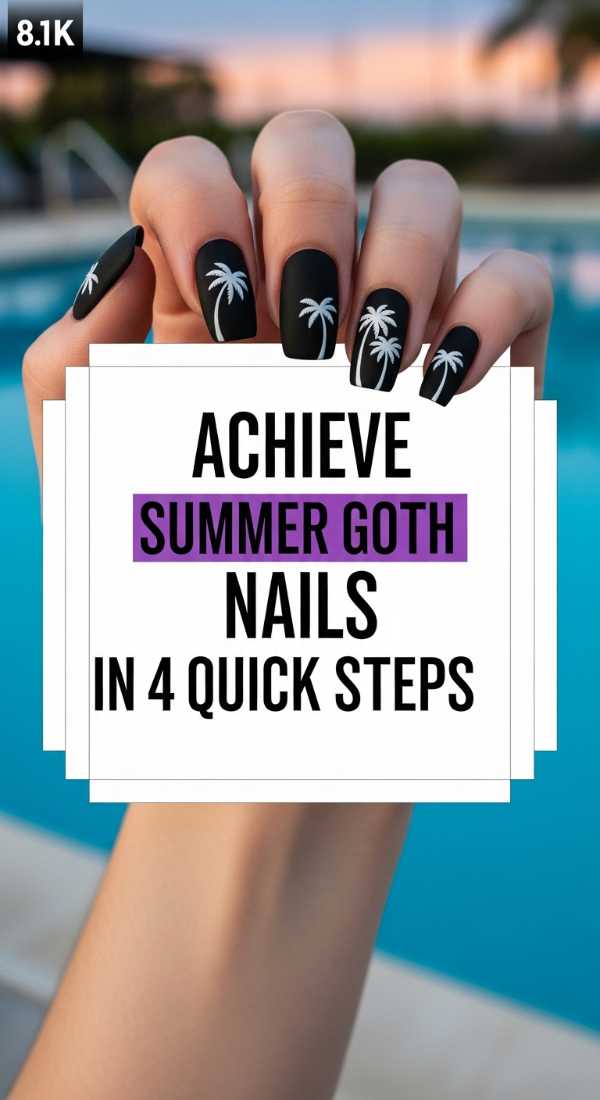
Why to love this Design:
Who says summer is only for pastels? Summer goth is for the moody sun-seekers. It uses sheer blacks and negative space to keep things light and airy while maintaining that edgy, mysterious soul. It’s the sheer black dress of manicures.
Essential Elements:
- ‘Jelly’ black polish (sheer)
- Opaque black liner
- Clear base
How to Prepare:
- Apply one coat of sheer black ‘jelly’ polish for a smoky effect.
- Use the opaque black to draw a single, ultra-thin vertical line down the center of each nail.
- Add a tiny black dot at the base of the nail (the lunula).
- Seal with a high-shine top coat to give it a ‘glass’ finish.
Budget Range
- Cirque Colors ‘Satin Luxe’ – $14
- Lights Lacquer ‘444’ – $13
- Glisten & Glow Top Coat – $8
Peach Pucci Prints
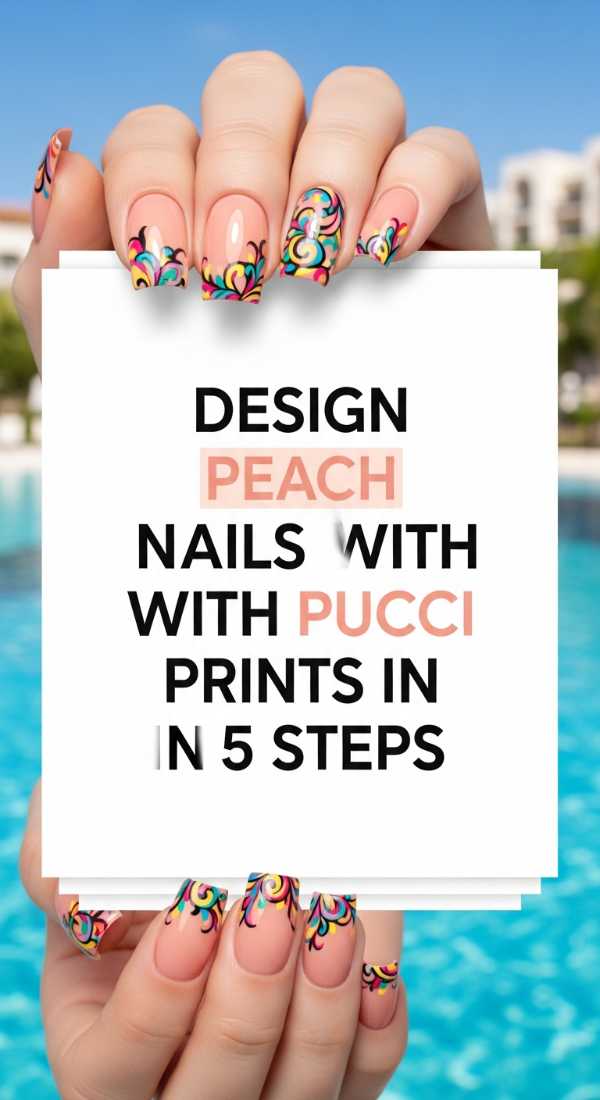
Why to love this Design:
Retro is back with a vengeance! These peach-based Pucci prints are all about 1960s Italian glamour. The swirling, psychedelic patterns in shades of peach, cream, and tan feel incredibly high-fashion and pair perfectly with a vintage scarf and oversized sunnies.
Essential Elements:
- Soft peach base
- Cream, Tan, and Terracotta polishes
- Long striping brush
How to Prepare:
- Apply the peach base and let dry.
- Use the long brush to draw wavy, organic ‘S’ shapes in cream.
- Follow the curves of the cream lines with your tan and terracotta colors.
- Ensure the lines vary in thickness to get that authentic vintage textile feel.
- Finish with a leveling top coat to smooth out the layers of the design.
Budget Range
- Bio Seaweed Gel ‘Peach Tea’ – $18
- Artistic Nail Design Liners – $15
- Seche Vive Gel Effect Top Coat – $10
The Mani-Pedi Match
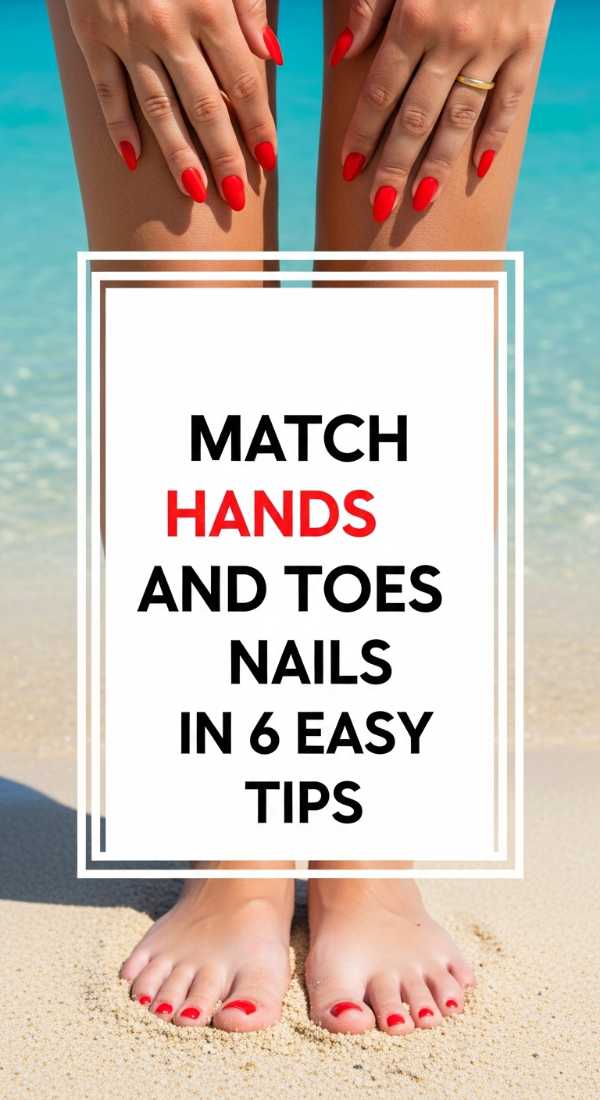
Why to love this Design:
The ultimate polished look comes from harmony. In 2026, we aren’t necessarily doing ‘exact’ matches, but rather ‘sister’ looks that tie your hands and toes together for a cohesive, put-together summer aesthetic.
Essential Elements:
- Primary color (e.g., Lavender)
- Secondary shade (e.g., Deep Purple)
- Coordinating glitter
How to Prepare:
- Tip 1: Use the lighter shade on your hands and the darker shade on your toes for a grounding effect.
- Tip 2: Apply the same solid color to both, but add a glitter accent nail to the fingers only.
- Tip 3: Keep the finish consistent—both must be either matte or both high-gloss.
- Tip 4: Use a matching floral decal on your big toe and your ring finger.
- Tip 5: Ensure your cuticle care is consistent for both hands and feet.
- Tip 6: Use a quick-dry spray to avoid smudging your hard work.
Budget Range
- Essie Gel Couture Duo Pack – $19
- Dr. Dane Cuticle Oil – $12
- Dashing Diva Floral Decals – $7
Taurus Birthday Luxury
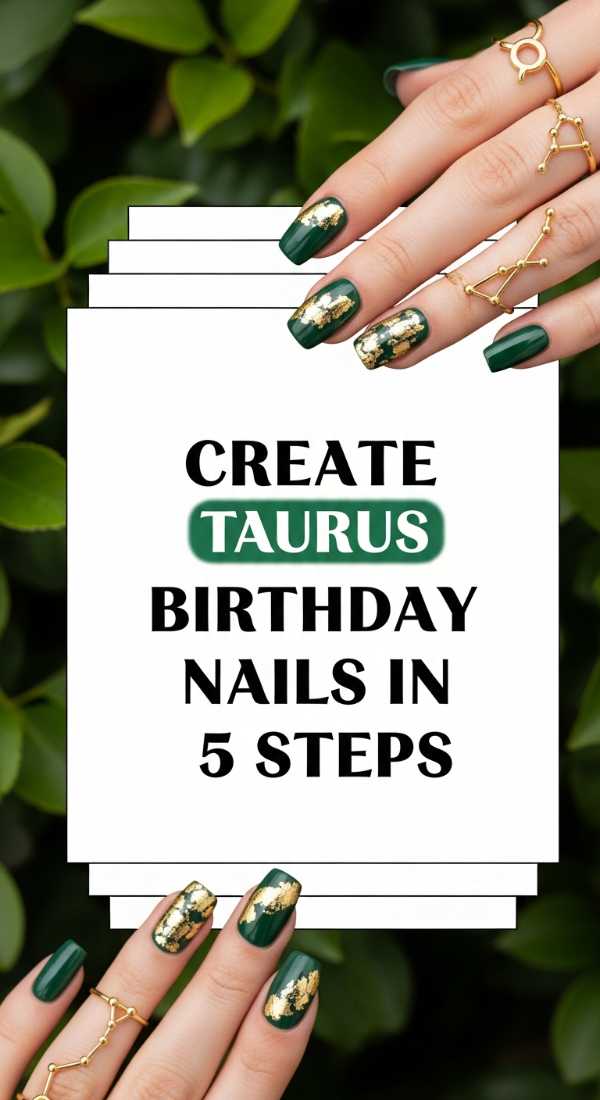
Why to love this Design:
Happy birthday to my steady, sensual, and luxury-loving Taurus queens! This design celebrates your earth sign energy with rich forest greens and expensive-looking gold accents. It’s grounded, gorgeous, and screams ‘expensive taste.’
Essential Elements:
- Emerald or Sage green polish
- Gold metallic stamping polish or foil
- Matte top coat
How to Prepare:
- Apply two coats of deep emerald green.
- Once dry, apply a matte top coat to the entire nail.
- Use a gold metallic polish to paint a thin French tip—the contrast of matte green and shiny gold is stunning.
- Add a small gold stud or dot at the base of the ring finger.
- Finish with a cuticle massage using a rose-scented oil.
Budget Range
- ILNP ‘Logan’ (Green) – $10
- Maniology Gold Stamping Polish – $9
- Born Pretty Nail Studs – $6
Hot Pink & Wildflowers
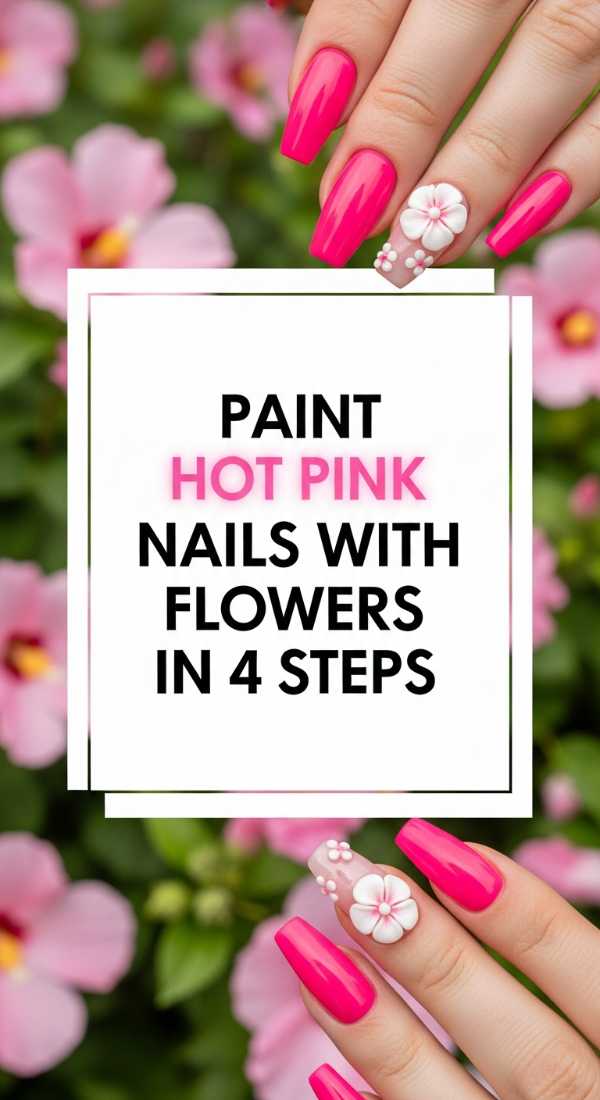
Why to love this Design:
Hot pink and delicate florals—a love story that never goes out of style. This design captures the vibrancy of summer blooms and the unapologetic joy of a ‘Barbiecore’ pink. It’s feminine, energetic, and perfectly sweet.
Essential Elements:
- Neon or Hot Pink polish
- White and yellow acrylic paint or polish for flowers
- Small dotting tool
How to Prepare:
- Paint nails with a vibrant hot pink.
- Use a dotting tool to create five white dots in a circle to form a simple daisy.
- Place a tiny yellow dot in the center of each daisy.
- Scatter the flowers randomly or cluster them at the tips for a ‘wildflower’ meadow effect.
Budget Range
- OPI ‘Pink FLAMENCO’ – $11
- Apple Barrel White/Yellow Acrylics – $3
- Dotting Tool Set – $5
Closing Thoughts
I hope these designs spark a little bit of magic in your summer routine, my loves. Remember, nail art isn’t about perfection—it’s about the joy of creating something beautiful for yourself. Whether you go for the bold neon cheetah or the soft, romantic sunset aura, wear it with confidence and a smile. You deserve to feel radiant from your head to your fingertips! Tag me in your recreations, I can’t wait to see your beautiful work. Stay golden!