
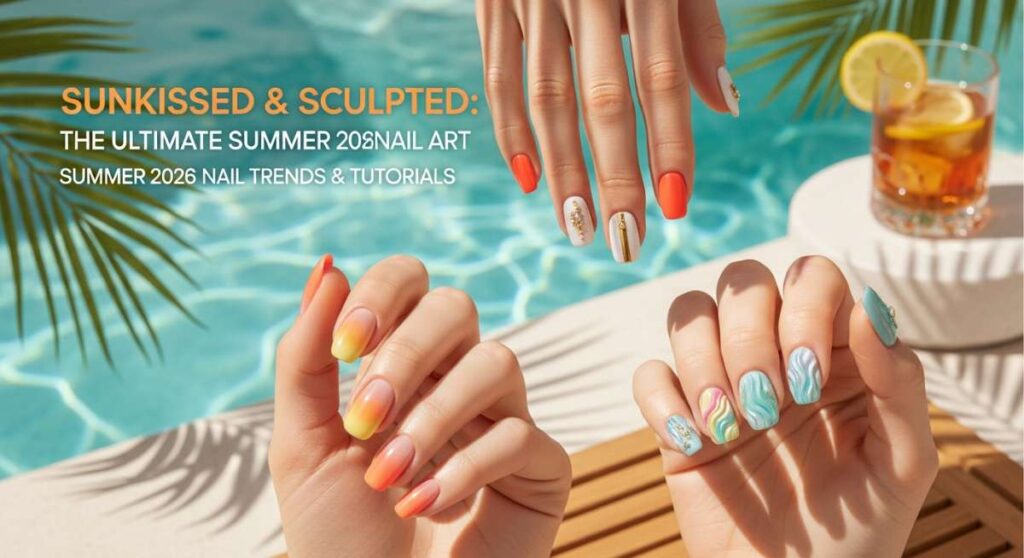
Sunkissed & Sculpted: The Ultimate Summer 2026 Nail Art Guide & Tutorials
Hello, my loves! Can you feel that? That soft, golden warmth of the 2026 sun is finally starting to hug us, and honestly, I couldn’t be more ready. There is something so magical about this time of year—it’s like the world is waking up in a riot of color, and we get to carry that vibrant energy right on our fingertips. I’ve spent the last few weeks dreaming up designs that feel like a cloud-soft embrace for your soul, and I am so excited to share these trends with you.
For me, summer isn’t just a season; it’s a feeling of pure freedom. Whether you’re lounging by a crystal-clear pool, walking across a graduation stage, or dancing under the moonlight at a festival, your nails should be your favorite accessory. They are a little canvas for your joy! Grab a cold iced latte, find a sunny spot, and let’s dive into the looks that are going to define our most beautiful summer yet.
5 Easy Steps to Get Sunset Chrome Nails
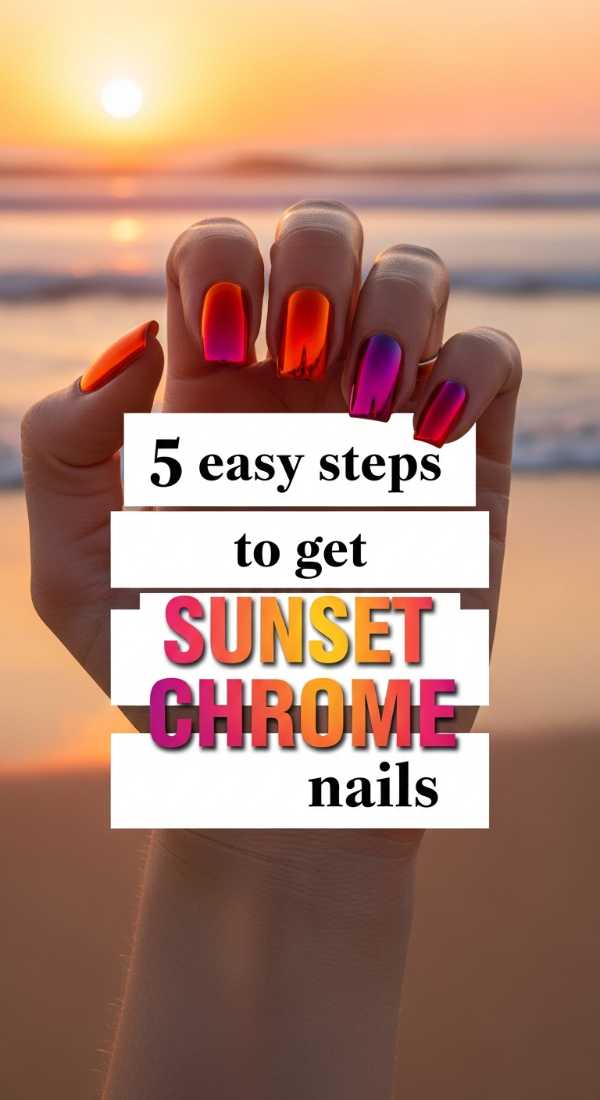
Why to love this Design:
Sunset chrome is like wearing a literal piece of the golden hour. It captures that breathtaking moment when the sky turns into a cocktail of pink and orange, giving your hands a glow that looks stunning against sunkissed skin. It’s ethereal, modern, and perfectly luminous.
Essential Elements:
- Neon orange and hot pink gel polish
- Iridescent peach chrome powder
- No-wipe top coat
- Sponge applicator
How to Prepare:
- Apply a thin layer of vibrant pink on one half and orange on the other half of the nail.
- Softly blend the center with a sponge to create a seamless gradient.
- Cure under your UV/LED lamp.
- Apply a no-wipe top coat and cure for only 30 seconds so it stays slightly tacky.
- Buff the chrome powder over the surface until it shines like a mirror, then seal with a final top coat.
Budget Range
- OPI Infinite Shine in ‘Data Peach’ ($14)
- Born Pretty Sunset Chrome Powder ($8)
- Gelish Top It Off ($15)
3 Ways to Mix Teal and Coral Nails
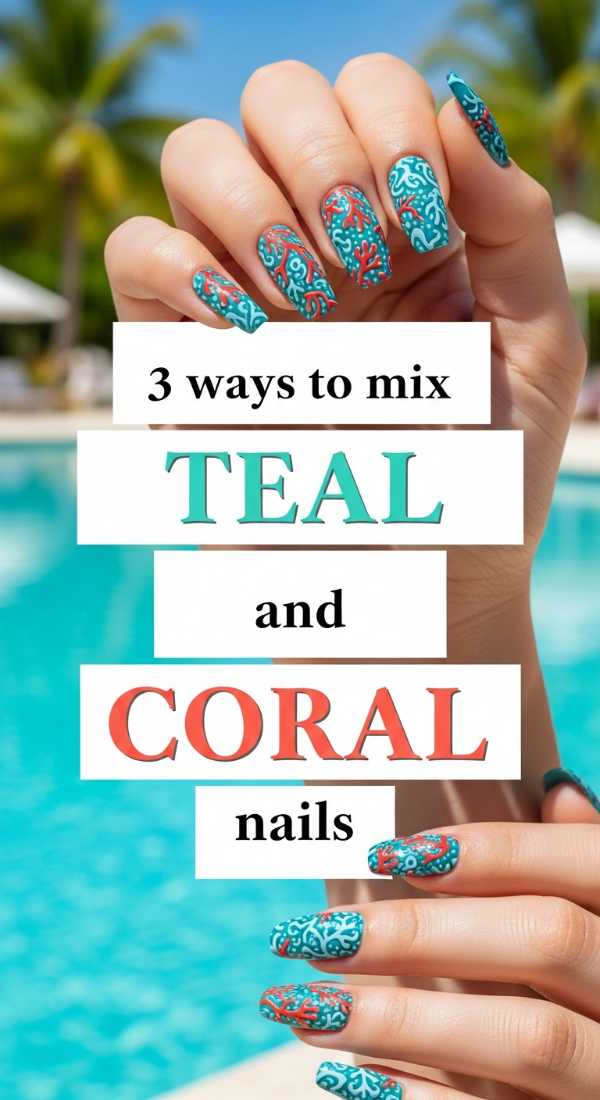
Why to love this Design:
Teal and coral are the ultimate summer power couple. One represents the cooling depths of the ocean, while the other mimics the vibrant life of a tropical reef. Mixing them creates a high-contrast look that feels energetic and fresh for any beach day.
Essential Elements:
- Turquoise or Teal cream polish
- Vivid Coral cream polish
- Gold striping tape or foil
How to Prepare:
- The Split Look: Paint the left half teal and the right half coral, separating them with a thin gold line.
- The Accent Vibe: Go full teal on all fingers except the ring finger, which gets a solid coral pop.
- The Dotty Detail: Paint a teal base and use a dotting tool to add dainty coral floral shapes near the cuticle.
Budget Range
- Essie ‘Turquoise & Caicos’ ($10)
- Zoya ‘Cora’ ($12)
- Nail Art Gold Foil Flakes ($6)
Prepare Your College Graduation Nails in 4 Steps

Why to love this Design:
Graduation is such a massive milestone, babes! You want a look that says ‘I’m sophisticated and ready for the world’ while still looking timeless in those photos you’ll keep forever. It’s about quiet luxury and celebrating your hard work.
Essential Elements:
- Sheer milky white or nude polish
- Fine silver or gold glitter
- High-shine top coat
How to Prepare:
- Groom your cuticles and shape your nails into a classic almond or soft square for a professional look.
- Apply two coats of your chosen milky sheer nude.
- Add a ‘micro-french’ tip using a very fine line of silver glitter to represent your bright future.
- Finish with a thick layer of high-shine top coat to ensure no chips while holding your diploma.
Budget Range
- DND ‘Milky White’ ($9)
- Holler and Glow Glitter Liner ($5)
- Olive & June Super Glossy Top Coat ($9)
Recreate Lemon and Blue Nails in 6 Steps
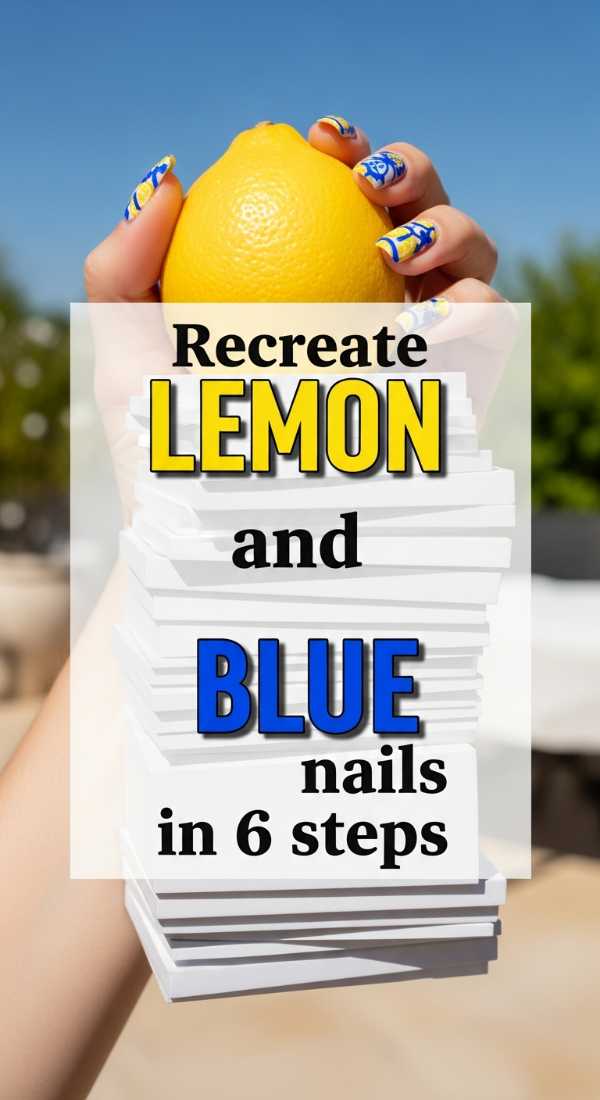
Why to love this Design:
This look is pure Amalfi Coast vibes. The crisp contrast of Mediterranean blue tiles against bright, zesty lemons feels like a vacation in a bottle. It’s playful, artistic, and incredibly chic for 2026.
Essential Elements:
- Cobalt blue polish
- Bright yellow polish
- White base polish
- Detailing brush
How to Prepare:
- Paint your thumb and pinky in solid cobalt blue.
- On the middle fingers, apply a crisp white base.
- Using a detailing brush, draw two small yellow ovals for the lemons.
- Add a tiny green leaf to each yellow oval.
- Use the blue to create small ’tile’ dots around the lemons.
- Seal the masterpiece with a matte or glossy top coat depending on your preference.
Budget Range
- Sally Hansen Insta-Dri ‘Brisk Blue’ ($7)
- Revel Nail ‘Lemonade’ ($10)
- Nail Art Brushes Set ($8)
Match Your Hands and Toes in 3 Simple Steps
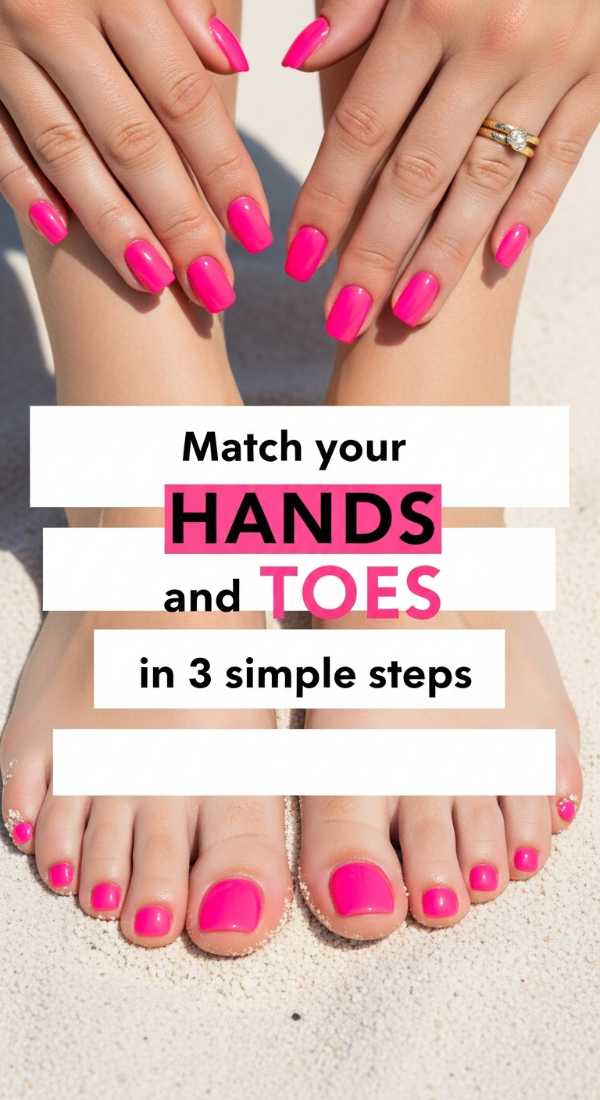
Why to love this Design:
There is nothing that makes you feel more ‘put together’ than a matching mani-pedi. In Summer 2026, we aren’t doing identical colors, but rather ‘sister’ shades that complement each other for a cohesive, curated aesthetic.
Essential Elements:
- A primary color (e.g., Lavender)
- A secondary shimmer in the same family
How to Prepare:
- Pick a solid cream color for your toes—this keeps them looking clean and bold in sandals.
- For your hands, use the same base color but add a shimmer or ‘glazed donut’ topper to elevate the look.
- Ensure both sets are shaped similarly (soft square is best for toes!) for a harmonious feel.
Budget Range
- Lights Lacquer ‘Paper Snow’ ($13)
- Pear Nova ‘Clear’ ($12)
- Standard Manicure Kit ($15)
Create Summer Goth Nails in 5 Easy Steps
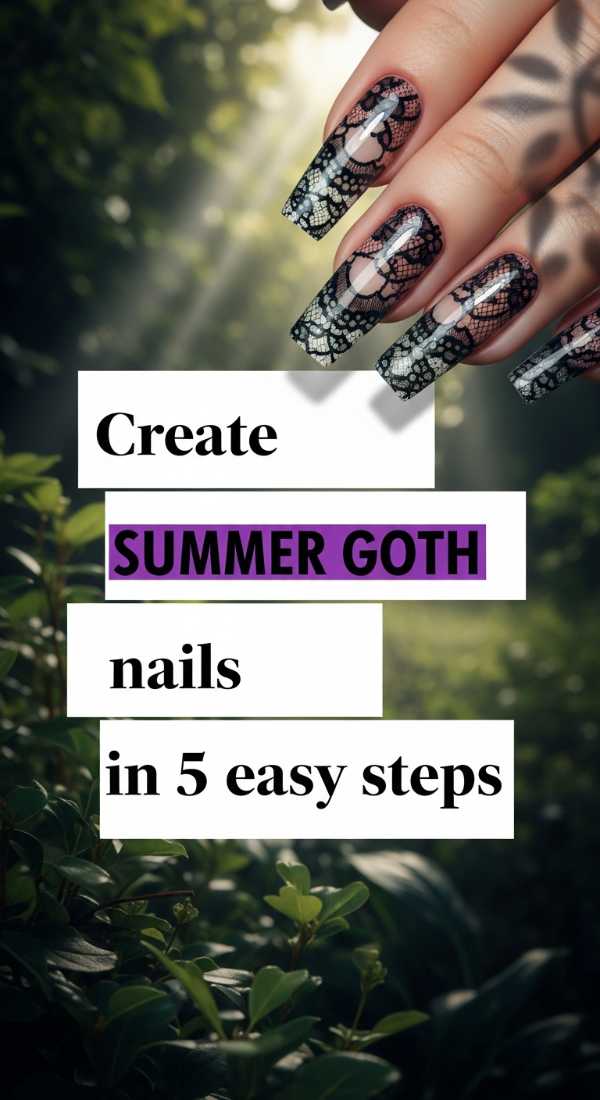
Why to love this Design:
Who says dark colors are only for winter? Summer Goth is all about moodiness under the sun. Think sheer blacks, 3D textures, and starry details that feel like a warm midnight breeze. It’s for my loves who prefer the moon to the sun.
Essential Elements:
- Sheer ‘black jelly’ polish
- Silver 3D star charms
- Nail glue
- Deep plum accent color
How to Prepare:
- Apply two coats of black jelly polish for a ‘see-through’ smoky effect.
- Create a ‘deep-french’ tip using the opaque deep plum.
- Cure or let dry completely.
- Place a single silver star charm near the base of the ring finger using nail glue.
- Seal everything with a thick gel-effect top coat to protect the charms.
Budget Range
- Cirque Colors ‘RRR’ Jelly ($12)
- Amazon Star Nail Charms ($6)
- Seche Vite Dry Fast Top Coat ($10)
7 Steps to Master Pucci Nails Designs
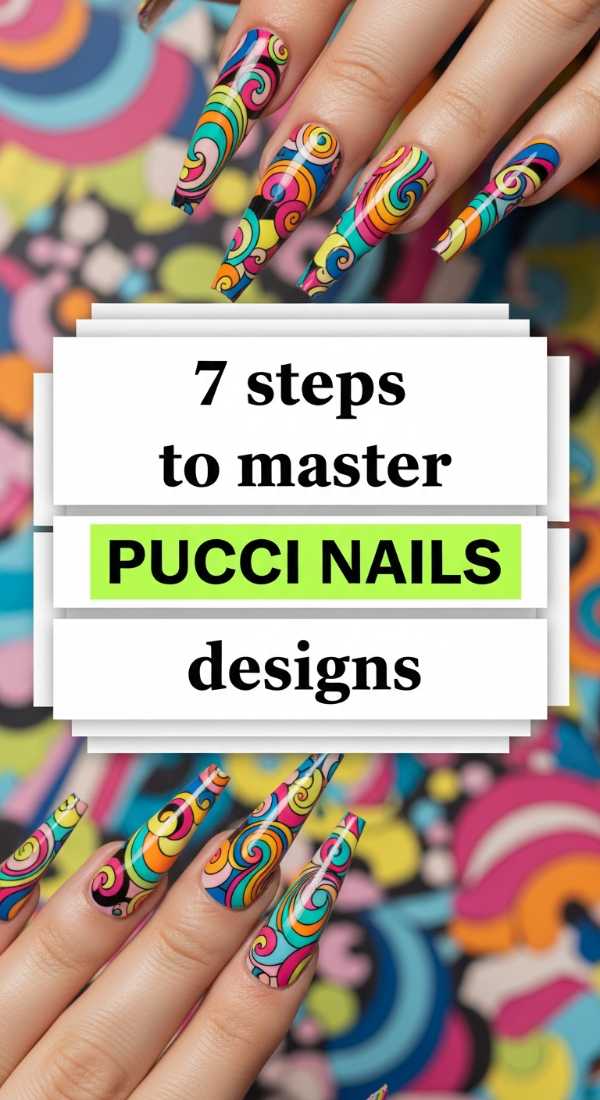
Why to love this Design:
Inspired by the iconic fashion house, Pucci-style nails are all about psychedelic swirls and retro 70s energy. It’s high-fashion, high-effort, and high-reward. It’s the ultimate conversation starter at any summer party.
Essential Elements:
- 4-5 contrasting colors (Pink, Orange, Lime, White, Black)
- Extra-long liner brush
How to Prepare:
- Start with a clean white base to make the colors pop.
- Take your first color (Pink) and draw a large, curvy ‘S’ shape across the nail.
- Follow that curve with your second color (Orange) right next to it.
- Add a third color (Lime) filling in the gaps.
- Use a very fine liner brush with black to outline the sections thinly.
- Add small white dots within the black lines for that retro flair.
- Finish with a super glossy top coat to flatten the layers.
Budget Range
- Beetles Pastel Gel Polish Set ($20)
- Winstonia Long Liner Brush ($7)
- Modelones Gel Base & Top ($12)
Style Hot Pink Nails with Flowers in 4 Steps
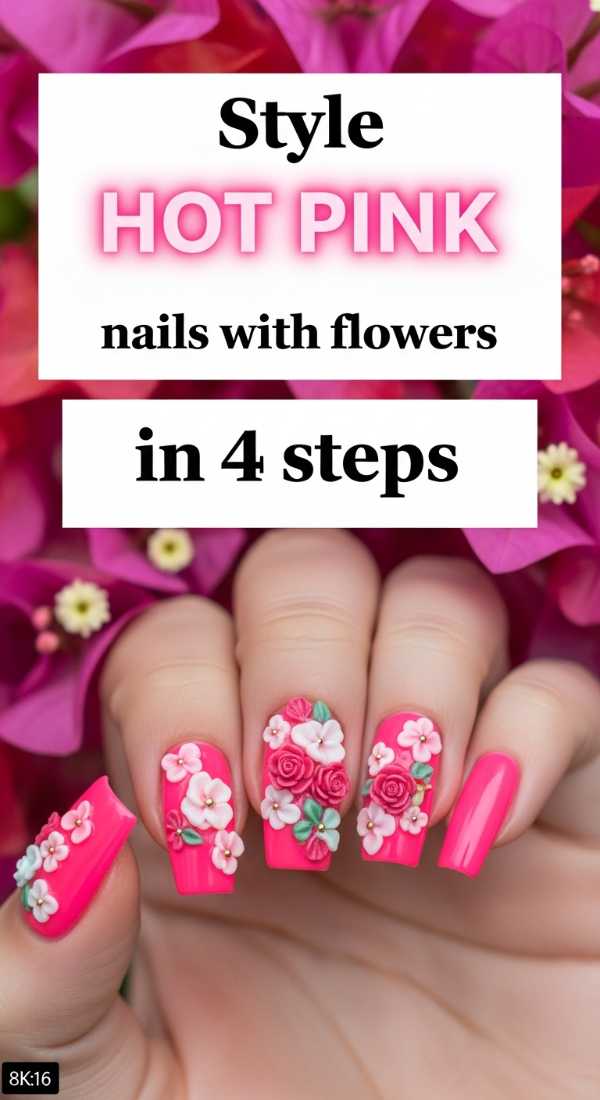
Why to love this Design:
Hot pink is a summer staple that never dies, but in 2026, we’re making it more romantic. Adding delicate floral accents softens the boldness of the pink, making it perfect for garden parties or brunch dates.
Essential Elements:
- Barbie Pink cream polish
- White and Yellow acrylic paint or polish
- Dotting tool
How to Prepare:
- Paint all nails with two coats of hot pink.
- Using a dotting tool and white polish, create five small dots in a circle on your accent nail to form petals.
- Place one yellow dot in the very center of the white petals.
- Repeat for a ‘cascading’ flower effect down the side of the nail.
Budget Range
- Orly ‘Oh Darling’ ($15)
- Nail Art Dotting Tools ($5)
- Essie ‘Blanc’ ($10)
5 Tips to Achieve Sunset Aura Nails

Why to love this Design:
Aura nails represent your inner energy, and the sunset version is all about warmth and radiating positivity. It has a beautiful blurred effect that looks soft and diffused, like a watercolor painting.
Essential Elements:
- Aura base color (soft yellow)
- Aura center color (deep orange or red)
- Makeup sponge or small eyeshadow applicator
How to Prepare:
- Apply your base color (yellow) and dry/cure completely.
- Apply a small amount of the center color (orange) to a makeup sponge.
- Gently dab the sponge in the very center of the nail, keeping the edges of the circle blurry.
- Build the intensity slowly by adding more layers of orange in the very middle.
- Top with a shimmer top coat to blend any harsh lines.
Budget Range
- Kokie Cosmetics ‘Lemonade’ ($8)
- Real Techniques Makeup Sponges ($6)
- ILNP Shimmer Topper ($12)
Apply Neon Cheetah Print Nails in 6 Steps
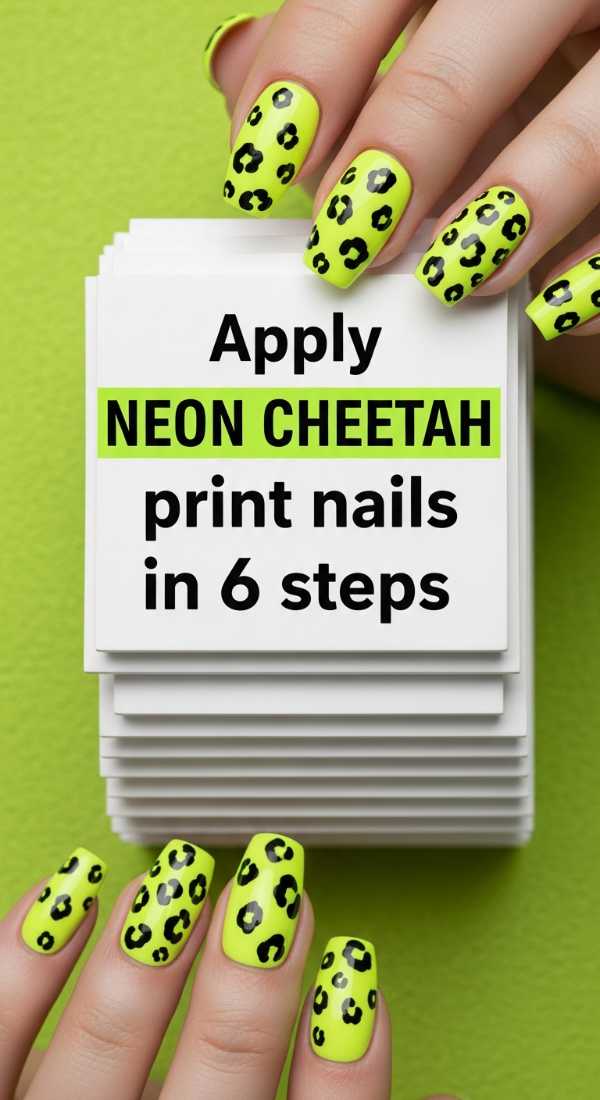
Why to love this Design:
Wild, fierce, and impossible to ignore! Neon cheetah print is for the babes who want to make a statement. It’s a fun twist on a classic animal print that feels electric under the summer sun.
Essential Elements:
- Neon green or yellow base
- Brown or Dark Orange polish
- Black detailing polish
How to Prepare:
- Apply two coats of neon green as your base.
- Use a dotting tool to place irregular ‘blobs’ of brown polish across the nail.
- Take your black polish and a thin brush to partially outline the brown blobs.
- Draw ‘C’ shapes and brackets around the blobs—don’t make them perfect!
- Add tiny black random dots in the empty spaces.
- Finish with a high-gloss top coat to lock in the neon vibrance.
Budget Range
- China Glaze ‘Electric Nights’ Neon ($9)
- Maniology Stamping/Detailing Polish ($8)
- Glisten & Glow Top Coat ($10)
Embrace Your Summer Glow
As we wrap up this guide, I hope you feel inspired to treat yourself to a little DIY nail session or a trip to your favorite tech. Remember, my loves, these trends are just a starting point. The most beautiful thing you can wear this summer is your own confidence. Whether you go for the bold neon cheetah or the soft sunset aura, let your nails be a reflection of the beautiful light you carry inside. I can’t wait to see your recreations! Tag me in your photos and let’s sparkle together all season long. Stay sun-kissed, stay sculpted, and most importantly, stay uniquely you. Love you all so much!