

Bold Beats & Brighter Nails: A Step-by-Step Rock Concert Tutorial
Hello, my sweet loves! There is something truly magical about the moment the lights dim, the crowd begins to roar, and that first electric chord vibrates right through your chest. Music is more than just sound; it is a feeling, a connection, and a way for us to express the wildest parts of our souls. Whenever I’m getting ready for a show, I find that the ritual of preparation is just as soulful as the concert itself.
Today, I wanted to share a little piece of my heart with you all—a guide to creating the perfect rock-inspired nails that capture that edgy, rebellious, yet soft-hearted energy we all carry. Think of your nails as tiny canvases that dance along with you in the front row. We’re going to walk through ten different styles together, step-by-step, so you can find the one that resonates most with your playlist.
So, grab a cozy cup of tea, put on your favorite vinyl, and let’s dive into this creative journey. These looks are designed to be achievable and fun, because beauty should always feel like a warm, cloud-soft embrace rather than a chore. Let’s get you ready to rock, my loves!
Create cherry rocker nails in 4 simple steps
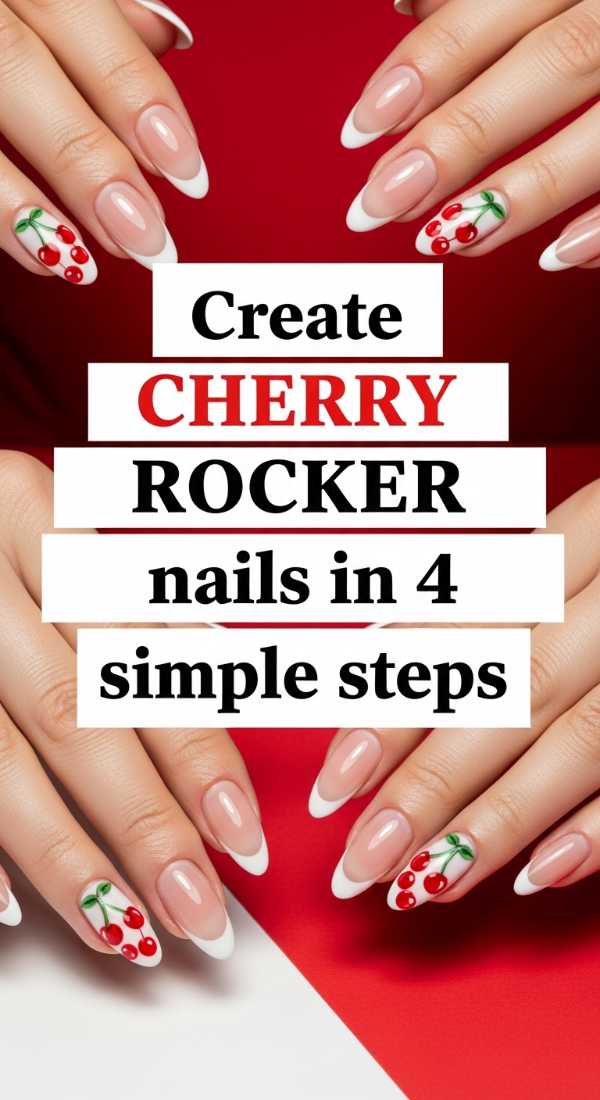
Why to love these Nails:
These cherry rocker nails are the perfect blend of sweet and edgy. They remind me of vintage rockabilly vibes and that classic red-and-black contrast that never goes out of style. It’s like a little wink of personality on your fingertips that feels both bold and absolutely darling.
Essential Items:
- Deep red polish
- Opaque black polish
- Fine-line nail brush
- Glossy top coat
How to Prepare:
- Apply two thin coats of your favorite deep red polish as the base.
- Using a fine brush, dot two small black circles near the base of the nail.
- Draw thin, slightly curved black stems connecting the dots.
- Seal the look with a high-shine top coat to make them pop under the stage lights.
Budget Range
- Essie ‘Forever Yummy’ ($10)
- Zoya ‘Willis’ Black ($12)
- Sally Hansen Top Coat ($6)
Apply metallic star decals in 3 easy minutes
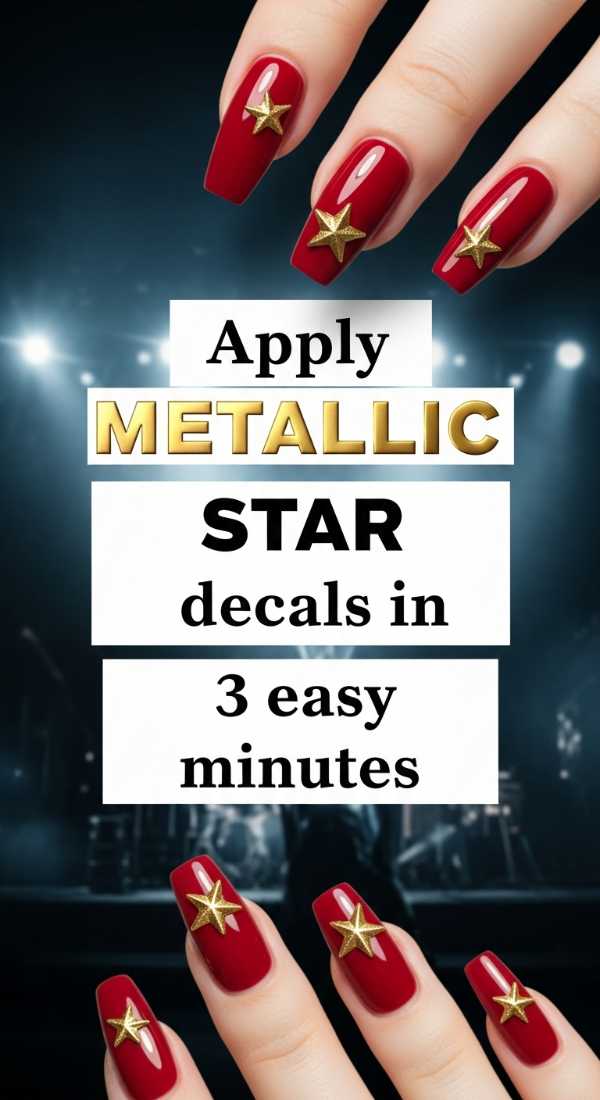
Why to love these Nails:
If you’re short on time but want maximum impact, metallic stars are your best friend. They catch the strobe lights beautifully and give off a total rockstar-in-the-making vibe. It’s a fast way to feel like you’ve put in hours of effort when you’ve really just enjoyed a few minutes of self-care.
Essential Items:
- Silver or gold star decals
- Tweezers
- Clear base/top coat
How to Prepare:
- Apply a clear base coat or a neutral nude polish and let it dry completely.
- Use tweezers to carefully place star decals in a random, scattered pattern across each nail.
- Press them down firmly and apply a thick layer of top coat to ensure they don’t snag on your concert outfit.
Budget Range
- Amazon Nail Decal Variety Pack ($7)
- Revlon Clear Polish ($5)
- Tweezerman Mini Tweezers ($12)
Paint a checkerboard pattern in 5 quick steps
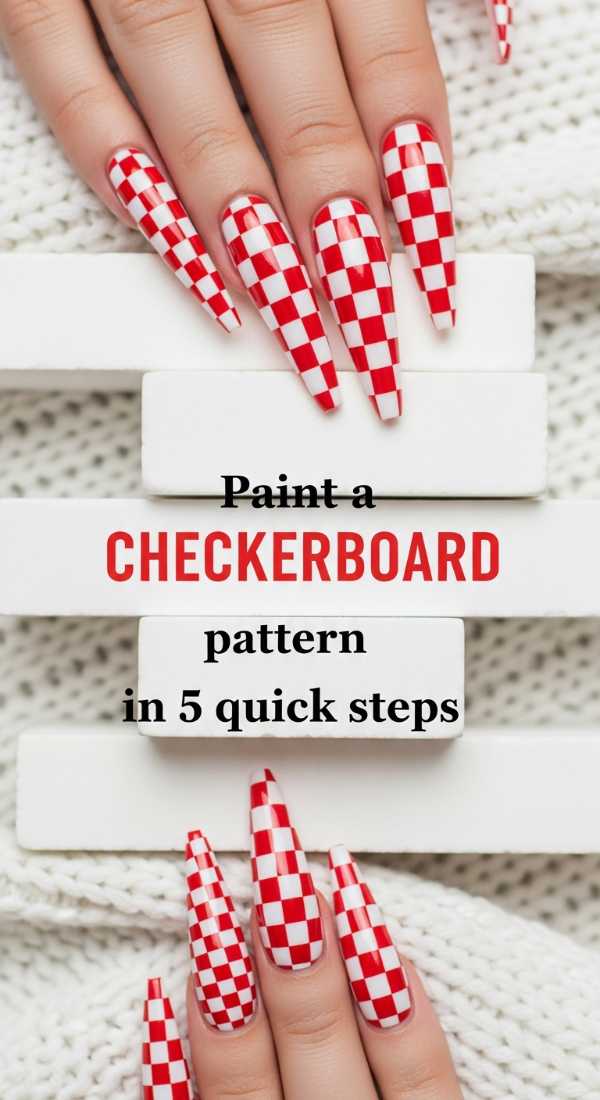
Why to love these Nails:
The checkerboard is such an iconic symbol of the ska and punk scenes. It feels energetic and rhythmic, just like a fast drum beat. I love how graphic and clean this looks, especially when you’re holding a microphone or your phone to record your favorite song.
Essential Items:
- White cream polish
- Black striper polish
- Steady hand or masking tape
- Matte top coat
How to Prepare:
- Paint your nails with two coats of solid white polish.
- Draw a vertical black line down the center and a horizontal line across the middle.
- Fill in alternating squares with black polish to create the grid.
- Clean up any edges with a brush dipped in remover.
- Finish with a matte top coat for that authentic ’90s grunge feel.
Budget Range
- OPI ‘Alpine Snow’ ($11)
- Orly ‘Liquid Vinyl’ ($12)
- NYX Matte Finisher ($7)
Design 8-ball nail art in 6 easy phases
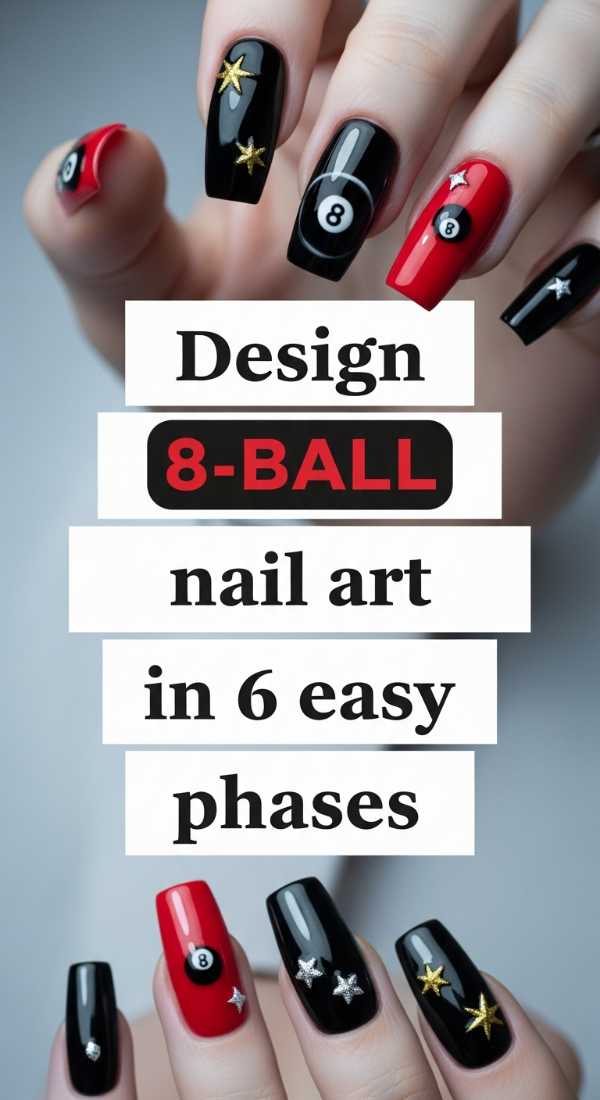
Why to love these Nails:
There is something so cool and mysterious about the 8-ball motif. It’s a little bit of luck and a little bit of attitude. These nails always spark a conversation in the merch line, and they look incredibly chic against a leather jacket.
Essential Items:
- Black polish
- White polish
- Large dotting tool
- Fine detail brush
How to Prepare:
- Apply a solid black base coat to all nails.
- Use a large dotting tool to create a perfect white circle in the center of the accent nail.
- Let the white circle dry completely so the colors don’t bleed.
- Using a very fine brush, carefully paint a small black ‘8’ inside the white circle.
- Add a tiny white ‘shine’ dot on the black part of the ball for a 3D effect.
- Finish with a glossy top coat.
Budget Range
- Holo Taco ‘One-Coat Black’ ($13)
- Dotting Tool Set ($5)
- Essie ‘Blanc’ ($10)
Master the red French tip in 3 clean steps
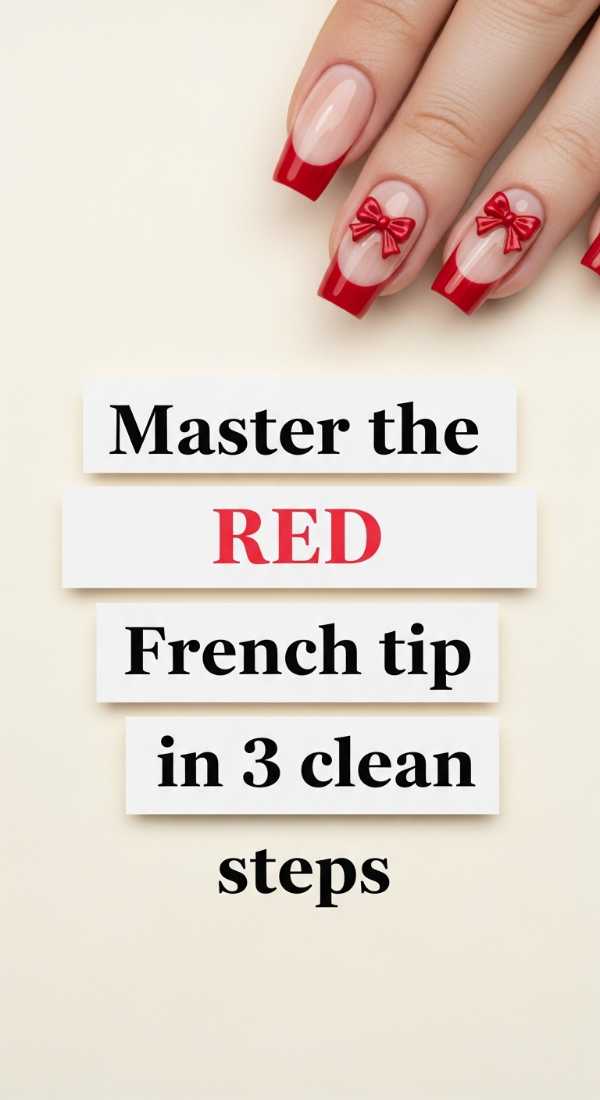
Why to love these Nails:
This is a fiery twist on a classic. The red French tip feels sophisticated but has that ‘rock and roll’ bite. It’s perfect for the love who wants to stay elegant while still channeling their inner rebel. It’s clean, sharp, and totally captivating.
Essential Items:
- Sheer nude base
- Bright crimson polish
- French tip guides or a steady brush
How to Prepare:
- Apply a sheer nude or pink base coat and let it dry.
- Swipe a bright crimson polish across the very tips of your nails in a soft curve.
- Tidy up the ‘smile line’ with a clean brush and seal with a high-gloss finish.
Budget Range
- Olive & June ‘OJSM’ ($9)
- Chanel ‘Le Vernis’ in Pirate ($32)
- French Tip Guides ($4)
Add indie polka dots in 4 effortless steps

Why to love these Nails:
Indie polka dots are all about imperfection and artistic flair. Instead of a uniform grid, we’re going for a scattered, ‘confetti at the end of the show’ look. It’s playful, lighthearted, and so easy to do even if your hands are a little shaky from excitement!
Essential Items:
- Muted grey or ‘sludge’ green base
- White and black polish
- Toothpick or dotting tool
How to Prepare:
- Start with a cool, muted base color like grey or olive.
- Dip a toothpick into white polish and add random dots of varying sizes.
- Repeat with black polish, overlapping some dots for depth.
- Wait for it to dry and seal with a top coat.
Budget Range
- ILNP ‘Coffee Run’ ($10)
- Sinful Colors Black/White ($3 each)
- Wooden Toothpicks ($2)
Style coquette rock bows in 5 simple steps
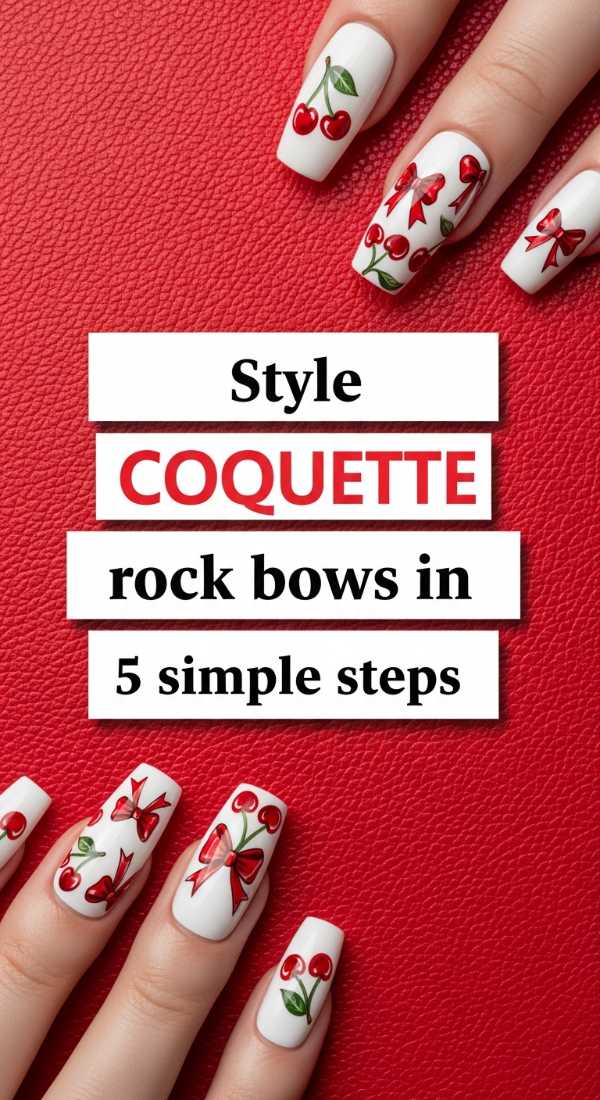
Why to love these Nails:
I am currently obsessed with the ‘coquette’ aesthetic mixed with rock elements. It’s that soft-meets-hard vibe—think lace and combat boots. Adding little black bows to your nails brings a touch of femininity to the mosh pit in the most beautiful way.
Essential Items:
- Pale pink base polish
- Black nail art pen
- Small silver rhinestones
- Nail glue
How to Prepare:
- Apply two coats of a soft, pale pink.
- Using a black nail art pen, draw two small triangles touching at the points to form a bow.
- Add two little ‘ribbon’ tails coming off the bottom.
- Place a tiny silver rhinestone in the center of the bow using a drop of glue.
- Apply top coat carefully around the stone.
Budget Range
- Essie ‘Ballet Slippers’ ($10)
- Sally Hansen Nail Art Pen ($8)
- Nail Rhinestone Kit ($9)
Shape edgy stiletto nails in 4 precise steps
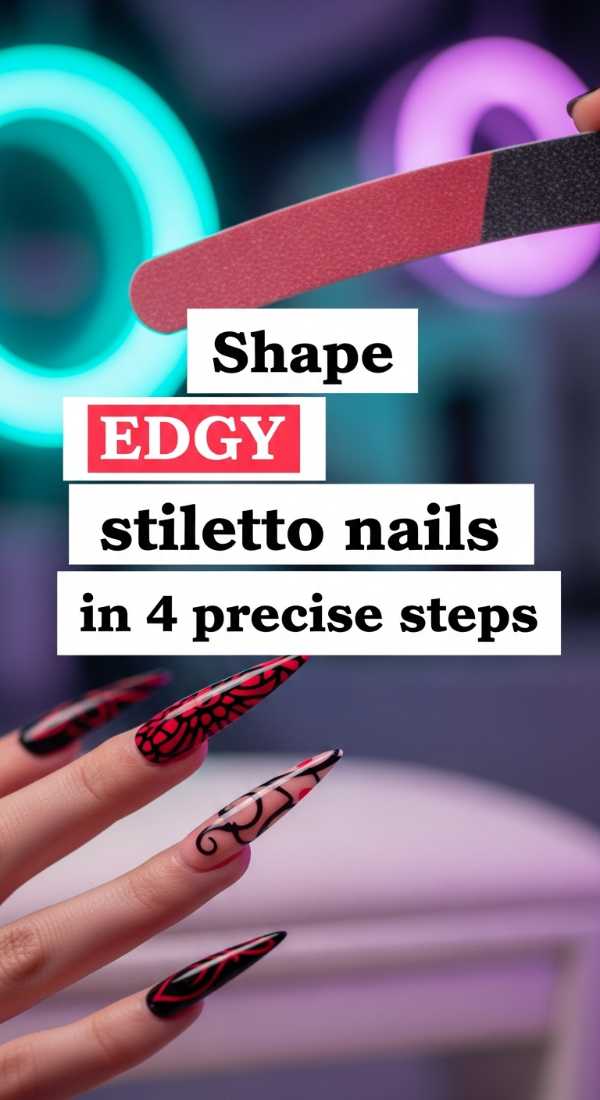
Why to love these Nails:
Stiletto nails are the ultimate rock star shape. They are bold, elongating, and give you that instant ‘edge.’ Even if you prefer a shorter length, the pointed tip changes your whole hand’s silhouette, making you feel powerful and ready to take on the world.
Essential Items:
- High-grit nail file
- Buffing block
- Nail strengthener
How to Prepare:
- Mark the center point of your nail tip with a tiny dot of polish.
- File the side walls of your nails at an angle toward that center point.
- Switch to a finer grit file to round out the very tip so it’s sharp but not dangerous.
- Buff the edges until smooth and apply a strengthener to prevent snapping.
Budget Range
- Glass Nail File ($10)
- OPI Envy Strengthener ($19)
- Tropical Shine Buffer ($4)
Apply concert glitter gradients in 3 fast steps
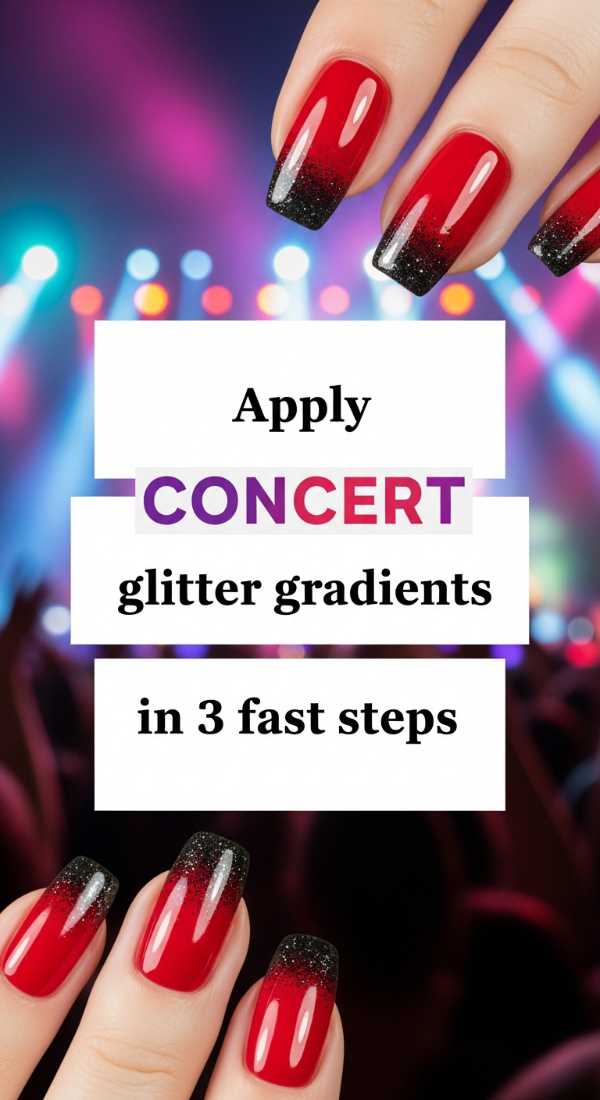
Why to love these Nails:
Nothing says ‘concert’ like glitter! A gradient look is wonderful because it hides chips easily—perfect for a multi-day music festival. It looks like falling stars or the shimmer of a disco ball, and it brings so much joy every time you look down.
Essential Items:
- Solid base color
- Chunky glitter polish
- Makeup sponge
How to Prepare:
- Apply your base color (black or navy works best).
- Paint a little glitter onto the edge of a makeup sponge and dab it onto the tips of your nails.
- Fade the glitter downward toward the middle of the nail for a seamless transition.
Budget Range
- Wet n Wild Glitter Polish ($3)
- Wedge Makeup Sponges ($5)
- Butter London ‘Starlight’ ($15)
Mix rock nail motifs in 5 creative steps
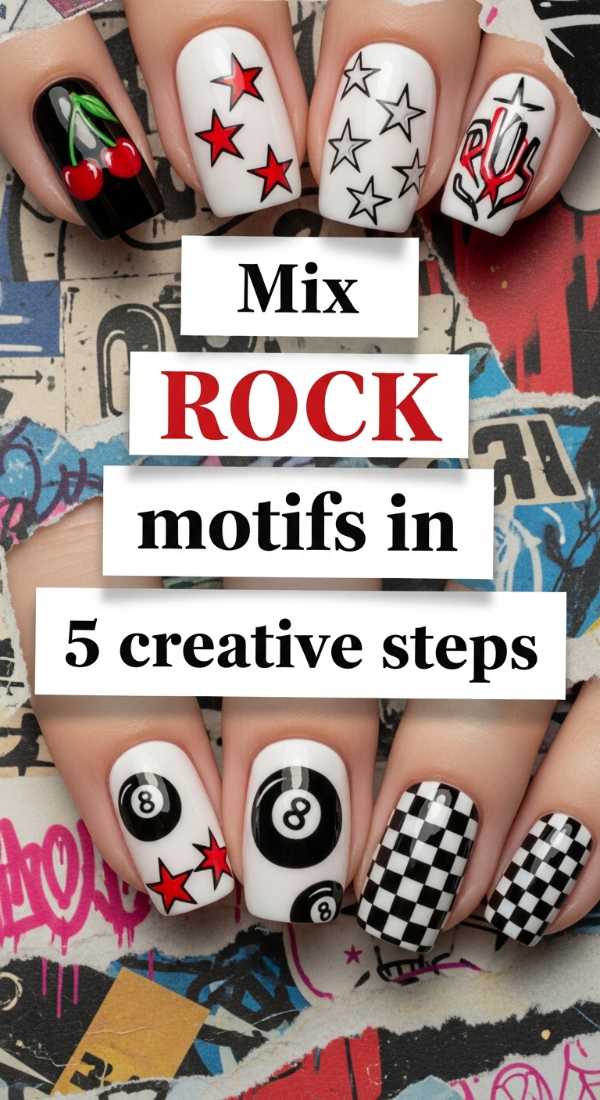
Why to love these Nails:
Can’t decide on just one? This ‘mismatched’ look is the ultimate expression of creativity. It tells a story on every finger. Mixing patterns shows off your eclectic taste in music and style, and honestly, it’s just so much fun to create!
Essential Items:
- A collection of 3-4 coordinating polishes
- All previous tools (brushes, dotters)
- Patience and a playlist
How to Prepare:
- Pick a cohesive color palette (like black, white, red, and silver).
- Assign a different ‘motif’ from the steps above to each finger (e.g., thumb: star, index: checkerboard).
- Work finger by finger, letting each design dry slightly before moving on.
- Ensure all nails have a similar finish (all glossy or all matte) to tie them together.
- Take a photo because your hands are now a masterpiece!
Budget Range
- Bundle of Mini Polishes ($15)
- Complete Nail Art Tool Kit ($20)
- Your imagination (Free!)
Rock On, My Loves!
I hope these tutorials spark a little light in your heart and get you even more excited for your next show. Remember, there are no rules in art or music—only what makes you feel most like yourself. Whether you go for the bold 8-ball or the soft coquette bows, your nails are an extension of your beautiful energy. Wear them with pride, dance until your feet ache, and never stop chasing those brighter beats. I’ll be right there with you in spirit, cheering you on. Until next time, stay lovely!