
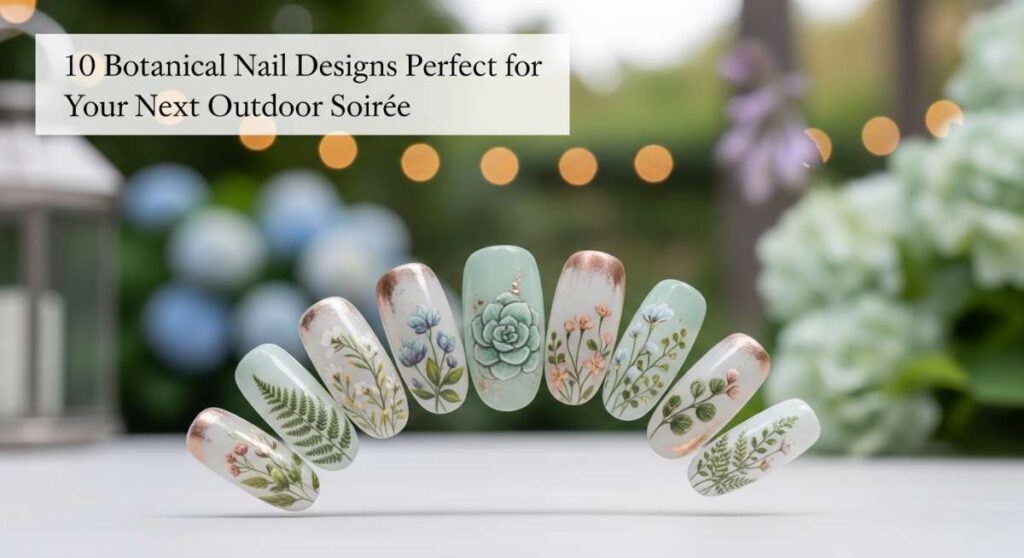
10 Botanical Nail Designs Perfect for Your Next Outdoor Soirée
Hello, my loves! Can you feel it? That soft, golden light filtering through the oak trees and the scent of blooming jasmine dancing on the breeze? There is something truly magical about garden party season. It’s a time for clinking vintage glassware, feeling the cool grass beneath your feet, and embracing a beauty that feels as effortless as a summer daydream. I wanted to create a space today that feels like a warm, cloud-soft embrace, guiding you toward the perfect finishing touch for your next outdoor gathering.
Your hands are such a beautiful part of how you connect with the world—whether you’re holding a chilled glass of rosé or tucking a stray wildflower behind a friend’s ear. These botanical-inspired designs are meant to make you feel whimsical, elegant, and entirely at home in nature. So, grab a cup of herbal tea, settle into your favorite sun-drenched nook, and let’s explore these tiny canvases of joy together.
5 Easy Steps to Cherry Garden Nails
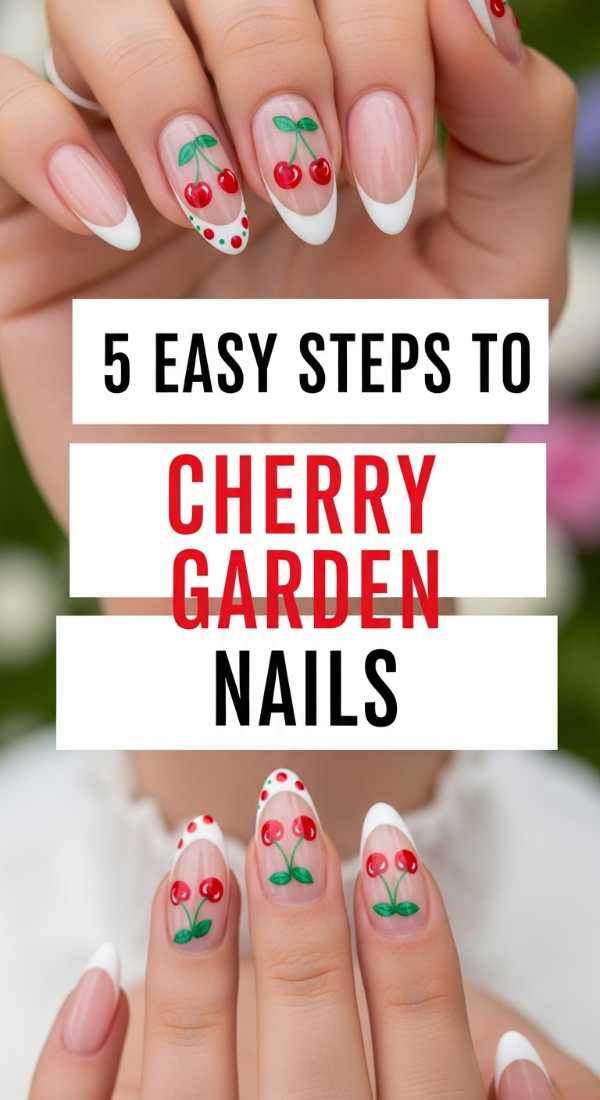
Why to love these Nails:
These cherry garden nails are pure nostalgia in a bottle. They remind me of sweet summer afternoons and the simple joy of picking fruit right from the branch. They add a playful, feminine pop of color that feels both classic and incredibly trendy for a garden setting.
Essential Items:
- Pale pink or nude base polish
- Bright red polish
- Forest green polish
- A double-ended dotting tool
- Glossy top coat
How to Prepare:
- Apply two thin coats of your nude base and let dry completely.
- Dip the larger end of your dotting tool into the red polish and create two side-by-side dots for the cherries.
- Using a thin brush or the smaller end of the tool, draw a tiny ‘V’ shape in green connecting the dots.
- Add a tiny green leaf flick at the top of the stem.
- Seal with a thick layer of top coat for that juicy, glass-like finish.
Budget Range
- Essie ‘Sugar Daddy’ ($10)
- OPI ‘Big Apple Red’ ($11)
- Sally Hansen ‘Pucker Up’ ($6)
4 Ways to Style Gingham Party Tips

Why to love these Nails:
Gingham is the unofficial uniform of the perfect picnic, isn’t it? Bringing this pattern to your tips feels so intentional and charming. It’s like wearing a little piece of a vintage tablecloth, reimagined for a modern, chic soirée.
Essential Items:
- White cream polish
- Semi-sheer tint (in your chosen color)
- Opaque polish (matching the tint)
- Long striping brush
How to Prepare:
- Paint a crisp white French tip as your foundation.
- Draw vertical stripes using your semi-sheer tint.
- Draw horizontal stripes with the same tint to create the ‘overlap’ effect.
- Use the opaque polish to paint tiny squares only where the vertical and horizontal lines intersect.
Budget Range
- Holo Taco ‘Not Milky White’ ($13)
- Zoya ‘ZP244’ ($12)
- Nail Art Striping Brush Set ($8 on Amazon)
3 Secrets for Perfect 3D Nail Bows
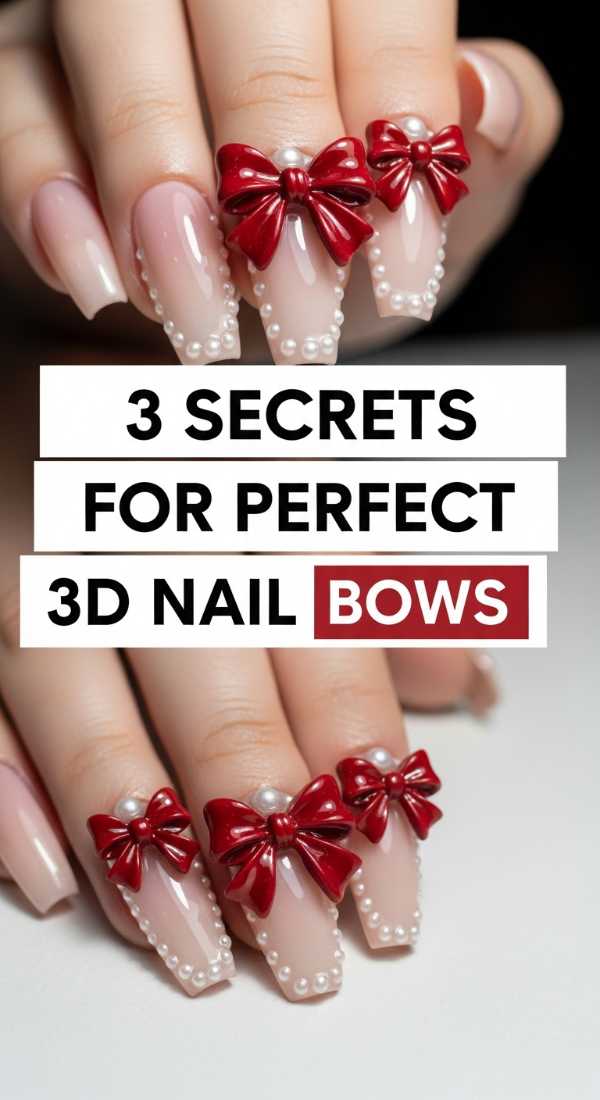
Why to love these Nails:
There is nothing quite as ‘coquette’ as a 3D bow. It adds a tactile, sculptural element to your manicure that catches the light beautifully when you’re moving your hands. It’s pure, unadulterated whimsy, darling.
Essential Items:
- Resin or acrylic nail bows
- Nail rhinestone glue (gel formula works best)
- Fine tweezers
- UV/LED lamp (if using gel glue)
How to Prepare:
- Complete your base color and top coat first; 3D elements should always be the final step.
- Apply a tiny, precise bead of glue exactly where you want the bow to sit.
- Place the bow with tweezers and hold it steady for 10 seconds (or cure under the lamp) to ensure it’s locked in place.
Budget Range
- Makartt Rhinestone Glue ($9)
- Assorted Resin Bow Charms ($7 for 100pcs)
- Beetles No Wipe Top Coat ($8)
6 Tricks for a Coquette Party Mani
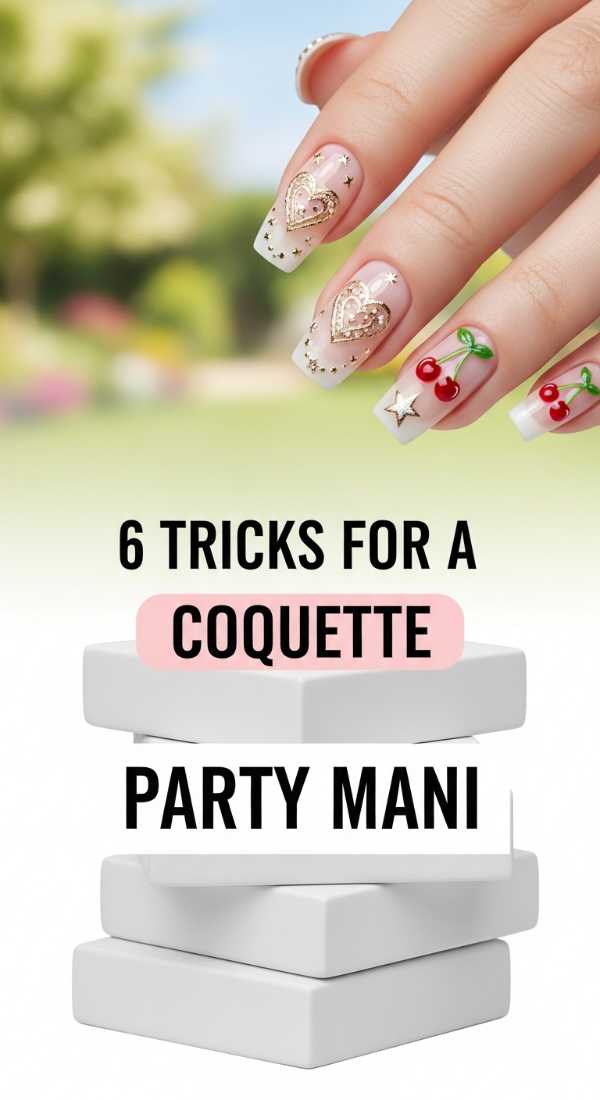
Why to love these Nails:
The coquette aesthetic is all about embracing your softest, most romantic self. Think pearls, lace, and whispers of pink. It’s the perfect look for a tea party or a bridal brunch in a blooming garden.
Essential Items:
- Sheer milky pink polish
- Tiny pearl decals
- White lace nail stickers
- Fine liner brush
- Matte and glossy top coats
How to Prepare:
- Start with a milky pink base for that ‘clean girl’ foundation.
- Apply lace stickers to the ring finger for a delicate accent.
- Place pearls near the cuticle on your middle finger.
- Use a liner brush to paint tiny white hearts.
- Mix matte and glossy finishes on different fingers for texture.
- Use a high-quality nail glue for the pearls to ensure they don’t pop off during dinner.
Budget Range
- DND ‘Soft White’ ($9)
- Olive & June ‘BP’ ($9)
- Pearl Nail Decal Kit ($6)
5 Minutes to Apply Party Star Decals
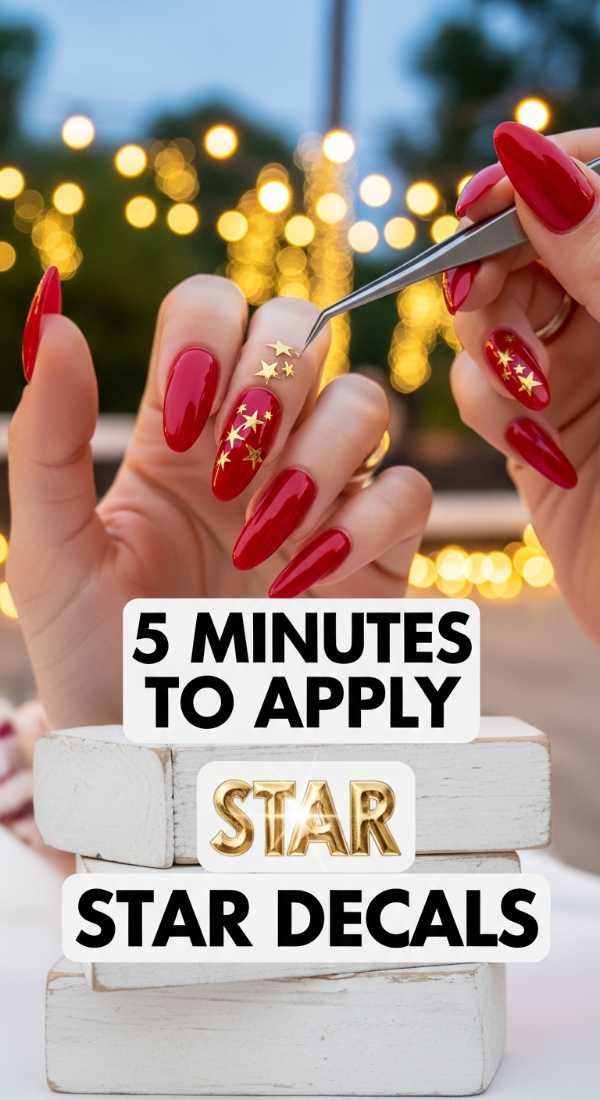
Why to love these Nails:
When the sun sets and the fairy lights come on, you want your nails to twinkle! Star decals are the fastest way to transition your look from daytime garden lounging to an evening under the stars.
Essential Items:
- Gold or silver foil star decals
- Pointed tweezers
- Clear base/top coat
- Silicone pressing tool
How to Prepare:
- Paint your nails a soft ‘twilight’ lavender or navy blue.
- While the polish is still slightly tacky, pick up a star with your tweezers.
- Gently press it onto the nail.
- Use the silicone tool to smooth out any edges so it doesn’t snag.
- Apply two coats of top coat to ‘bury’ the decal for a smooth surface.
Budget Range
- Lights Lacquer ‘Moon River’ ($13)
- ManiMe Star Stickers ($15)
- Revlon Quick Dry Top Coat ($7)
4 Steps for French Tip Cherries
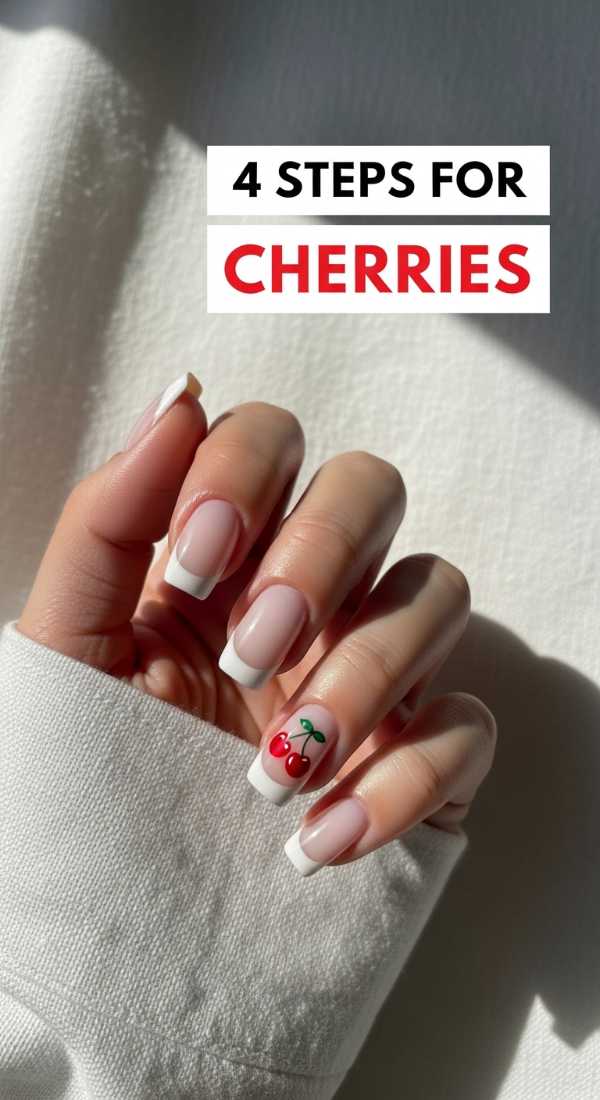
Why to love these Nails:
This is a sophisticated twist on the garden cherry look. By keeping the design strictly on the tips, you maintain that elegant French manicure silhouette while adding a cheeky, seasonal surprise.
Essential Items:
- Nude-to-pink base color
- Bright red polish
- Deep green polish
- A very fine detail brush
How to Prepare:
- Paint a classic French tip (white or even a soft red).
- Place two tiny red dots on one side of the French tip.
- Draw a thin ‘J’ shaped green stem.
- Finish with a tiny dot of white on the cherries for a ‘highlight’ effect.
Budget Range
- Orly ‘Barely There’ ($15)
- CND Vinylux ‘Wildfire’ ($11)
- Detail Paint Brush Set ($12)
7 Ideas for Edgy Garden Party Nails
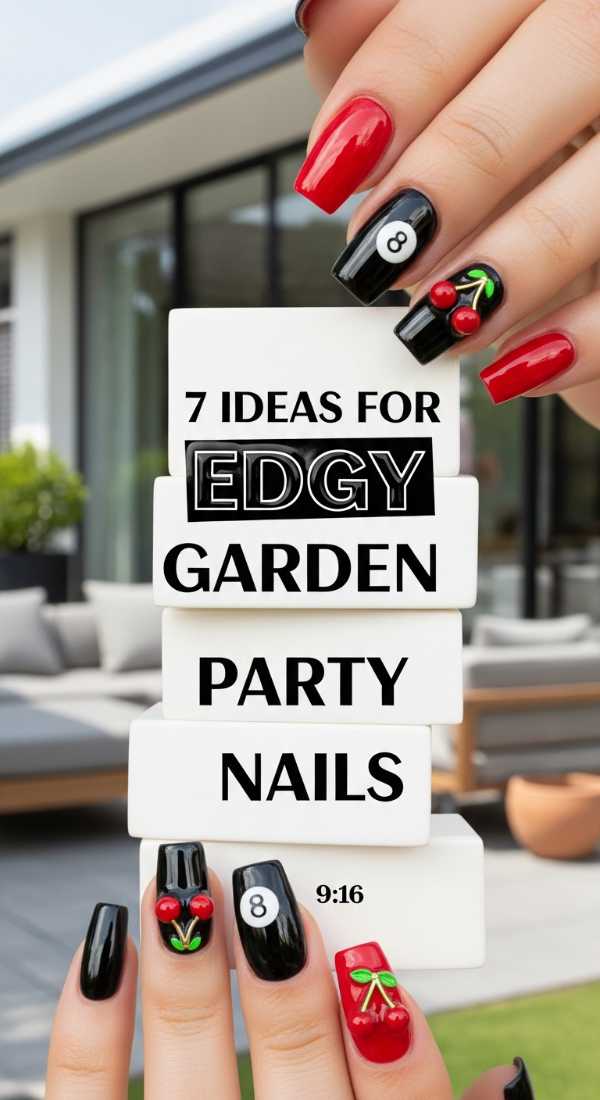
Why to love these Nails:
Who says garden parties have to be all pastels? For my loves who prefer a bit of mystery, adding ‘edgy’ elements like black floral silhouettes or metallic thorns creates a stunning contrast against a soft floral dress.
Essential Items:
- Black stamping polish
- Chrome powder (gold or silver)
- Matte top coat
- Floral stamping plates
How to Prepare:
- Use a dark base like hunter green or plum.
- Stamp delicate floral patterns in black for a subtle, ‘shadow’ effect.
- Rub gold chrome powder onto the edges for a vintage ‘antique frame’ look.
- Apply a matte top coat to give it a velvet appearance.
- Add a single tiny gold stud for a bit of ‘bite’.
- Keep the shapes almond or stiletto for an edgier silhouette.
- Finish with cuticle oil for a healthy, lived-in glow.
Budget Range
- Maniology Stamping Kit ($20)
- Essie ‘Off Tropic’ ($10)
- Born Pretty Chrome Powder ($8)
5 Tips for Long-Lasting Picnic Nails
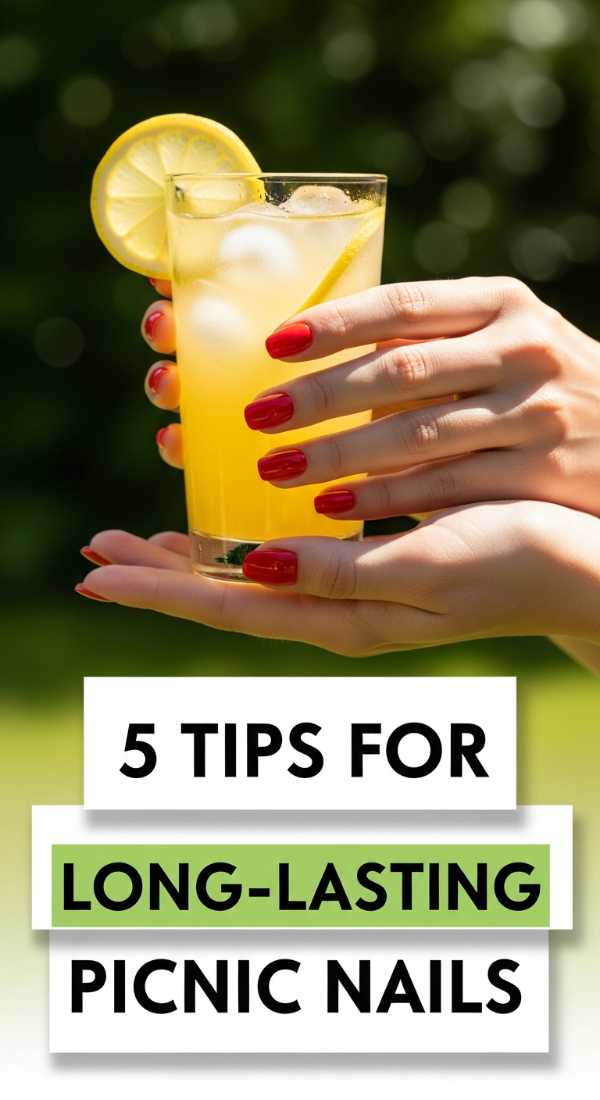
Why to love these Nails:
There is nothing worse than a chip during the first course! Picnic nails need to be durable enough to handle opening containers, playing lawn games, and sitting on blankets without losing their luster.
Essential Items:
- Dehydrating primer
- Long-wear base coat
- Gel-effect polish
- Reinforcing top coat
How to Prepare:
- Always wipe your nails with alcohol first to remove oils.
- Cap the ‘free edge’ (the very tip of your nail) with every layer of polish.
- Avoid hot water for at least two hours after painting.
- Use a ‘gel-like’ system that air dries but provides extra thickness.
- Carry a small top-coat bottle in your purse for quick touch-ups.
Budget Range
- Essie Gel Couture System ($19 for set)
- Seche Vite Dry Fast Top Coat ($10)
- OPI Bond-Aid ($12)
3 Ways to Wear Red Gingham Nails
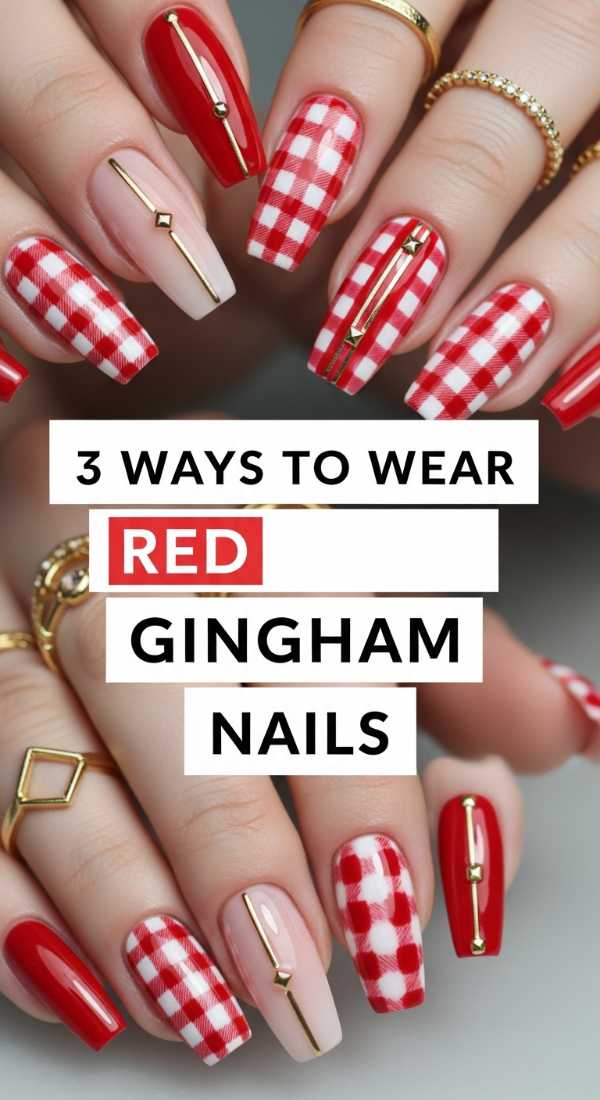
Why to love these Nails:
Red gingham is the ultimate ‘Americana’ garden vibe. It’s bold, it’s cheery, and it looks incredible next to a plate of fresh strawberries or a summer cocktail.
Essential Items:
- Primary red polish
- White polish
- A steady hand or nail tape
How to Prepare:
- The ‘Full Accent’: Paint one finger in full gingham and the rest in solid red.
- The ‘Gingham Moon’: Paint a gingham pattern only at the base (the half-moon) of your nail.
- The ‘Mix & Match’: Pair red gingham with solid white nails and a few cherry decals.
Budget Range
- China Glaze ‘Salsa’ ($8)
- Sinful Colors ‘Snow Me White’ ($3)
- Nail Striping Tape ($5)
6 Steps to 8-Ball Accent Nails
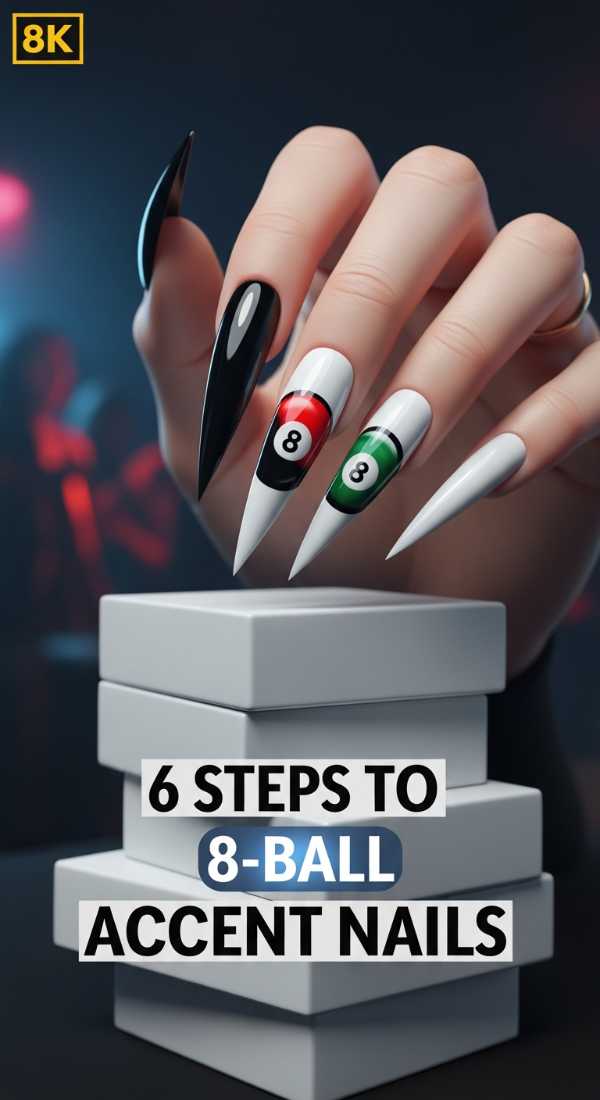
Why to love these Nails:
For a garden party with a ‘cool girl’ or ‘pub garden’ vibe, the 8-ball accent is a total conversation starter. It’s a little bit retro, a little bit lucky, and adds a fun, graphic punch to your botanical look.
Essential Items:
- Opaque black polish
- Crisp white polish
- Smallest dotting tool
- Fine liner brush
How to Prepare:
- Paint your accent nail solid black and let dry.
- Paint a medium-sized white circle in the center.
- Once the white is dry, take your smallest tool and paint a tiny black ‘8’ inside the circle.
- Ensure the ‘8’ is centered for that authentic billiard ball look.
- Add a tiny white ‘glint’ on the black part of the ball for dimension.
- Seal with a high-shine top coat to mimic the gloss of a real pool ball.
Budget Range
- Cirque Colors ‘Back to Black’ ($12)
- Bio Seaweed Gel ‘White’ ($18)
- Nail Art Tool Kit ($10)
Bloom Where You Are Planted
My loves, I hope these designs inspire you to bring a little extra beauty to your next outdoor gathering. Whether you choose the sweetness of cherries or the bold charm of red gingham, remember that the best accessory you can wear is your own radiant smile. Beauty isn’t just about the polish on our tips; it’s about the warmth we share with those around us in the sunshine. Go forth, enjoy your soirée, and let your spirit bloom!