

Stop Overpaying! How to Master the Art of Press-On Nails
Hello, my sweet loves! Take a deep breath with me. Imagine a world where your hands look like a million bucks, but you didn’t have to spend two hours in a noisy salon or empty your savings account for a single set. For the longest time, I felt like my self-care routine was at the mercy of expensive appointments, but I’ve found a way to bring that luxury home, wrapped in a soft, cozy blanket of DIY magic.
Lately, I’ve been diving deep into the world of press-on nails, and honestly? I’m never going back. There is something so incredibly therapeutic about sitting down at your sun-drenched vanity, sipping a latte, and crafting a look that reflects your beautiful soul. Today, I’m sharing everything I’ve learned so we can all embrace the sparkle without the stress. Let’s get into this cloud-soft journey of nail mastery together.
The Foundation: 5 Steps to Prep Your Natural Nails

Why to love these Nails:
The secret to a set that stays is all in the preparation, loves. When you prep correctly, you’re giving your press-ons a clean, strong foundation to cling to, making them feel like a natural extension of your own fingertips.
Essential Items:
- Cuticle pusher (glass or wood)
- 180-grit nail file
- Buffing block
- Alcohol prep pads
- Nail dehydrator
How to Prepare:
- Gently push back your cuticles to reveal the full nail bed.
- Trim and file your natural nails down to a short, manageable length.
- Lightly buff the surface of each nail to remove shine and create grip.
- Wipe each nail thoroughly with an alcohol pad to remove oils.
- Apply a thin layer of dehydrator to ensure a bone-dry surface for the glue.
Budget Range
- Basic Prep Kit: $5.00
- Glass Cuticle Pusher: $8.00
- Professional Dehydrator: $12.00
Sweet Sophistication: 3 Ways to Paint Cute Cherry Designs

Why to love these Nails:
Cherries are just the ultimate vibe—sweet, nostalgic, and a little bit playful. They add a pop of color that instantly brightens your mood every time you look down at your keyboard.
Essential Items:
- Red gel polish
- Green nail art liner
- Dotting tool
- Fine detail brush
- Non-wipe top coat
How to Prepare:
- Method 1: Use a large dotting tool to place two red circles side-by-side, then pull a thin green line up for the stem.
- Method 2: Use a fine brush to paint tiny ‘C’ shapes in red and connect them with delicate leafy stems.
- Method 3: Create ‘abstract’ cherries by dropping red polish and swirling it with a toothpick for a painterly feel.
Budget Range
- Cherry Red Polish: $7.00
- Dotting Tool Set: $4.00
- Green Art Liner: $9.00
The Classic Look: 4 Secrets to Perfect French Tips

Why to love these Nails:
There is nothing more timeless than a French tip. It makes your hands look elongated, elegant, and ready for any occasion, from a wedding to a cozy bookstore date.
Essential Items:
- Silicone nail stamper
- White stamping polish
- Clean-up brush
- Nude base color
How to Prepare:
- Secret 1: Use a silicone stamper—apply white polish to the stamper and press the nail tip into it at a 45-degree angle.
- Secret 2: Always start with a high-quality nude base that matches your skin’s undertone.
- Secret 3: Use a brush dipped in acetone to crisp up the ‘smile line’ for a professional finish.
- Secret 4: Flash cure between layers to prevent the white from smudging into the nude.
Budget Range
- Silicone Nail Stamper: $6.00
- Precision Clean-up Brush: $10.00
- Classic White Polish: $8.00
Cozy Texture: 6 Tips for Applying 3D Cherry Charms

Why to love these Nails:
Adding 3D elements takes your press-ons from ‘store-bought’ to ‘custom-boutique’ in seconds. These charms add a tactile, luxurious dimension that is simply irresistible.
Essential Items:
- Resin cherry charms
- Jewelry glue or thick builder gel
- Tweezers
- UV Lamp
- Top coat
- Small brush
How to Prepare:
- Pick the charm up with precision tweezers to avoid fingerprints.
- Place a generous bead of builder gel where you want the charm to sit.
- Press the charm firmly into the gel, ensuring no air bubbles are trapped.
- Flash cure for 10 seconds to hold it, then full cure for 60 seconds.
- Use a small brush to seal the edges of the charm with top coat so it doesn’t snag.
- Check the balance of the nail to ensure it isn’t too top-heavy.
Budget Range
- Bulk Cherry Charms: $5.00
- Strong Nail Resin: $11.00
- Portable UV Lamp: $15.00
Dreaming Big: 7 Essential Tools for Your Press-On Business

Why to love these Nails:
Turning your passion into a business is the ultimate form of self-love. Sharing your art with the world while working from your cozy home is such a beautiful goal to strive for.
Essential Items:
- Full cover soft gel tips
- Nail display stands
- Professional gel polish collection
- High-quality packaging boxes
- Custom logo stickers
- Measuring tape for sizing
- Business business cards
How to Prepare:
- Invest in high-quality full cover tips as your canvas.
- Source a range of gel colors that represent your brand aesthetic.
- Set up a dedicated, well-lit workspace.
- Create a consistent photography backdrop for social media.
- Order eco-friendly packaging to delight your future customers.
- Develop a sizing chart to help buyers find their perfect fit.
- Register your business name and set up an online storefront.
Budget Range
- Business Starter Kit: $50.00
- Bulk Soft Gel Tips: $20.00
- Custom Packaging: $30.00
Rustic Charm: 2 Easy Techniques for Red Gingham Patterns
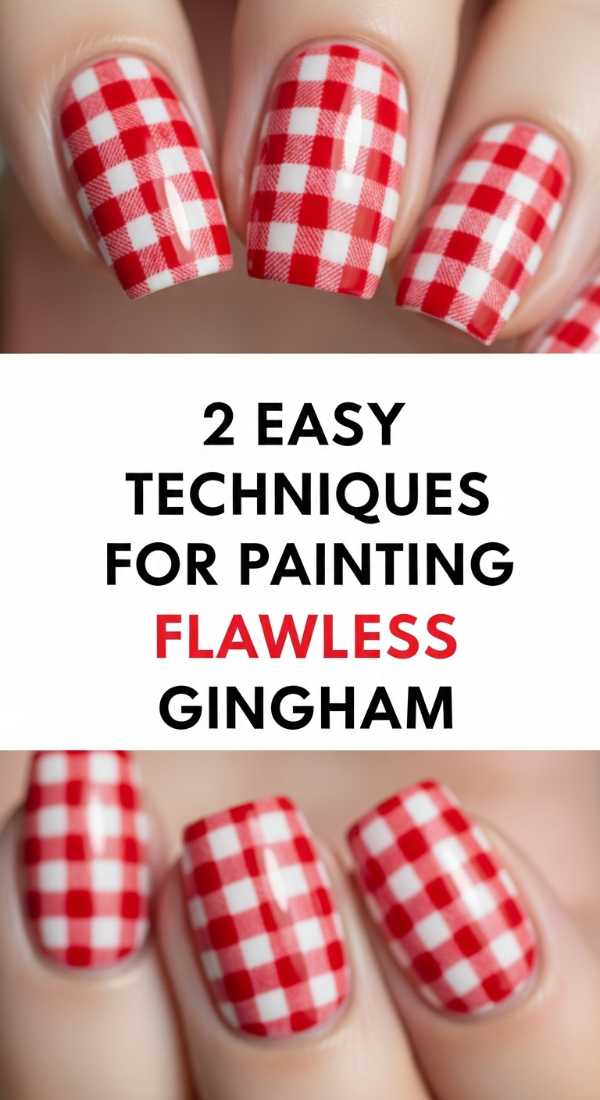
Why to love these Nails:
Gingham reminds me of summer picnics and vintage dresses. It’s a pattern that feels warm and comforting, giving your nails a sweet, hand-painted look.
Essential Items:
- Sheer red polish
- Opaque red polish
- Flat square brush
- White base coat
How to Prepare:
- Technique 1: The Layering Method—Paint vertical stripes of sheer red, then horizontal stripes; where they overlap, the color deepens naturally.
- Technique 2: The Block Method—Use a flat brush to stamp squares in a grid pattern using opaque red for a more graphic look.
Budget Range
- Sheer ‘Jelly’ Polish: $9.00
- Flat Art Brush: $6.00
- White Base Polish: $7.00
Lasting Love: 8 Hacks to Make Short Press-Ons Last 3 Weeks

Why to love these Nails:
Shorter nails are so practical for our busy lives, and making them last means more time enjoying your look and less time worrying about a nail popping off at the wrong moment.
Essential Items:
- High-quality nail glue
- Buffer
- Gloves for cleaning
- Cuticle oil
- Top coat
- Alcohol
- Nail file
- Patience
How to Prepare:
- Hack 1: Buff the inside of the press-on nail to create more surface area for the glue.
- Hack 2: Apply glue to both your natural nail and the press-on.
- Hack 3: Hold each nail down with firm pressure for at least 30 seconds.
- Hack 4: Avoid water for the first 2-4 hours after application.
- Hack 5: Wear gloves when doing dishes or using cleaning chemicals.
- Hack 6: Apply a fresh top coat every week to seal the edges.
- Hack 7: Use cuticle oil daily to keep the natural nail flexible.
- Hack 8: Ensure the press-on is not touching your skin or cuticles.
Budget Range
- Maximum Strength Glue: $6.00
- Rubber Cleaning Gloves: $3.00
- Nourishing Cuticle Oil: $10.00
Celestial Magic: 3 Steps to Add Gold Star Accents
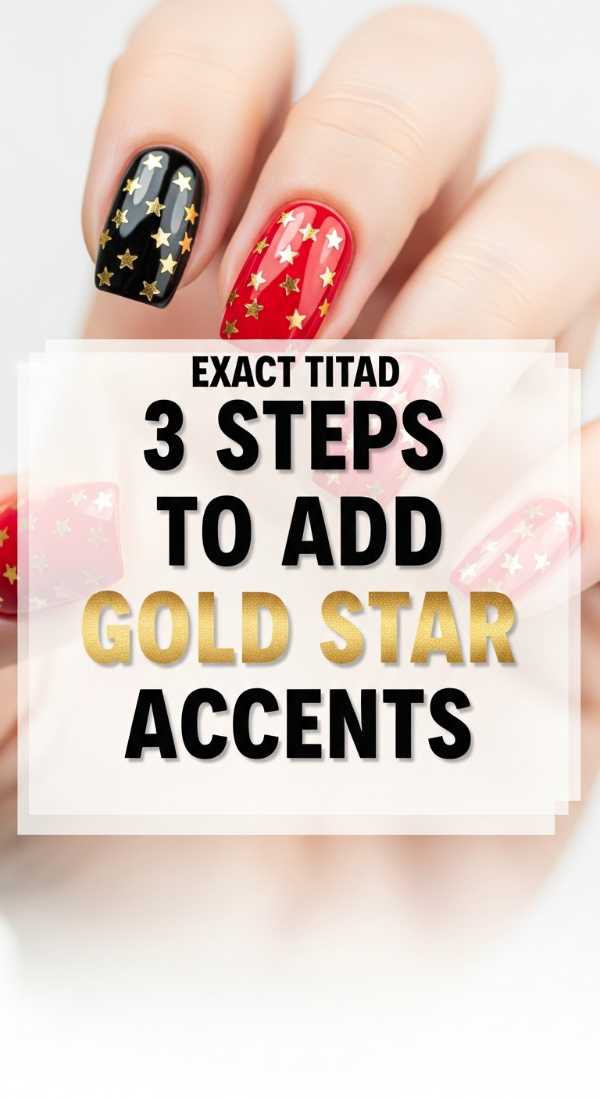
Why to love these Nails:
A little bit of gold leaf or a star decal can make your nails feel like a starry night sky. It adds a touch of magic to your everyday routine, reminding you to reach for the stars.
Essential Items:
- Gold star decals or foil
- Pointed tweezers
- Encapsulating top coat
How to Prepare:
- Apply your base color and let it dry until it is slightly tacky.
- Place the gold star carefully using tweezers, pressing the edges down flat.
- Apply two thin layers of top coat to ‘encapsulate’ the star so it stays smooth.
Budget Range
- Gold Star Decals: $4.00
- Gold Nail Foil: $5.00
- High-Gloss Top Coat: $12.00
Kindness First: 4 Gentle Ways to Remove Press-Ons
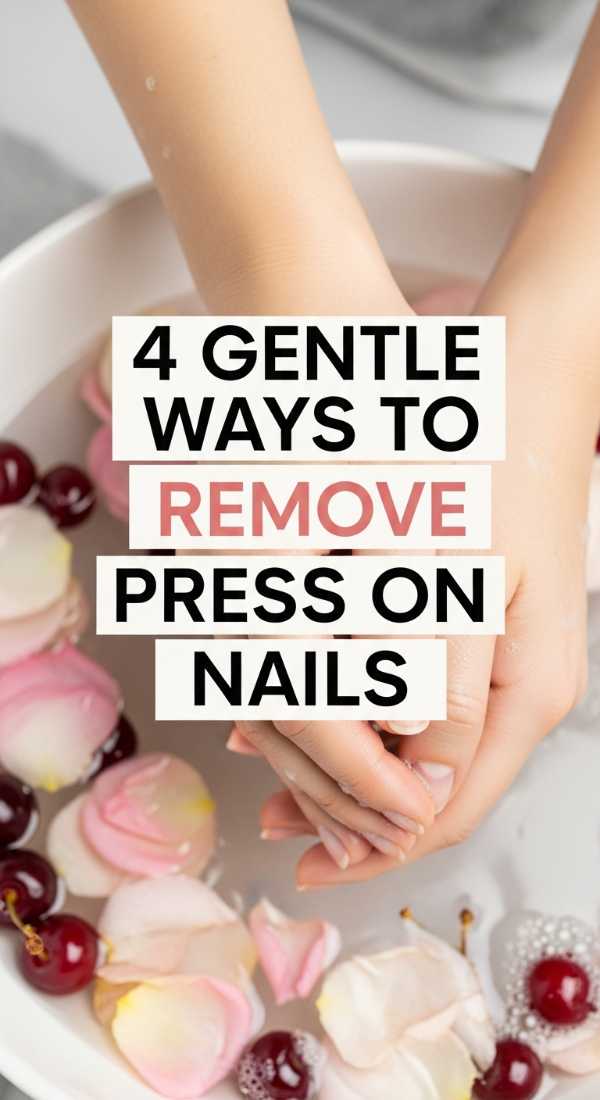
Why to love these Nails:
Removing your nails should be a gentle, spa-like experience, not a chore. Protecting your natural nails is the kindest thing you can do for your hands.
Essential Items:
- Warm soapy water
- Olive oil or cuticle oil
- Dental floss picks
- Acetone (optional)
How to Prepare:
- Method 1: Soak your hands in warm, soapy water mixed with oil for 15 minutes.
- Method 2: Gently slide a dental floss pick under the edges to lift the nail.
- Method 3: Apply cuticle oil around the edges and let it sit to dissolve the glue.
- Method 4: If using professional glue, use a small amount of acetone on a cotton ball for stubborn spots.
Budget Range
- Dental Floss Picks: $3.00
- Extra Virgin Olive Oil: $8.00
- Nail Buffer: $2.00
The Perfect Fit: 5 Professional Tricks for Sizing Nails

Why to love these Nails:
When your press-ons fit perfectly, nobody can tell they aren’t your natural nails! A perfect fit ensures comfort and prevents that ‘sore’ feeling from a nail that’s too small.
Essential Items:
- Sizing kit
- Soft measuring tape
- Small file
- Notebook for records
- Good lighting
How to Prepare:
- Trick 1: Measure the widest part of your nail bed using a soft tape measure in millimeters.
- Trick 2: If you are between sizes, always size up and file the sides down for a custom fit.
- Trick 3: Ensure the press-on covers from sidewall to sidewall without overlapping the skin.
- Trick 4: Keep a ‘size diary’ for each finger so you never have to guess again.
- Trick 5: Test the fit before applying glue to ensure the curve of the press-on matches your nail’s natural arch.
Budget Range
- Soft Measuring Tape: $2.00
- Sizing Sample Kit: $10.00
- Nail Journal: $12.00
A Little Note From Me to You
I hope this guide feels like a warm hug for your creativity. Remember, my loves, beauty isn’t about how much you spend; it’s about the intention and the love you pour into yourself. Mastering the art of press-on nails is such a fun, rewarding way to express who you are. So, put on your favorite playlist, light a candle, and let your hands tell your story. You deserve to feel beautiful, every single day.