
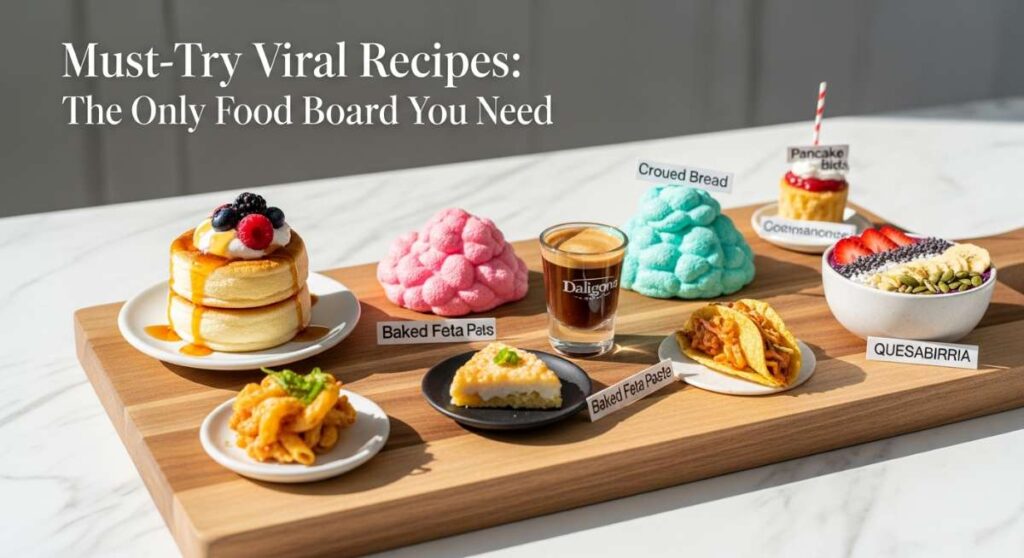
Hello, my loves! Welcome back to our cozy little corner of the internet. There is something so profoundly healing about spending a quiet afternoon in the heart of the home, letting the rhythmic sounds of whisking and the sweet aroma of melting chocolate wash over you like a warm, cloud-soft embrace. I’ve spent the last few weeks curating a collection of recipes that have been dancing across our feeds, testing each one to make sure they aren’t just ‘viral’ but truly soulful and delicious.
Today, I am sharing my absolute favorites from my personal ‘Food Ideas Board’—the ones that made my heart skip a beat and my kitchen feel like a sanctuary. These aren’t just recipes; they are little moments of joy wrapped in flour and sugar, designed to be shared with the people you hold most dear. So, grab your favorite apron, put on some soft music, and let’s dive into these treats together. I promise your kitchen is about to become the most magical place in the world.
Secret to Perfectly Gooey Chocolate Lava Cakes

Why we love this
It’s the ultimate romantic dessert that feels like a warm hug on a cold evening. There is something truly magical about breaking into a delicate cake only to find a molten, chocolate heart waiting for you inside. We love how this recipe turns a few humble ingredients into a sophisticated masterpiece that impresses every single guest at the table. It is the definition of a ‘treat yourself’ moment that everyone deserves to experience at least once a week.
Ingredients
- 1/2 cup unsalted butter
- 4 ounces high-quality semi-sweet chocolate
- 2 large eggs plus 2 egg yolks
- 1/4 cup granulated sugar
- Pinch of salt
- 2 tablespoons all-purpose flour
How to make it
- Preheat your oven to 425°F (218°C) and generously grease two or three 6-ounce ramekins with butter and a dusting of cocoa powder.
- In a microwave-safe bowl, melt the butter and chopped chocolate together in 30-second increments, stirring until completely smooth and glossy.
- In a separate medium bowl, beat the eggs, egg yolks, sugar, and salt with a whisk or electric mixer until thickened and pale yellow in color.
- Gently fold the melted chocolate mixture into the egg mixture until just combined, being careful not to deflate the air you’ve built up.
- Sift the flour over the batter and gently fold it in until no white streaks remain; then divide the batter evenly among the prepared ramekins.
- Bake for 12-14 minutes until the sides are firm but the center still jiggles slightly, then let cool for one minute before inverting onto a plate.
How to Make Soft Homemade Cinnamon Rolls

Why we love this
Nothing says ‘I love you’ quite like the scent of fresh cinnamon and yeast wafting through the house on a slow Sunday morning. These rolls are like little pillowy clouds of joy, swirled with a spicy-sweet filling and topped with a melt-in-your-mouth glaze that feels so indulgent. They bring the family together in the kitchen, creating memories that are just as sweet as the rolls themselves. You’ll never want to buy the canned version again once you taste this homemade magic.
Ingredients
- 4 cups all-purpose flour
- 1/3 cup softened butter
- 1 cup warm milk
- 2 1/4 tsp yeast
- 1/2 cup sugar
- For filling: 1 cup brown sugar, 2 tbsp cinnamon, 1/3 cup butter
- For frosting: 4 oz cream cheese, 1/4 cup butter, 1 cup powdered sugar
How to make it
- Dissolve the yeast and a pinch of sugar in the warm milk and let it sit for about 10 minutes until it becomes frothy and active.
- Mix in the sugar, softened butter, and flour gradually using a stand mixer with a dough hook until a soft, slightly tacky dough forms.
- Knead the dough for about 5-7 minutes until smooth, then place in a greased bowl, cover with a warm towel, and let rise for one hour.
- Roll the dough out into a large rectangle, spread with softened butter, and sprinkle the cinnamon-sugar mixture evenly over the entire surface.
- Roll the dough tightly into a log, cut into 12 even rolls using dental floss or a sharp knife, and place them in a greased baking pan.
- Let them rise for another 30 minutes, bake at 350°F for 20-25 minutes, and slather with the cream cheese frosting while they are still warm.
Easy No Bake Peanut Butter Bars Tutorial

Why we love this
These bars are the perfect solution for those afternoons when you are craving something sweet but simply cannot bear to turn on the oven. The combination of salty peanut butter and smooth milk chocolate is a classic duo that never fails to satisfy the strongest of cravings. They are incredibly easy to whip up with the kids and keep perfectly in the fridge for a quick midnight snack. Every bite is a nostalgic trip back to childhood bake sales and lunchbox surprises that we all remember fondly.
Ingredients
- 1 cup melted butter
- 2 cups graham cracker crumbs
- 2 cups powdered sugar
- 1 1/2 cups creamy peanut butter
- 1 1/2 cups semi-sweet chocolate chips
How to make it
- In a large mixing bowl, combine the melted butter, graham cracker crumbs, and powdered sugar until a thick, sandy dough forms.
- Stir in 1 cup of the creamy peanut butter until the mixture is well combined and holds together when pressed.
- Press the peanut butter mixture firmly and evenly into the bottom of a parchment-lined 9×9 inch square baking pan.
- In a small microwave-safe bowl, melt the chocolate chips with the remaining 1/2 cup of peanut butter in 30-second bursts until smooth.
- Spread the chocolate mixture evenly over the peanut butter base, using a spatula to create a smooth, beautiful top layer.
- Refrigerate the bars for at least 2 hours to allow them to set completely before slicing into squares and serving chilled.
Healthy Low Sugar Chocolate Mousse Recipe

Why we love this
This mousse is a total game-changer for my loves who want to indulge their chocolate cravings without the heavy sugar crash afterward. It has a texture that is so light and airy, it feels like eating a chocolate-flavored cloud that gently dissolves on your tongue. By using natural sweeteners and high-quality cocoa, we manage to keep the depth of flavor while staying true to our wellness goals. It is the perfect elegant finish to a light dinner party or a quiet evening of self-care.
Ingredients
- 2 ripe avocados
- 1/2 cup unsweetened cocoa powder
- 1/2 cup maple syrup or honey
- 1/3 cup almond milk
- 2 tsp vanilla extract
- Pinch of sea salt
How to make it
- Scoop the flesh of the two ripe avocados into a high-speed blender or a food processor, ensuring there are no brown spots.
- Add the cocoa powder, maple syrup, vanilla extract, and a pinch of salt to the blender to build the flavor profile.
- Pour in the almond milk, starting with a small amount and adding more if you prefer a thinner, lighter consistency for your mousse.
- Blend the mixture on high speed for 1-2 minutes until it is completely smooth, creamy, and free of any avocado lumps.
- Taste the mousse and adjust the sweetness if necessary, then spoon it into small glass jars or ramekins for a beautiful presentation.
- Chill the mousse in the refrigerator for at least 30 minutes to let the flavors meld and the texture firm up slightly before serving.
Trick for the Most Moist Sponge Cake

Why we love this
A truly moist sponge cake is the holy grail of baking, and this recipe finally unlocks the secret to that perfect, tender crumb. We have all experienced the disappointment of a dry cake, but this version stays remarkably soft and hydrated for days on end. It is the ideal canvas for your favorite jams, creams, or fresh summer fruits, making it a versatile staple in any baker’s repertoire. There is a quiet confidence that comes with knowing your base cake will be absolutely flawless every single time.
Ingredients
- 2 1/4 cups all-purpose flour
- 1 1/2 cups granulated sugar
- 3 1/2 tsp baking powder
- 1 tsp salt
- 1/2 cup softened butter
- 1 cup whole milk at room temperature
- 1 tsp vanilla extract
- 2 large eggs
How to make it
- Preheat your oven to 350°F (175°C) and prepare two 9-inch cake pans with parchment paper and a light coating of flour.
- In a large bowl, whisk together the flour, sugar, baking powder, and salt until light and aerated to ensure a good rise.
- Add the softened butter and half of the milk, mixing on low speed until the ingredients are moistened, then beat on medium for two minutes.
- In a small bowl, whisk the remaining milk, vanilla, and eggs together, then gradually add this to the batter in three separate stages.
- Divide the batter evenly between the two pans and bake for 25-30 minutes, or until a toothpick inserted in the center comes out clean.
- The real trick: wrap the warm cake layers in plastic wrap while they are still slightly warm to trap the steam and ensure maximum moisture.
Perfectly Chewy Brown Butter Cookies Method

Why we love this
Taking the extra few minutes to brown your butter transforms a standard cookie into a gourmet experience with deep, toasty, toffee-like notes. The edges are delightfully crisp while the centers remain soft and chewy, creating a multi-layered texture that is completely addictive for any cookie lover. Adding a tiny sprinkle of sea salt on top elevates the sweetness and brings out the richness of the butter in a way that is truly transformative. These are not just cookies; they are a warm, nutty embrace in handheld form.
Ingredients
- 1 cup unsalted butter
- 3/4 cup brown sugar
- 3/4 cup white sugar
- 1 egg + 1 egg yolk
- 2 cups all-purpose flour
- 1 tsp baking soda
- 1 cup chocolate chunks
- Flaky sea salt
How to make it
- Melt the butter in a light-colored saucepan over medium heat, swirling constantly until it foams, turns golden brown, and smells nutty.
- Immediately pour the browned butter into a large heat-proof bowl and let it cool for about 10 minutes so it doesn’t cook the eggs.
- Whisk in the brown sugar and white sugar until well combined, then add the egg and egg yolk, whisking vigorously until the mixture lightens.
- Fold in the flour and baking soda with a spatula until just a few streaks of flour remain, then stir in the chocolate chunks.
- Chill the dough in the refrigerator for at least 30 minutes; this is a non-negotiable step for the best flavor and texture.
- Scoop dough onto a baking sheet, bake at 350°F for 10-12 minutes, and sprinkle with flaky sea salt immediately after removing from the oven.
How to Make Professional Fruit Tarts at Home

Why we love this
There is something so incredibly rewarding about assembling a fruit tart that looks like it stepped right out of a high-end Parisian patisserie window. The contrast between the buttery, shortbread-like crust and the silky smooth pastry cream creates a sophisticated base for whatever seasonal fruits you choose. Glazing the berries gives them a professional shine that makes the whole dessert sparkle under the dining room lights during your gatherings. It is a labor of love that rewards you with both beauty and a burst of fresh, vibrant flavor.
Ingredients
- 1 1/2 cups flour
- 1/2 cup powdered sugar
- 3/4 cup cold butter
- 2 cups whole milk
- 1/2 cup sugar
- 4 egg yolks
- 1/4 cup cornstarch
- Assorted fresh fruit
How to make it
- Pulse the flour, powdered sugar, and cold butter in a food processor until it forms a dough, then press into a tart pan and bake at 350°F for 15 minutes.
- To make the pastry cream, heat the milk in a saucepan until simmering, while whisking egg yolks, sugar, and cornstarch in a separate bowl.
- Slowly temper the hot milk into the egg mixture, then return everything to the heat and whisk constantly until thickened into a custard.
- Strain the cream through a fine-mesh sieve, cover with plastic wrap touching the surface, and chill in the fridge until completely cold.
- Spread the chilled pastry cream into the cooled tart shell and arrange your fresh fruit in a beautiful, concentric circular pattern.
- Melt a little apricot jam with a splash of water and brush it gently over the fruit to give it that signature professional bakery shine.
The Most Satisfying Chocolate Ganache Recipe
Why we love this
Ganache is the liquid gold of the dessert world, and mastering this simple two-ingredient technique will make you feel like a true kitchen professional. Whether you use it as a pourable glaze, a whipped frosting, or a rich truffle base, its versatility is absolutely unmatched in the world of sweets. We love the glossy, mirror-like finish it provides to cakes, making even the simplest bakes look incredibly expensive and meticulously crafted. It is a decadent, velvety smooth experience that coats your palate in pure chocolate luxury.
Ingredients
- 8 ounces high-quality bittersweet chocolate (60% cacao)
- 1 cup heavy whipping cream
- Optional: 1 tbsp butter for extra shine
- Optional: 1 tsp vanilla extract
How to make it
- Chop the chocolate into very small, uniform pieces and place them in a medium-sized heat-proof glass or metal bowl.
- Heat the heavy cream in a small saucepan over medium heat until it just begins to simmer—do not let it reach a full, rolling boil.
- Pour the hot cream immediately over the chopped chocolate and let it sit undisturbed for exactly five minutes to allow the chocolate to melt.
- Starting from the center of the bowl, gently whisk the mixture in small circles until the cream and chocolate emulsify into a dark, glossy liquid.
- If using, stir in the butter and vanilla extract at this stage to add an extra layer of flavor and a professional polished look.
- Let the ganache sit at room temperature to thicken for a glaze, or refrigerate and whip with a mixer for a fluffy, rich frosting.
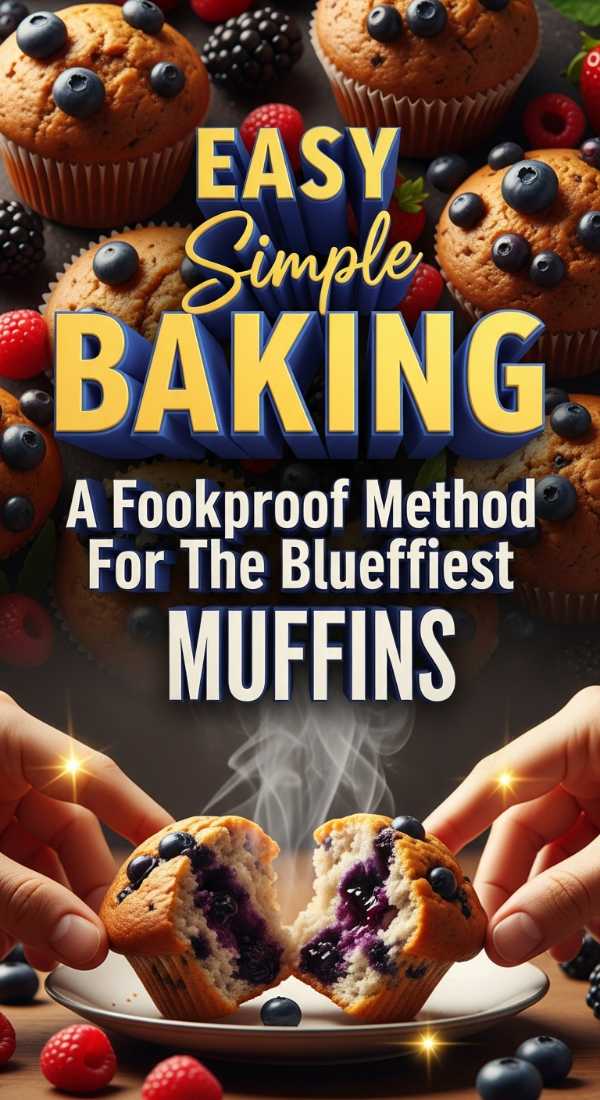
Foolproof Method for the Fluffiest Muffins

Why we love this
There is nothing more disappointing than a flat, dense muffin, which is why this high-heat method for achieving bakery-style domes is so vital. These muffins are incredibly light and airy, with a tender crumb that practically melts away the moment it hits your mouth. They are the perfect way to start your day, especially when they are still warm enough to melt a little pat of butter. This recipe is a warm invitation to slow down and savor the morning with a cup of tea and a treat.
Ingredients
- 3 cups all-purpose flour
- 1 tbsp baking powder
- 1 tsp baking soda
- 1/2 tsp salt
- 1/2 cup melted butter
- 1 cup granulated sugar
- 2 eggs
- 1 cup buttermilk
How to make it
- Preheat your oven to a high 425°F (218°C) and line a muffin tin with paper liners, spraying the top of the tin to prevent sticking.
- Whisk the dry ingredients (flour, baking powder, baking soda, and salt) in one bowl and the wet ingredients (butter, sugar, eggs, buttermilk) in another.
- Gently fold the wet ingredients into the dry ingredients until just barely combined—remember, lumps are your friend when it comes to fluffy muffins.
- Fill the muffin liners all the way to the very top; this is essential for getting those high, beautiful, bakery-style domed tops.
- Bake at 425°F for exactly 5 minutes, then, without opening the oven door, lower the temperature to 350°F (175°C) for the remaining 13-15 minutes.
- The initial burst of high heat creates the rise, while the lower heat finishes the baking without drying out the delicate interior of the muffin.
Indulgent Rich Dark Chocolate Fudge
[IMAGE_10]
Why we love this
This fudge is the ultimate expression of chocolate decadence, offering a rich and dense texture that feels like a pure indulgence in every square. It is surprisingly simple to make, yet it tastes like something that took hours of careful tempering and stirring over a hot stove. We love wrapping these up in parchment paper and twine to give as heartfelt gifts to neighbors, friends, or anyone needing a smile. It is a timeless treat that brings a sense of comfort and tradition to any holiday table.
Ingredients
- 3 cups semi-sweet or dark chocolate chips
- 1 can (14 oz) sweetened condensed milk
- 1/4 cup unsalted butter
- 1 tsp vanilla extract
- 1/4 tsp salt
How to make it
- Line an 8×8 inch square baking pan with parchment paper, leaving an overhang on the sides so you can easily lift the fudge out later.
- In a heavy-bottomed saucepan, combine the chocolate chips, sweetened condensed milk, and butter over low heat.
- Stir the mixture constantly with a silicone spatula until the chocolate is completely melted and the mixture is thick and smooth.
- Remove the pan from the heat and quickly stir in the vanilla extract and salt until they are fully incorporated into the fudge.
- Pour the warm fudge into the prepared pan and smooth the top with your spatula until it is even and beautiful.
- Let the fudge cool at room temperature for an hour, then refrigerate for at least 3 hours until firm before lifting out and slicing.
A Sweet Goodbye for Now
Thank you so much for spending this time with me in my favorite place. I hope these recipes bring as much warmth and light into your home as they have into mine. Remember, baking isn’t about perfection; it’s about the love you fold into the batter and the smiles you share over the finished plate. Go ahead and pin these to your boards, try one out this weekend, and let me know how it goes. I’m sending you all so much love and a giant virtual hug!