

We’ve all been there—that frantic twenty minutes before guests arrive when the kitchen looks like a flour-dusted disaster zone and you’re still in your bathrobe. I used to think hosting meant three-course meals and elaborate table settings, but lately, I’ve discovered the magic of the ‘Viral Food Board.’ It’s about more than just food; it’s about creating a centerpiece that invites everyone to lean in, grab a plate, and share a moment together without the stiff formality of a sit-down dinner.
This ultimate hosting hack is my secret weapon for the season. By combining these crowd-pleasing favorites into one spectacular spread, you transform a simple afternoon into a memory. Whether it’s the sizzle of the grill or the refreshing crunch of garden-fresh vegetables, these recipes are designed to be low-stress and high-impact. Let’s dive into the components that will make your next gathering the talk of the neighborhood.
How to make a cheesy Rotel dip
Why we love this
There is something undeniably nostalgic and comforting about a warm bowl of cheesy Rotel dip. As it bubbles away, the aroma of savory ground meat and zesty green chilies fills the air, instantly making the house feel like a party. The texture is velvety and rich, clinging perfectly to a salty tortilla chip, while the subtle heat from the habanero-infused tomatoes provides a gentle kick that keeps you coming back for more. It is the ultimate communal food, melting hearts as quickly as it melts in your mouth.
Ingredients
- 1 lb ground beef or spicy sausage
- 1 block (32 oz) Velveeta cheese, cubed
- 2 cans (10 oz each) Rotel Diced Tomatoes and Green Chilies
- 1/2 cup chopped cilantro for garnish
- 1 teaspoon smoked paprika
How to make it
- Begin by browning your choice of ground meat in a large skillet over medium-high heat. Use a wooden spoon to break the meat into small, uniform crumbles, ensuring it cooks evenly until no pink remains and a slight crust develops for extra flavor.
- Once the meat is fully cooked, drain the excess fat carefully into a heat-safe container. This step is crucial to prevent the dip from becoming oily or separated later on.
- Lower the heat to medium-low and add the cubed Velveeta cheese to the skillet. Cubing the cheese into 1-inch pieces ensures it melts consistently without burning on the bottom of the pan.
- Stir in the two cans of Rotel tomatoes, including the liquid. The juices from the tomatoes help thin the cheese to a dip-able consistency.
- Continue to stir the mixture frequently for about 5-8 minutes until the cheese is completely smooth and incorporated with the meat. If the dip feels too thick, you can add a splash of milk to reach your desired texture.
- Transfer to a warm serving bowl or a small slow cooker on the ‘warm’ setting to keep it liquid and luscious throughout your event.
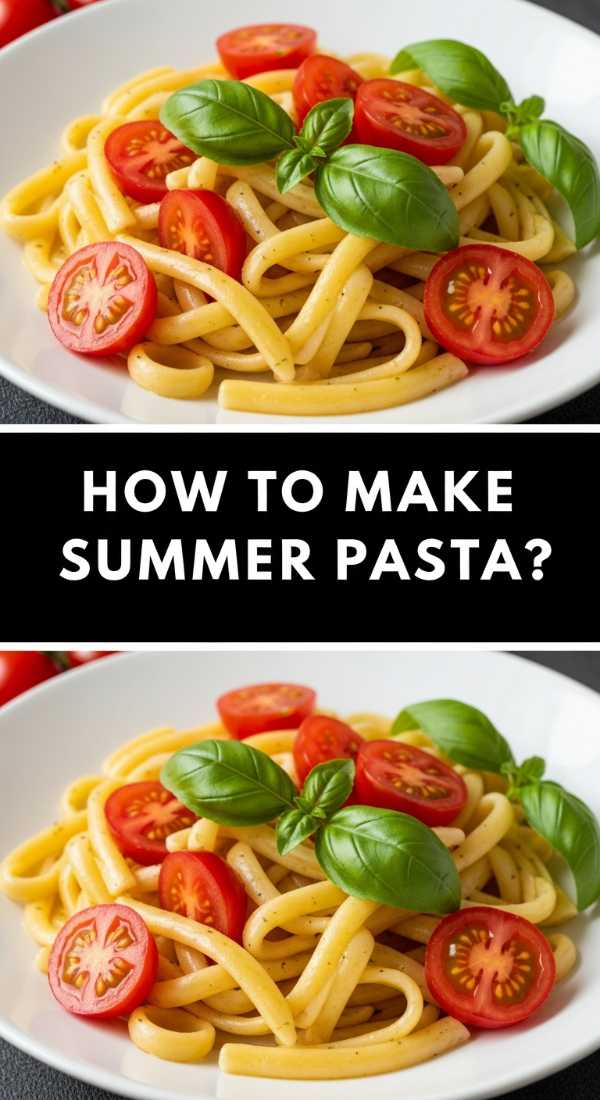
How to make fresh summer pasta

Why we love this
This dish captures the very essence of a sun-drenched July afternoon. The brightness of the lemon zest cuts through the richness of the olive oil, creating a light, silky sauce that coats every strand of pasta perfectly. When you take a bite, you experience the burst of sweet cherry tomatoes and the earthy, peppery notes of fresh basil. It feels elegant yet effortless, making it the perfect centerpiece for a light dinner on the patio with a glass of chilled white wine.
Ingredients
- 1 lb Linguine or Angel Hair pasta
- 2 cups cherry tomatoes, halved
- 4 cloves garlic, thinly sliced
- 1/2 cup high-quality extra virgin olive oil
- 1 cup fresh basil leaves, torn
- Zest of one organic lemon
- Grated Parmesan cheese
How to make it
- Bring a large pot of heavily salted water to a rolling boil. Adding plenty of salt is the only chance you have to season the pasta itself, so don’t be shy.
- Cook the pasta according to the package directions, but aim for ‘al dente’—about 1-2 minutes less than the full cooking time—as it will finish cooking in the sauce.
- While the pasta boils, heat the olive oil in a wide skillet over medium heat. Add the sliced garlic and sauté gently for 1-2 minutes. Watch closely; you want the garlic to turn a pale golden color and become fragrant without browning, which would make it bitter.
- Add the halved cherry tomatoes to the skillet with a pinch of salt. Sauté them for 3-4 minutes until they just begin to soften and release their juices, creating a natural sauce.
- Reserve 1/2 cup of the starchy pasta water before draining the noodles. Toss the pasta into the skillet with the tomatoes and garlic.
- Add the reserved pasta water, lemon zest, and half of the fresh basil. Toss vigorously over low heat for 1 minute until the sauce emulsifies and clings to the pasta. Serve immediately with the remaining basil and a generous dusting of Parmesan.
How to make hummingbird food at home
Why we love this
Creating your own hummingbird nectar is a small act of kindness for the environment that rewards you with the most magical backyard view. There is a quiet joy in watching these iridescent creatures dart through the air, their wings humming as they hover over the feeder you’ve prepared. This homemade solution is much healthier for the birds than store-bought red dyes, offering a pure, clean energy source that mimics the natural nectar found in flowers. It transforms your outdoor space into a living sanctuary.
Ingredients
- 1 cup granulated white sugar
- 4 cups filtered water
How to make it
- Measure out your water and pour it into a medium saucepan. Using filtered water is recommended to remove any chlorine or minerals that might be harsh for the delicate birds.
- Bring the water to a boil over high heat. Boiling the water helps to neutralize any impurities and ensures the sugar dissolves completely into a clear syrup.
- Once boiling, stir in the granulated sugar. Use only white cane sugar; never use honey, brown sugar, or artificial sweeteners, as these can be fatal to hummingbirds.
- Stir the mixture until the sugar is fully dissolved and the liquid is crystal clear. Let it boil for about 1-2 minutes to ensure stability.
- Remove the pot from the heat and allow the nectar to cool completely to room temperature. This is a vital step; pouring hot liquid into a plastic feeder can warp it or harm the birds.
- Fill your clean hummingbird feeders and store any leftover nectar in a sealed glass jar in the refrigerator for up to one week.
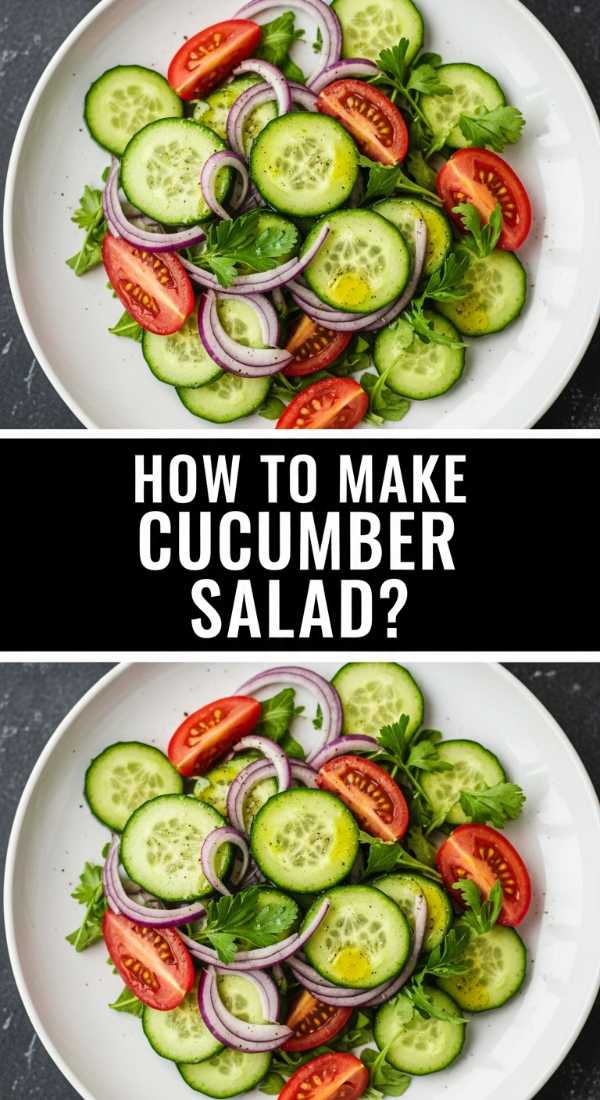
How to make cucumber tomato salad

Why we love this
This salad is the definition of crisp refreshment. Every bite is a cooling explosion of flavor, from the snap of the cucumber to the juicy sweetness of vine-ripened tomatoes. The red onion provides a sharp, colorful contrast, while the vinegar dressing adds a tangy brightness that wakes up the palate. It’s the kind of side dish that feels like a palate cleanser, cutting through the heat of a summer day with its vibrant, garden-fresh aroma and light, crunchy texture.
Ingredients
- 2 large English cucumbers, sliced
- 4 medium tomatoes, cut into wedges
- 1/2 red onion, thinly sliced
- 1/4 cup red wine vinegar
- 2 tablespoons olive oil
- 1 tablespoon fresh dill, chopped
- Salt and cracked black pepper to taste
How to make it
- Prepare the cucumbers by slicing them into half-moons. If using English cucumbers, there is no need to peel them, as the skin is thin and adds a beautiful green color.
- Cut the tomatoes into bite-sized wedges. For the best flavor, use tomatoes that are slightly soft to the touch, indicating they are fully ripe and sweet.
- In a small mixing bowl, whisk together the red wine vinegar, olive oil, salt, and pepper. Whisk until the oil and vinegar are well combined into a temporary emulsion.
- In a large glass bowl, combine the cucumbers, tomatoes, and sliced red onions. The glass won’t react with the vinegar, keeping the flavors pure.
- Pour the dressing over the vegetables and toss gently with large spoons. Be careful not to bruise the tomatoes.
- Stir in the fresh dill. Let the salad sit in the refrigerator for at least 30 minutes before serving; this ‘marinating’ time allows the juices from the tomatoes to mix with the vinegar for a deeper flavor profile.
How to cook healthy summer dinner

Why we love this
A healthy summer dinner should feel nourishing without being heavy. We love this approach because it focuses on clean proteins and the smoky char of grilled seasonal vegetables. The aroma of rosemary and lemon hitting the hot grates is enough to draw everyone into the kitchen. It’s a meal that leaves you feeling energized rather than sluggish, celebrating the simplicity of high-quality ingredients cooked with fire and care. It is balance on a plate, served under the golden hour light.
Ingredients
- 2 lbs Chicken breast or Salmon fillets
- 1 bunch of asparagus, trimmed
- 2 bell peppers, sliced into thick strips
- 3 tablespoons olive oil
- Juice of 2 lemons
- 2 cloves garlic, minced
- 1 tablespoon fresh rosemary or thyme
How to make it
- In a small bowl, create a marinade by whisking together olive oil, lemon juice, minced garlic, and your chosen fresh herbs. Divide the marinade into two portions.
- Place your protein (chicken or salmon) in a shallow dish and pour half the marinade over it. Let it sit for 20 minutes. If using salmon, don’t marinate for more than 30 minutes or the acid will ‘cook’ the fish.
- Preheat your grill to medium-high heat (about 400°F). Clean the grates thoroughly and lightly oil them to prevent sticking.
- Toss the asparagus and bell peppers with the remaining marinade. Grilling vegetables at high heat caramelizes their natural sugars, giving them a sweet, smoky finish.
- Place the protein on the hottest part of the grill. For chicken, cook for 6-7 minutes per side until the internal temperature reaches 165°F. For salmon, cook for 4-5 minutes per side until it flakes easily with a fork.
- Arrange the vegetables around the protein and grill for 3-5 minutes, turning occasionally until they have distinct grill marks but still retain a bit of snap.
How to make easy summer desserts

Why we love this
When the sun is out, no one wants to stand over a hot oven. These easy summer desserts are all about assembly and the natural sweetness of peak-season fruit. Imagine light-as-air whipped cream layered with macerated strawberries and crunchy shortbread crumbles. The textures play together beautifully—creamy, crunchy, and juicy all at once. It’s a dessert that looks like a masterpiece but takes minutes to assemble, allowing you to spend more time enjoying the sunset and less time washing mixing bowls.
Ingredients
- 1 pint heavy whipping cream
- 2 tablespoons powdered sugar
- 2 cups fresh strawberries, sliced
- 1 tablespoon granulated sugar
- 1 pack of butter shortbread cookies, crushed
- Fresh mint for garnish
How to make it
- Start by macerating the strawberries. Place the sliced berries in a bowl and sprinkle with the tablespoon of granulated sugar. Let them sit for 15 minutes; the sugar will draw out the juices, creating a natural syrup.
- In a cold metal bowl, pour the heavy whipping cream and powdered sugar. Using a hand mixer or whisk, beat until stiff peaks form. Stiff peaks mean the cream stands straight up when the whisk is lifted.
- Take clear glass jars or dessert bowls. Place a generous layer of crushed shortbread cookies at the bottom to provide a buttery, crunchy foundation.
- Follow with a layer of the sweetened whipped cream, using a spoon to spread it to the edges so the layers are visible from the side.
- Add a spoonful of the macerated strawberries, ensuring you get some of that delicious strawberry syrup in there.
- Repeat the layers once more and top with a sprig of fresh mint. Chill in the fridge for 10 minutes before serving to let the flavors meld.
How to make refreshing summer soup

Why we love this
Cold soup, like a classic Gazpacho, is an unexpected delight on a sweltering day. It is incredibly refreshing, acting almost like a savory smoothie that’s packed with vitamins. The aroma is purely garden-fresh—the scent of bell peppers, cucumbers, and cilantro blended into a vibrant, chilled harmony. The texture is thick and satisfying yet remarkably light, offering a cooling sensation that radiates from the inside out. It’s the ultimate way to utilize an overabundance of summer produce in one sophisticated dish.
Ingredients
- 6 large ripe tomatoes, cored and chopped
- 1 red bell pepper, seeded and chopped
- 1 cucumber, peeled and chopped
- 1/2 small red onion
- 2 tablespoons sherry vinegar
- 1/3 cup extra virgin olive oil
- A dash of Tabasco sauce
How to make it
- Place the chopped tomatoes, bell pepper, cucumber, and red onion into a high-powered blender. If your blender is small, work in two batches to ensure a smooth consistency.
- Add the sherry vinegar and a pinch of salt. The vinegar is essential here; it provides the ‘zip’ that makes the cold soup refreshing rather than bland.
- Blend on medium speed until the mixture is broken down. While the blender is running on low, slowly stream in the olive oil. This process, called emulsification, creates a creamy, orange-tinted texture without adding any dairy.
- Taste the soup and add a dash of Tabasco for a hint of background heat, and more salt if necessary.
- Pour the soup through a fine-mesh sieve into a large bowl if you prefer a perfectly silky texture, or leave it as is for a more rustic, chunky feel.
- Chill the soup in the refrigerator for at least 2 hours. Serving it ice-cold is the secret to its success. Garnish with a drizzle of oil and some finely diced cucumber before serving.
How to make tasty picnic sides

Why we love this
Picnic sides are the unsung heroes of outdoor dining. We love them because they are designed for portability and resilience—flavors that actually improve as they sit and mingle in the cooler. A Mediterranean-style bean salad, for instance, offers a hearty, protein-packed bite that doesn’t wilt in the sun like lettuce does. The earthy beans, tangy feta, and sharp vinaigrette create a robust flavor profile that pairs perfectly with sandwiches or grilled meats, making every picnic feel like a gourmet outing.
Ingredients
- 2 cans (15 oz) cannellini or chickpeas, rinsed
- 1/2 cup kalamata olives, halved
- 1/2 cup crumbled feta cheese
- 1/4 cup flat-leaf parsley, chopped
- 3 tablespoons lemon juice
- 4 tablespoons olive oil
- 1 teaspoon dried oregano
How to make it
- Rinse your canned beans thoroughly under cold water until the water runs clear. This removes the starchy liquid and excess sodium, ensuring the salad tastes fresh.
- In a large mixing bowl, whisk together the olive oil, lemon juice, and dried oregano. Adding the herbs to the oil first helps release their essential oils, intensifying the flavor.
- Add the rinsed beans to the bowl and toss to coat them in the dressing. Beans are porous and will soak up the lemon and oil while they sit.
- Fold in the halved kalamata olives and chopped parsley. The olives add a salty, briny depth that balances the creamy beans.
- Finally, gently fold in the crumbled feta cheese. You want to do this last so the cheese stays in distinct chunks rather than dissolving into the dressing.
- Transfer to a portable, airtight container. This side dish can be made up to 24 hours in advance, which actually allows the Mediterranean flavors to deepen significantly.
How to make cold mini sandwiches

Why we love this
Mini sandwiches are the quintessential finger food, offering a dainty and delightful way to satisfy guests. There is a refined charm to a perfectly cut tea sandwich with the crusts removed, revealing layers of creamy spread and crisp vegetables. The aroma of fresh bread and herbed butter is subtle and inviting. They are incredibly versatile, allowing you to offer a variety of flavors in small, manageable bites that encourage guests to try one of everything on the food board.
Ingredients
- 1 loaf of thin-sliced white or whole wheat bread
- 1 bag of baby spinach or sprouts
- 8 oz cream cheese, softened
- 1 tablespoon fresh chives, minced
- Thinly sliced smoked turkey or cucumber
- Salt and white pepper
How to make it
- Start with your softened cream cheese in a bowl. Mix in the minced chives and a pinch of white pepper. Softening the cheese is key; it must spread easily so you don’t tear the delicate bread slices.
- Lay out your bread slices in pairs. Spread a thin, even layer of the herbed cream cheese onto both sides of the bread. This acts as a moisture barrier, preventing the bread from getting soggy from the fillings.
- Place a single layer of very thinly sliced cucumber or smoked turkey on one side. If using cucumber, pat the slices dry with a paper towel first to remove excess moisture.
- Add a few leaves of baby spinach or a sprinkle of sprouts for a bit of crunch and color.
- Close the sandwich and use a very sharp serrated knife to saw off the crusts. Removing the crusts gives them that professional, ‘viral’ catering look.
- Cut each sandwich into four small squares or triangles. Arrange them on your board in a pattern, or stack them neatly for a clean, organized aesthetic.
How to grill perfect summer kabobs
[IMAGE_10]
Why we love this
Kabobs bring a sense of theater to the dinner table. There is nothing quite like the sight of colorful skewers piled high, steam rising from the charred edges of peppers and onions. The smell of smoke and caramelizing marinade is the ultimate call to dinner. We love how the individual portions make serving a breeze, and the combination of textures—the tender, juicy meat against the slightly softened, fire-kissed vegetables—creates a complete meal on a single stick. It is summer hosting at its most vibrant and fun.
Ingredients
- 1.5 lbs top sirloin steak or chicken thigh, cut into 1-inch cubes
- 1 large red onion, cut into chunks
- 1 zucchini, sliced into thick rounds
- 1 cup pineapple chunks (optional for sweetness)
- 1/2 cup soy sauce
- 2 tablespoons honey
- 1 tablespoon grated ginger
How to make it
- If using wooden skewers, soak them in water for at least 30 minutes before threading. This prevents them from catching fire on the grill.
- In a bowl, mix the soy sauce, honey, and grated ginger. Place the meat cubes in a zip-top bag with half of this mixture and marinate for at least 1 hour in the fridge.
- Thread the meat and vegetables onto the skewers, alternating between the protein, onion, zucchini, and pineapple. Don’t crowd them too tightly; leaving a tiny bit of space between items ensures the heat circulates and cooks everything evenly.
- Preheat the grill to medium-high. You want a steady heat that will sear the outside while keeping the inside juicy.
- Place the kabobs on the grill. Cook for 10-12 minutes, turning a quarter-turn every few minutes. This ensures the meat is cooked on all sides and the vegetables get those beautiful char marks.
- During the last 2 minutes of cooking, brush the remaining marinade onto the kabobs. The honey will caramelize quickly, creating a sticky, flavorful glaze. Remove from heat and let rest for 3 minutes before serving.
Bringing It All Together
Creating a viral-worthy food board isn’t about perfection; it’s about the joy of variety and the ease of hosting. By combining these ten elements—from the warm, gooey Rotel dip to the refreshing chilled soup—you provide a sensory experience that caters to every craving. The best part? Most of these can be prepped in advance, leaving you free to actually enjoy the party. So, grab a large board, start arranging, and watch as your guests gravitate toward the beautiful, delicious spread you’ve created. Happy hosting!