
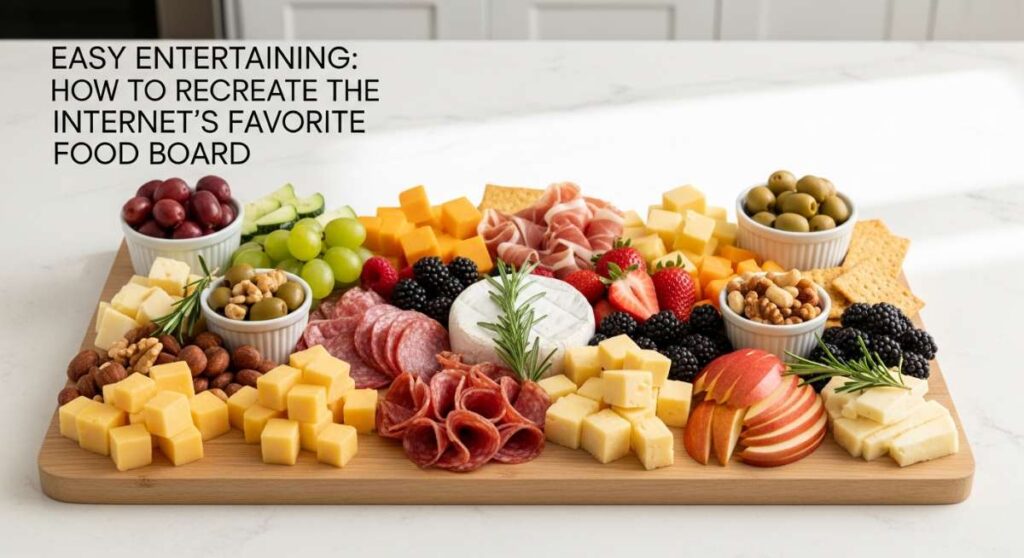
Easy Entertaining: How to Recreate the Internet’s Favorite Food Board
There is something inherently magical about the way a well-curated food board brings people together. I remember the first time I hosted a summer gathering; I was a nervous wreck, worrying if the oven would be too hot or if the food would go cold before everyone arrived. That all changed when I discovered the beauty of the modular food board—a sprawling, vibrant canvas of flavors that allows guests to graze, chat, and linger without the formality of a seated dinner. It’s more than just a meal; it’s an invitation to relax and connect.
The internet has fallen in love with this ‘everything-at-once’ style of entertaining because it’s visually stunning and incredibly practical. Whether you’re setting up on a marble countertop or a rustic wooden table, the goal is to create a feast for the eyes that tastes even better than it looks. In this guide, I’m breaking down the ten essential components of the ultimate summer lifestyle board, from slow-cooked meats to refreshing drinks, so you can recreate this viral sensation in your own home with zero stress.
10 Easy Ways to Slow Cook Summer Dinners (Step-by-Step Guide)
Why we love this
Slow cooking in the summer is the ultimate hosting hack because it keeps your kitchen cool while delivering incredibly tender, succulent results. Imagine the aroma of citrus-marinated pork or smoky brisket wafting through the house all afternoon, the meat becoming so soft it practically melts off the fork. It provides a rich, savory anchor to your food board, offering a warm contrast to crisp vegetables and chilled dips. The deep, concentrated flavors developed over hours of low heat provide a gourmet foundation that feels effortless and indulgent.
Ingredients
- 3-4 lb Pork Shoulder or Beef Chuck Roast
- 2 tablespoons smoked paprika
- 1 tablespoon cumin
- 1 cup fresh orange juice
- 4 cloves minced garlic
- Salt and cracked black pepper
- 1 large white onion, sliced
How to make it
- Begin by patting your protein completely dry with paper towels; this ensures the spices adhere and the meat sears properly if you choose to brown it.
- Apply a generous rub of salt, pepper, paprika, and cumin to all sides of the meat, pressing the spices into the fibers for maximum flavor penetration.
- Place the sliced onions at the bottom of the slow cooker to act as a natural trivet, preventing the meat from scorching and adding sweetness to the juices.
- Nestle the seasoned meat on top of the onions and pour the orange juice and minced garlic over the sides, avoiding washing off the spice rub.
- Set your slow cooker to the ‘Low’ setting for 8 to 10 hours. The slow, gentle heat breaks down tough connective tissues into rich collagen, resulting in that signature ‘pull-apart’ texture.
- Once the meat is tender enough to shred with two forks, remove it from the pot and let it rest for 15 minutes before shredding. This allows the juices to redistribute so the meat remains moist on the board.
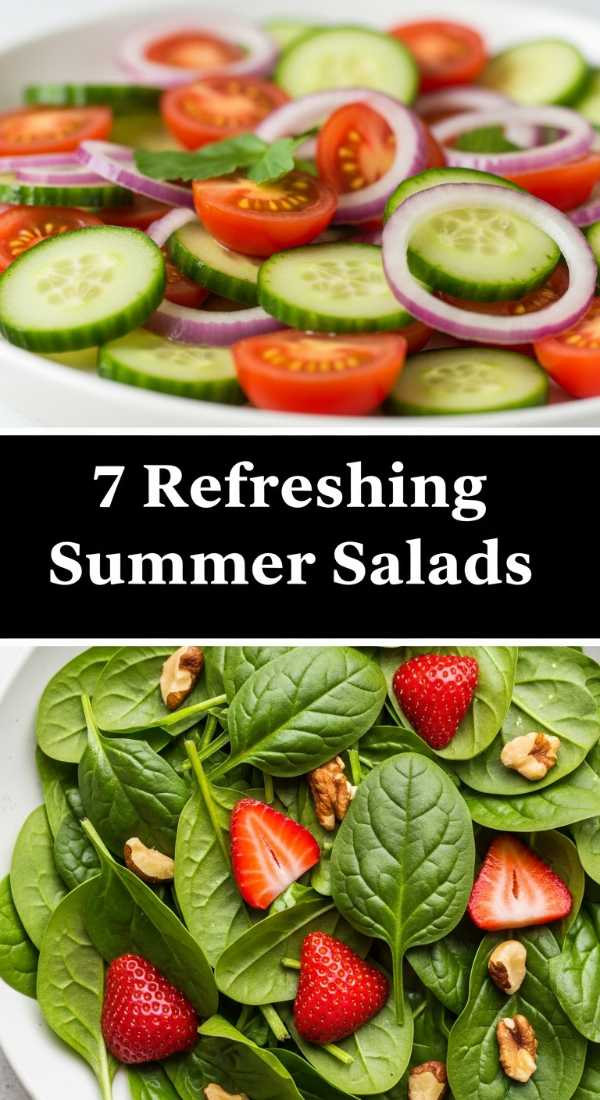
7 Fresh Ways to Toss Summer Salads (Step-by-Step Guide)
Why we love this
A vibrant summer salad is the breath of fresh air every food board needs to balance out richer elements. There is a satisfying crunch from cold, garden-picked greens paired with the juicy, explosive sweetness of seasonal fruits like peaches or strawberries. When tossed with a zingy vinaigrette, the acidity cuts through savory fats, cleansing the palate and making every bite feel light and energetic. It’s a sensory celebration of color and texture that makes the entire spread look like a work of art.
Ingredients
- 5 cups mixed baby greens or arugula
- 1 cup sliced strawberries or stone fruit
- 1/2 cup crumbled feta or goat cheese
- 1/4 cup toasted pecans or walnuts
- 3 tablespoons extra virgin olive oil
- 1 tablespoon balsamic glaze
- Flaky sea salt
How to make it
- Start by washing your greens in ice-cold water and using a salad spinner to get them bone-dry. Excess water is the enemy of a great salad, as it prevents the dressing from clinging to the leaves.
- In a large chilled bowl, whisk together your olive oil and balsamic glaze until fully emulsified; the mixture should look thick and glossy.
- Add the greens to the bowl and use your hands or large tongs to gently toss, ensuring every single leaf is lightly kissed by the dressing without becoming soggy.
- Layer in your sliced fruit and nuts last. By adding these heavier items at the end, you ensure they don’t all sink to the bottom of the bowl and remain visible for the ‘viral’ aesthetic.
- Sprinkle the crumbled cheese and a pinch of flaky sea salt over the top right before serving. The salt draws out the sweetness of the fruit, creating a perfect flavor balance.
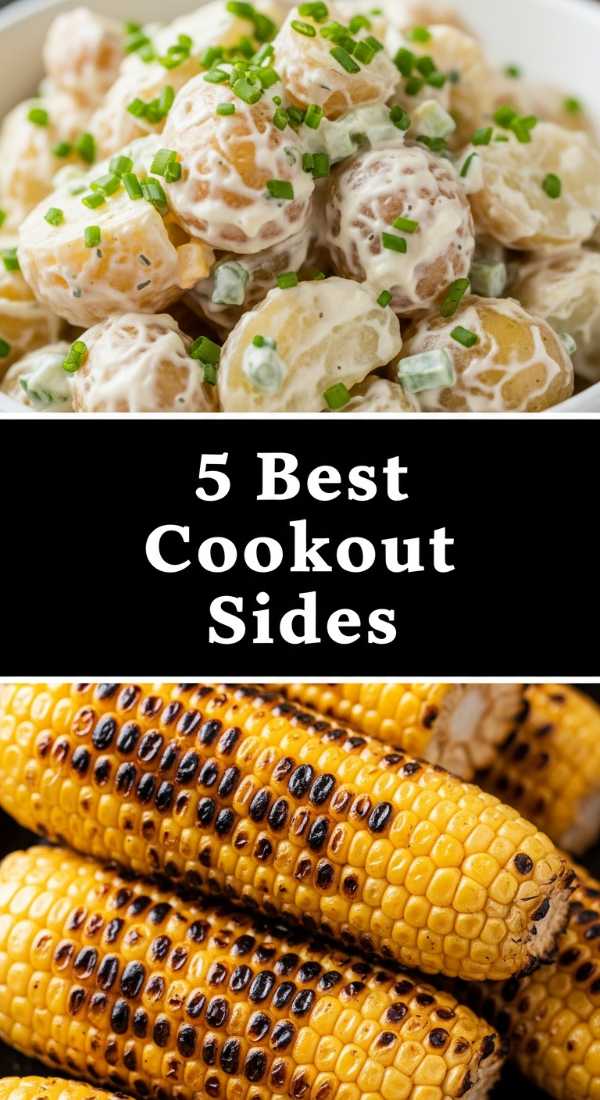
5 Best Ways to Prep Cookout Side Dishes (Step-by-Step Guide)
Why we love this
Side dishes are the unsung heroes of the food board, providing the variety and ‘nibble-ability’ that guests crave. Think of charred corn on the cob slathered in herbed butter or roasted fingerling potatoes that are crispy on the outside and fluffy as a cloud on the inside. These sides add essential bulk and comforting textures to the meal, serving as the perfect vessel for soaking up sauces. Their rustic, golden-brown appearance adds a cozy, homemade feel to the centerpiece spread.
Ingredients
- 6 ears of fresh sweet corn
- 1/2 cup softened unsalted butter
- 1 tablespoon fresh chopped chives
- 1 teaspoon chili lime seasoning
- 1/2 teaspoon smoked sea salt
How to make it
- Preheat your grill or oven to a high heat (around 400°F). High heat is crucial for achieving that smoky, charred exterior while keeping the inside juicy.
- In a small bowl, whip the softened butter with chives and chili lime seasoning until it’s light and airy.
- Peel back the husks of the corn but leave them attached at the base to serve as a natural handle for your guests.
- Brush a thin layer of the herbed butter over the kernels and place them directly on the heat source.
- Rotate the corn every 2-3 minutes. You are looking for ‘golden-char’ spots—the kernels should begin to caramelize and pop slightly, indicating the natural sugars are intensifying.
- Remove from heat once the kernels are tender and bright yellow. Finish with a final swipe of butter and a dusting of smoked sea salt before placing them on the board.
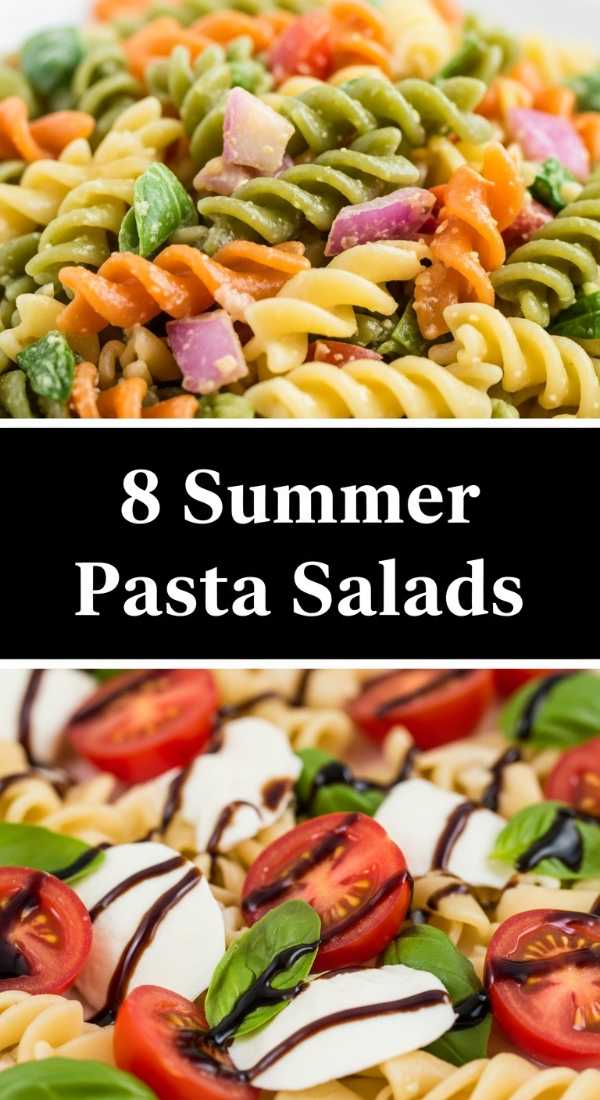
8 Delicious Ways to Make Summer Pasta (Step-by-Step Guide)

Why we love this
Summer pasta is all about simplicity and brightness, trading heavy creams for the silky richness of high-quality oils and fresh cheeses. The feeling of a fork twirling through al dente strands coated in a lemon-garlic emulsion is pure bliss. It’s a versatile addition to the board that can be served warm or at room temperature, making it incredibly host-friendly. The aroma of toasted garlic and fresh basil creates an irresistible pull that draws everyone toward the table.
Ingredients
- 1 lb Linguine or Penne
- 1/2 cup high-quality olive oil
- 4 cloves garlic, thinly sliced
- Zest and juice of 2 lemons
- 1/2 cup fresh grated Parmesan
- 1/2 cup torn fresh basil leaves
How to make it
- Bring a large pot of heavily salted water to a rolling boil—it should taste like the sea to properly season the pasta from within.
- Cook the pasta until it is just ‘al dente,’ meaning it still has a slight resistance when bitten. Overcooking will lead to a mushy texture once the sauce is added.
- While the pasta cooks, heat the olive oil in a wide skillet over medium-low heat. Add the garlic slices and sauté slowly until they turn a pale golden brown; do not let them burn or they will turn bitter.
- Reserve 1 cup of starchy pasta water before draining. This liquid gold is the secret to a glossy, restaurant-quality sauce.
- Toss the drained pasta into the skillet with the garlic oil, lemon juice, and half of the pasta water. Stir vigorously over medium heat to create an emulsion.
- Fold in the lemon zest, Parmesan, and basil. If the sauce is too thick, add a splash more pasta water until the noodles are perfectly glazed.
6 Refreshing Ways to Order Dutch Bros (Step-by-Step Guide)

Why we love this
Sometimes the best part of a summer gathering is the ‘fun’ drinks, and replicating that viral Dutch Bros aesthetic adds a trendy, youthful energy to your spread. Whether you’re actually doing a coffee run or recreating these layered, colorful beverages at home, the appeal lies in the customization. The icy, slushy textures and vibrant syrups look incredible in clear glassware, providing a pop of neon color that makes your food board photos truly stand out on social media.
Ingredients
- 1 cup strong cold brew or espresso
- 2 tablespoons white chocolate sauce
- 1 tablespoon caramel sauce
- 1/2 cup half and half (for that ‘Breve’ style)
- Ice cubes (plenty of them!)
- Whipped cream and extra caramel drizzle
How to make it
- For a classic ‘Golden Eagle’ style, start by drizzling caramel sauce around the inside walls of your glass to create those beautiful, ‘gram-worthy streaks.
- Fill the glass to the very brim with ice. Using a lot of ice is key to keeping the drink cold and maintaining the layered look.
- Pour your white chocolate sauce and cold brew into a separate pitcher and stir until combined. This ensures the sweetness is even throughout.
- Slowly pour the coffee mixture over the ice, leaving about two inches of space at the top.
- Gently pour the half and half over the back of a spoon onto the coffee. This technique allows the cream to swirl slowly into the coffee rather than mixing instantly.
- Finish with a generous cloud of whipped cream and a cross-hatch drizzle of caramel. Serve with a colorful straw for the full effect.
5 Tasty Ways to Serve Rotel Dip (Step-by-Step Guide)

Why we love this
Rotel dip is the ultimate nostalgia food, updated for the modern food board with high-quality ingredients and bold toppings. There is something deeply satisfying about the velvet-smooth, molten cheese punctuated by the spicy kick of diced tomatoes and green chilies. It’s the centerpiece that everyone hovers over, dipping salty chips or crisp peppers into the warm, gooey goodness. Its rich, savory profile is the perfect companion to the lighter elements on your board, providing a heavy dose of comfort.
Ingredients
- 1 lb high-quality melting cheese (like Oaxaca or a sharp American)
- 1 can (10 oz) Ro*Tel Diced Tomatoes and Green Chilies
- 1/2 lb browned spicy sausage or chorizo
- 1/4 cup fresh cilantro, chopped
- Sliced jalapeños for garnish
How to make it
- Start by browning your sausage in a skillet over medium-high heat until it is crispy and fully cooked. Drain the excess fat thoroughly to prevent the dip from becoming oily.
- Cut your cheese into small, uniform cubes. Uniformity is the secret to an even melt without any stubborn lumps.
- In a small slow cooker or a heavy-bottomed pot over low heat, combine the cheese cubes and the entire can of Ro*Tel (do not drain the liquid, as it provides the necessary acidity).
- Stir constantly with a silicone spatula. Keep the heat low; high heat will cause the cheese to ‘break’ and become grainy.
- Once the cheese is perfectly smooth and liquid, fold in the browned sausage.
- Transfer to a serving bowl and immediately top with fresh cilantro and jalapeños. Place it in the center of your board surrounded by sturdy tortilla chips and veggie sticks.
12 Viral Ways to Bake Summer Desserts (Step-by-Step Guide)
Why we love this
No food board is complete without a sweet finish, and a sheet-pan summer dessert is the most efficient way to feed a crowd. The scent of buttery crust and bubbling fruit jam baking in the oven creates an atmosphere of pure warmth. These desserts are designed to be sliced into small, pick-up-able squares that guests can grab as they please. The contrast between a golden, flaky crust and the vibrant, ruby-red hues of summer berries makes the dessert section of your board look absolutely irresistible.
Ingredients
- 2 cups all-purpose flour
- 1 cup cold unsalted butter, cubed
- 1/2 cup granulated sugar
- 3 cups fresh blueberries or raspberries
- 1 tablespoon cornstarch
- 1 tablespoon lemon juice
How to make it
- Preheat your oven to 375°F and line a rimmed baking sheet with parchment paper, leaving an overhang for easy removal.
- In a food processor, pulse the flour, sugar, and cold butter until the mixture resembles coarse crumbs. Press two-thirds of this mixture firmly into the bottom of the pan to create a solid base.
- Bake the crust for 10-12 minutes until it is just beginning to set but hasn’t yet browned.
- While the base bakes, toss your fresh berries with cornstarch and lemon juice. The cornstarch is vital as it thickens the juices that release during baking, preventing a soggy crust.
- Spread the fruit evenly over the par-baked crust and sprinkle the remaining dough crumbs over the top to create a rustic ‘streusel’ effect.
- Bake for another 25-30 minutes until the fruit is bubbling and the topping is a deep golden brown. Let it cool completely before slicing into squares to ensure the layers stay intact.
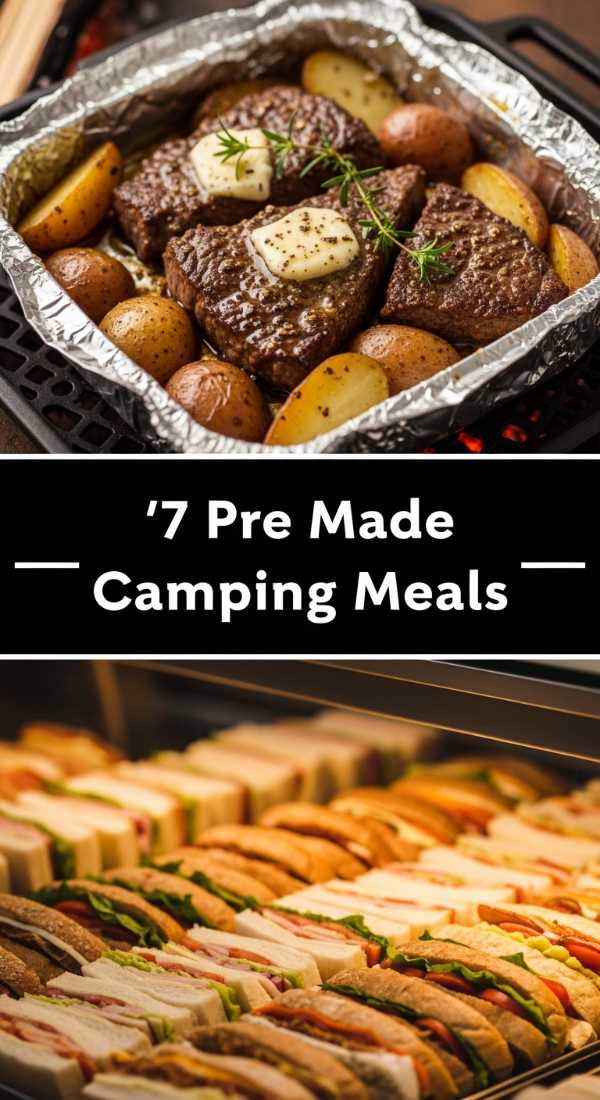
7 Smart Ways to Prep Camping Meals (Step-by-Step Guide)

Why we love this
Bringing the spirit of camping to your food board means introducing smoky, charred, and rugged flavors that feel adventurous and fun. These ‘foil-pack’ style components are incredibly easy to prep in advance, allowing you to spend more time with your guests. The combination of garlic-infused steam and the intense sear of a grill creates a complex flavor profile that is both rustic and sophisticated. It adds a ‘DIY’ element to the board that encourages guests to dig in and explore the different textures.
Ingredients
- 1 lb large shrimp or diced chicken
- 2 cups chopped zucchini and bell peppers
- 3 tablespoons melted butter
- 2 cloves garlic, smashed
- 1 teaspoon Old Bay or Cajun seasoning
- Heavy-duty aluminum foil
How to make it
- Cut four large squares of heavy-duty aluminum foil. Using heavy-duty foil is important to prevent tearing when flipping the packets on the heat.
- In a large bowl, toss your protein and vegetables with the melted butter, garlic, and seasonings until everything is evenly coated.
- Divide the mixture among the foil squares, placing the food in the center of each.
- Fold the sides of the foil inward and crimp the edges tightly to create a sealed pouch. You want to leave a little air space inside for steam to circulate.
- Place the packets on a preheated grill over medium heat. For shrimp, cook for 8-10 minutes; for chicken, 15-18 minutes. Flip the packets halfway through for even cooking.
- Carefully open the packets (watch out for the hot steam!) and slide the contents directly onto your food board, garnishing with fresh parsley and lemon wedges.
9 Fun Ways to Serve Summer Drinks (Step-by-Step Guide)
Why we love this
The beverage section of a food board is where you can truly let your creativity shine with ‘mocktail’ style refreshments. Imagine the effervescence of sparkling water hitting fresh muddled mint and lime, creating a drink that is as cooling as a dip in the pool. Serving drinks in a large dispenser or individual mason jars with floral garnishes adds a whimsical, curated feel to the party. These drinks provide a crisp, clean finish that balances the salty and savory notes of the food spread.
Ingredients
- 1 small seedless watermelon, cubed and chilled
- 1 liter sparkling mineral water
- 1/4 cup fresh lime juice
- A handful of fresh mint leaves
- Honey or agave nectar (optional)
- Ice with frozen berries inside
How to make it
- Place the chilled watermelon cubes in a high-speed blender and process until completely smooth.
- Strain the watermelon puree through a fine-mesh sieve into a large pitcher to remove any pulp, leaving you with a crystal-clear, vibrant pink juice.
- Muddle the mint leaves with the lime juice in the bottom of the pitcher to release the aromatic oils.
- Add the watermelon juice and stir in your sweetener of choice until fully dissolved.
- When ready to serve, fill glasses with ‘berry ice’ (ice cubes frozen with a raspberry or blueberry inside for extra flair).
- Fill each glass halfway with the watermelon base and top with the sparkling mineral water for a refreshing, fizzy finish. Garnish with a sprig of mint.
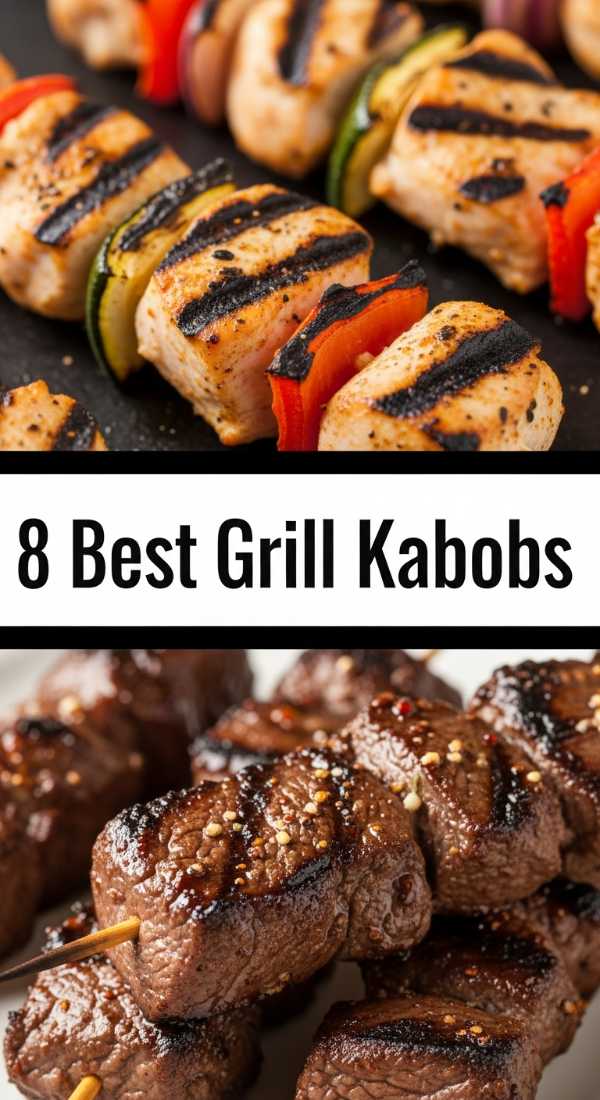
8 Easy Ways to Grill Summer Kabobs (Step-by-Step Guide)
[IMAGE_10]
Why we love this
Kabobs are the quintessential food board item because they are naturally portioned and easy to eat while standing. The sight of alternating colors—bright red tomatoes, green peppers, and golden-brown meat—creates a beautiful rhythmic pattern on the board. The high-heat char from the grill adds a smoky depth of flavor that is impossible to achieve any other way. They are fun, interactive, and allow every guest to pick exactly what they want, making them a universal crowd-pleaser.
Ingredients
- 1 lb sirloin steak or chicken breast, cut into 1-inch cubes
- 1 red onion, cut into wedges
- 1 pint cherry tomatoes
- 1/4 cup soy sauce
- 2 tablespoons honey
- 1 tablespoon grated ginger
- Wooden or metal skewers
How to make it
- If using wooden skewers, soak them in water for at least 30 minutes before grilling. This prevents them from catching fire or splintering under the heat.
- Whisk together the soy sauce, honey, and ginger to create a savory-sweet marinade. Reserve a small amount for brushing later.
- Toss the meat cubes in the marinade and let them sit for at least 20 minutes (or up to 4 hours in the fridge) to tenderize.
- Thread the meat and vegetables onto the skewers, alternating colors for the best visual appeal. Don’t pack them too tightly; leave a tiny bit of space so the heat can reach all sides.
- Grill over medium-high heat for 8-10 minutes, turning every 2 minutes. The meat should develop a beautiful crust while the tomatoes just begin to blister.
- During the last 2 minutes of cooking, brush the reserved marinade over the kabobs to create a sticky, flavorful glaze. Serve warm on the edge of your board.
Conclusion
Building the internet’s favorite food board isn’t about perfection; it’s about variety, color, and the joy of sharing a meal with the people you love. By combining these slow-cooked mains, fresh salads, and interactive skewers, you create a dining experience that feels curated yet completely relaxed. The next time you host, skip the individual plates and let your table become the canvas. Happy hosting!
Frequently Asked Questions
Find answers to the most common questions about creating the perfect summer food board below.