

5-Ingredient Food Boards: The Viral Hack for Easy Entertaining
We’ve all been there—the doorbell rings in twenty minutes, your kitchen looks like a flour bomb went off, and you’re still scouring Pinterest for a recipe that doesn’t require a trip to three different specialty grocery stores. For years, I thought hosting meant complex four-course meals and a sink full of dishes, but then I discovered the magic of the 5-ingredient food board. It’s more than just a trend; it’s a lifestyle shift that prioritizes connection over kitchen-induced stress, turning simple ingredients into a stunning, communal centerpiece that looks like a million bucks.
There is something inherently soulful about gathering around a shared board. It invites your guests to graze, to linger, and to build their own perfect bites while the conversation flows naturally. By stripping back the ingredient list to five high-quality components, you allow the natural flavors to shine and the visual textures to take center stage. From the sizzle of crispy bacon to the vibrant pop of a summer salad, these boards prove that you don’t need a pantry full of spices to create a viral-worthy feast that will have your friends asking for the ‘recipe’ before the night is over.
How to make summer chicken?

Why we love this
This summer chicken board captures the essence of a sun-drenched afternoon in the garden, bringing together the smoky char of the grill with the bright, zesty perfume of fresh lemon. The skin of the chicken crackles with a satisfying crunch, yielding to meat that is incredibly succulent and infused with the earthy aroma of garden-fresh rosemary and thyme. It’s the kind of dish that feels light yet deeply satisfying, perfect for those balmy evenings when you want to eat something vibrant while the golden hour light filters through the trees.
Ingredients
- 4 Bone-in, skin-on chicken thighs
- 2 Large lemons (sliced into rounds)
- 4 Tablespoons high-quality olive oil
- 3 Sprigs of fresh rosemary
- Flaky sea salt and cracked black pepper
How to make it
- Begin by patting the chicken thighs completely dry with paper towels; removing moisture is the secret to achieving that coveted golden-brown, crispy skin.
- In a large bowl, whisk together the olive oil, the juice of half a lemon, and finely chopped rosemary needles to create a simple yet potent marinade.
- Massage the marinade into the chicken, ensuring you get under the skin, and let it sit at room temperature for 15-20 minutes to take the chill off the meat.
- Preheat your grill or cast-iron skillet to medium-high heat. Place the chicken skin-side down first; you should hear a vigorous sizzle immediately.
- Cook undisturbed for 6-8 minutes until the skin is deeply bronzed and releases easily from the surface. Flip the chicken and scatter the lemon rounds around the pan, allowing them to caramelize and char alongside the meat for another 10-12 minutes.
- Use an instant-read thermometer to ensure the internal temperature reaches 165°F (74°C). Let the chicken rest for 5 minutes on the board before serving to allow the juices to redistribute through the muscle fibers.
How to cook mexican dinner?

Why we love this
A Mexican dinner board is a riot of color and a symphony of bold, spicy, and creamy textures that instantly turns any Tuesday into a celebration. Imagine the aroma of cumin-rubbed steak mingling with the sharpness of pickled red onions and the buttery softness of charred corn tortillas. Every bite is customizable, offering a balance of heat and coolness that dances across the palate, making it a crowd-favorite for guests who love to play with their food and craft the perfect taco assembly.
Ingredients
- 1 lb Flank steak or skirt steak
- 1 Pack of small corn tortillas
- 2 Ripe avocados
- 1 Jar of restaurant-style red salsa
- 1 Bunch of fresh cilantro
How to make it
- Start by seasoning your steak generously with salt and pepper. For the best sear, let the steak sit out for 30 minutes to reach room temperature, which ensures even cooking throughout the cut.
- Heat a heavy skillet over high heat with a teaspoon of high-smoke-point oil (like avocado oil) until it is just beginning to wisps of smoke.
- Lay the steak in the pan and sear for 3-4 minutes per side for a medium-rare finish. You are looking for a dark, crusty exterior while the center remains pink and tender.
- Remove the steak to a cutting board and tent it loosely with foil. While it rests, hold the corn tortillas with metal tongs over an open gas flame for 10 seconds per side until they are slightly charred and pliable.
- Mash the avocados with a pinch of salt and a squeeze of lime if you have it, or simply slice them into thick wedges for the board.
- Slice the steak against the grain into thin strips. Arrange the steak, warm tortillas, bowls of salsa, and cilantro on the board, allowing everyone to build their own tacos with the resting juices drizzled over the top.
How to grill crispy bacon?

Why we love this
There is nothing quite like the smell of bacon sizzling over an open flame; it’s an olfactory signal that a great brunch or a decadent burger night has begun. Grilling bacon adds a sophisticated, woody smokiness that you just can’t get from a stovetop, and the resulting texture is a perfect hybrid of a snappy, brittle crunch and a melt-in-your-mouth richness. It’s the ultimate salty accent for any board, providing a savory depth that pairs beautifully with everything from sweet fruits to creamy cheeses.
Ingredients
- 1 lb Thick-cut smoked bacon
- 2 Tablespoons maple syrup (optional glaze)
- 1 Teaspoon black pepper
- 1/2 Teaspoon smoked paprika
- Cooking spray for the grates
How to make it
- Preheat your grill to a consistent medium-low heat (about 300°F). Cooking bacon too fast over high heat will cause the fat to flare up and burn the meat before it gets crispy.
- Lightly coat the grill grates with cooking spray to prevent sticking, or better yet, use a perforated grill topper to prevent any slices from slipping through the cracks.
- Lay the bacon strips perpendicular to the grill grates. Close the lid and cook for 5-7 minutes. The indirect heat under the lid helps render the fat slowly and evenly.
- Flip the slices carefully with long tongs. At this stage, you can brush on a thin layer of maple syrup and a dusting of black pepper for a candied finish.
- Continue cooking for another 5 minutes, checking frequently. The bacon is done when the white fat has turned a deep golden translucent color and the meat is mahogany.
- Remove the bacon and place it on a wire rack over a paper towel-lined tray. Letting it air dry on a rack for 2 minutes ensures the fat doesn’t pool, resulting in a much crispier finish for your board.
How to cook perfect eggs?

Why we love this
The perfect soft-boiled egg is a masterpiece of culinary contrast: a firm, opaque white that yields to a rich, jammy yolk that flows like liquid gold. When added to a food board, these eggs act as both a protein source and a natural sauce, coating crackers or bread in a velvety layer of savory goodness. The sight of those bright orange centers is visually arresting and signals a level of care and technique that elevates a simple snack board into a gourmet experience.
Ingredients
- 6 Large pasture-raised eggs
- Ice cubes (for the water bath)
- 1 Tablespoon sea salt
- 1 Teaspoon red pepper flakes
- Fresh chives for garnish
How to make it
- Bring a large pot of water to a rolling boil. Make sure there is enough water to cover the eggs by at least an inch so they cook uniformly.
- Gently lower the cold eggs from the fridge into the boiling water using a slotted spoon to prevent the shells from cracking against the bottom of the pot.
- Immediately set a timer for exactly 6 minutes and 30 seconds for a perfect jammy yolk. If you prefer a slightly firmer yolk, go to 7 minutes.
- While the eggs cook, prepare an “ice bath” by filling a medium bowl with cold water and a generous handful of ice cubes.
- When the timer goes off, instantly transfer the eggs to the ice bath. This shocks the eggs, stopping the cooking process immediately and pulling the membrane away from the shell for easy peeling.
- Let them sit in the ice bath for 10 minutes. Gently crack the shells all over and peel under a thin stream of cool running water. Slice them in half lengthwise right before serving on the board to showcase the vibrant centers.
How to make asian noodles?

Why we love this
Asian noodle boards are a sensory delight, combining the slippery, satisfying texture of perfectly al dente noodles with a punchy, umami-rich sauce that tingles the tongue. The aroma of toasted sesame oil and fresh ginger creates an inviting atmosphere that promises a meal full of depth and complexity. It’s a versatile base that works beautifully as a cold salad or a warm main, offering a refreshing and light alternative to traditional heavy pasta dishes while still feeling incredibly indulgent.
Ingredients
- 10 oz Soba or Udon noodles
- 3 Tablespoons soy sauce
- 2 Tablespoons toasted sesame oil
- 1 Tablespoon chili garlic sauce
- 2 Green onions (thinly sliced)
How to make it
- Bring a pot of unsalted water to a boil. Unlike Italian pasta, many Asian noodles (especially soba) don’t need salted water as the noodles themselves contain salt.
- Cook the noodles according to the package directions—usually 4-5 minutes. Check a strand frequently; you want them tender but with a slight “bite” (al dente).
- Drain the noodles and immediately rinse them under cold running water for 60 seconds. This removes the excess starch, preventing them from becoming a gummy mass on your board.
- In a small bowl, whisk together the soy sauce, toasted sesame oil, and chili garlic sauce until emulsified.
- Toss the cooled noodles with the sauce until every strand is glistening. Use your hands or tongs to ensure even distribution.
- Mound the noodles in the center of your board and garnish heavily with the sliced green onions. The bright green contrast against the dark, glossy noodles makes the board pop visually.
How to prep healthy bowls?

Why we love this
A healthy bowl board is a celebration of vitality and color, proving that nutritious eating can be as beautiful as it is delicious. The combination of fluffy grains, crunchy raw vegetables, and creamy dressings provides a multi-textured experience that keeps every bite interesting. It’s the ultimate “choose your own adventure” meal, where guests can layer flavors to suit their preferences, leaving everyone feeling nourished, energized, and completely satisfied without any post-meal slump.
Ingredients
- 2 Cups cooked quinoa or farro
- 1 Large sweet potato (cubed and roasted)
- 2 Cups baby spinach or kale
- 1 Cup canned chickpeas (rinsed)
- 1/2 Cup tahini or lemon vinaigrette
How to make it
- Start with your base grain. If using quinoa, rinse it thoroughly before boiling in a 2:1 ratio of water to grain. Once the water is absorbed, fluff it with a fork and let it cool slightly so it doesn’t wilt the greens.
- Toss your cubed sweet potatoes with a little oil and salt, then roast at 400°F (200°C) for 25 minutes until the edges are caramelized and the centers are pillowy soft.
- To prep the chickpeas, pat them dry and toss them with a pinch of cumin or paprika. You can serve them as-is for a creamy texture or roast them for 15 minutes for an added crunch.
- Prepare the greens by massaging them with a tiny drop of olive oil and lemon juice; this softens the fibers of kale and makes the spinach more flavorful.
- Arrange the components in distinct piles on the board: the grain base, the warm roasted potatoes, the fresh greens, and the protein-rich chickpeas.
- Place a small bowl of tahini or your favorite vinaigrette in the center. This allows guests to drizzle as much or as little as they like, keeping the vegetables crisp on the board.
How to grill juicy burgers?

Why we love this
The juicy burger board is the king of casual entertaining, bringing the classic Americana cookout into a sophisticated, shareable format. There is nothing more enticing than the sight of thick, hand-pressed patties with deep sear marks, topped with ribbons of melted cheese that drape over the sides like velvet. The aroma of rendered fat and charred beef is intoxicating, promising a savory, high-protein feast that pairs perfectly with the cool crunch of fresh toppings and soft, toasted buns.
Ingredients
- 1.5 lbs Ground beef (80/20 fat ratio)
- 4 Slices of sharp cheddar cheese
- 4 Brioche buns
- 1 Large heirloom tomato (sliced)
- 1 Small red onion (thinly sliced)
How to make it
- Divide the beef into four 6-ounce portions. Handle the meat as little as possible to keep the burgers tender; overworking the beef results in a tough, rubbery texture.
- Press the patties so they are about an inch thick and slightly wider than your buns, as they will shrink during cooking. Press a small thumbprint indentation into the center of each patty to prevent it from puffing up into a dome.
- Preheat your grill to high heat (450°F). Season both sides of the patties generously with salt and pepper only right before they hit the grill to prevent the salt from drawing out moisture.
- Grill the patties for 4 minutes on the first side without pressing down on them with a spatula (this preserves the juices!). Flip and immediately place a slice of cheddar on each.
- Close the grill lid for the final 3 minutes to melt the cheese perfectly and reach a medium internal temperature (145°F-150°F).
- Briefly toast the split brioche buns on the grill for 30 seconds. Place the burgers on the board surrounded by the sliced tomatoes and onions, letting the residual heat from the meat soften the onions slightly.
How to make southern chicken?

Why we love this
Southern chicken is the ultimate comfort food, a golden-brown masterpiece that evokes memories of family reunions and Sunday dinners. The thick, craggy crust shatters with a thunderous crunch, revealing meat that has been steamed to perfection inside its flavorful envelope. It’s a sensory experience that combines the heat of spices with the richness of the fry, creating a soul-warming dish that stands as the proud centerpiece of any food board, especially when paired with a little honey or hot sauce.
Ingredients
- 1 lb Chicken tenders or drumsticks
- 2 Cups buttermilk
- 2 Cups all-purpose flour
- 2 Tablespoons Cajun or Creole seasoning
- Vegetable oil (for frying)
How to make it
- Marinate the chicken in buttermilk for at least 4 hours (or overnight). The lactic acid in the buttermilk breaks down the proteins, ensuring the chicken is incredibly tender and moist.
- In a shallow dish, mix the flour with your seasoning of choice. For a truly craggy crust, drizzle two tablespoons of the buttermilk marinade into the flour and mix with a fork to create small clumps.
- Dredge each piece of chicken in the flour, pressing firmly so the seasoned flour adheres to every nook and cranny. Let the breaded chicken rest on a wire rack for 10 minutes before frying; this helps the coating set so it doesn’t fall off in the oil.
- Heat 2 inches of oil in a heavy Dutch oven to 350°F (175°C). Use a kitchen thermometer to maintain this temperature; if the oil is too cold, the chicken will be greasy; if too hot, the outside will burn before the inside is cooked.
- Fry the chicken in batches for 6-8 minutes, turning once, until the exterior is a deep, majestic golden brown.
- Drain on a wire rack (not paper towels, which can cause steaming and sogginess) and sprinkle with a final pinch of salt while hot. Serve on the board with a side of honey for that classic sweet-and-savory Southern finish.
How to cook fast dinner?
Why we love this
When time is of the essence but you still crave a meal that feels intentional and fancy, the fast dinner board is your secret weapon. This board focuses on high-impact, low-effort ingredients that come together in under fifteen minutes, providing a sophisticated array of flavors without the frantic cleanup. It’s the perfect solution for late-night cravings or an impromptu date night, offering a balance of savory meats, zesty acids, and chewy textures that satisfy the soul and the stomach simultaneously.
Ingredients
- 1 Bag of pre-washed arugula
- 1 Pack of high-quality prosciutto
- 1 Ball of fresh mozzarella (or burrata)
- 1 Baguette (sliced and toasted)
- Balsamic glaze
How to make it
- Start by slicing your baguette into 1-inch rounds. Brush them lightly with olive oil and toast them in a toaster oven or under a broiler for 2 minutes until the edges are golden and crisp.
- Place a large bed of arugula on one side of the board. The peppery bite of the greens acts as a built-in palate cleanser for the richer ingredients.
- Tear the fresh mozzarella or burrata into rustic chunks. If using burrata, place it in a small shallow bowl so the creamy center doesn’t run all over the board.
- Artfully drape the prosciutto slices in loose ribbons. This aeration makes the ham easier to pick up and improves the texture as it hits the tongue.
- Nestle the warm baguette slices near the cheese and meat.
- Drizzle the entire board—the greens, the cheese, and even the bread—with a generous zigzag of balsamic glaze. The sweetness of the glaze ties the salty ham and creamy cheese together for a complete meal in minutes.
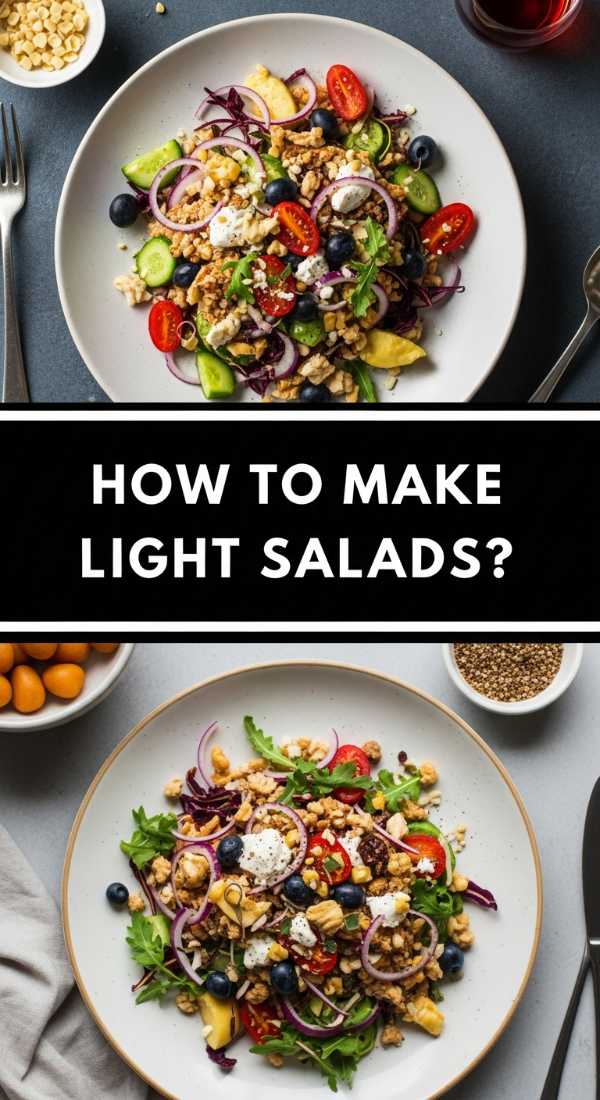
How to make light salads?
[IMAGE_10]
Why we love this
A light salad board is like a breath of fresh air, featuring the crispest produce and the brightest dressings that leave you feeling refreshed and rejuvenated. By deconstructing the salad onto a board, you allow each ingredient to maintain its unique texture—the crunch of a cucumber, the burst of a cherry tomato, and the creaminess of a feta crumble—rather than letting them get lost in a tossed bowl. It’s a visually stunning way to showcase seasonal produce and serves as the perfect cooling accompaniment to any heavy main course.
Ingredients
- 1 Large English cucumber (sliced)
- 1 Pint cherry tomatoes (halved)
- 1/2 Cup crumbled feta cheese
- 1/4 Cup kalamata olives
- Fresh mint and parsley
How to make it
- Slice the English cucumber into thin rounds or half-moons. If the skin is thick, use a peeler to create a striped pattern for extra visual flair.
- Halve the cherry tomatoes. Slicing them exposes their juicy interiors, which allows them to slightly marinate in the dressing once it’s added.
- Arrange the cucumbers in a shingled pattern across the board to create a foundation. Scatter the tomatoes and olives over the top.
- Sprinkle the feta cheese generously. The saltiness of the feta is the key seasoning component here, so don’t be shy with the crumbles.
- Finely chop the fresh mint and parsley. Herbs are not just a garnish here; they are a primary flavor component that adds a “green” brightness to every bite.
- Just before serving, whisk together a quick splash of olive oil and lemon juice, and drizzle it over the board. This keeps the vegetables from weeping water and ensures the salad stays vibrant and crisp throughout the party.
The Art of the Board: Final Thoughts
Mastering the 5-ingredient food board is about more than just food; it’s about reclaiming your time and focusing on the people gathered around your table. These viral hacks prove that simplicity is the ultimate sophistication. Whether you’re serving up crispy Southern chicken or a light summer salad, the goal is to create a space where everyone feels welcome to dig in. So, grab a board, pick your favorite subtopic, and start your own easy entertaining tradition today!
Frequently Asked Questions
Can I prep these boards in advance? Yes! Most components like roasted vegetables, cooked grains, and sliced meats can be prepped 2-3 hours ahead and kept in the fridge. Assemble the final board just before guests arrive to keep everything fresh.
What kind of board is best for food serving? Large wooden cutting boards or marble slabs are ideal. Just ensure they are food-grade and have been properly cleaned and seasoned with mineral oil if they are wood.
How do I keep the hot items warm on a board? The best trick is to serve them on a small pre-heated ceramic plate that sits on top of the wooden board, or simply serve them last so they are the star of the show while they’re still steaming.