

The Simple Food Board Trend That’s Taking Over the Internet
There is something inherently magical about a wooden board overflowing with delicious, homemade food. Gone are the days of stiff, formal dinner parties where everyone sits around a structured table, afraid to reach for the last piece of bread. Today, the internet is falling head over heels for the ‘Simple Food Board’—a way of eating that prioritizes connection, tactile textures, and the raw beauty of ingredients served family-style. It’s about more than just food; it’s about the laughter that happens when hands cross over one another to grab a slice of perfectly seared steak or a warm, gooey cookie.
I remember the first time I ditched my individual plates for a giant oak board. The atmosphere in the room shifted instantly. People started leaning in, the conversation flowed more naturally, and the meal became an interactive experience rather than just a task. Whether it’s the sizzle of outdoor pizza or the vibrant colors of a fruit tart, these boards invite us to slow down and savor the moment. In this post, I’m sharing my favorite centerpieces for your next gathering, guaranteed to turn your table into a viral-worthy masterpiece.
How to cook perfect steak?

Why we love this
There is nothing quite as primal and satisfying as a perfectly cooked steak, sliced thin and fanned across a board with sprinkles of flaky sea salt. The contrast between the deeply caramelized, salty crust and the tender, butter-soft pink interior is a sensory journey in every bite. When the steak is served on a board, the juices mingle with roasted garlic and rosemary, creating a natural sauce that begs to be mopped up with crusty bread. The aroma of searing beef and browned butter fills the kitchen, signaling a meal that is both luxurious and comfortingly grounded.
Ingredients
- 2 thick-cut Ribeye or New York Strip steaks
- 4 tablespoons unsalted butter
- 3 cloves garlic, smashed
- 2 sprigs fresh rosemary or thyme
- Kosher salt and coarse black pepper
- High-smoke point oil (avocado or grapeseed)
How to make it
- Take your steaks out of the refrigerator at least 45 minutes before cooking. Pat them bone-dry with paper towels; moisture is the enemy of a good crust. Season aggressively with salt and pepper on all sides, including the fat caps.
- Place a heavy cast-iron skillet over high heat. Wait until the pan is wispy with smoke before adding 2 tablespoons of oil. Carefully lay the steaks into the pan, laying them away from you to avoid splatter.
- Sear the first side for 3-4 minutes without moving them. You are looking for a deep, dark mahogany crust. Flip the steaks using tongs and sear the other side for another 3 minutes.
- Reduce the heat to medium-high. Add the butter, smashed garlic, and herbs to the pan. Once the butter foams and turns nut-brown, tilt the pan and use a large spoon to continuously baste the steaks with the aromatic butter for 2-3 minutes.
- Use an instant-read thermometer to check for your preferred doneness: 130°F (54°C) for medium-rare. Remove the steaks to a cutting board and let them rest for at least 10 minutes to allow the fibers to relax and juices to redistribute. Slice against the grain and serve on your board.
How to make outdoor pizza?

Why we love this
Outdoor pizza is a celebration of fire and dough, bringing a smoky, rustic charm that a kitchen oven simply cannot replicate. The high heat creates those coveted ‘leopard spots’—tiny charred bubbles of flavor on a crust that is simultaneously crisp and airy. Watching the cheese bubble and the edges of the pepperoni curl under the intense heat of a pizza stone is mesmerizing. It’s an interactive craft that invites guests to participate, choosing their toppings while breathing in the scent of charred wood and fresh basil under the open sky.
Ingredients
- 1 ball of fermented pizza dough
- San Marzano tomato sauce
- Fresh mozzarella pearls
- Fresh basil leaves
- Extra virgin olive oil
- Semolina or cornmeal for dusting
How to make it
- Preheat your outdoor pizza oven (or grill with a pizza stone) for at least 30 minutes. You want the stone temperature to reach between 750°F and 850°F. If using a grill, ensure the lid is closed to trap the ambient heat.
- On a surface lightly dusted with semolina, gently stretch your dough from the center outwards, leaving a slightly thicker rim for the crust. Avoid using a rolling pin, as it will knock out the precious air bubbles.
- Dust a pizza peel with a little more semolina and slide the dough on top. Quickly spread a thin layer of sauce, leaving an inch of the border clear. Dot with mozzarella and a drizzle of olive oil.
- Slide the pizza onto the hot stone with a quick, confident shimmy of the peel. If using a high-heat pizza oven, rotate the pizza every 20-30 seconds using a turning peel to ensure the side closest to the flame doesn’t burn.
- The pizza is done when the crust has risen and shows dark char marks, and the cheese is completely melted and bubbling (usually 60-90 seconds in a pizza oven, or 5-7 minutes on a grill). Top with fresh basil immediately after removing.
How to bake fruit tarts?

Why we love this
A fruit tart is the ultimate edible art piece for a food board, offering a vibrant mosaic of colors and a sophisticated balance of textures. The base is a crumbly, buttery shortbread that snaps elegantly, followed by a layer of silky, vanilla-flecked pastry cream that melts on the tongue. Topping it with glazed, seasonal fruits adds a refreshing acidity and a jewel-like shine that makes the board feel celebratory. The scent of sweet butter and cooked sugar creates an inviting atmosphere that promises a sweet, light finish to any meal.
Ingredients
- 1 pre-baked tart shell (Pâte Sucrée)
- 2 cups whole milk
- 4 egg yolks
- 1/2 cup granulated sugar
- 1/4 cup cornstarch
- 1 teaspoon vanilla bean paste
- Assorted fresh berries, kiwi, and peaches
- Apricot jam for glazing
How to make it
- To make the pastry cream, whisk egg yolks, sugar, and cornstarch in a bowl until pale. In a saucepan, bring milk and vanilla to a gentle simmer. Slowly pour half the hot milk into the egg mixture while whisking constantly to temper the eggs.
- Return the entire mixture to the saucepan over medium heat. Whisk vigorously and continuously until the mixture thickens into a heavy custard. Once it starts to bubble, cook for one more minute to neutralize the cornstarch taste.
- Transfer the cream to a bowl, cover the surface directly with plastic wrap to prevent a skin from forming, and chill in the refrigerator for at least 3 hours until set.
- Once chilled, whisk the pastry cream to smooth it out and spread it evenly into your pre-baked, cooled tart shell. Smooth the top with an offset spatula.
- Arrange your sliced fruits in concentric circles, starting from the outside and working your way in. Heat a tablespoon of apricot jam with a splash of water and brush lightly over the fruit for a professional, high-gloss finish.
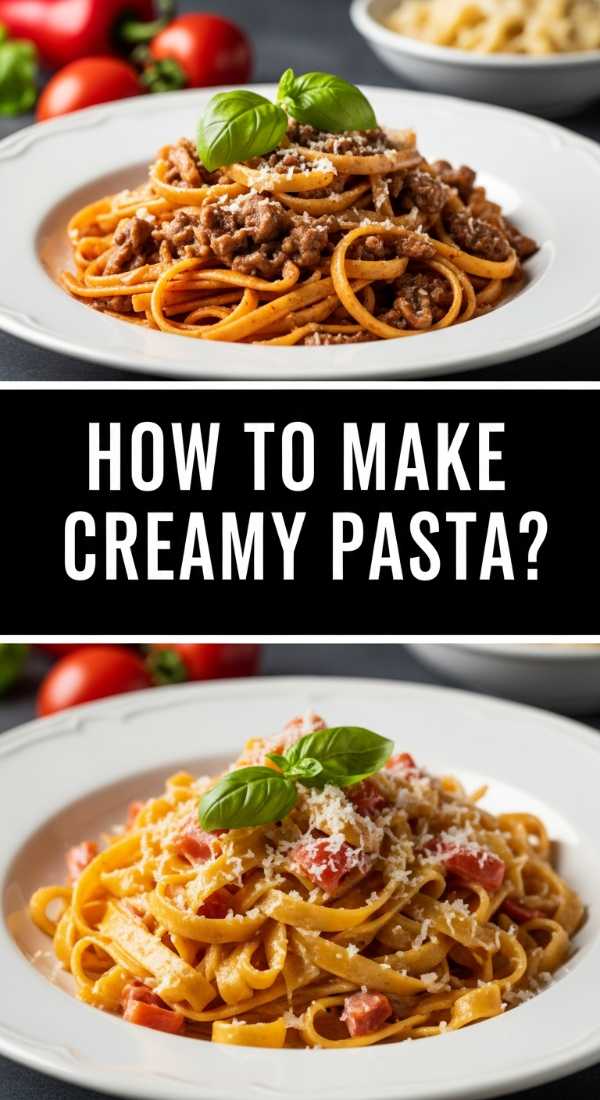
How to make creamy pasta?
Why we love this
Creamy pasta served on a board—often styled as a ‘pasta nest’—is the epitome of comfort food elevated for a crowd. The magic lies in the emulsion; a glossy, velvety sauce that coats every strand of pasta perfectly without being heavy or oily. The aroma of toasted peppercorns or melting parmesan is intoxicating, drawing everyone in for just one more forkful. There is something deeply communal about sharing a large heap of twirlable noodles, where the steam rises and the cheese stays perfectly gooey as it sits on a warm platter.
Ingredients
- 1 lb long pasta (Linguine or Bucatini)
- 2 cups freshly grated Pecorino Romano or Parmesan
- 3 tablespoons unsalted butter
- 1 tablespoon freshly cracked black pepper
- 1/2 cup heavy cream (optional for extra silkiness)
- Reserved pasta water (the secret ingredient)
How to make it
- Boil a large pot of water but salt it less than usual, as the cheese is very salty. Cook the pasta until it is about 2 minutes away from being al dente. The pasta should still have a firm bite in the center.
- While the pasta cooks, toast the cracked black pepper in a large, wide skillet over medium heat until fragrant (about 1 minute). Add the butter and cream (if using) and stir until melted and simmering.
- Using tongs, transfer the pasta directly from the water into the skillet. Do not drain the pasta water! Add 1/2 cup of the starchy pasta water to the skillet immediately.
- Turn the heat to low and toss the pasta vigorously. Slowly sprinkle in the grated cheese while continuing to toss and stir. The heat from the pasta and the starch in the water will melt the cheese into a creamy, stable emulsion.
- If the sauce looks too thick or dry, add more pasta water a tablespoon at a time. The goal is a sauce that looks like liquid gold. Serve immediately on a board, garnished with more cheese and pepper.
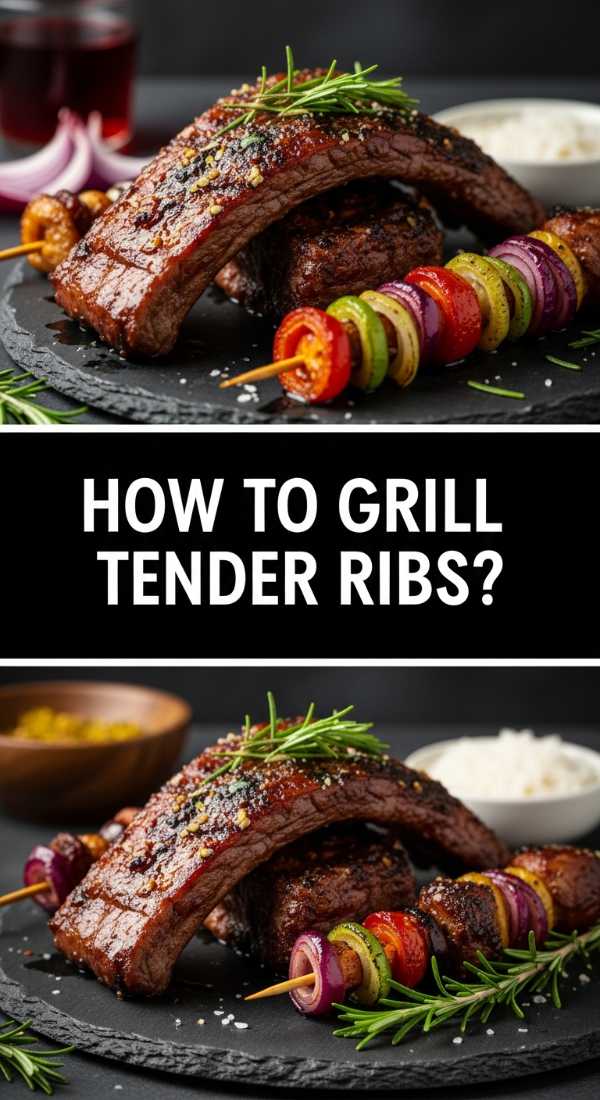
How to grill tender ribs?
Why we love this
Grilled ribs are the messy, soulful heart of a great food board, offering a combination of smoky depth and sticky, sweet glaze. When done right, the meat should pull away from the bone with the slightest tug, revealing a pink smoke ring and a texture that is incredibly juicy. The ritual of eating with your hands, getting a bit of sauce on your fingers, and savoring the charred edges creates a relaxed, fun vibe. The smell of hickory or applewood smoke drifting through the air is the ultimate invitation to a summer feast.
Ingredients
- 2 racks of Baby Back Ribs
- Dry Rub: Brown sugar, paprika, garlic powder, onion powder, salt, and cayenne
- 1 cup of your favorite BBQ sauce
- Apple juice or cider vinegar for spritzing
How to make it
- Remove the thin, silvery membrane (silverskin) from the back of the ribs using a paper towel for grip. This ensures the seasonings penetrate and the ribs stay tender. Coat the ribs generously on both sides with your dry rub.
- Set up your grill for indirect cooking (coals on one side, meat on the other) and stabilize the temperature at 250°F (121°C). Add wood chunks for smoke. Place the ribs on the cool side of the grill.
- Cook the ribs for 3 hours, spritzing with apple juice every 45 minutes to keep them moist. This phase builds the bark and the smoky flavor profile.
- Wrap the ribs tightly in heavy-duty aluminum foil with a splash of apple juice and a few pats of butter inside. Place them back on the grill for another 1.5 to 2 hours. This ‘Texas Crutch’ method steams the meat to perfect tenderness.
- Carefully unwrap the ribs and place them back on the grill. Brush with BBQ sauce and cook for another 20-30 minutes, allowing the sauce to ‘tack up’ and caramelize into a sticky glaze. Test for doneness by lifting the rack; it should bend and start to crack slightly.
How to bake soft cookies?

Why we love this
A board stacked with warm, soft-baked cookies is the ultimate nostalgia trip. There is a specific joy in a cookie that features crisp, golden-brown edges but a center so soft it’s almost doughy. As they sit on the board, the puddles of dark chocolate remain melted and glossy, inviting you to break one in half and see the ‘pull.’ The scent of vanilla and toasted butter is the olfactory equivalent of a warm hug, making any gathering feel like home. They are the perfect finger food for a dessert board, paired with fresh milk or fruit.
Ingredients
- 1 cup browned butter (cooled)
- 3/4 cup brown sugar + 1/2 cup white sugar
- 1 egg + 1 egg yolk (room temperature)
- 2 cups all-purpose flour
- 1/2 teaspoon baking soda
- 1.5 cups high-quality chocolate chunks
- Flaky sea salt for topping
How to make it
- Start by browning your butter in a skillet until it smells nutty and has golden specks. Let it cool until it’s semi-solid. Cream the butter with both sugars for at least 3-5 minutes until the mixture is light and fluffy.
- Beat in the egg and the extra yolk, followed by the vanilla. The extra yolk is the secret to that chewy, soft texture. Do not overbeat once the eggs are in.
- Sift in the flour, baking soda, and a pinch of salt. Mix by hand with a spatula until just combined. Fold in the chocolate chunks. Chill the dough for at least 2 hours (or overnight) to prevent spreading and deepen the flavor.
- Scoop large mounds of dough (about 3 tablespoons each) onto a parchment-lined sheet. Space them far apart. Bake at 350°F (175°C) for 10-12 minutes.
- The key to a soft cookie is to remove them when the edges are just barely set and the centers still look slightly underbaked and pale. They will firm up as they cool on the pan. Sprinkle with sea salt while warm.
How to stack juicy burgers?

Why we love this
The ‘Burger Board’ is a masterclass in customization and indulgence. There is something deeply appealing about a stack of perfectly seared patties topped with glistening, melted cheese and crisp, vibrant greens. A great burger is a balance of temperatures and textures: the hot, savory beef, the cold crunch of a pickle, and the pillowy softness of a toasted brioche bun. When served on a board, it becomes a build-your-own adventure that feels bountiful and generous, encouraging guests to get creative with their flavor combinations.
Ingredients
- 1 lb 80/20 ground chuck (cold)
- Brioche buns
- American or sharp cheddar cheese slices
- Toppings: Heirloom tomatoes, red onion, bibb lettuce, pickles
- Secret Sauce: Mayo, ketchup, mustard, and relish
How to make it
- Shape your meat into loose balls (about 5-6 oz each). Do not overwork the meat or season the inside; seasoning the inside leads to a sausage-like texture. Keep the meat cold until the moment it hits the pan.
- Heat a flat-top griddle or large skillet to high heat. Place the meat balls on the dry surface and use a heavy spatula to smash them down firmly until they are about 1/2 inch thick. Now, season the top side heavily with salt and pepper.
- Sear for 2 minutes until a deep, dark crust forms. Flip the patties. Immediately place a slice of cheese on each patty and add a teaspoon of water to the pan, then cover with a lid for 30 seconds to create a steam dome that perfectly melts the cheese.
- Toast your buns with butter on the griddle until golden brown. This creates a barrier so the juices from the meat don’t make the bread soggy.
- To assemble the board, place the patties on one side and stacks of buns, lettuce, tomatoes, and bowls of sauce on the other. This allows everyone to assemble their ‘perfect’ burger at the table.
How to roast crispy chicken?

Why we love this
A whole roasted chicken, carved and served on a board with its own juices, is a timeless classic that feels both humble and grand. The hallmark of a perfect roast chicken is skin that crackles like parchment paper, protecting meat that is incredibly succulent and aromatic. Infused with lemon, garlic, and thyme, the chicken fills the house with a comforting, savory aroma that reminds everyone of Sunday dinners. It’s a versatile centerpiece that pairs beautifully with roasted vegetables or a simple green salad, making the board look rich and rustic.
Ingredients
- 1 whole roasting chicken (4 lbs)
- 4 tablespoons softened butter
- 1 lemon, halved
- 1 head of garlic, sliced in half
- Fresh thyme and rosemary
- Kosher salt and cracked black pepper
How to make it
- Remove the chicken from the fridge an hour before roasting. Pat the skin extremely dry. If you have time, leave it uncovered in the fridge for a few hours to air-dry the skin even further.
- Generously salt the cavity of the chicken and stuff it with the lemon, garlic, and herbs. Rub the softened butter all over the outside of the skin, making sure to get into the crevices of the wings and legs. Season the exterior heavily with salt and pepper.
- Preheat your oven to 425°F (218°C). Place the chicken in a roasting pan or a large cast-iron skillet. High heat is essential for rendering the fat and achieving that golden-brown, crispy skin.
- Roast for 50-60 minutes. Use a meat thermometer to check the thickest part of the thigh; it should reach 165°F (74°C). The juices should run clear when the thigh is pierced.
- This is the most important step: let the chicken rest for at least 15-20 minutes before carving. This keeps the juices inside the meat. Carve into drumsticks, wings, and sliced breasts, and arrange on your board.
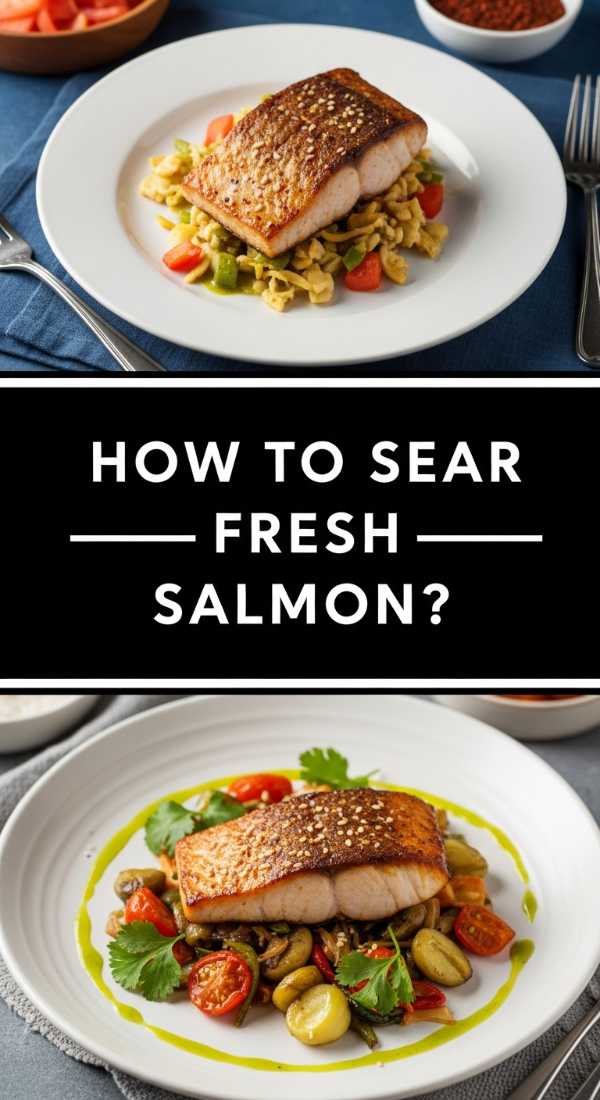
How to sear fresh salmon?
Why we love this
Pan-seared salmon is a light yet luxurious addition to a food board, offering a beautiful pop of coral color and a sophisticated flavor profile. We love it for the ‘glass-like’ crispy skin that provides a satisfying crunch against the buttery, flake-apart flesh. When drizzled with a bright lemon-butter sauce or topped with fresh dill, it feels elevated and healthy. It’s a dish that appeals to the senses with its vibrant presentation and the clean, oceanic aroma of high-quality seafood, making it a perfect centerpiece for a brunch or garden party board.
Ingredients
- 4 salmon fillets (skin-on)
- 2 tablespoons olive oil
- 3 tablespoons butter
- 1/2 lemon (for juice)
- Fresh dill or parsley
- Salt and pepper
How to make it
- Pat the salmon fillets dry with paper towels, especially the skin side. Season both sides with salt and pepper just before cooking. If you salt too early, the salt will draw out moisture and prevent a good sear.
- Heat a non-stick or stainless steel skillet over medium-high heat with the olive oil. Once the oil is shimmering, place the salmon fillets skin-side down in the pan. Press down firmly with a spatula for 10 seconds to ensure the skin makes full contact with the pan.
- Lower the heat slightly to medium and let the salmon cook skin-side down for about 5-6 minutes. You will see the color of the flesh slowly changing from the bottom up. Do not try to flip it until the skin releases easily from the pan.
- Flip the fillets and add the butter to the pan. Cook for only 1-2 minutes on the second side for a medium-rare finish. Spoon the melting butter over the skin as it finishes.
- Finish with a squeeze of fresh lemon juice while the fish is still in the pan. Serve the fillets on the board with the crispy skin facing up to keep it from getting soggy.
How to prepare street tacos?

Why we love this
Street tacos are the ultimate ‘party on a board,’ bringing a festive, high-energy vibe to any table. We love the explosion of contrasting flavors: the smoky, charred meat, the sharp bite of raw white onion, the creaminess of avocado, and the electric zing of fresh lime. The tortillas should be warm and slightly toasted, serving as the perfect vessel for the vibrant fillings. It’s a tactile, messy, and joyful way to eat that encourages everyone to customize their own perfect bite while sharing from the same beautiful spread.
Ingredients
- 1 lb flank steak or chicken thighs (marinated in lime, cumin, and garlic)
- Small corn tortillas
- Finely diced white onion
- Fresh cilantro, chopped
- Sliced radishes and lime wedges
- Salsa verde or pico de gallo
How to make it
- Marinate your protein for at least 1 hour in a mixture of lime juice, oil, garlic, cumin, and chili powder. Grill or sear the meat over very high heat to get charred, caramelized edges. Once cooked, let the meat rest, then dice it into small, bite-sized cubes.
- Warm the corn tortillas. The best way is to place them directly over a low gas flame for 10-15 seconds per side until they have charred spots and become pliable. Alternatively, use a dry cast-iron skillet. Keep them warm in a clean kitchen towel.
- Prepare your garnishes with care. The onion should be finely minced, and the cilantro should be fresh and bright. Slice the radishes very thin for a refreshing crunch.
- To assemble the board, place the piles of warm meat in the center, surrounded by stacks of toasted tortillas. Place the onions, cilantro, and radishes in small bowls or directly on the board in aesthetic heaps.
- Intersperse lime wedges throughout the board—they aren’t just for looks, the acid is crucial for cutting through the richness of the meat. Encourage guests to double up on tortillas if they are extra loaded!
Why the Board Trend is Here to Stay
The transition from plating in the kitchen to serving on a board represents a deeper shift in how we value our time together. These boards strip away the pretension of fine dining and replace it with something much more valuable: connection. When we share from the same surface, the meal becomes a conversation, an exploration of flavors, and a shared memory. Whether you’re serving a rustic roast chicken or a pile of soft-baked cookies, the board is a reminder that the best meals are the ones where everyone feels welcome to reach in and grab a piece of the magic.
Frequently Asked Questions
What is the best type of board to use?
Hardwoods like maple, walnut, or oak are best as they are durable and food-safe. Avoid softwoods or porous surfaces that can trap bacteria. Always ensure your board is seasoned with food-grade mineral oil.
How do I keep the food warm on a board?
The best trick is to warm the board itself in a low oven (around 150°F) before placing the food on it. You can also use small cast-iron skillets placed directly on the board for items like melted cheese or hot meats.
How do I prevent juices from running off the edge?
Look for boards with a ‘juice groove’ carved into the perimeter. If yours is flat, you can place a few slices of crusty bread or a bed of greens under juicy meats to soak up the delicious flavors.