
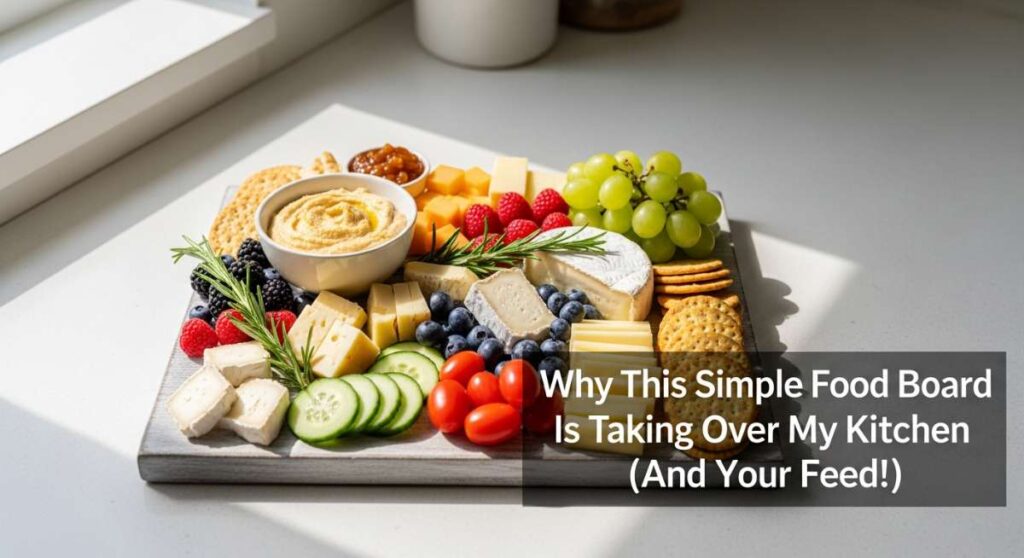
Why This Simple Food Board Is Taking Over My Kitchen (And Your Feed!)
There is something almost magical about the way a simple food board can transform a chaotic weekday evening into a moment of genuine connection. I remember the first time I ditched the formal plates and just laid everything out on a large wooden board; the atmosphere in the room shifted instantly. Instead of everyone being hunched over their own separate meals, we were leaning in, sharing stories, and reaching for seconds of our favorite bites. It’s not just about the food; it’s about the permission to slow down and savor the textures and colors of a well-prepared spread.
Lately, my social media feed has been exploding with these ‘Simple Food Boards,’ and it’s easy to see why. They are the ultimate hack for the modern host or the busy parent who still wants to eat beautifully. By combining hearty proteins, refreshing salads, and even a few sweet treats, you create a visual feast that feels curated but is actually incredibly easy to pull together. Whether you are hosting a backyard get-together or just making a ‘grazing dinner’ for the family, these recipes are the building blocks of a viral-worthy spread that tastes even better than it looks.
How to make crockpot chicken?

Why we love this
There is nothing quite like the comforting aroma of slow-cooked chicken wafting through the house on a rainy afternoon. The meat becomes so incredibly tender that it practically melts off the bone, infused with the savory depths of garlic, herbs, and its own natural juices. Every bite is a succulent explosion of flavor, offering a velvety texture that pairs perfectly with a crusty piece of bread or a pile of fluffy mashed potatoes. It is the ultimate ‘set it and forget it’ comfort food that feels like a warm hug at the end of a long day.
Ingredients
- 3-4 lbs boneless, skinless chicken breasts or thighs
- 1 cup chicken broth
- 2 tbsp butter, cubed
- 1 tsp garlic powder
- 1 tsp onion powder
- 1 tsp dried oregano
- Salt and black pepper to taste
- Fresh parsley for garnish
How to make it
- Begin by patting your chicken pieces dry with paper towels to ensure the seasoning adheres well. Season both sides generously with salt, pepper, garlic powder, onion powder, and dried oregano.
- Place the seasoned chicken into the bottom of the crockpot in an even layer. If you are using a mix of breasts and thighs, put the thighs on the bottom as they can withstand longer heat.
- Pour the chicken broth around the sides of the chicken, taking care not to wash off the spices you just applied.
- Distribute the cubes of butter over the top of the chicken; this adds a rich, silky mouthfeel to the final sauce.
- Cover the crockpot and cook on Low for 6 to 7 hours or on High for 3 to 4 hours. For the most tender, shreddable results, the ‘Low’ setting is highly recommended as it breaks down the connective tissues slowly.
- Once the internal temperature reaches 165°F and the meat pulls apart easily with a fork, remove the chicken from the pot. Shred it using two forks or leave the pieces whole, then drizzle with some of the residual cooking juices and garnish with fresh parsley.
How to make rotel dip?

Why we love this
This dip is the undisputed king of game day snacks, offering a nostalgic, creamy, and slightly spicy experience that keeps everyone coming back for more. The way the molten cheese wraps around the chunky tomatoes and zesty green chilies creates a thick, decadent texture that clings perfectly to a salty tortilla chip. There’s a distinct smoky warmth from the browned meat and a sharp, tangy kick from the Rotel that cuts through the richness, making it an addictive center-piece for any casual food board. It’s bubbly, golden, and undeniably satisfying to the very last scoop.
Ingredients
- 1 lb ground beef or pork sausage
- 1 block (16 oz) Velveeta or processed cheese, cubed
- 1 can (10 oz) Rotel Original Diced Tomatoes and Green Chilies (undrained)
- 1/2 tsp chili powder
- Optional: sliced jalapeños or cilantro for topping
How to make it
- Place a large skillet or saucepan over medium-high heat. Add the ground beef or sausage and cook until it is completely browned and no longer pink. Use a wooden spoon to crumble the meat into small, even pieces as it cooks.
- Once the meat is fully cooked, drain the excess grease thoroughly. This step is crucial to prevent your dip from becoming oily or separated.
- Reduce the heat to low and add the cubed cheese to the skillet. It is important to cut the cheese into small, uniform 1-inch cubes so that it melts evenly and quickly without scorching.
- Pour the entire can of Rotel (including the liquid) into the pan and sprinkle in the chili powder. The juices from the can provide the perfect amount of acidity and moisture to create a silky consistency.
- Stir the mixture constantly over low heat. Patience is key here; you want the cheese to melt slowly into a smooth, homogenous sauce. If the dip seems too thick, you can add a splash of milk to reach your desired consistency.
- Once the dip is smooth and bubbling gently, transfer it to a warm serving bowl or a small slow cooker to keep it melted while serving on your food board.
How to make cucumber salad?
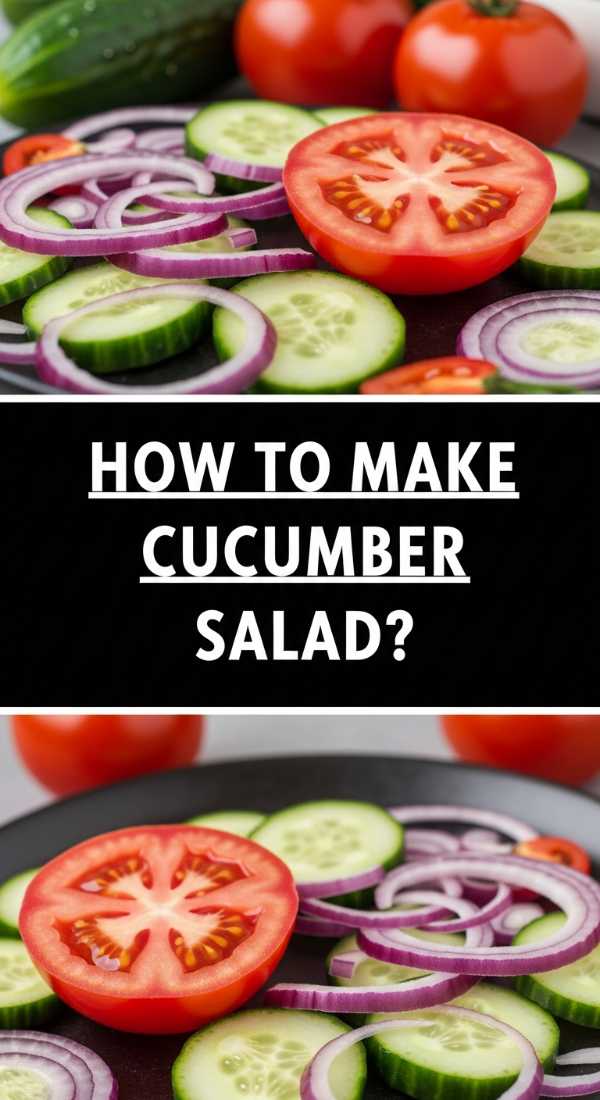
Why we love this
Cucumber salad is the ultimate palate cleanser, offering a crisp, cooling crunch that provides a brilliant contrast to heavier grilled meats or rich dips. The aroma is instantly refreshing—a mix of garden-fresh greens and the sharp, bright zing of vinegar and red onion. Each translucent slice of cucumber is saturated with a light, tangy dressing that wakes up the taste buds, making it feel like a breath of fresh air on a hot summer afternoon. It is light, vibrant, and visually stunning when piled high on a board with its bright green and purple hues.
Ingredients
- 2 large English cucumbers, thinly sliced
- 1/2 small red onion, very thinly sliced into half-moons
- 1/2 cup white wine vinegar or apple cider vinegar
- 2 tbsp sugar
- 1/4 cup fresh dill, chopped
- 1/2 tsp salt
- 1/4 tsp black pepper
How to make it
- Using a mandoline slicer or a very sharp chef’s knife, slice the English cucumbers into uniform, paper-thin rounds. Leaving the skin on adds a beautiful green border and a bit of extra fiber.
- In a medium mixing bowl, whisk together the vinegar, sugar, salt, and black pepper until the sugar and salt have completely dissolved. This creates a balanced brine that will pickle the vegetables slightly.
- Add the sliced cucumbers and the thinly sliced red onions to the bowl with the dressing. Toss them thoroughly to ensure every single slice is coated.
- Fold in the freshly chopped dill. Using fresh herbs rather than dried makes a massive difference in the aromatic profile of the dish.
- Cover the bowl and refrigerate for at least 30 minutes before serving. This resting period allows the cucumbers to release some of their moisture and the flavors to meld together.
- Give the salad one final toss before placing it in a shallow bowl on your food board to keep the dressing contained.
How to make fruit popsicles?

Why we love this
These popsicles are like frozen sunshine, bursting with the pure, unadulterated sweetness of ripe summer fruit. When you bite into one, you get the icy, refreshing chill followed by the soft, jammy texture of real fruit pieces suspended in a vibrant juice base. They are naturally beautiful, showcasing the deep purples of berries or the bright oranges of peaches, making them a stunning addition to a dessert-themed food board. The lack of artificial syrups means the clean, floral notes of the fruit really shine through, leaving you feeling refreshed rather than weighed down by sugar.
Ingredients
- 3 cups assorted fresh fruit (strawberries, blueberries, mango, or kiwi)
- 2 cups fruit juice (such as white grape or apple) or coconut water
- 1 tbsp honey or agave nectar (optional)
- 1 tbsp fresh lemon or lime juice
How to make it
- Wash all the fruit thoroughly. Slice larger fruits like strawberries, kiwi, or mango into thin, decorative slices or small bite-sized chunks. Leave berries like blueberries or raspberries whole.
- In a small pitcher, whisk together your base liquid (juice or coconut water) with the lemon juice and sweetener if you are using it. The citrus juice helps keep the colors of the fruit bright.
- Carefully arrange the fruit pieces inside your popsicle molds. Try to press some of the slices against the sides of the molds so they are visible once frozen.
- Pour the liquid mixture into each mold, leaving about a quarter-inch of space at the top to allow for expansion as the liquid freezes.
- Insert the popsicle sticks into the centers. If your molds don’t have a lid to hold the sticks, freeze the popsicles for about an hour first, then insert the sticks so they stay upright.
- Freeze for at least 6 to 8 hours, or ideally overnight, until completely solid. To unmold, run the outside of the molds under warm water for 10-15 seconds to loosen the edges, then gently pull the popsicles out.
How to make banana bread?
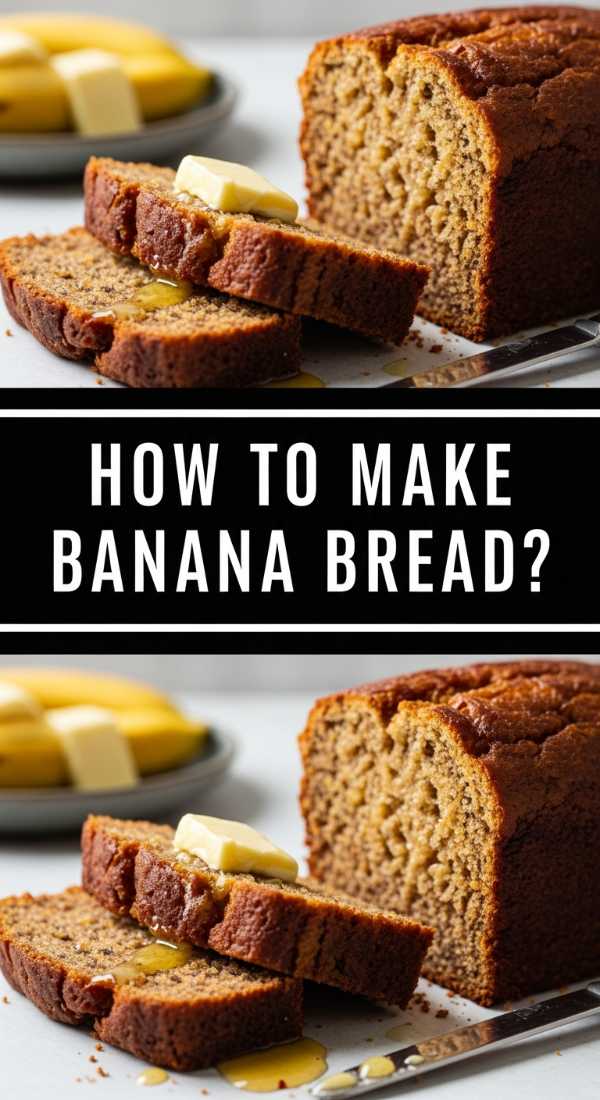
Why we love this
The smell of banana bread baking is the universal scent of a cozy home, filled with notes of caramelized sugar, warm cinnamon, and ripened fruit. This bread has a dense, moist crumb that feels incredibly indulgent, especially when served warm with a smear of salted butter. Each slice offers a complex sweetness that isn’t overpowering, complemented by the occasional crunch of a walnut or the richness of a chocolate chip if you choose to add them. It is the perfect ‘anchor’ for a brunch board, providing a hearty, comforting element that pairs beautifully with fresh fruit and coffee.
Ingredients
- 3 very ripe bananas, mashed
- 1/2 cup melted butter
- 3/4 cup granulated sugar
- 1 large egg, beaten
- 1 tsp vanilla extract
- 1 tsp baking soda
- Pinch of salt
- 1 1/2 cups all-purpose flour
- Optional: 1/2 tsp cinnamon or 1/2 cup chopped walnuts
How to make it
- Preheat your oven to 350°F (175°C) and grease a 4×8-inch loaf pan with butter or non-stick spray.
- In a large mixing bowl, use a fork to mash the ripe bananas until they are smooth with only a few small lumps remaining. The spottier and browner the bananas, the sweeter and more flavorful your bread will be.
- Stir the melted butter into the mashed bananas until well combined.
- Mix in the sugar, beaten egg, and vanilla extract. Whisk gently until the batter is smooth and the egg is fully incorporated.
- Sprinkle the baking soda, salt, and cinnamon (if using) over the mixture and stir.
- Gently fold in the flour using a spatula. It is critical not to overmix at this stage; stir only until the white streaks of flour disappear. Overmixing leads to a tough, rubbery loaf.
- Pour the batter into the prepared loaf pan and smooth the top. Bake for 50 to 60 minutes. Check for doneness by inserting a toothpick into the center; it should come out clean or with just a few moist crumbs.
- Let the bread cool in the pan for 10 minutes before transferring it to a wire rack to cool completely before slicing.
How to grill summer steak?

Why we love this
A perfectly grilled summer steak is a masterclass in texture—the exterior features a salty, charred crust that gives way to a tender, buttery interior that is dripping with juice. The smoky aroma from the grill combined with the savory richness of the beef is enough to make anyone’s mouth water instantly. When sliced thinly and placed on a food board, it becomes a sophisticated yet accessible protein that feels like a true celebration of the season. It’s bold, savory, and incredibly satisfying, especially when finished with a sprinkle of flaky sea salt and a dollop of herb butter.
Ingredients
- 2 lbs of steak (Ribeye, Strip, or Flank)
- 2 tbsp olive oil
- 2 cloves garlic, minced
- 1 tbsp kosher salt
- 1 tsp coarse black pepper
- 1 tsp dried rosemary or thyme
How to make it
- Remove the steak from the refrigerator at least 30 to 45 minutes before grilling. Bringing the meat to room temperature ensures it cooks evenly throughout.
- Pat the steak completely dry with paper towels. Any moisture on the surface will create steam, preventing that beautiful brown crust from forming.
- Rub the steak with olive oil, then generously coat all sides with salt, pepper, garlic, and herbs. Press the seasonings into the meat firmly.
- Preheat your grill to high heat (about 450-500°F). Ensure the grates are clean and lightly oiled.
- Place the steak on the grill and sear for about 4-5 minutes per side for a medium-rare finish (internal temp of 130-135°F). Use tongs to flip the steak; never use a fork as piercing the meat will let the juices escape.
- Once cooked to your preference, remove the steak from the grill and place it on a cutting board. Tent it loosely with foil and let it rest for at least 10 minutes. This allows the fibers to relax and the juices to redistribute.
- Slice the steak against the grain into thin strips for easier sharing on your board.
How to make pasta salad?
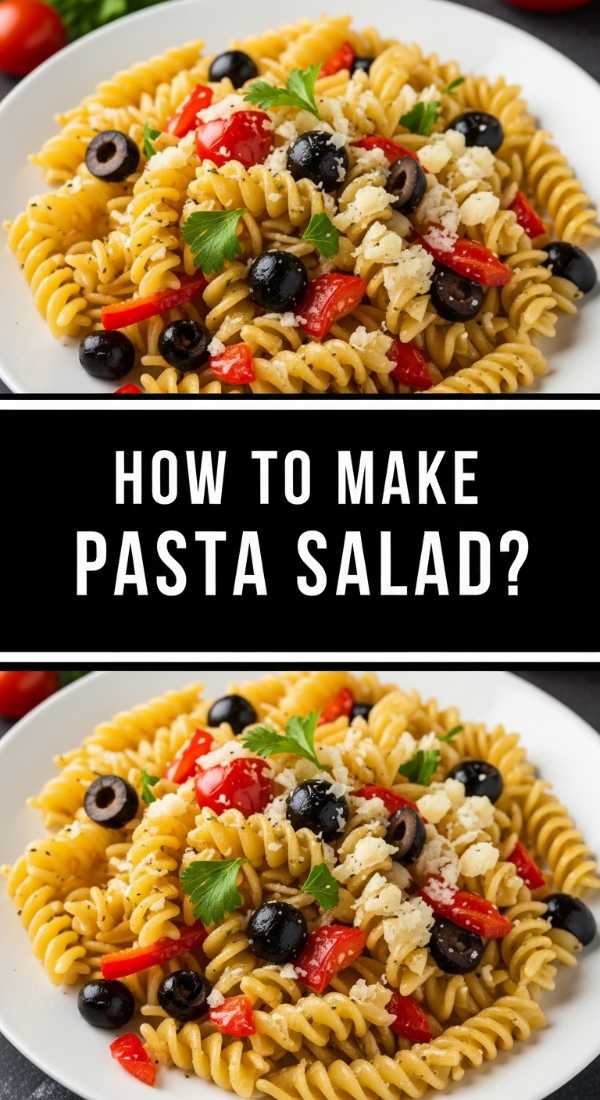
Why we love this
Pasta salad is the ultimate versatile side dish, bringing together a rainbow of colors and a symphony of textures in every forkful. The chewy, al dente pasta acts as a canvas for the sharp bite of feta, the salty snap of olives, and the juicy burst of cherry tomatoes. It’s coated in a zesty, herb-forward dressing that ties everything together with a bright acidity, making it incredibly refreshing even on the hottest days. It holds up beautifully on a food board, staying delicious for hours and only getting better as the pasta absorbs the flavors of the vinaigrette.
Ingredients
- 1 lb rotini or fusilli pasta
- 1 cup cherry tomatoes, halved
- 1 cucumber, diced
- 1/2 cup kalamata olives, sliced
- 1/2 cup red onion, finely diced
- 1/2 cup crumbled feta cheese
- 1/2 cup Italian vinaigrette dressing
- 1/4 cup fresh basil or parsley, chopped
How to make it
- Boil a large pot of salted water. Cook the pasta according to the package directions, but aim for ‘al dente’—it should still have a slight firmness. Mushy pasta will fall apart when tossed with the other ingredients.
- Drain the pasta and immediately rinse it under cold running water. This stops the cooking process and removes excess starch, preventing the pasta from sticking together.
- In a very large mixing bowl, combine the cooled pasta with the halved tomatoes, diced cucumbers, olives, and red onions.
- Pour the Italian dressing over the mixture. Start with half a cup and add more if the pasta seems dry, as the noodles will absorb a significant amount of the liquid over time.
- Gently fold in the crumbled feta cheese and the fresh herbs. Mixing gently ensures the feta stays in distinct chunks rather than dissolving into the dressing.
- Chill the salad in the refrigerator for at least one hour. Before serving on your board, give it a quick stir and add a tiny splash more dressing or a squeeze of lemon to brighten the flavors back up.
How to make pina coladas?

Why we love this
Sipping a pina colada is like taking an instant vacation; the combination of creamy coconut and sweet, acidic pineapple is the quintessential flavor of the tropics. The texture is thick and frosty, like a sophisticated adult slushy that coats the palate in a velvety, milky richness. There’s a wonderful balance between the natural sugars of the fruit and the slightly nutty, floral notes of the coconut cream, making it an incredibly indulgent treat. Garnished with a bright cherry and a wedge of pineapple, it’s the perfect ‘drinkable accessory’ for a vibrant, summer-themed food spread.
Ingredients
- 2 cups frozen pineapple chunks
- 1/2 cup coconut cream (the thick stuff in the can)
- 1/2 cup pineapple juice
- 4 oz white rum (optional for a mocktail version)
- 2 cups ice
- Pineapple wedges and maraschino cherries for garnish
How to make it
- Place the frozen pineapple chunks into a high-powered blender. Using frozen fruit instead of just ice ensures a more concentrated flavor and a smoother, creamier texture.
- Add the coconut cream, pineapple juice, and white rum (if using) to the blender. Ensure you are using ‘cream of coconut’ or canned coconut cream for that signature thick consistency, rather than thin coconut milk.
- Add the ice to the blender last.
- Start the blender on a low speed to break up the frozen fruit, then gradually increase to high. Blend for 45-60 seconds until the mixture is completely smooth and no ice crystals remain.
- Taste the mixture. If it’s too tart, add a teaspoon of agave or honey; if it’s too thick, add a splash more pineapple juice and pulse again.
- Pour into tall glasses and garnish immediately with a pineapple wedge and a cherry. Serve these alongside your food board in chilled glasses to keep the tropical vibes going.
How to make hummingbird nectar?

Why we love this
While not for human consumption, making hummingbird nectar is a beautiful way to bring life and movement to the area where you enjoy your outdoor food boards. There is a simple, meditative joy in boiling the sugar water and knowing you are providing a high-energy fuel for these tiny, iridescent creatures. Seeing a hummingbird hover near your table while you eat is a magical experience that connects you to nature and adds an element of wonder to any backyard gathering. It’s a small, thoughtful gesture that transforms your patio into a vibrant sanctuary of flickering wings and bright colors.
Ingredients
- 1 cup white granulated sugar
- 4 cups water
- Note: Never use red dye, honey, or artificial sweeteners, as these can be harmful to hummingbirds.
How to make it
- In a medium saucepan, combine the 4 cups of water and 1 cup of granulated sugar. This 4:1 ratio most closely mimics the natural nectar found in flowers.
- Place the pan over medium-high heat and stir constantly until the sugar is completely dissolved.
- Bring the mixture to a low boil for 1 to 2 minutes. Boiling the water helps remove impurities and slows down the growth of bacteria or mold in the feeder later on.
- Remove the pan from the heat and let the nectar cool completely to room temperature. This is a vital step; pouring hot liquid into a plastic feeder can warp the feeder and harm the birds.
- Once cooled, fill your clean hummingbird feeder with the nectar. Store any leftover nectar in a sealed container in the refrigerator for up to two weeks.
- Hang the feeder in a shaded area near your outdoor seating so you can watch the birds while you enjoy your own food board spread!
How to make chicken salad?
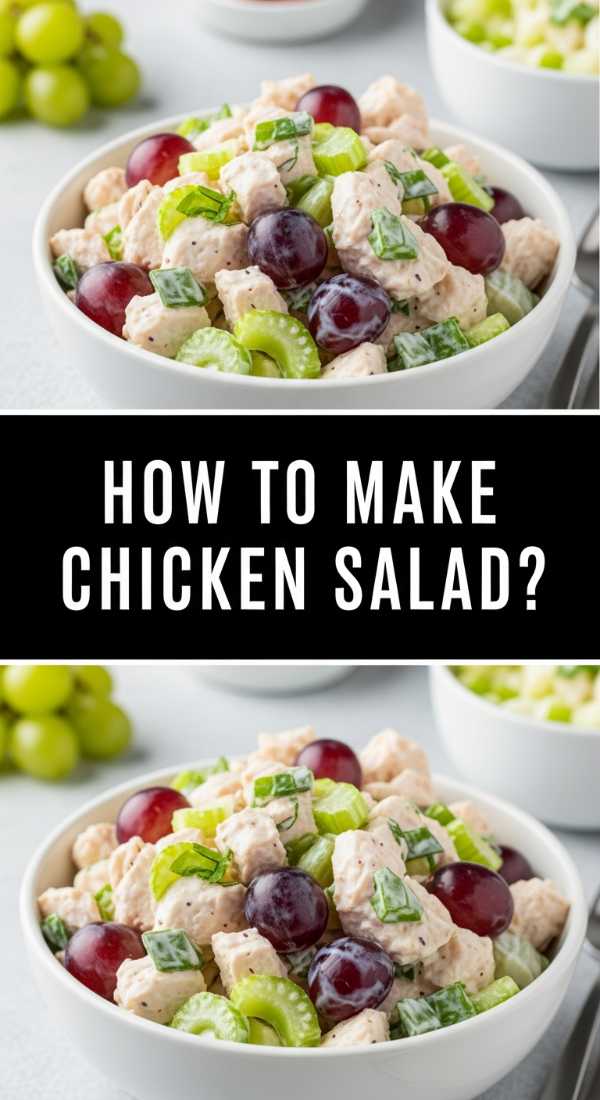
Why we love this
Chicken salad is a classic for a reason—it’s a harmonious blend of savory, sweet, and crunchy that feels sophisticated yet deeply familiar. The creamy mayonnaise-based dressing binds together the tender chunks of chicken with the crisp snap of celery and the juicy, floral sweetness of halved grapes. Every bite offers a different texture, from the soft meat to the crunch of toasted pecans, making it a delight to eat on a cracker or inside a buttery croissant. It is the perfect ‘scoopable’ addition to a food board, looking elegant when served in a glass bowl or nestled into large lettuce leaves.
Ingredients
- 3 cups cooked chicken (rotisserie works great), diced
- 1/2 cup mayonnaise
- 1/4 cup Greek yogurt (for tang)
- 1 cup red grapes, halved
- 1/2 cup celery, finely diced
- 1/4 cup toasted pecans or walnuts, chopped
- 1 tbsp Dijon mustard
- 1 tsp lemon juice
- Salt and pepper to taste
How to make it
- In a large mixing bowl, whisk together the mayonnaise, Greek yogurt, Dijon mustard, and lemon juice. The yogurt adds a nice tanginess that lightens up the traditional heavy mayo base.
- Season the dressing with a pinch of salt and a generous amount of black pepper. Remember that the chicken and nuts will absorb some of this seasoning, so be bold.
- Add the diced chicken to the bowl and toss until every piece is thoroughly coated in the dressing. Using cold, pre-cooked chicken ensures the dressing stays thick and doesn’t melt.
- Gently fold in the halved grapes, diced celery, and chopped nuts. Using red grapes provides a beautiful pop of color and a burst of sweetness that balances the savory chicken.
- Taste and adjust the seasoning if necessary. You might want an extra squeeze of lemon to brighten the flavors.
- For the best results, cover the bowl and refrigerate for at least an hour before serving. This allows the celery to stay crisp while the chicken absorbs the creamy dressing. Serve on your board with a side of artisanal crackers or toasted baguette slices.
Conclusion
Building a food board is about more than just the recipes; it’s about creating an experience that is as beautiful as it is delicious. By combining these viral-worthy dishes—from the savory warmth of crockpot chicken to the refreshing chill of fruit popsicles—you create a spread that caters to every craving. So, grab your largest wooden board, gather your favorite people, and start building. Don’t forget to take a picture before everyone dives in, because a spread this good deserves to be shared!