

Viral and Simple: Why These Snacking Boards Are Taking Over the Internet
There is something undeniably magical about the moment you set a beautifully arranged board in the middle of a table. It’s not just about the food; it’s about the collective exhale from your guests, the immediate reach for a favorite morsel, and the way the atmosphere shifts from formal to festive in an instant. In a world that often feels rushed and digital, these snacking boards bring us back to the basics of sharing, tasting, and lingering over good conversation.
I remember the first time I traded a traditional multi-course dinner for a giant, vibrant board filled with textures and colors. The relief I felt as a host was life-changing—no more hovering over a hot stove while my friends laughed in the other room. Instead, I was right there with them, enjoying the crunch of a fresh radish or the creaminess of a slow-cooked dip. These boards are the ultimate hack for the modern lifestyle: they look like a million bucks but are surprisingly simple to pull together with the right ingredients.
Whether you are planning a sun-drenched backyard bash or a quiet lunch on the patio, these ten viral-inspired board concepts will elevate your summer hosting game. We’ve curated the absolute best recipes that focus on ease, freshness, and that ‘wow’ factor that makes everyone pull out their phones to snap a photo before the first bite.
10 Easy Summer Crockpot Recipes (Step-by-Step Guide)
Why we love this
There is an incredible sensory satisfaction in the aroma of slow-cooked BBQ pulled pork wafting through a house while the sun blazes outside. This board captures the contrast between the tender, melt-in-your-mouth strands of savory meat and the cool, crisp crunch of a tangy cabbage slaw. Imagine biting into a warm brioche bun piled high with smoky, sweet pork, followed by the refreshing zest of a homemade pickle—it’s the ultimate low-effort, high-reward summer meal that keeps the kitchen cool and your guests incredibly happy.
Ingredients
- 3 lbs pork shoulder (butt)
- 2 cups honey BBQ sauce
- 1/4 cup apple cider vinegar
- 1 tbsp smoked paprika
- 2 tsp garlic powder
- Brioche slider buns
- Pickled red onions and jalapeños for garnish
How to make it
- Pat the pork shoulder dry with paper towels to ensure a better sear and seasoning adhesion.
- In a small bowl, whisk together the smoked paprika, garlic powder, salt, and black pepper. Rub this mixture thoroughly into all sides of the pork.
- Place the seasoned pork in the crockpot and pour the apple cider vinegar around the base to provide moisture without washing off the spices.
- Cover and cook on LOW for 8 to 10 hours. The pork is ready when it literally falls apart at the touch of a fork.
- Carefully remove the pork from the slow cooker and place it on a large cutting board. Use two forks to shred it into bite-sized pieces, discarding any large pieces of fat.
- Return the shredded meat to the crockpot and stir in the honey BBQ sauce, letting it warm through on the ‘Warm’ setting for another 20 minutes to allow the flavors to meld.
- Arrange the slider buns, pickles, and the saucy pork on a large wooden board for a self-serve slider station.
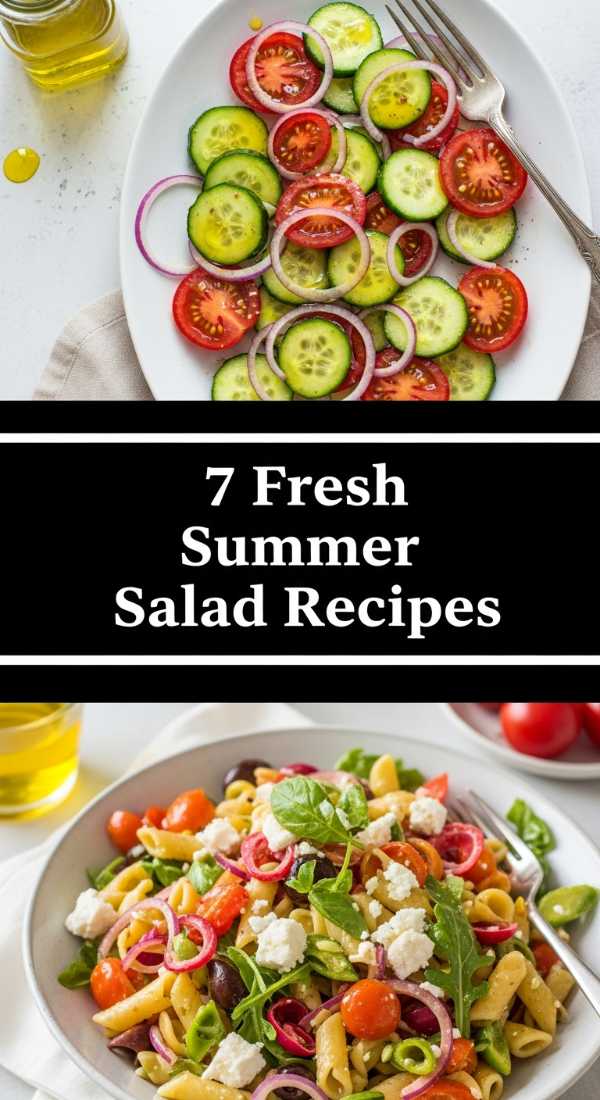
7 Fresh Summer Salad Recipes (Easy Guide)
Why we love this
This salad board celebrates the peak of summer harvest with a focus on a vibrant Watermelon and Feta medley. The experience begins with the icy, sweet crunch of perfectly ripe watermelon, which immediately meets the salty, creamy crumble of high-quality sheep’s milk feta. A drizzle of balsamic glaze adds a thick, syrupy sweetness that lingers on the tongue, while fresh mint leaves provide a cooling, herbal finish that clears the palate. It is a symphony of contrasting flavors that feels like a cool breeze on a humid July afternoon.
Ingredients
- 6 cups cubed seedless watermelon
- 1 cup crumbled feta cheese
- 1/2 cup fresh mint leaves, torn
- 1/4 cup extra virgin olive oil
- 3 tbsp thick balsamic glaze
- Flaky sea salt and cracked black pepper
How to make it
- Cube your watermelon into uniform 1-inch squares. For the best texture, ensure the watermelon has been chilled in the refrigerator for at least 4 hours prior to cutting.
- Scatter the watermelon cubes across a large, flat serving board, creating an even layer but leaving room for air between the pieces.
- Evenly sprinkle the crumbled feta over the watermelon. Don’t over-mix; you want the white of the cheese to pop against the red fruit.
- Tear the fresh mint leaves by hand rather than chopping them with a knife to prevent bruising and to release the maximum amount of aromatic oils.
- Whisk the olive oil with a pinch of flaky sea salt and drizzle it lightly over the entire board to add a luxurious mouthfeel.
- Just before serving, use a spoon to decoratively zig-zag the balsamic glaze over the top. This prevents the glaze from bleeding into the fruit too much before guests arrive.
- Finish with a final crack of black pepper to add a tiny hint of heat that balances the sugar of the melon.
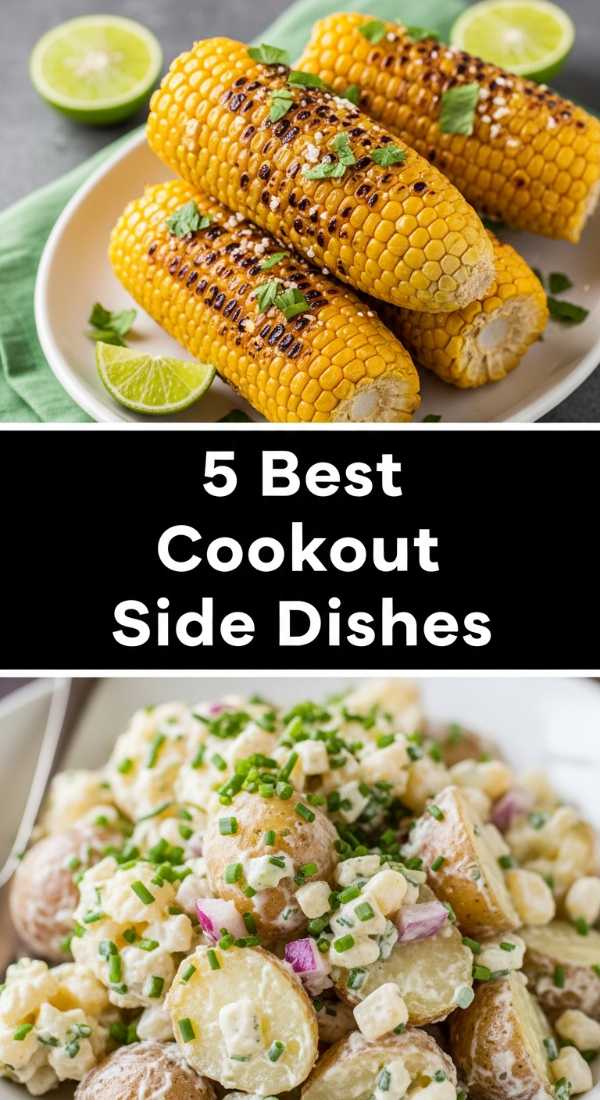
5 Best Cookout Side Dishes (Step-by-Step Guide)

Why we love this
Nothing says ‘cookout’ quite like the smoky, charred aroma of Grilled Street Corn, or Elote. This board is a tactile delight, encouraging guests to pick up a cob coated in a velvety mixture of crema, lime, and chili. The kernels pop in your mouth with juicy sweetness, while the salty Cotija cheese provides a gritty, savory texture that sticks to your lips. It’s messy in the best way possible, evoking memories of street fairs and neighborhood block parties where the food is as warm as the company.
Ingredients
- 6 ears of fresh sweet corn, husks removed
- 1/2 cup Mexican crema or sour cream
- 1/2 cup mayonnaise
- 1/2 cup crumbled Cotija cheese
- 1 tsp ancho chili powder
- 2 limes, cut into wedges
- Fresh cilantro for garnish
How to make it
- Preheat your grill to medium-high heat (about 400°F). Lightly oil the grates to prevent the corn from sticking.
- Place the corn ears directly on the grill. Rotate them every 2-3 minutes using tongs. You are looking for even char marks—deep brown or black spots—all around the cob, which usually takes about 10-12 minutes total.
- While the corn is grilling, whisk together the crema and mayonnaise in a small bowl until smooth.
- Once the corn is charred and the kernels are tender, remove them from the grill and immediately brush a generous layer of the crema mixture over each cob while they are still steaming hot.
- Sprinkle the Cotija cheese over the cobs, rolling them slightly to ensure the cheese adheres to the creamy base.
- Dust each cob with a light coating of chili powder for that signature smoky kick.
- Arrange the cobs on a board surrounded by lime wedges and a heavy dusting of chopped cilantro, instructing guests to squeeze the lime over the corn right before eating.
8 Quick Summer Dinner Ideas (Easy Recipes)

Why we love this
When the sun is setting late and you want a dinner that feels sophisticated yet effortless, the 15-Minute Lemon Garlic Shrimp Board is the answer. The scent of sizzling garlic and bright citrus fills the air instantly, promising a meal that is light but deeply satisfying. Each shrimp is succulent and buttery, carrying the sharp tang of lemon that cuts through the richness. Served with crusty bread to soak up the golden garlic butter, it’s a communal eating experience that turns a simple Tuesday night into a vacation-style feast.
Ingredients
- 1.5 lbs jumbo shrimp, peeled and deveined
- 4 cloves garlic, minced
- 4 tbsp unsalted butter
- 1 tbsp olive oil
- 1 tsp red pepper flakes
- Zest and juice of 2 lemons
- 1 baguette, sliced and toasted
How to make it
- In a large skillet, heat the olive oil and 2 tablespoons of butter over medium-high heat until the butter begins to foam.
- Add the minced garlic and red pepper flakes. Sauté for only 30-60 seconds—just until the garlic becomes fragrant and golden, but be careful not to let it burn, as bitter garlic will ruin the sauce.
- Add the shrimp in a single layer. Do not crowd the pan; if necessary, cook in two batches. Cook for 2 minutes on one side until the edges turn pink and opaque.
- Flip the shrimp and cook for another 1-2 minutes. The shrimp should form a ‘C’ shape; if they curl into an ‘O’, they are overcooked.
- Stir in the remaining 2 tablespoons of butter, the lemon zest, and the lemon juice. Toss the shrimp constantly for 30 seconds to create a glossy, emulsified sauce.
- Remove from heat immediately. Pour the shrimp and all the pan juices into a shallow bowl in the center of a board.
- Surround the bowl with toasted baguette slices and extra lemon wedges for a beautiful, interactive dinner presentation.
10 Best Summer Party Dips (Step-by-Step Guide)

Why we love this
The Mediterranean Whipped Feta Board is a viral sensation for a reason: it’s visually stunning and offers a complexity of flavor that belies its simplicity. The base is a cloud-like swirl of salty feta and Greek yogurt, providing a cool, tangy foundation for warm, honey-roasted cherry tomatoes. As you dip a piece of warm pita into the board, you get the contrast of the chilled cheese and the burst of warm, sweet tomato juice. It’s a sophisticated, savory treat that feels like dining on a terrace in Santorini.
Ingredients
- 8 oz block of feta cheese
- 1/2 cup Greek yogurt
- 1 cup cherry tomatoes
- 2 tbsp honey
- 2 tsp dried oregano
- 3 tbsp olive oil
- Warm pita bread or cucumbers for dipping
How to make it
- Preheat your oven to 400°F. In a small baking dish, toss the cherry tomatoes with 1 tablespoon of olive oil, the honey, and a pinch of salt. Roast for 15-20 minutes until the skins burst and the juices are syrupy.
- While the tomatoes roast, crumble the feta into a food processor. Add the Greek yogurt and the remaining 2 tablespoons of olive oil.
- Pulse the mixture until it becomes completely smooth and airy. This may take 2-3 minutes of continuous processing. If it’s too thick, add a teaspoon of water.
- Spread the whipped feta onto a large board or flat plate using the back of a spoon to create deep swoops and wells.
- Once the tomatoes are done, pour them (along with all their roasted juices) directly into the center of the feta swoops.
- Sprinkle the dried oregano and a little extra black pepper over the top for an aromatic finish.
- Serve immediately while the tomatoes are warm, surrounded by piles of fluffy pita and crisp cucumber slices.
7 Refreshing Fun Summer Drinks (Drink Ideas)

Why we love this
The Sparkling Peach Thyme Lemonade is the ultimate ‘mocktail’ or cocktail base that screams summer elegance. The fuzziness of the peach puree provides a thick, luxurious texture that dances with the sharp, effervescent bubbles of sparkling water. The inclusion of fresh thyme adds a surprising earthy undertone that prevents the drink from being cloyingly sweet, making it sophisticated enough for adults but fun enough for kids. It’s a refreshing, ice-cold gulp of sunshine that looks stunning served in a large glass pitcher on a board filled with fruit garnishes.
Ingredients
- 4 ripe peaches, pitted and sliced
- 1 cup fresh lemon juice
- 1/2 cup honey or simple syrup
- 6 sprigs of fresh thyme
- 1 liter sparkling water or club soda
- Ice cubes with frozen berries inside
How to make it
- Place the sliced peaches in a blender with the honey and lemon juice. Puree on high speed until the mixture is completely smooth and liquid.
- Strain the puree through a fine-mesh sieve into a bowl to remove any pulp or skin fragments, ensuring a silky-smooth drink consistency.
- In a large pitcher, place the fresh thyme sprigs and use a long spoon to gently muddle them against the side of the glass. This releases the essential oils without breaking the leaves.
- Pour the peach-lemon base over the thyme. If preparing in advance, let this sit in the fridge for an hour to infuse.
- When ready to serve, add the sparkling water. Stir very gently once—over-stirring will cause the carbonation to dissipate too quickly.
- Fill highball glasses with your decorative ice cubes and pour the lemonade over the top.
- Garnish each glass with a fresh peach slice and a small sprig of thyme for a professional, ‘viral’ look.
5 Delicious Summer Dessert Recipes (Easy Guide)

Why we love this
The Grilled Peach and Mascarpone Board is a masterclass in summer dessert simplicity. The heat of the grill caramelizes the natural sugars in the peaches, creating a soft, jammy texture and a deep, smoky sweetness. When paired with a dollop of cold, velvety mascarpone cheese and a crunch of toasted pistachios, it becomes a sophisticated alternative to heavy cakes or pies. The smell of charred fruit and honey is intoxicating, making it the perfect end to a warm evening under the stars.
Ingredients
- 6 ripe but firm peaches, halved and pitted
- 8 oz mascarpone cheese
- 1/4 cup honey
- 1/2 cup crushed pistachios
- Fresh basil leaves for garnish
- 1 tbsp vegetable oil (for the grill)
How to make it
- Preheat your grill to medium heat. Lightly brush the cut side of each peach half with a neutral vegetable oil to prevent sticking.
- Place the peaches cut-side down on the grill. Cook for 4-5 minutes without moving them to develop those beautiful, dark caramelization lines.
- Flip the peaches and cook for another 2 minutes until the fruit feels soft when pressed but still holds its shape.
- While the peaches are grilling, whisk the mascarpone in a small bowl with a teaspoon of honey to lighten the texture.
- Arrange the warm peaches on a serving board. Place a generous dollop of mascarpone in the center of each peach where the pit used to be.
- Drizzle the remaining honey over the entire board in a decorative pattern.
- Top with the crushed pistachios and a few small basil leaves for a pop of color and a fresh, herbal finish that cuts through the creaminess.
8 Healthy Summer Meal Ideas (Step-by-Step Guide)

Why we love this
The Quinoa & Roasted Veggie Rainbow Board is proof that ‘healthy’ can be the most exciting thing on the table. This board is a visual feast of deep purples, bright greens, and golden yellows, offering a variety of textures from the fluffy, nutty quinoa to the tender, caramelized edges of roasted bell peppers and zucchini. Each bite is a discovery of flavors, especially when topped with a zesty tahini dressing that adds a rich, toasted sesame finish. It’s a grounded, nourishing meal that leaves you feeling energized rather than weighed down by the summer heat.
Ingredients
- 2 cups cooked quinoa (chilled)
- 2 bell peppers (red and yellow), sliced
- 1 large zucchini, sliced into rounds
- 1 bunch asparagus, trimmed
- 1/2 cup tahini
- Juice of 1 lemon
- 2 tbsp maple syrup
How to make it
- Preheat oven to 400°F. Spread the peppers, zucchini, and asparagus on a large baking sheet. Drizzle with olive oil, salt, and pepper. Roast for 20 minutes until the edges are slightly charred and the veggies are tender.
- While the veggies roast, make the dressing by whisking tahini, lemon juice, maple syrup, and 2-3 tablespoons of warm water until it reaches a pourable, creamy consistency.
- On a large board, create a ‘river’ of cooked quinoa running through the center.
- Arrange the roasted vegetables in color-coordinated groups on either side of the quinoa to create a ‘rainbow’ effect.
- Tuck in some raw elements like sliced radishes or snap peas for an extra crunch.
- Drizzle half of the tahini dressing over the entire board and serve the rest in a small bowl for dipping.
- Garnish with toasted pumpkin seeds or hemp hearts for an extra boost of protein and texture.
10 Best Picnic Side Dishes (Party Ideas)

Why we love this
A Picnic Pasta Salad Board takes a classic and makes it interactive. Instead of a soggy bowl of noodles, this presentation keeps the ingredients distinct and vibrant. We love the springy texture of fusilli pasta paired with the sharp, salty punch of olives and the snap of fresh bell peppers. The dressing is a light, herbaceous vinaigrette that coats everything in a glossy sheen without making it heavy. It’s the kind of dish that stays fresh for hours, making it the perfect companion for a blanket in the park or a beachside gathering.
Ingredients
- 1 lb fusilli or rotini pasta, cooked al dente
- 1 cup cherry tomatoes, halved
- 1/2 cup black olives, sliced
- 1/2 cup cucumber, diced
- 1/2 cup cubed mozzarella cheese
- 1/2 cup Italian vinaigrette
- Fresh parsley, chopped
How to make it
- Boil the pasta in heavily salted water until it is just ‘al dente’ (firm to the bite). This is crucial as the pasta will absorb the dressing later; if it’s too soft now, it will become mushy.
- Drain the pasta and immediately rinse it under cold running water to stop the cooking process and wash away excess starch, which prevents sticking.
- Toss the cold pasta with 2 tablespoons of the Italian dressing to lightly coat it.
- On a large portable board or a deep tray, lay out the pasta as a base.
- Create neat rows or piles of the tomatoes, olives, cucumbers, and mozzarella cubes on top of the pasta. This prevents the vegetables from losing their juices into the noodles before you’re ready to eat.
- Just before serving, drizzle the remaining vinaigrette over everything and toss gently with large spoons.
- Finish with a generous sprinkle of fresh parsley and a pinch of red pepper flakes for those who like a little zest.
7 Quick Summer Lunch Ideas (Easy Guide)
[IMAGE_10]
Why we love this
The Caprese Pesto Naan Flatbread Board is the ultimate 10-minute lunch that feels like a gourmet treat. The base is soft, chewy naan bread that gets slightly crisp on the edges, providing the perfect vessel for thick slices of creamy fresh mozzarella and juicy heirloom tomatoes. The aroma of basil pesto is instant and intoxicating, bringing a concentrated burst of summer garden flavor to every bite. It’s light, handheld, and perfectly balanced between the richness of the cheese and the acidity of the tomatoes.
Ingredients
- 4 pieces of stonefire naan bread
- 1/2 cup prepared basil pesto
- 2 large heirloom tomatoes, sliced
- 8 oz fresh mozzarella log, sliced
- Balsamic glaze for drizzling
- Fresh basil leaves
How to make it
- Preheat your oven to 400°F or use a toaster oven. Place the naan breads directly on the rack for 2-3 minutes just until they are warm and the edges have a slight crunch.
- Remove the naan and spread a thick, even layer of basil pesto across each piece, leaving a small border for the ‘crust’.
- Alternate slices of heirloom tomato and fresh mozzarella across the bread. Using heirlooms provides a variety of colors (yellow, purple, red) that look incredible on a board.
- Return the flatbreads to the oven for just 2 minutes—you want the cheese to soften and begin to sweat, but not completely melt and run off the bread.
- Place the warm flatbreads on your serving board and use a pizza cutter to slice them into easy-to-grab wedges.
- Drizzle the balsamic glaze in a fast, sweeping motion across the entire board.
- Scatter whole fresh basil leaves over the top. The heat from the bread will slightly wilt the basil, releasing its scent just as you serve it.
The Art of the Board
As we’ve seen, the true secret to the viral success of these snacking boards isn’t just the recipes—it’s the way they encourage us to eat. They break down the barriers of a formal meal and invite everyone to participate in the preparation and the enjoyment. This summer, I challenge you to put away the individual plates and try one of these concepts. You’ll find that the food tastes better when it’s shared, the cleanup is easier, and the memories made around a crowded, colorful board are the ones that stick with you long after the season ends.
Frequently Asked Questions
How do I keep my boards fresh if I’m eating outside?
For outdoor hosting, place your serving board on top of a slightly larger tray filled with a thin layer of ice. This keeps the base of the board cool, which is essential for cheese and seafood. Also, keep the board in the shade and cover it with a mesh food dome to protect it from uninvited guests (like bees and flies!).
Can I make these boards ahead of time?
Most components can be prepped in advance! You can chop veggies, cook pasta, and make dressings up to 24 hours early. However, for the best visual appeal and texture, I recommend assembling the actual board no more than 30 minutes before your guests arrive to prevent bread from getting soggy or fruit from drying out.
What is the best type of board to use?
A large wooden butcher block or a marble slab are the most popular choices. Marble is excellent for cold items like the Whipped Feta or Dessert boards because it stays naturally cool. Wood is perfect for warm items like sliders or grilled corn. Just ensure your board is food-safe and has been treated with mineral oil if it’s wood.