
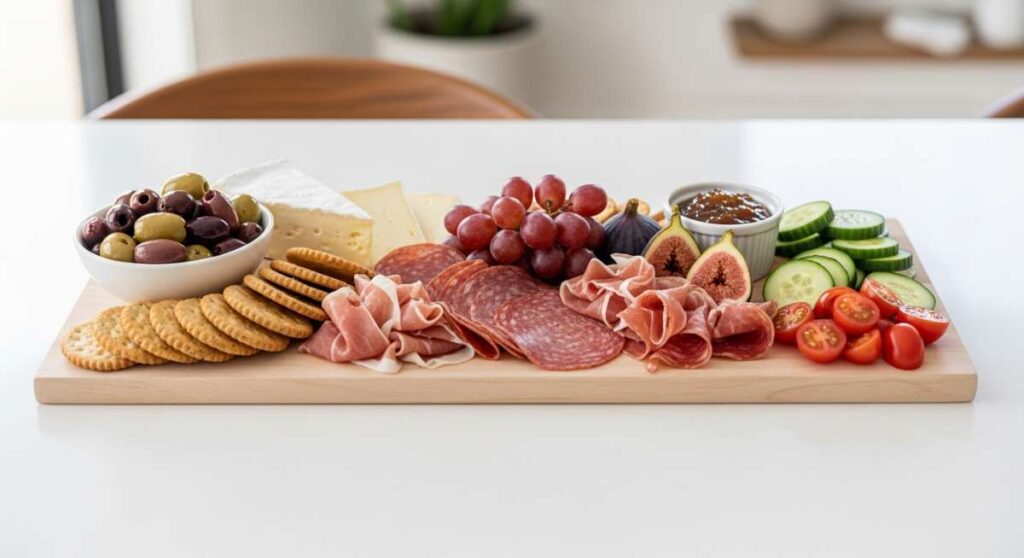
Effortless Entertaining: How to Create the Ultimate Simple Food Board
There is something truly magical about the way food brings people together. We have all been there—the frantic rush of cleaning the house, the stress of timing every dish perfectly, and the eventual exhaustion that leaves you too tired to actually enjoy your guests. I used to think hosting required a formal five-course meal, but then I discovered the beauty of the curated food board. It’s not just a trend; it’s a way to invite ease, warmth, and conversation back to your dinner table.
Imagine a spread that feels lush and abundant, where textures mingle and flavors pop, yet everything is designed for grazing and comfort. This isn’t just about cheese and crackers anymore; we are elevating the concept into a ‘Viral Simple Food Board’ that features everything from savory noodles to honey-glazed proteins. It’s about creating a sensory experience that looks like a work of art but feels as cozy as a Sunday afternoon. Let’s dive into the components that will make your next gathering unforgettable.
How to make authentic ramen?

Why we love this
There is nothing quite like the deep, soul-warming embrace of a bowl of authentic ramen. The broth is a labor of love, carrying layers of umami that dance on the tongue, while the springy noodles provide a satisfying chew that anchors the dish. As the steam rises, you catch the scent of ginger, garlic, and slow-simmered bones, creating an aromatic atmosphere that feels like a hug in a bowl. It’s the ultimate comfort food that adds a sophisticated, international flair to your hosting spread.
Ingredients
- 2 portions of fresh ramen noodles
- 4 cups pork or chicken bone broth
- 2 tablespoons soy sauce
- 1 tablespoon miso paste
- 1 inch fresh ginger, sliced
- 2 cloves garlic, smashed
- Toppings: Soft-boiled egg, nori, green onions, bamboo shoots
How to make it
- Begin by preparing your aromatic base; in a large pot, combine your bone broth with the smashed garlic, ginger slices, and soy sauce. Bring this to a gentle simmer over medium-low heat for at least 30 minutes to allow the flavors to infuse deeply into the liquid.
- While the broth simmers, prepare your ramen eggs by boiling them for exactly 6 minutes and 30 seconds, then immediately plunging them into an ice bath to stop the cooking and ensure a jammy yolk.
- Whisk the miso paste into a small amount of warm broth in a separate bowl until smooth, then stir it back into the main pot; avoid boiling the broth once the miso is added to preserve its delicate flavor and probiotic benefits.
- Cook your fresh ramen noodles in a separate pot of boiling water according to the package instructions, usually about 2-3 minutes, then drain them immediately to prevent sogginess.
- To assemble, place the noodles in a deep bowl, ladle the piping hot, strained broth over them, and garnish with your prepared toppings, finishing with a drizzle of sesame oil for a professional touch.
How to cook garlic shrimp?

Why we love this
Garlic shrimp is the undisputed star of any grazing board, offering a vibrant pop of color and a burst of Mediterranean flavor. The moment the shrimp hit the pan, the aroma of sizzling butter and toasted garlic fills the kitchen, instantly making everyone’s mouth water. Each bite is a perfect balance of succulent, sweet seafood and the sharp, savory bite of garlic, finished with a bright zing of lemon that cuts through the richness beautifully. It is elegant, fast, and always the first thing to disappear.
Ingredients
- 1 lb large shrimp, peeled and deveined
- 4 tablespoons unsalted butter
- 5 cloves garlic, minced
- 1 tablespoon olive oil
- 1/4 cup fresh parsley, chopped
- 1 tablespoon lemon juice
- Red pepper flakes (optional)
How to make it
- Pat the shrimp completely dry with paper towels; this is a critical step because moisture will cause the shrimp to steam rather than sear, preventing that beautiful golden-brown crust.
- Heat a large skillet over medium-high heat and add the olive oil and two tablespoons of the butter; wait until the butter is foaming but not browning.
- Arrange the shrimp in a single layer in the skillet, ensuring they aren’t crowded, and sear for about 2 minutes on the first side without moving them until they turn pink and slightly charred.
- Flip the shrimp, then immediately add the remaining butter and the minced garlic; the garlic should sizzle and become fragrant but take care not to let it burn, which would turn the dish bitter.
- Toss the shrimp constantly for another 60 seconds to coat them in the garlic butter, then remove from heat, stir in the lemon juice and fresh parsley, and serve immediately while the butter is still bubbling.
How to roast sweet beets?

Why we love this
Roasted beets are nature’s candy, offering an earthy sweetness and a stunning jewel-toned hue that makes any food board look like a professional catering spread. When roasted, their natural sugars caramelize, transforming a tough root vegetable into a tender, melt-in-your-mouth delicacy. The contrast between the dark, charred exterior and the vibrant, soft interior is visually striking and provides a grounding, wholesome element to your meal. They are simple yet incredibly sophisticated in their flavor profile.
Ingredients
- 4 medium-sized beets (red or golden)
- 2 tablespoons olive oil
- 1 teaspoon sea salt
- 1/2 teaspoon black pepper
- 2 sprigs fresh thyme
How to make it
- Preheat your oven to 400°F (200°C) and prepare the beets by scrubbing them thoroughly under cold water to remove any dirt, then trim the greens leaving about an inch of the stem to prevent the color from ‘bleeding’ out.
- Place each beet on a large piece of aluminum foil, drizzle with olive oil, and sprinkle with salt, pepper, and thyme sprigs before folding the foil tightly to create individual pouches.
- Place the foil-wrapped beets on a baking sheet and roast for 45 to 60 minutes; the exact time depends on the size of the beets, so check for doneness by piercing the largest one with a paring knife—it should slide in with zero resistance.
- Carefully open the foil packets (watch out for the steam!) and let the beets cool for about 10 minutes until they are safe to handle.
- Using a paper towel or your fingers, gently rub the skins off—they should slip right away—then slice the beets into wedges or rounds for a beautiful presentation.
How to make honey chicken?

Why we love this
Honey chicken is that perfect intersection of sweet, salty, and savory that appeals to everyone at the table. The honey creates a glossy, sticky glaze that clings to the chicken, creating a beautiful shine that looks stunning under dining room lights. As it cooks, the aroma of honey caramelizing against savory aromatics like soy or garlic creates an irresistible scent that signals a festive occasion. It’s crispy, juicy, and has that finger-licking quality that makes hosting feel relaxed and joyful.
Ingredients
- 1 lb chicken thighs, bite-sized pieces
- 1/2 cup honey
- 3 tablespoons soy sauce
- 1 tablespoon cornstarch
- 2 cloves garlic, minced
- 1 teaspoon ginger, grated
- 1 tablespoon vegetable oil
How to make it
- In a small bowl, whisk together the honey, soy sauce, minced garlic, and grated ginger until the honey is fully incorporated into the liquids.
- Toss your chicken pieces in a light coating of cornstarch, shaking off any excess; this creates a thin, protective barrier that helps the chicken stay moist while providing a surface for the sauce to cling to.
- Heat the vegetable oil in a large wok or skillet over medium-high heat; once the oil is shimmering, add the chicken in batches to avoid crowding the pan.
- Cook the chicken for 5-7 minutes, turning frequently, until all sides are golden brown and the internal temperature reaches 165°F (74°C).
- Pour the honey mixture over the chicken and stir constantly for 2-3 minutes; the sauce will begin to bubble vigorously and thicken into a dark, sticky glaze that coats every piece of chicken perfectly.
How to make savory pasta?

Why we love this
A truly savory pasta is the backbone of a great meal, providing a hearty and versatile base that everyone craves. We love it for the way it carries flavors—whether it’s a rich garlic-infused oil or a bright herb pesto—and the way the ‘al dente’ texture provides a satisfying bite. There is something deeply traditional and comforting about a big bowl of pasta sitting in the center of a board, inviting guests to twist their forks and share in the bounty. It smells like a rustic Italian kitchen and feels like home.
Ingredients
- 12 oz high-quality dried pasta (like Rigatoni or Linguine)
- 1/4 cup extra virgin olive oil
- 4 cloves garlic, thinly sliced
- 1/2 cup grated Parmesan cheese
- 1/4 cup fresh basil or parsley
- Red pepper flakes
- Reserved pasta water
How to make it
- Bring a large pot of heavily salted water (it should taste like the sea) to a rolling boil and cook the pasta for 1-2 minutes less than the package directions to ensure it remains ‘al dente’.
- Before draining the pasta, carefully scoop out at least one cup of the starchy pasta water; this is the ‘liquid gold’ that will help create your silky sauce later.
- In a wide skillet, heat the olive oil over low-medium heat and add the sliced garlic and red pepper flakes, cooking slowly until the garlic is golden and the oil is fragrant, but be careful not to brown the garlic too much.
- Add the cooked pasta directly into the skillet with the oil and garlic, then pour in half of the reserved pasta water and the grated Parmesan cheese.
- Toss vigorously over medium heat for 2 minutes; the agitation and the starch in the water will emulsify with the oil and cheese to create a creamy, savory sauce that coats the noodles perfectly.
How to make sushi rolls?

Why we love this
Making sushi rolls at home is an act of artistry that adds a playful, interactive element to your entertaining. We love the clean, fresh flavors of vinegared rice paired with crisp cucumber and buttery avocado or fish. The process of rolling is meditative, and the result is a beautiful, colorful wheel of textures that looks incredibly impressive on a board. It offers a light, refreshing contrast to the cooked proteins, providing a balance that keeps your palate excited throughout the meal.
Ingredients
- 2 cups sushi rice, cooked and seasoned with rice vinegar and sugar
- 4 sheets of Nori (seaweed)
- Fillings: Cucumber strips, avocado slices, fresh salmon or imitation crab
- Soy sauce, wasabi, and pickled ginger for serving
How to make it
- Place a sheet of nori, shiny side down, on a bamboo rolling mat (makisu); have a small bowl of water nearby to keep your hands moist, which prevents the sticky sushi rice from clinging to your fingers.
- Gently spread a thin, even layer of seasoned sushi rice over the nori, leaving about an inch of empty space at the top edge to allow for sealing the roll.
- Arrange your fillings in a neat, horizontal line across the center of the rice; keep the ingredients sliced thinly to ensure the roll can close properly without tearing.
- Using the bamboo mat, lift the bottom edge of the nori and roll it over the fillings, tucking it in tightly while applying even pressure across the length of the mat.
- Once rolled, dampen the top edge of the nori with a tiny bit of water to seal it, then use a very sharp, wet knife to slice the roll into 6-8 uniform pieces with a single, smooth sawing motion.
How to make honey salmon?
Why we love this
Honey salmon is a showstopper, boasting a caramelized, crusty exterior and a flakey, moist interior that practically melts on the tongue. The natural richness of the salmon is enhanced by the sweetness of the honey, which browns beautifully under heat, creating a stunning mahogany glaze. It’s a dish that feels high-end and luxurious, yet it’s surprisingly simple to execute. The aroma of searing fish mixed with sweet glaze is intoxicating, making it a favorite for those who want a lighter but still indulgent protein option.
Ingredients
- 2 large salmon fillets
- 3 tablespoons honey
- 1 tablespoon soy sauce
- 1 teaspoon lemon zest
- 1 clove garlic, minced
- Salt and pepper to taste
- 1 tablespoon olive oil
How to make it
- Season your salmon fillets generously with salt and pepper on both sides, then whisk together the honey, soy sauce, lemon zest, and minced garlic in a small bowl to create your glaze.
- Heat olive oil in a non-stick skillet over medium-high heat until it begins to shimmer, then place the salmon fillets skin-side down (or top-side down if skinless) into the pan.
- Sear the salmon for about 3-4 minutes without moving it to develop a crispy, golden crust; you’ll see the color of the fish change from the bottom up as it cooks.
- Flip the fillets and immediately pour the honey glaze over them, allowing the liquid to bubble and reduce in the hot pan.
- Spoon the thickening glaze over the fish repeatedly for another 2-3 minutes until the salmon is opaque and flakes easily with a fork, then remove from heat immediately to avoid overcooking.
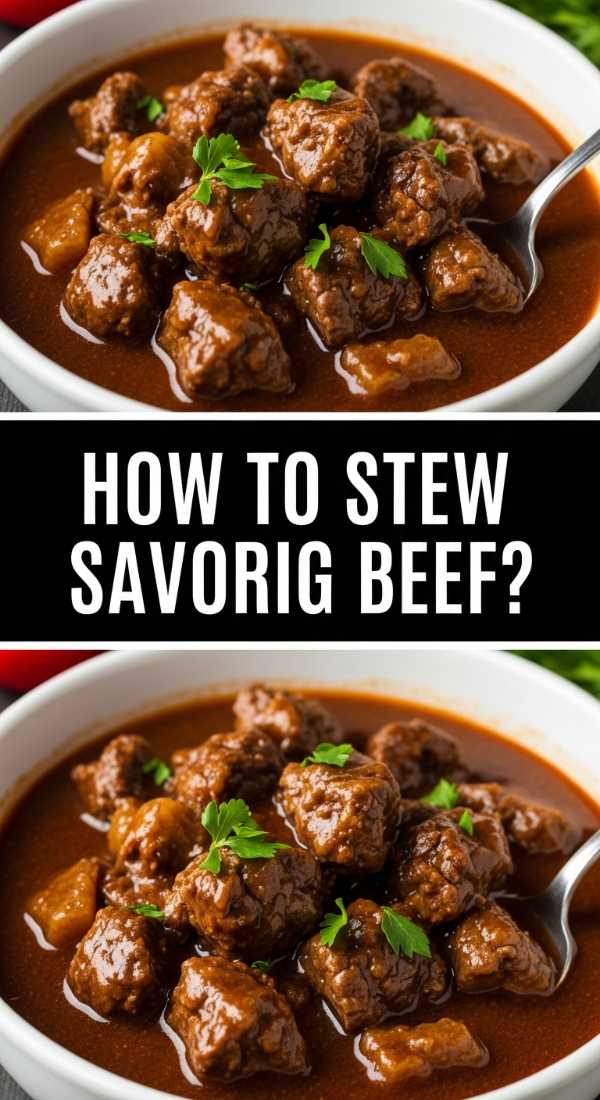
How to stew savory beef?

Why we love this
There is a deep, primal satisfaction in a savory beef stew that has been allowed to simmer until the meat is fork-tender and the sauce is thick enough to coat a spoon. It’s the ultimate slow-food experience, filling the entire house with a rich, beefy aroma that promises a hearty and fulfilling meal. We love the way the fibers of the beef break down, absorbing all the flavors of the wine, herbs, and aromatics. It adds a rustic, grounding element to your food board that feels both sophisticated and incredibly nourishing.
Ingredients
- 1 lb beef chuck, cut into 1-inch cubes
- 2 cups beef broth
- 1/2 cup red wine (optional)
- 2 carrots, sliced
- 1 onion, diced
- 2 cloves garlic, minced
- Fresh rosemary and thyme
- 2 tablespoons flour
How to make it
- Toss the beef cubes in flour seasoned with salt and pepper, then sear them in a heavy-bottomed pot or Dutch oven over high heat with a bit of oil until they are deeply browned on all sides.
- Remove the beef and add the onions and carrots to the same pot, using the moisture from the vegetables to scrape up the ‘fond’ (the brown bits) from the bottom of the pan, which contains all the concentrated flavor.
- Deglaze the pan with red wine or a splash of broth, stirring well, then return the beef to the pot along with the remaining broth and fresh herbs.
- Bring the liquid to a boil, then immediately reduce the heat to the lowest setting, cover tightly, and simmer gently for at least 90 minutes.
- Check the beef occasionally; it is finished when a fork can easily pull the meat apart with almost no pressure, and the sauce has reduced into a thick, savory gravy.
How to cook beet salad?

Why we love this
A beet salad is a masterclass in texture and color, offering a vibrant, crunchy, and creamy experience all in one bowl. The earthy sweetness of the beets is perfectly offset by the tang of goat cheese and the bright acidity of a balsamic vinaigrette. It feels incredibly fresh and acts as a palate cleanser between the heavier meats on your food board. We love the pop of purple against green leaves and the way the different elements combine to create a dish that is as healthy as it is visually spectacular.
Ingredients
- 3 roasted beets, cubed
- 2 cups mixed salad greens (arugula or spinach)
- 1/4 cup crumbled goat cheese or feta
- 1/4 cup toasted walnuts or pecans
- Vinaigrette: 3 parts olive oil, 1 part balsamic vinegar, 1 tsp Dijon mustard
How to make it
- Start with your pre-roasted and cooled beets (see section 3), cutting them into uniform bite-sized cubes so they distribute evenly throughout the salad.
- Prepare the vinaigrette by vigorously whisking together the olive oil, balsamic vinegar, and Dijon mustard in a small jar until the mixture is fully emulsified and thick.
- In a large mixing bowl, lightly toss the salad greens with just enough dressing to coat the leaves, being careful not to over-saturate them, which leads to wilting.
- Layer the dressed greens on a platter, then scatter the beet cubes over the top rather than tossing them in, which prevents the entire salad from turning pink.
- Finish the salad by sprinkling the crumbled cheese and toasted nuts over the top, adding a final light drizzle of dressing and a pinch of flaky sea salt for texture.
How to bake tender chicken?
[IMAGE_10]
Why we love this
Baking chicken to perfection is an essential skill that results in a versatile, juicy protein that serves as a canvas for any flavor. We love tender baked chicken for its simplicity and the way a slow, careful bake preserves the natural juices, ensuring every bite is moist rather than dry. The skin (if left on) gets a delicate crispness, while the meat remains tender enough to pull apart. It’s a reliable, crowd-pleasing addition to any spread that feels light yet satisfying, filling the air with the classic, homey scent of roasting poultry.
Ingredients
- 2 chicken breasts or thighs (skin-on for more flavor)
- 2 tablespoons olive oil
- 1 teaspoon garlic powder
- 1 teaspoon dried oregano
- Salt and smoked paprika
- Lemon slices
How to make it
- Preheat your oven to 400°F (200°C) and let the chicken sit at room temperature for about 15 minutes before cooking to ensure even heat penetration.
- Rub the chicken thoroughly with olive oil and a blend of salt, garlic powder, oregano, and smoked paprika, making sure to get the seasoning under the skin if applicable.
- Place the chicken in a baking dish and top with thin lemon slices; the lemon adds acidity and moisture as it bakes, preventing the top of the meat from drying out.
- Bake for 20-25 minutes, but the most accurate method is to use a meat thermometer—remove the chicken the second it hits 160°F (71°C), as the temperature will rise to the safe 165°F while it rests.
- Cover the chicken loosely with foil and let it rest for at least 10 minutes before slicing; this allows the juices to redistribute through the meat, guaranteeing a tender, juicy result.
Conclusion: The Art of the Board
Creating the ultimate simple food board is about more than just the recipes; it’s about the intention behind the meal. By combining these diverse, flavorful elements—from the savory depth of beef stew to the bright crunch of a beet salad—you create a landscape of food that encourages your guests to explore and enjoy at their own pace. Remember, the goal isn’t perfection; it’s connection. So, pour a drink, set out your beautiful creations, and enjoy the effortless magic of a meal shared with love.