
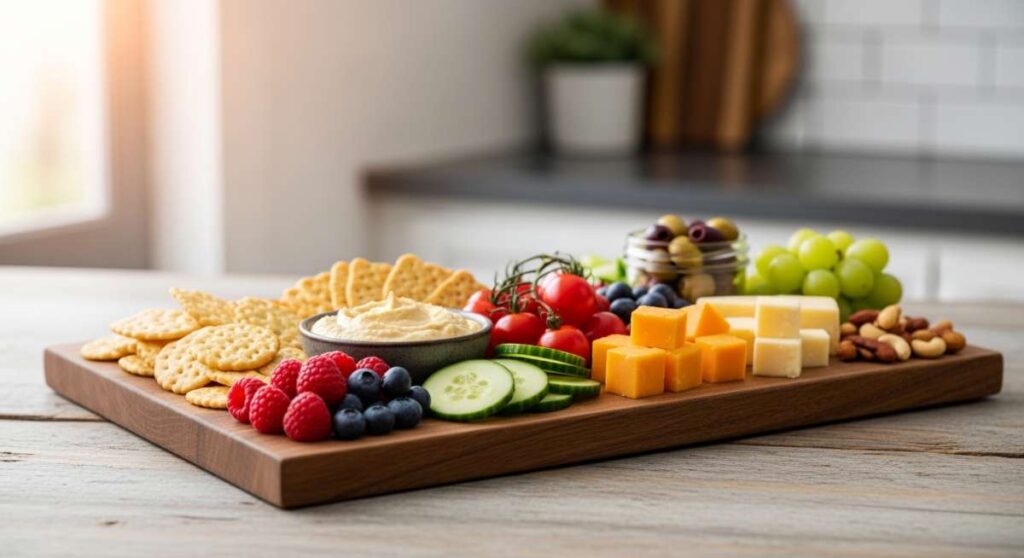
10-Minute Magic: The Viral Simple Food Board Everyone is Craving
There is something truly magnetic about a table spread that feels both effortless and intentionally curated. I remember the first time I set out a large wooden board filled with little bowls and fresh bakes; the room’s energy shifted instantly from formal to familial. We are living in the era of the ‘Simple Food Board,’ a viral movement that celebrates the beauty of slow-living staples gathered in one stunning, accessible place. It is not about perfection; it’s about the tactile joy of reaching for a slice of warm bread or a crisp cucumber while the sun dips below the horizon.
The beauty of this trend lies in its versatility. Whether you are hosting a garden party or just treating your family to a special Sunday afternoon, these components create a tapestry of flavors that tell a story of home. From the sweet hum of pollinators in the garden to the nostalgic scent of a buttery pound cake cooling on the counter, every element on this board is designed to evoke comfort and connection. Let’s dive into the ten magical components that will make your next food board absolutely legendary.
How to make hummingbird nectar?

Why we love this
There is a quiet, meditative joy in watching a hummingbird hover near your window, its iridescent wings a blur of motion. Providing homemade nectar is like offering a tiny, sugary handshake to nature, inviting the most delicate guests to your garden party. This nectar is free from the harsh dyes found in store-bought versions, ensuring a pure, clean source of energy for these high-speed visitors. The simple clarity of the syrup catching the light in a glass feeder adds an ethereal, living element to your outdoor atmosphere that no decoration could ever replicate.
Ingredients
- 1 cup granulated white sugar
- 4 cups filtered water
How to make it
- Begin by measuring your filtered water into a medium saucepan. It is crucial to use plain white granulated sugar only, as honey can promote fungal growth and brown sugars contain iron levels that are toxic to birds.
- Place the saucepan over medium-high heat and bring the water to a gentle rolling boil. This step is vital not just for dissolving the sugar, but for neutralizing any impurities or bacteria in the water that could harm the birds.
- Once boiling, pour in the sugar and stir constantly with a whisk. Continue stirring until the crystals have completely vanished and the liquid is perfectly transparent.
- Boil the mixture for exactly two minutes to ensure full sterilization, then remove the pan from the heat immediately to prevent too much water from evaporating, which would alter the 1:4 ratio.
- Allow the nectar to cool completely at room temperature before filling your feeders. Never put hot nectar into a feeder, as it can warp the plastic or glass and harm the birds’ delicate beaks. Store any extra in a sealed jar in the refrigerator for up to one week.
How to bake strawberry pie?
Why we love this
Few things capture the essence of a sun-drenched summer afternoon like the scent of a fresh strawberry pie cooling on a wire rack. As you slice into it, the ruby-red filling glistens like edible jewels, releasing a sweet, floral aroma that instantly makes the kitchen feel like a cozy bakery. The contrast between the flaky, salt-kissed crust and the jammy, concentrated sweetness of the berries creates a sensory experience that is both nostalgic and sophisticated. It is the ultimate centerpiece for a food board, offering a vibrant pop of color and a taste that feels like a warm hug.
Ingredients
- 2 deep-dish pie crusts (homemade or store-bought)
- 6 cups fresh strawberries, hulled and sliced
- 3/4 cup granulated sugar
- 1/4 cup cornstarch
- 1 tablespoon lemon juice
- 1/2 teaspoon vanilla extract
- 1 egg (for egg wash)
- Coarse sparkling sugar for topping
How to make it
- Preheat your oven to 400°F (200°C) and place a baking sheet on the bottom rack to catch any potential fruit drips. Prepare your bottom crust by pressing it firmly into a 9-inch pie plate, crimping the edges as desired.
- In a large mixing bowl, gently toss the sliced strawberries with the lemon juice and vanilla extract. In a separate small bowl, whisk together the sugar and cornstarch to ensure there are no lumps, then fold this dry mixture into the berries until they are evenly coated.
- Let the berry mixture sit for 10 minutes; this allows the juices to begin macerating, which helps the cornstarch activate during the baking process for a perfect, non-runny set.
- Pour the fruit into the prepared bottom crust. Place the second crust over the top, either as a solid sheet with steam vents cut in the center or woven into a beautiful lattice pattern for a professional look.
- Brush the top crust with a beaten egg wash and sprinkle generously with coarse sugar. Bake for 45-55 minutes until the crust is a deep golden brown and the filling is bubbling thick juices through the vents. Allow it to cool for at least 4 hours to ensure the filling sets completely.
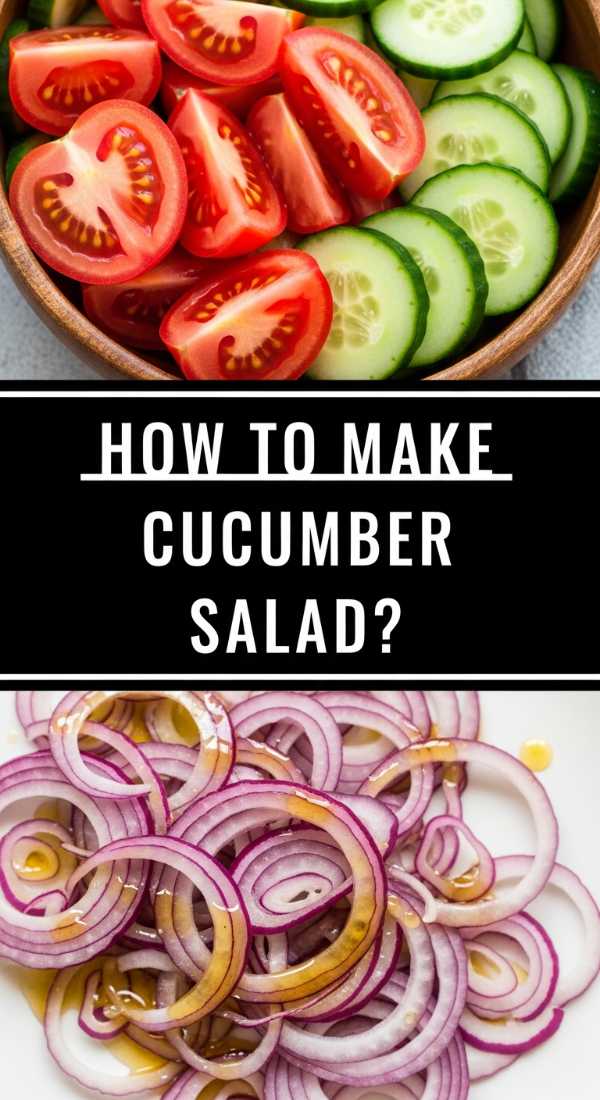
How to make cucumber salad?

Why we love this
This cucumber salad is the refreshing, zesty palate cleanser that every rich food board needs. The crunch of the chilled cucumber slices provides a rhythmic snap with every bite, while the paper-thin red onions offer a sharp, colorful bite that wakes up the senses. Drenched in a light, vinegary dressing with flecks of fresh dill, it smells like a garden after a rainstorm. It is cooling, hydrating, and possesses that addictive balance of acid and salt that keeps you coming back for ‘just one more’ forkful during a long, lazy lunch.
Ingredients
- 3 large English cucumbers, thinly sliced
- 1/2 red onion, sliced into paper-thin half-moons
- 1/2 cup white vinegar
- 1/4 cup water
- 2 tablespoons sugar
- 1 tablespoon fresh dill, chopped
- 1 teaspoon sea salt
- 1/2 teaspoon black pepper
How to make it
- Start by slicing your cucumbers as thinly as possible; using a mandoline on a thin setting is highly recommended to achieve those translucent, flexible slices that soak up the marinade best.
- Place the sliced cucumbers in a colander and sprinkle with the sea salt. Let them sit for about 15 minutes to draw out excess moisture, then pat them dry with a clean kitchen towel. This prevents the salad from becoming watery later.
- In a medium glass bowl, whisk together the white vinegar, water, sugar, and black pepper until the sugar is fully dissolved. Taste the dressing; it should be sharp but have a hint of sweetness.
- Add the dried cucumbers and the thinly sliced red onions to the bowl, tossing thoroughly so every slice is submerged or coated.
- Fold in the fresh chopped dill. Cover the bowl and refrigerate for at least one hour before serving. The colder this salad is, the crispier and more refreshing it feels on the tongue.
How to bake pound cake?

Why we love this
A classic pound cake is the unsung hero of the dessert world, offering a dense, velvety crumb that feels incredibly luxurious. When you slice through its golden-brown exterior, you are met with a rich, buttery interior that carries the intoxicating scent of pure vanilla and creamed sugar. It isn’t light and airy like a sponge; it is substantial and satisfying, making it the perfect vessel for soaking up fruit juices or being enjoyed plain with a cup of tea. Its simplicity is its strength, providing a timeless elegance to any food board display.
Ingredients
- 1 pound (4 sticks) unsalted butter, room temperature
- 3 cups granulated sugar
- 6 large eggs, room temperature
- 3 cups all-purpose flour
- 1/2 teaspoon salt
- 1 tablespoon vanilla extract
- 1/2 cup whole milk
How to make it
- Preheat your oven to 325°F (165°C). The lower temperature is key for pound cake, as it allows the dense batter to cook through evenly without burning the outside. Thoroughly grease and flour a large Bundt pan or two loaf pans.
- In a large stand mixer, cream the butter and sugar together on medium-high speed for at least 5-7 minutes. You are looking for a pale, almost white color and a fluffy, whipped texture—this is the only aeration the cake gets, so don’t rush it.
- Add the eggs one at a time, beating well after each addition. If the batter looks curdled, add a tablespoon of your flour to help it emulsify. Stir in the vanilla extract.
- In a separate bowl, whisk the flour and salt. Gradually add the flour to the butter mixture in three parts, alternating with the milk, beginning and ending with the flour. Mix only until just combined to avoid a tough cake.
- Pour the heavy batter into the prepared pan and smooth the top. Bake for 60-75 minutes, or until a long wooden skewer inserted into the center comes out clean. Let the cake cool in the pan for 20 minutes before inverting it onto a wire rack to cool completely.
How to make dandelion jelly?

Why we love this
Dandelion jelly is often called ‘liquid sunshine’ for a reason; it captures the essence of a spring meadow in a jar. It has a surprising flavor profile that mimics fine honey with a delicate, floral undertone that feels bright and whimsical. The process of foraging the yellow blossoms and transforming them into a clear, golden spread is a beautiful way to connect with the land. Spreading this over a warm biscuit is a sensory delight, as the jelly glows against the bread and releases a faint, wild sweetness that is unlike any store-bought jam.
Ingredients
- 2 cups dandelion petals (yellow parts only)
- 4 cups boiling water
- 1/4 cup lemon juice
- 1 package (1.75 oz) powdered fruit pectin
- 4 cups granulated sugar
How to make it
- First, harvest your dandelions from a clean area free of pesticides. Carefully pull the yellow petals away from the green base (the sepal); the green parts are bitter and will ruin the flavor, so ensure you have only the bright yellow fluff.
- Place the petals in a heat-proof jar and pour the 4 cups of boiling water over them. Let this steep for at least 2 hours, or overnight in the fridge, to create a potent dandelion ‘tea.’
- Strain the liquid through a fine-mesh sieve or cheesecloth, squeezing the petals to get every drop of flavor. You should have about 3 to 3.5 cups of golden liquid.
- Pour the dandelion tea into a large pot and stir in the lemon juice and the powdered pectin. Bring the mixture to a full, rolling boil that cannot be stirred down.
- Add all the sugar at once and stir constantly. Bring it back to a rolling boil and let it boil hard for exactly one minute. Remove from heat, skim off any foam, and pour into sterilized jars. The jelly will set as it cools, turning into a beautiful translucent gold.
How to marinate grilled chicken?

Why we love this
The secret to a show-stopping food board often lies in the protein, and this marinated grilled chicken is the ultimate crowd-pleaser. The marinade infuses the meat with a complex profile of citrusy brightness, earthy herbs, and a hint of smoky sweetness that caramelizes beautifully over an open flame. As the chicken grills, the aroma of charred garlic and rosemary wafts through the air, promising a meal that is tender, juicy, and bursting with flavor. It transforms a simple chicken breast into a gourmet experience that holds its own alongside fresh fruits and vegetables.
Ingredients
- 1.5 lbs chicken breasts or thighs
- 1/3 cup extra virgin olive oil
- 1/4 cup soy sauce
- Juice of 1 lemon
- 3 cloves garlic, smashed
- 1 tablespoon fresh rosemary, minced
- 1 teaspoon honey
- 1/2 teaspoon red pepper flakes
How to make it
- Place your chicken pieces between two sheets of plastic wrap and use a meat mallet to pound them to an even thickness. This ensures that every part of the chicken cooks at the same rate, preventing the edges from drying out.
- In a medium bowl or a gallon-sized Ziploc bag, whisk together the olive oil, soy sauce, lemon juice, honey, smashed garlic, rosemary, and red pepper flakes. The oil carries the flavor, while the acid in the lemon juice tenderizes the fibers.
- Submerge the chicken in the marinade, ensuring every inch is coated. Seal the bag or cover the bowl and refrigerate for at least 30 minutes, though 4 hours is ideal for maximum flavor penetration. Avoid marinating longer than 12 hours as the lemon juice can start to ‘cook’ the meat and change the texture.
- Preheat your grill to medium-high heat (about 400°F). Lightly oil the grates to prevent sticking.
- Remove the chicken from the marinade and discard the excess liquid. Grill for 6-7 minutes per side. Use a meat thermometer to check for an internal temperature of 165°F (74°C). Let the meat rest for 5 minutes before slicing to allow the juices to redistribute, ensuring a moist bite.
How to brew sun tea?
Why we love this
Sun tea is the epitome of slow, mindful preparation, relying on the gentle warmth of the sun rather than the harsh heat of a stove. This method results in a smoother, less astringent tea that tastes incredibly clean and mellow. There is something deeply satisfying about seeing a large glass jar sitting on a sunny porch, the water slowly darkening into a rich amber hue as the hours pass. It feels like bottling a summer afternoon, and when served over a mountain of ice with a sprig of mint, it is the most refreshing accompaniment to a diverse food board.
Ingredients
- 8 black or herbal tea bags
- 1 gallon filtered water
- Fresh mint sprigs (optional)
- Lemon slices (optional)
- Honey or simple syrup to taste
How to make it
- Clean a one-gallon glass jar thoroughly. Avoid using plastic, as the sun’s heat can cause chemicals to leach into the water and alter the taste of your tea.
- Fill the jar with cool, filtered water. Place your tea bags into the water, draped over the rim so the strings hang outside, or simply drop them in if they are stringless. Ensure they are fully submerged.
- Secure the lid tightly and place the jar in a spot where it will receive direct, unobstructed sunlight. This could be a porch railing, a garden table, or a sunny windowsill.
- Leave the tea to steep for 3 to 5 hours. Observe the color; when it reaches a deep, vibrant amber, the tea is ready. Do not leave it out for more than 5 hours, as the water doesn’t get hot enough to kill bacteria over long periods.
- Bring the jar inside and remove the tea bags immediately. Stir in any sweeteners while the tea is still slightly warm from the sun. Refrigerate at once and serve over ice with fresh mint and lemon for a classic, crisp finish.
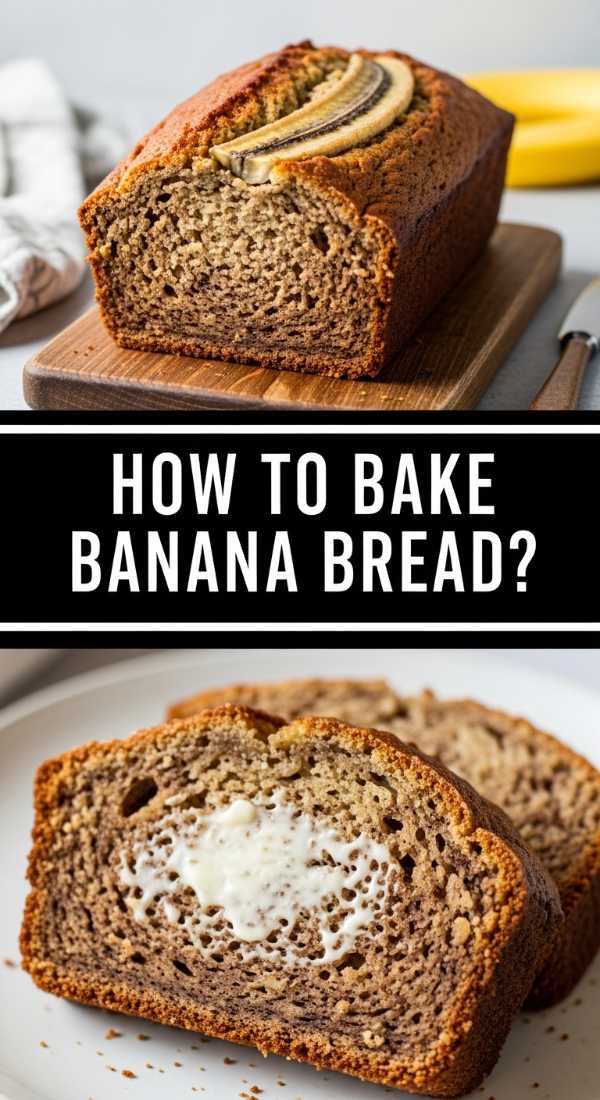
How to bake banana bread?

Why we love this
Banana bread is the ultimate ‘comfort’ component for a food board, offering a moist, cake-like texture that feels incredibly homely. The scent of overripe bananas caramelizing in the oven, mingled with the warmth of cinnamon and toasted nuts, is enough to bring anyone to the kitchen. It is a fantastic way to use up fruit that might otherwise go to waste, transforming ‘old’ ingredients into something that feels like a special treat. Sliced thick and slathered with salted butter, it provides a hearty, sweet element that balances the lighter fruits and salads on your board.
Ingredients
- 3 very ripe bananas, mashed
- 1/3 cup melted butter
- 3/4 cup granulated sugar
- 1 large egg, beaten
- 1 teaspoon vanilla extract
- 1 teaspoon baking soda
- Pinch of salt
- 1.5 cups all-purpose flour
- 1/2 teaspoon cinnamon
How to make it
- Preheat your oven to 350°F (175°C) and grease a 4×8-inch loaf pan with butter or non-stick spray.
- In a large mixing bowl, use a fork to mash the ripe bananas until they are almost liquid but still have a few small lumps for texture. The riper the bananas (brown spots are good!), the sweeter and more moist your bread will be.
- Stir the melted butter into the mashed bananas. Add the sugar, beaten egg, and vanilla extract, whisking until the mixture is smooth and well-incorporated.
- Sprinkle the baking soda, salt, and cinnamon over the wet mixture and stir. Finally, gently fold in the flour. It is vital to fold the flour in by hand and stop as soon as you see no more white streaks; overmixing will develop the gluten and make the bread tough rather than tender.
- Pour the batter into your prepared pan and bake for 50 to 60 minutes. Test for doneness by inserting a toothpick into the center; it should come out clean or with just a few moist crumbs. Let the bread cool in the pan for 10 minutes before moving to a wire rack.
How to mix pina colada?
Why we love this
Bringing a Pina Colada to your food board spread is like injecting a dose of tropical paradise into your afternoon. This drink is a creamy, frosty masterpiece of coconut and pineapple that feels like a vacation in a glass. The texture is thick and velvety, while the flavor is a bold balance of tart acidity and mellow, fatty sweetness. When you garnish it with a fresh pineapple wedge and a maraschino cherry, it becomes a visual anchor for your board, signaling that it’s time to relax, unwind, and enjoy the finer things in life.
Ingredients
- 2 oz white rum
- 2 oz cream of coconut (like Coco Lopez)
- 4 oz fresh pineapple juice
- 1 cup crushed ice
- Fresh pineapple wedges for garnish
How to make it
- Start with chilled ingredients to ensure the drink stays frosty longer. In a high-speed blender, combine the white rum, cream of coconut, and pineapple juice. Note that ‘cream of coconut’ is different from ‘coconut cream’; the former is sweetened and much thicker, which is essential for that classic flavor.
- Add the crushed ice to the blender. Crushed ice is preferred over large cubes as it blends into a smoother, slushie-like consistency much faster.
- Blend on high for 30-45 seconds until the mixture is completely smooth and no ice chunks remain. The consistency should be like a thick milkshake.
- Taste the mixture. If it’s too sweet, add a squeeze of fresh lime juice to cut through the sugar. If it’s too thick, add a splash more pineapple juice and pulse briefly.
- Pour the mixture into a tall hurricane glass or a chilled tumbler. Garnish with a fresh pineapple wedge and a cherry. For an extra touch of viral-worthy style, add a tiny paper umbrella or a dusting of toasted coconut on top.
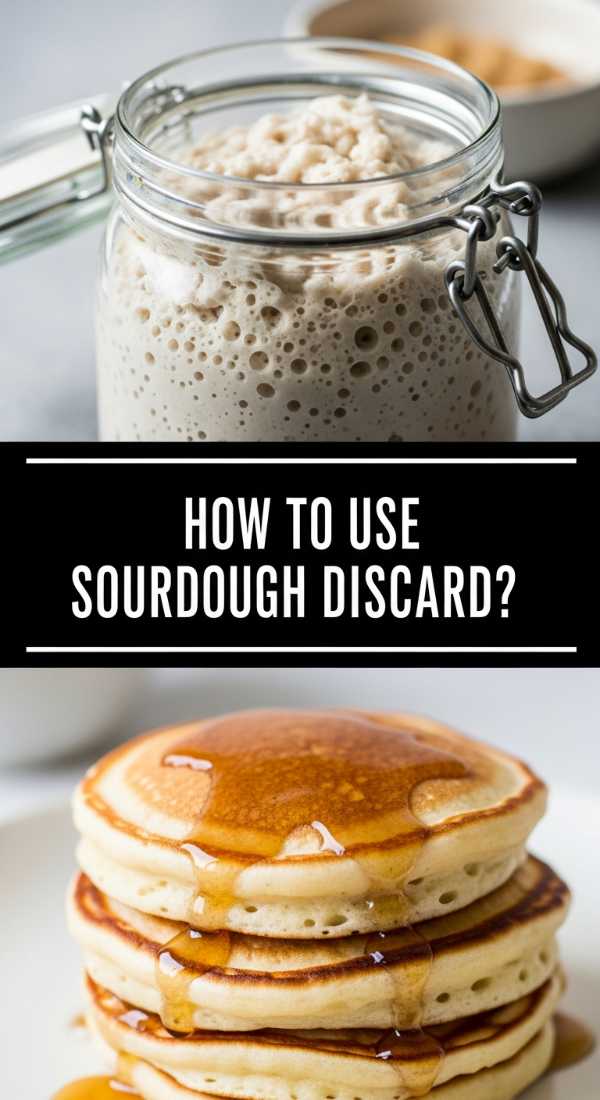
How to use sourdough discard?
[IMAGE_10]
Why we love this
Sourdough discard is the hidden gem of the artisan kitchen, offering a tangy, fermented depth that you just can’t get from standard flour. Instead of washing that ‘waste’ down the drain, you can transform it into crisp, salty crackers or savory pancakes that add a sophisticated, fermented element to your food board. The aroma of sourdough baking is earthy and complex, and the resulting snacks have a wonderful ‘snap’ that pairs perfectly with soft cheeses and fruit preserves. It’s a sustainable, delicious way to honor the rhythm of the kitchen.
Ingredients
- 1 cup sourdough discard (unfed)
- 1/4 cup unsalted butter, melted
- 1 cup all-purpose flour
- 1/2 teaspoon sea salt
- 2 tablespoons dried herbs (like rosemary or thyme)
- Maldon sea salt for topping
How to make it
- Preheat your oven to 325°F (165°C). In a medium bowl, combine your sourdough discard with the melted butter. Stir until they are fully integrated into a smooth, slightly sticky paste.
- Add the flour, sea salt, and dried herbs. Mix by hand until a cohesive dough forms. If the dough feels too wet to roll, add flour one tablespoon at a time. It should be pliable but not sticky to the touch.
- Divide the dough in half. Place one half on a large sheet of parchment paper and flatten it with your hand. Place another sheet of parchment on top and roll the dough out until it is paper-thin—about 1/16th of an inch. The thinner you roll it, the crispier the crackers will be.
- Remove the top layer of parchment. Use a pizza cutter or a sharp knife to score the dough into squares or rectangles. Lightly spritz with water and sprinkle generously with Maldon sea salt.
- Slide the parchment onto a baking sheet and bake for 20-25 minutes. Keep a close eye on them; the edges will brown first. They are done when they are golden and firm to the touch. Let them cool completely on the pan to reach maximum crunchiness.
Conclusion: The Art of the Simple Spread
Creating a viral-worthy food board isn’t about spending hours in the kitchen; it’s about selecting high-quality, soulful components that invite people to linger. By combining the sweetness of strawberry pie with the zesty crunch of cucumber salad and the refreshing chill of sun tea, you create an environment where food is an experience, not just a meal. These recipes are designed to be approachable yet impressive, giving you the ’10-minute magic’ needed to turn any gathering into a lasting memory. So grab your biggest wooden board, start prepping, and watch as your table becomes the heart of your home.
Frequently Asked Questions
Can I make the sun tea even if it’s cloudy?
While direct sun is best for the traditional flavor, you can still make ‘refrigerator tea’ by steeping the bags in cold water in the fridge for 12-24 hours. It will be just as smooth, though it takes longer!
How do I store the leftovers from my food board?
Most items, like the cucumber salad and sourdough crackers, should be stored in airtight containers. The pound cake and banana bread stay moistest when wrapped tightly in plastic wrap at room temperature.
Can I use frozen strawberries for the pie?
Yes, but make sure to thaw and drain them thoroughly first, and you may need to add an extra tablespoon of cornstarch to account for the extra moisture frozen fruit tends to release.