
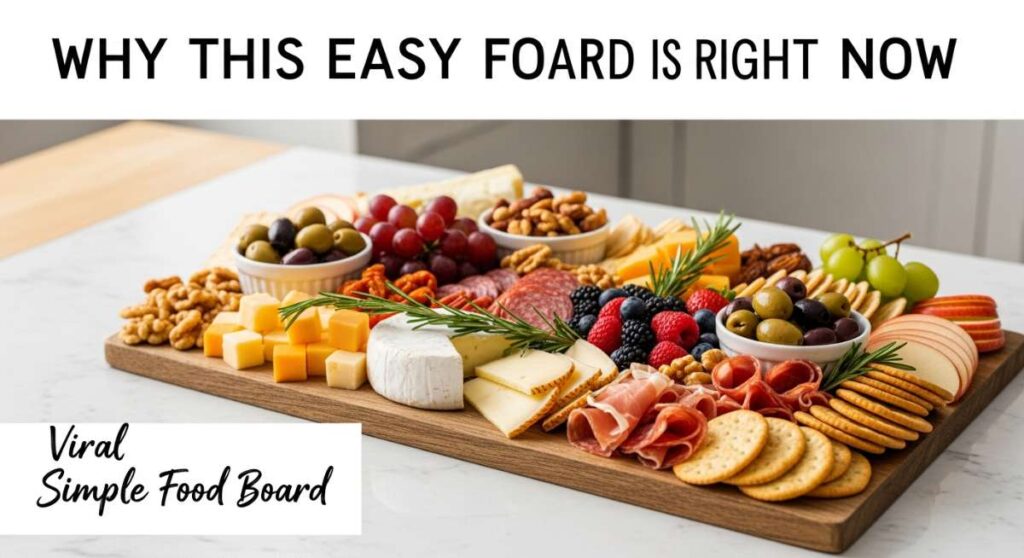
Why This Easy Food Board is Going Viral Right Now
There is something inherently magical about the way a shared plate brings people together. Lately, my social media feed has been flooded with a new kind of ‘grazing board’—one that moves beyond just cheese and crackers into a full-sensory lifestyle experience. It is about the art of slow living, the beauty of a simple, well-made meal, and the effortless aesthetic of a table filled with vibrant colors and textures. This viral trend isn’t just about food; it’s about creating a moment of connection that feels both elevated and approachable.
The secret to why this specific food board style is exploding online is its versatility. Whether you are hosting a cozy autumn gathering or just treating yourself to a mindful morning ritual, these individual components allow you to curate a plate that nourishes the soul. From the earthy depths of a matcha latte to the decadent silkiness of chocolate mousse, we are diving into the ten elements that turn a basic meal into a viral sensation.
How to Master Matcha Lattes for Sustainable Energy

Why we love this
We adore this vibrant green elixir because it offers a meditative pause in a busy morning, providing a clean, jitter-free energy boost that lasts for hours. The aroma is distinctively grassy and sweet, reminiscent of a fresh spring meadow, while the texture is incredibly creamy and frothy against the lips. As you take that first sip, the earthy umami notes of the ceremonial grade matcha blend perfectly with the silky sweetness of steamed oat or almond milk. It is a grounding ritual that looks just as beautiful in a ceramic mug as it feels in your body.
Essential Elements:
- Ceremonial grade matcha powder
- Filtered water (heated to 175°F)
- Creamy plant-based milk (oat or soy works best for froth)
- Natural sweetener (maple syrup or honey)
- Bamboo whisk (chasen) or electric frother
How to make it
- Begin by sifting 1-2 teaspoons of ceremonial grade matcha through a fine-mesh strainer into a wide bowl to remove any clumps, ensuring a perfectly smooth texture.
- Add approximately 2 ounces of hot water—crucially, this should be around 175°F, as boiling water will scorch the delicate tea leaves and create a bitter taste.
- Use a bamboo whisk to stir the mixture in a vigorous ‘W’ or ‘M’ motion for about 45 seconds until a thick, frothy layer of tiny bubbles forms on the surface.
- In a separate pitcher, steam or heat your milk of choice until it reaches 150°F, then use a frother to create a micro-foam that resembles the consistency of melted ice cream.
- Slowly pour the frothed milk over the matcha base, holding back the foam with a spoon until the end, then dollop the foam on top for a professional, cafe-quality finish.
How to Bake Apple Pie for Cozy Family Gatherings

Why we love this
Nothing evokes the feeling of ‘home’ quite like the scent of an apple pie bubbling in the oven, filling every corner of the house with notes of toasted cinnamon, nutmeg, and buttery pastry. The contrast between the flaky, golden-brown crust and the tender, jammy apples creates a textural masterpiece that is both comforting and sophisticated. Each bite offers a harmonious balance of tartness from the fruit and the rich, melt-in-your-mouth quality of a well-chilled butter crust. It is the ultimate centerpiece for a family table, promising warmth and nostalgia in every slice.
Essential Elements:
- Tart baking apples (Granny Smith or Honeycrisp)
- Unsalted cold butter, cubed
- All-purpose flour and ice-cold water
- Granulated and brown sugar
- Warm spices: Cinnamon, nutmeg, and a pinch of ground cloves
How to make it
- Prepare your pastry by cutting chilled, cubed butter into flour using a pastry cutter or your fingertips until the mixture resembles coarse crumbs with pea-sized bits of butter remaining.
- Gradually add ice water, one tablespoon at a time, mixing just until the dough holds together; wrap in plastic and chill for at least one hour to allow the gluten to relax.
- Peel, core, and slice your apples into even 1/4-inch wedges, then toss them in a large bowl with sugar, spices, and a tablespoon of flour to thicken the juices as they bake.
- Roll out the bottom crust on a floured surface and fit it into your pie dish, then mound the apple mixture high in the center to account for shrinkage during cooking.
- Top with a lattice or solid crust, vent with small slits, brush with an egg wash for shine, and bake at 425°F for 15 minutes before reducing to 375°F for another 45 minutes until the juices are thick and bubbling.
How to Roast Pumpkin Soup for Warm Autumn Nights

Why we love this
Roasting the pumpkin before blending creates a depth of flavor that is unattainable with canned varieties, resulting in a soup that is smokey, sweet, and incredibly velvety. The soup glows with a deep orange hue that mimics the changing leaves outside, and its aroma—heavy with garlic, sage, and roasted onion—is the definition of autumn comfort. Each spoonful feels like a warm hug, offering a thick, luxurious mouthfeel that is heightened by a swirl of heavy cream or a sprinkle of toasted pumpkin seeds for crunch. It is the perfect restorative meal for those chilly, rain-streaked evenings.
Essential Elements:
- Sugar pumpkin or Butternut squash
- Head of garlic and yellow onion
- Vegetable or chicken stock
- Fresh sage and thyme
- Heavy cream or coconut milk for finishing
How to make it
- Preheat your oven to 400°F and slice your pumpkin in half, removing the seeds; drizzle the flesh with olive oil and place face down on a baking sheet alongside halved onions and a whole head of garlic wrapped in foil.
- Roast for 45-50 minutes until the pumpkin skin is charred and the flesh is tender enough to be scooped out easily with a spoon.
- In a high-speed blender, combine the roasted pumpkin flesh, the squeezed-out roasted garlic cloves, and the caramelized onions with warm vegetable stock.
- Blend on high until the mixture is completely smooth and aerated, then pour into a large pot over medium-low heat to simmer with fresh herbs for 10 minutes to infuse the flavors.
- Stir in a splash of heavy cream and season generously with sea salt and cracked black pepper, serving immediately while steaming hot.
How to Prep Healthy Snacks for Productive Workdays

Why we love this
A well-curated snack board for the workday is a game-changer for focus, providing a vibrant array of colors and textures that keep the afternoon slump at bay. We love the combination of crisp, hydrating cucumbers alongside protein-rich nuts and the creamy indulgence of a sharp cheddar or hummus. The sensory experience of switching between crunchy, salty, and slightly sweet bites keeps your palate engaged and your energy levels steady. It transforms a mundane desk lunch into a curated ‘power plate’ that feels indulgent while being incredibly functional for a busy lifestyle.
Essential Elements:
- Fresh vegetables (bell peppers, snap peas, Persian cucumbers)
- Protein source (hard-boiled eggs or smoked almonds)
- Healthy fats (sliced avocado or walnut halves)
- Complex carbs (whole grain crackers or rice cakes)
- Creamy dip (hummus or Greek yogurt dip)
How to make it
- Start by washing and slicing all vegetables into uniform batons or rounds; uniform shapes make the snack board look more organized and appetizing for ‘grazing.’
- Boil eggs for exactly 8 minutes for a ‘jammy’ yolk, then immediately plunge them into an ice bath to stop the cooking and make peeling effortless.
- Portion out your dips into small ramekins to keep them from touching the dry ingredients and to maintain portion control throughout the day.
- Layer your board by placing the larger items like crackers and protein first, then tucking the smaller nuts and seeds into the remaining gaps for a full, ‘bountiful’ look.
- Finish with a sprinkle of ‘everything bagel’ seasoning over the avocado or hummus to add a final layer of texture and visual appeal.
How to Craft Tacos for Vibrant Dinner Parties

Why we love this
Tacos are the ultimate social food because they invite every guest to become a creator, building their own perfect bite with a riot of colors and bold flavors. The smell of charred corn tortillas and sizzling, spiced protein creates an immediate festive atmosphere that is hard to beat. We love the contrast of the hot, savory filling against the cold, acidic punch of pickled red onions and the creamy cooling effect of fresh lime-infused crema. It is a messy, joyful, and interactive dining experience that turns a simple dinner into a memorable celebration of flavor.
Essential Elements:
- Small corn or flour tortillas
- Marinated protein (shrimp, steak, or roasted cauliflower)
- Quick-pickled red onions
- Fresh cilantro and lime wedges
- Crumbled cotija cheese or feta
How to make it
- Marinate your protein for at least 30 minutes in a mixture of lime juice, cumin, smoked paprika, and garlic to ensure every fiber is infused with bright, smoky flavor.
- For the tortillas, heat a dry cast-iron skillet over high heat and char each tortilla for 30 seconds per side until dark spots appear and they become pliable and aromatic.
- Prepare a ‘slaw’ by tossing shredded cabbage with lime juice and a pinch of salt, letting it sit for 15 minutes to soften the texture while maintaining a refreshing crunch.
- Cook your protein in a very hot pan to achieve a ‘sear’—for shrimp, this only takes 2 minutes per side; for steak, aim for a medium-rare center with a crusty exterior.
- Assemble the tacos by layering the slaw, then the protein, followed by the pickles and cheese, finishing with a heavy squeeze of lime just before serving.
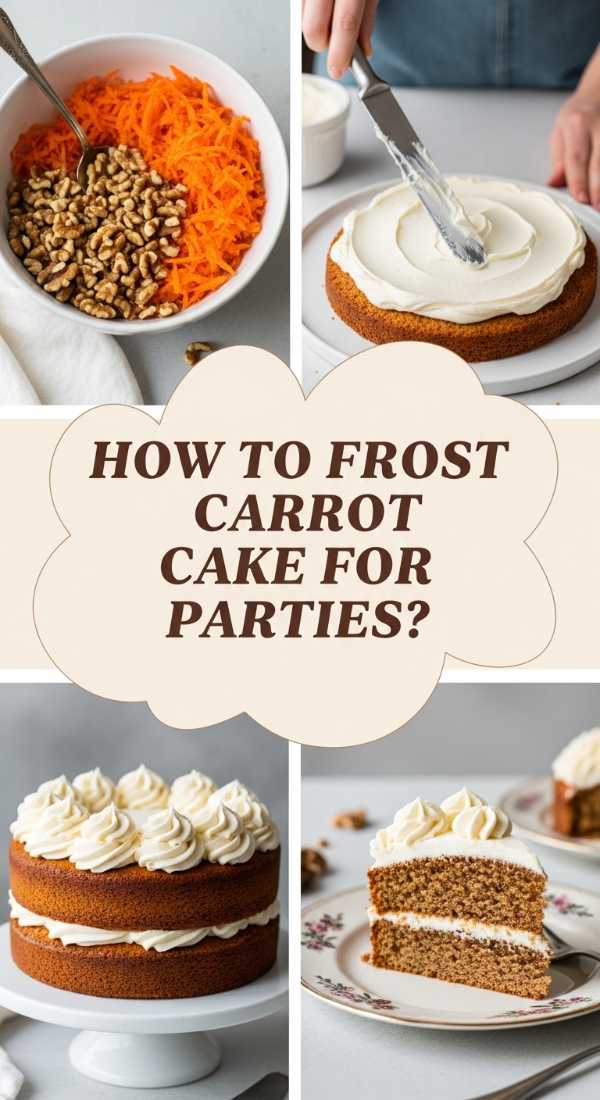
How to Frost Carrot Cake for Elegant Celebrations
Why we love this
There is a rustic elegance to a perfectly frosted carrot cake that makes it the star of any celebration, with its warm spice profile and luxuriously thick cream cheese icing. The texture is a delightful surprise, featuring a moist, dense crumb packed with shredded carrots and toasted pecans that provide a satisfying crunch in every bite. The tanginess of the frosting cuts through the sweetness of the cake, creating a balanced flavor profile that is sophisticated yet deeply nostalgic. Watching the thick, snowy-white frosting being swirled into decorative peaks is a visual treat that promises a decadent experience.
Essential Elements:
- Multi-layered spiced carrot cake (completely cooled)
- Full-fat cream cheese (room temperature)
- Unsalted butter (softened)
- Powdered sugar and pure vanilla bean paste
- Toasted pecans or walnuts for decoration
How to make it
- Ensure your cake layers are completely cold, or even slightly chilled in the fridge, to prevent the frosting from melting and sliding off the layers during assembly.
- In a stand mixer, beat the softened cream cheese and butter together for a full 5 minutes until the mixture is pale, airy, and free of any lumps.
- Gradually sift in the powdered sugar one cup at a time, mixing on low speed until incorporated, then add vanilla bean paste for those beautiful black flecks of flavor.
- Apply a ‘crumb coat’—a very thin layer of frosting over the entire cake—and chill for 20 minutes to lock in any loose crumbs and create a smooth canvas.
- Apply the remaining frosting generously, using an offset spatula to create intentional ‘swoops’ and swirls, then press crushed toasted pecans into the base of the cake for a professional finish.
How to Sauté Gnocchi for Gourmet Italian Nights

Why we love this
Forget boiling; pan-searing gnocchi transforms them from soft dumplings into golden, crispy pillows with a tender, melt-in-the-mouth interior. When tossed in a brown butter and sage sauce, the aroma becomes nutty and herbaceous, evoking the feeling of a high-end trattoria in Northern Italy. The sound of the gnocchi sizzling in the pan is music to a home cook’s ears, signaling the creation of a crust that holds up beautifully against rich sauces. It is a gourmet experience that feels incredibly fancy but can be achieved in under fifteen minutes with just a few quality ingredients.
Essential Elements:
- Fresh or high-quality store-bought potato gnocchi
- Unsalted butter
- Fresh sage leaves
- Grated Parmigiano-Reggiano
- Lemon zest and flaky sea salt
How to make it
- Heat a large non-stick skillet over medium-high heat and add a tablespoon of olive oil and a tablespoon of butter until the butter begins to foam.
- Add the gnocchi directly to the pan in a single layer (do not boil them first!); let them sit undisturbed for 3-4 minutes until the bottoms are a deep golden brown.
- Toss the gnocchi and add another knob of butter along with the fresh sage leaves, which will crisp up and infuse the fat with a savory, earthy flavor.
- Continue to sauté for another 3 minutes until the gnocchi are crispy on all sides and the butter has turned a toasted amber color with a nutty fragrance.
- Remove from heat, zest a fresh lemon over the top to brighten the flavors, and shower with finely grated Parmesan and flaky salt before serving immediately.
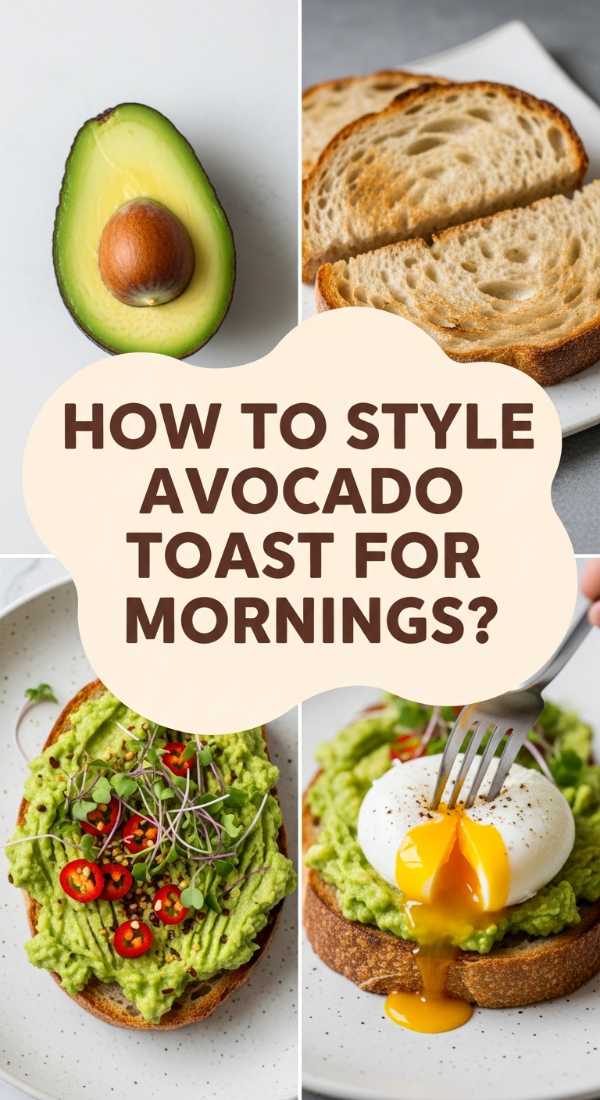
How to Style Avocado Toast for Aesthetic Morning Rituals
Why we love this
Avocado toast has become a viral sensation for a reason: it is the perfect canvas for culinary creativity and a staple of the ‘clean girl’ aesthetic morning ritual. We love the contrast of the hot, crunchy sourdough against the cool, buttery richness of a perfectly ripe Hass avocado. The visual appeal is undeniable, especially when topped with a bright pop of red chili flakes, the yellow drip of a soft-boiled egg, and a dusting of microgreens. It’s a meal that feels like an art project, turning the start of your day into a moment of intentionality and nourishment.
Essential Elements:
- Thick-cut sourdough bread
- Ripe Hass avocado
- Lemon juice and extra virgin olive oil
- Red pepper flakes and flaky sea salt
- Toppings: Soft-boiled egg, radishes, or microgreens
How to make it
- Toast your sourdough slices in a toaster or on a griddle with a little olive oil until they are exceptionally crunchy—this provides the necessary structural integrity for the toppings.
- In a small bowl, mash the avocado with a squeeze of lemon juice and a pinch of salt rather than mashing it directly on the toast; this ensures an even seasoning throughout.
- Spread the avocado mixture thickly from edge to edge, using the back of a spoon to create small ‘wells’ that will catch the olive oil and seasonings.
- Drizzle with your highest-quality olive oil and add a generous pinch of flaky sea salt and red pepper flakes for a hit of heat and texture.
- Finish with your chosen aesthetic elements, like thinly sliced radishes or a jammy egg, and serve on a wooden board for that quintessential viral look.
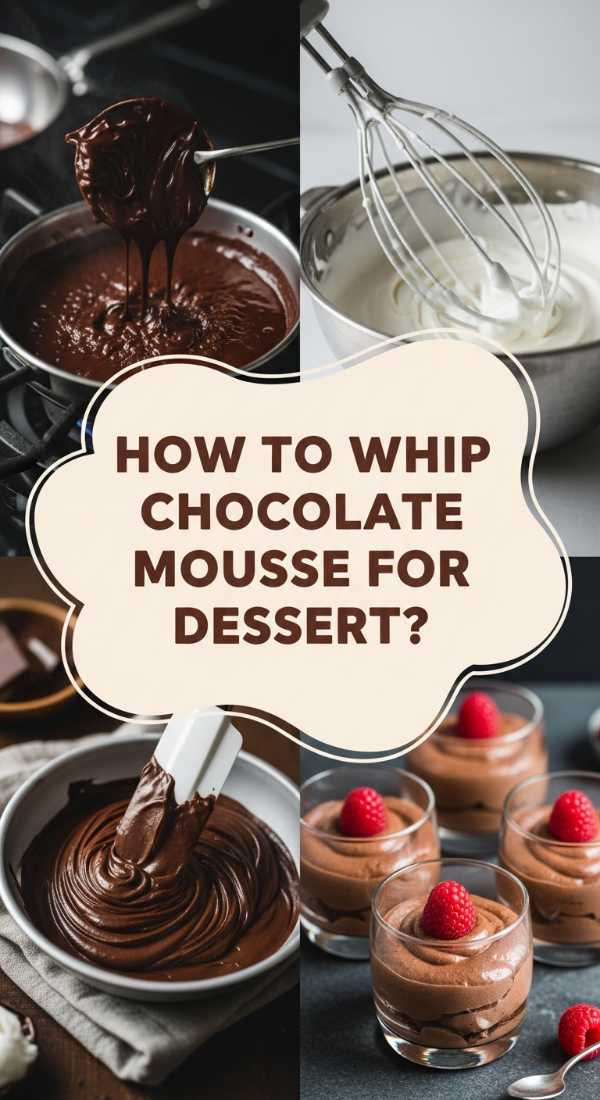
How to Whip Chocolate Mousse for Decadent Dessert Cravings
Why we love this
This chocolate mousse is the epitome of decadence, offering a texture that is so light and airy it practically disappears on the tongue, leaving behind a rich, intense cocoa flavor. The secret lies in the millions of tiny air bubbles created during the whipping process, which transform heavy chocolate into a cloud-like dream. We love how the bitterness of dark chocolate is softened by the creaminess of the whipped base, creating a dessert that is powerful yet refined. Serving this in a glass dish allows you to see the beautiful, porous structure that promises a luxurious sensory experience.
Essential Elements:
- High-quality dark chocolate (70% cocoa)
- Heavy whipping cream
- Large egg whites (room temperature)
- Granulated sugar
- A pinch of salt and vanilla extract
How to make it
- Melt the dark chocolate in a heat-proof bowl over a pot of simmering water (a bain-marie), ensuring the bottom of the bowl doesn’t touch the water, then let it cool slightly.
- In one bowl, whip the heavy cream until it forms stiff peaks, being careful not to over-beat it into butter; set this aside in the refrigerator.
- In a separate, perfectly clean bowl, whisk the egg whites with a pinch of sugar until they form glossy, firm peaks that stand up on their own when the whisk is lifted.
- Gently fold one-third of the whipped cream into the melted chocolate to lighten it, then very carefully fold in the egg whites using a ‘cut and fold’ motion to preserve the air.
- Spoon the mixture into individual ramekins and chill for at least 4 hours—this allows the mousse to set into its signature light, bubbly texture before serving with a shaving of chocolate.
How to Create Caramel Slices for Effortless Entertaining

Why we love this
Caramel slices, also known as Millionaire’s Shortbread, are the ultimate crowd-pleaser because they combine three distinct, addictive textures: a buttery crunch, a gooey center, and a crisp chocolate snap. The middle layer of caramel is deeply golden and salty-sweet, pulling away in a satisfying stretch with every bite. We love the way the dark chocolate topping balances the richness of the condensed milk caramel, making it impossible to stop at just one square. They are the perfect ‘make-ahead’ treat that actually tastes better the next day, making entertaining feel completely effortless and incredibly sweet.
Essential Elements:
- Shortbread base (flour, butter, sugar)
- Caramel layer (condensed milk, butter, golden syrup)
- Chocolate topping (milk or dark chocolate)
- Flaky sea salt for finishing
How to make it
- Press your shortbread dough into a lined square baking tin and bake at 350°F for 15-20 minutes until it is a pale golden color; let it cool completely to create a firm foundation.
- In a heavy-bottomed saucepan, combine condensed milk, butter, and golden syrup over medium-low heat, stirring constantly for about 10-12 minutes.
- Wait for the caramel to thicken and turn a deep amber color—you will see it start to pull away from the sides of the pan when it is ready.
- Pour the hot caramel over the cooled shortbread base, smooth it with a spatula, and let it set in the fridge for at least 2 hours until it is firm to the touch.
- Melt your chocolate with a teaspoon of oil for shine, pour over the cold caramel, sprinkle with flaky sea salt, and let it set at room temperature before slicing with a hot knife for clean edges.
Final Thoughts on the Viral Board Lifestyle
The beauty of this viral food board trend lies in the intentionality of the ingredients and the joy of the process. Whether you are whisking matcha or sautéing gnocchi, these recipes prove that even the simplest meals can be elevated into a beautiful lifestyle statement. By focusing on sensory details and high-quality components, you turn your daily nourishment into an aesthetic and emotional highlight of your day.