
Transform Your Space: The Most Viral Accent Wall Ideas of 2024
There is a profound magic that happens when you stop looking at your home as just a series of rooms and start seeing it as a canvas for your soul. We’ve all spent those late nights scrolling through Pinterest, heart-eyes fixed on that one perfect corner that seems to radiate peace, only to look up at our own plain beige walls and sigh. But here is a secret I’ve learned after years of decorating: your home doesn’t need a massive renovation to feel brand new; it just needs a focal point that tells a story.
This year, the trend cycle has shifted away from the ‘fast-fashion’ of home decor toward intentional, tactile, and deeply personal expressions of style. We are seeing a move toward organic textures, living elements, and architectural details that make a room feel like a high-end sanctuary. Whether you are craving the grounding presence of a forest in your living room or the sleek, sophisticated hum of a modern gallery, these viral accent wall ideas are designed to help you reclaim your space and turn your home into the retreat you deserve.
Join me as we explore ten transformative ways to elevate your walls, from the lush greens of a vertical garden to the architectural elegance of custom woodwork. These aren’t just projects; they are invitations to change the way you feel every time you walk through your front door. Let’s get creative and bring those dream boards to life!
How to Create a Lush Green Wall for Instant Serenity

Why we love this
There is nothing quite like the invigorating scent of damp moss and fresh ferns to instantly lower your heart rate. A living green wall acts as a natural air purifier, but more than that, it brings a tactile, velvet-like softness to a room that no paint color can replicate. The vibrant emerald hues and the subtle rustle of leaves create a multisensory experience that feels like a quiet walk through a morning forest. It transforms a sterile office or a quiet bedroom into a thriving, breathing sanctuary where you can truly exhale.
Essential Elements:
- Custom timber frame or modular planting trays
- Moisture-resistant backing (HDPE plastic or marine plywood)
- Automatic drip irrigation system or hand-misting spray
- High-quality potting felt or coconut coir liners
- Assorted low-light plants (Pothos, Bird’s Nest Fern, Philodendron)
- LED grow lights (if natural light is insufficient)
How to make it
- Begin by mounting a moisture-proof barrier to your wall to protect the underlying structure from humidity; use a high-density polyethylene sheet for the best results.
- Secure a sturdy wooden or metal frame over the barrier, ensuring it is anchored into the wall studs to support the significant weight of wet soil and foliage.
- Attach your modular planting pockets or felt layers to the frame, ensuring they are evenly spaced to allow for plant growth and air circulation.
- Install a simple gravity-fed drip irrigation line at the top of the wall, allowing water to slowly percolate down through each layer of plants; this prevents overwatering and messy spills.
- Gently remove your chosen plants from their nursery pots, shake off excess soil, and tuck them securely into the pockets, arranging them by color and texture for a lush, layered look.
- Monitor the moisture levels daily for the first two weeks, adjusting your watering frequency until the ecosystem stabilizes and the plants begin to reach toward the light.
How to Design a Stylish Fence Wall for Private Outdoor Living

Why we love this
An outdoor fence wall is more than just a boundary; it is the framework for your outdoor memories. The warm, toasted aroma of sun-warmed cedar combined with the clean, rhythmic lines of horizontal slats creates a backdrop that feels both modern and incredibly cozy. When the sun dips low, the shadows play across the wood grain, creating a textured masterpiece that makes your patio feel like a private resort. It provides that essential sense of enclosure that turns a backyard into an intimate ‘outdoor room’ for late-night conversations.
Essential Elements:
- Pressure-treated 4×4 posts for structural integrity
- Premium Western Red Cedar or Composite horizontal slats
- Stainless steel deck screws (to prevent rust streaks)
- High-quality exterior wood stain (semi-transparent)
- Laser-cut metal privacy panels for visual accents
- Solar-powered integrated cap lights
How to make it
- Map out your post locations precisely every 6 feet, using a string line to ensure perfect alignment across the length of the property.
- Dig post holes to a depth of at least 24 inches (or below the frost line), fill with a quick-set concrete mix, and use a spirit level to ensure every post is perfectly vertical as the concrete cures.
- Install a bottom ‘kickboard’ about 2 inches above the ground to prevent moisture rot, ensuring it is perfectly level as this will guide the rest of your slats.
- Begin mounting your horizontal slats from the bottom up, using a 1/2-inch spacer between each board to allow for wood expansion and a modern, airy aesthetic.
- Sand any rough edges on the cedar boards to a smooth finish, then apply a high-quality UV-resistant stain using a long-nap roller, back-brushing to ensure the stain penetrates deep into the grain.
- Finish the design by bolting a decorative laser-cut metal panel into a central section, providing a sophisticated focal point that breaks up the wood texture.
How to Style a Modern TV Wall for a Minimalist Sanctuary
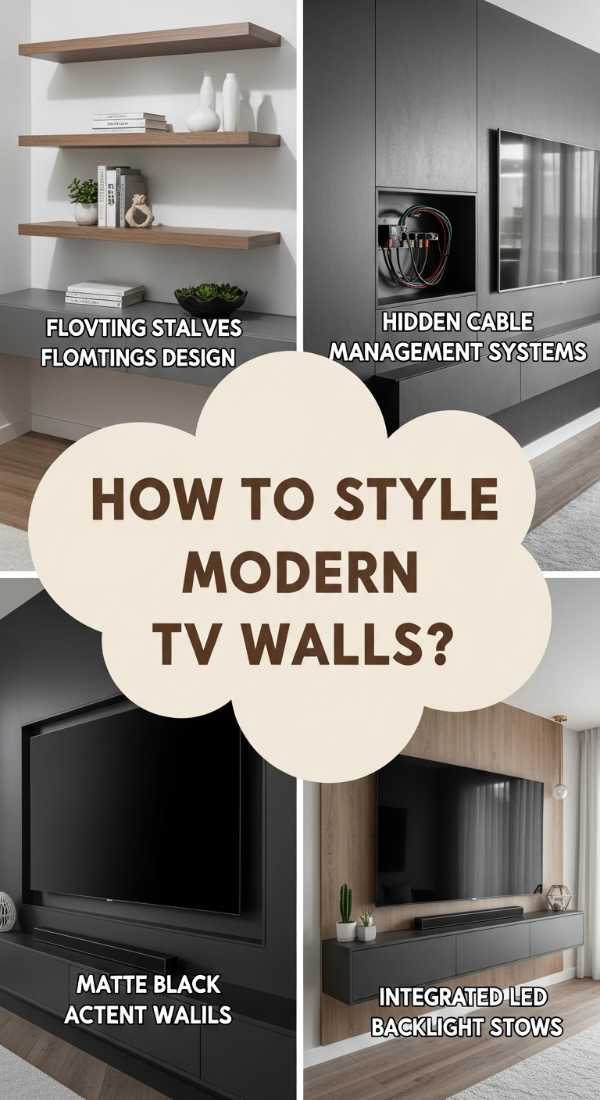
Why we love this
In a world of digital clutter, a minimalist TV wall offers a visual ‘reset’ button for the eyes. By concealing the chaos of wires and bulky tech, the focus shifts to the clean, architectural lines and the soft glow of the screen. We love the way matte finishes and floating elements create a sense of weightlessness, making even a large television feel like a curated piece of art rather than a black hole in the room. It’s about creating a space that feels intentional, quiet, and perfectly balanced for modern living.
Essential Elements:
- In-wall cable management kit (brush plates and power bridge)
- Low-profile tilting or slim-fit wall mount
- Floating media console in a matte finish
- Texture-rich paint or micro-cement finish for the wall
- Smart LED backlighting (bias lighting)
- Curated decor: one ceramic vase, one coffee table book
How to make it
- Start by marking the exact ‘eye-level’ center point of your seating area on the wall; this is where the middle of your TV should sit for ergonomic viewing.
- Install an in-wall power and cable routing kit to hide all HDMI and power cords behind the drywall, ensuring a completely wireless appearance.
- Apply a high-quality matte or lime-wash paint to the wall to eliminate glare and provide a soft, velvet-like texture that absorbs light beautifully.
- Secure your wall mount into at least two wall studs using heavy-duty lag bolts, checking and re-checking for a perfect level to avoid a slanted screen.
- Mount a floating console at least 12 inches below the TV to create a sense of ‘air’ and floor space, which makes the room feel larger and more organized.
- Affix a strip of LED bias lighting to the back of the TV, set to a warm 2700K temperature, to reduce eye strain and create a high-end cinematic glow against the wall.
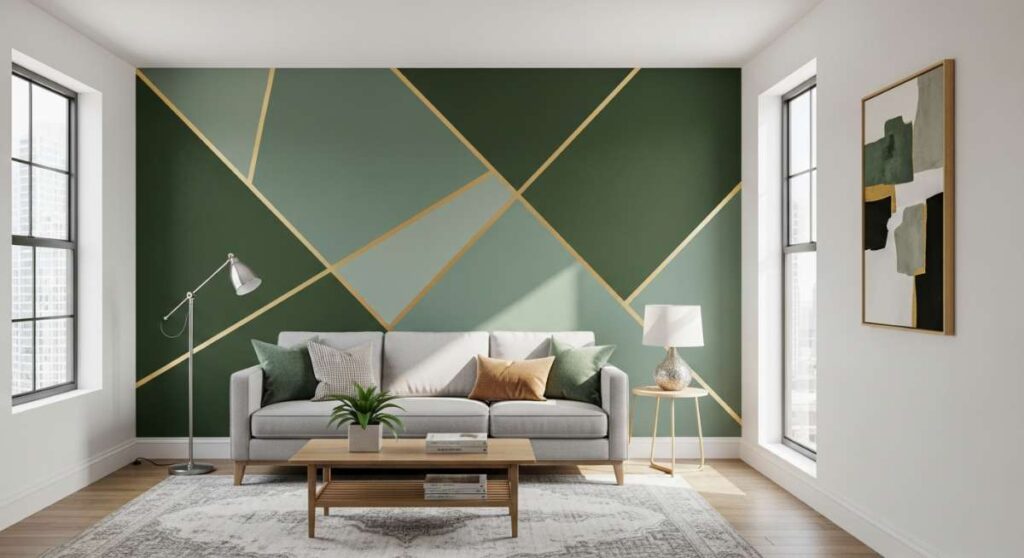
How to Elevate Living Room Wall Designs for a High End Feel
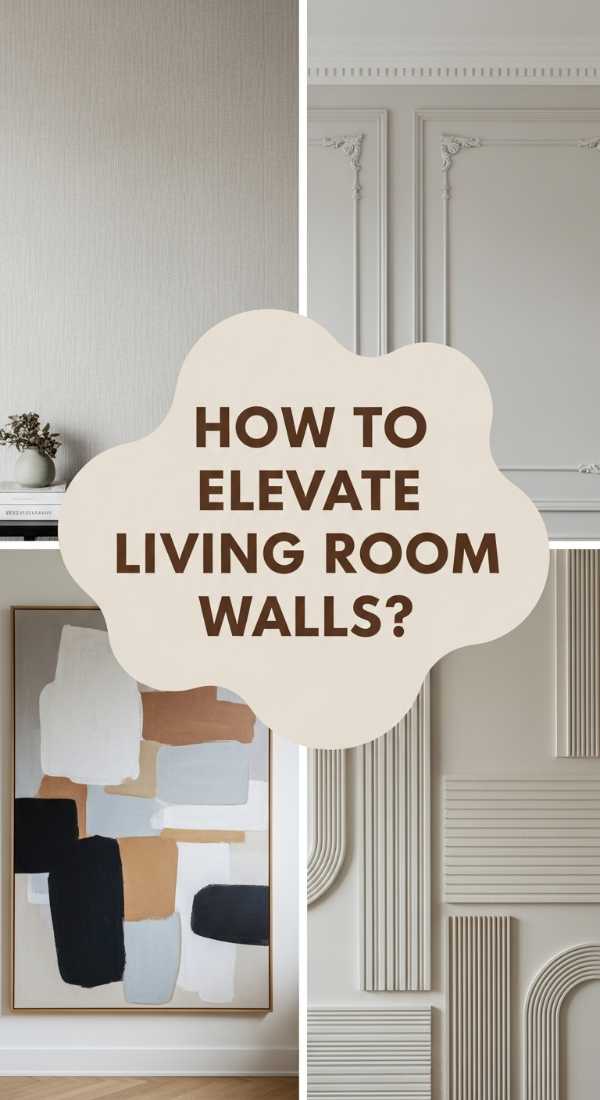
Why we love this
There is a specific kind of quiet luxury that comes from architectural detailing like picture frame molding or wainscoting. It adds a layer of history and ‘bones’ to a room, making it feel expensive without needing a single piece of furniture. The way light catches the edges of the trim, creating soft highlights and deep shadows, gives the wall a rhythmic, musical quality. It’s a sophisticated look that feels timeless, evocative of Parisian apartments where the architecture itself is the primary decoration.
Essential Elements:
- Polystyrene or wood decorative wall molding (trim)
- High-quality miter saw for precision 45-degree cuts
- Construction adhesive and a pneumatic brad nailer
- Paintable caulk and wood filler
- Eggshell or Satin finish paint (tonal color-drenching recommended)
- Laser level for perfect geometry
How to make it
- Design your layout on paper first, calculating the spacing so that each ‘box’ of molding is perfectly proportional to the wall height and width.
- Use a laser level to project horizontal and vertical lines directly onto the wall, marking your molding paths with a light pencil.
- Measure and cut your molding pieces at 45-degree angles using a sharp miter saw blade; professional tip: always ‘dry fit’ your boxes on the floor before taking them to the wall.
- Apply a thin bead of construction adhesive to the back of each piece, press it into place on your pencil lines, and secure with 1.25-inch brad nails every 6 inches.
- Fill all nail holes with wood filler and caulk every single edge where the molding meets the wall; this ‘seamless’ look is the secret to a high-end professional finish.
- Paint the entire wall—molding and all—in a single sophisticated color (color-drenching) to create a seamless, expensive-looking architectural feature.
How to Curate an Entrance Foyer Wall Design for a Warm Welcome
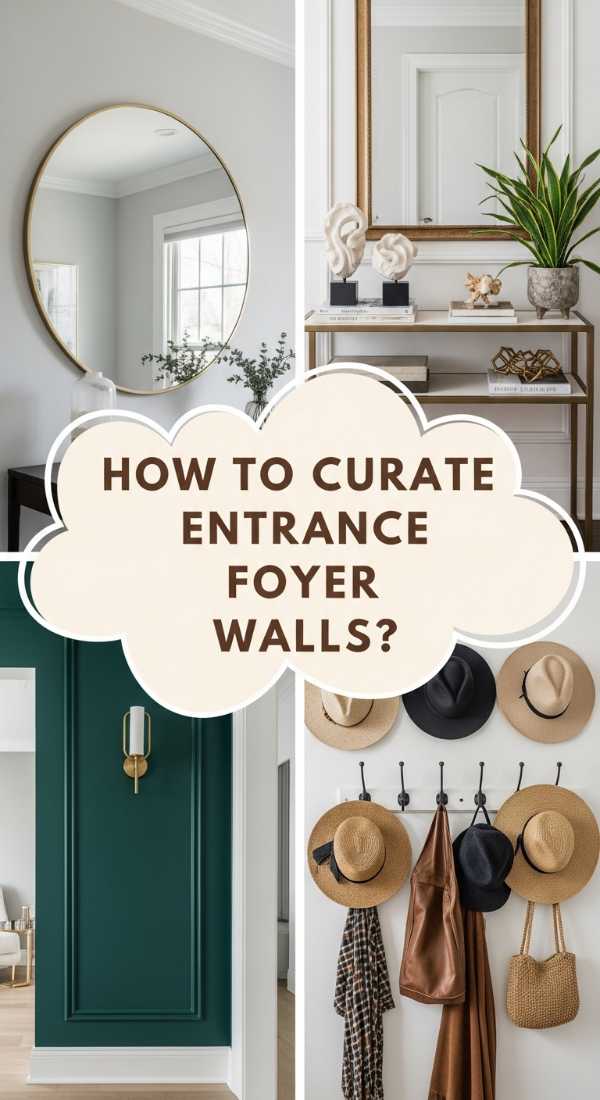
Why we love this
The foyer is the ‘handshake’ of your home; it sets the tone for everything that follows. A well-designed entrance wall feels like an embrace, combining functional elements with soulful touches like textured grasscloth or a grand, oversized mirror. We love the way a mirror catches the natural light from the front door, bouncing it into the hallway and making the transition from the outside world feel bright and optimistic. It’s the perfect place to blend the aroma of a signature candle with a visual display of your personal style.
Essential Elements:
- Statement oversized mirror (round or arched)
- Textured wallpaper or a bold accent paint color
- Slim-profile console table with tactile materials (stone or wood)
- Wall-mounted sconce lighting (plug-in or hardwired)
- Decorative hooks or a small floating shelf
- A tray for keys and a signature home fragrance
How to make it
- Select a ‘hero’ element—either a bold textured wallpaper or an oversized mirror—that will act as the primary visual anchor for the small space.
- If using wallpaper, prep the wall by cleaning it with sugar soap and applying a primer to ensure the adhesive bonds perfectly without peeling over time.
- Center your console table on the wall, ensuring there is enough clearance for the front door to swing fully open without obstruction.
- Hang your mirror so that its center is at eye level (roughly 60 inches from the floor), making sure it is anchored with heavy-duty wall toggles.
- Install wall sconces on either side of the mirror to create a symmetrical, balanced look that provides soft, welcoming ‘layers’ of light rather than harsh overhead glare.
- Style the console with three varying heights of objects: something tall (a vase), something medium (a stack of books), and something low (a key tray) for perfect visual flow.
How to Master TV Wall Design Luxury for Sophisticated Entertaining

Why we love this
Luxury TV wall design is about the marriage of technology and natural materials, like book-matched marble or rich walnut paneling. It feels like a high-end lounge where the screen is seamlessly integrated into a larger architectural statement. We love the dramatic contrast between cold stone and warm backlighting, which creates a ‘floating’ effect that is incredibly glamorous for evening entertaining. It elevates the act of watching a movie into an immersive, multi-sensory event, making your living room the envy of the neighborhood.
Essential Elements:
- Large-format porcelain slabs or stone veneer panels
- Hidden recessed channels for LED light strips
- Integrated soundbar mounting system
- Custom-built cabinetry or slatted wood accents
- Matte black hardware and outlets
- Professional mounting bracket with ‘pull-out’ accessibility
How to make it
- Construct a shallow ‘bump-out’ wall using 2×4 framing to create a recessed cavity for the TV and to provide a space for the stone slabs to sit flush.
- Run all electrical and audio-visual wiring through the framing before closing the wall with cement board, which provides the necessary support for heavy stone.
- Install large-format porcelain slabs using high-strength thin-set mortar, ensuring the ‘veining’ of the stone flows naturally across the surface for a custom-carved look.
- Embed dimmable LED channels along the perimeter of the stone or behind the TV recess to create a ‘halo’ effect that adds depth and drama.
- Mount the TV using a ‘mantel-mount’ or a recessed arm that allows the screen to sit perfectly flush with the stone surface when not in play.
- Incorporate a custom-slatted wood section at the base to hide high-fidelity speakers, allowing sound to pass through while keeping the aesthetic clean and organic.
How to Build a Vertical Green Wall for Urban Garden Bliss
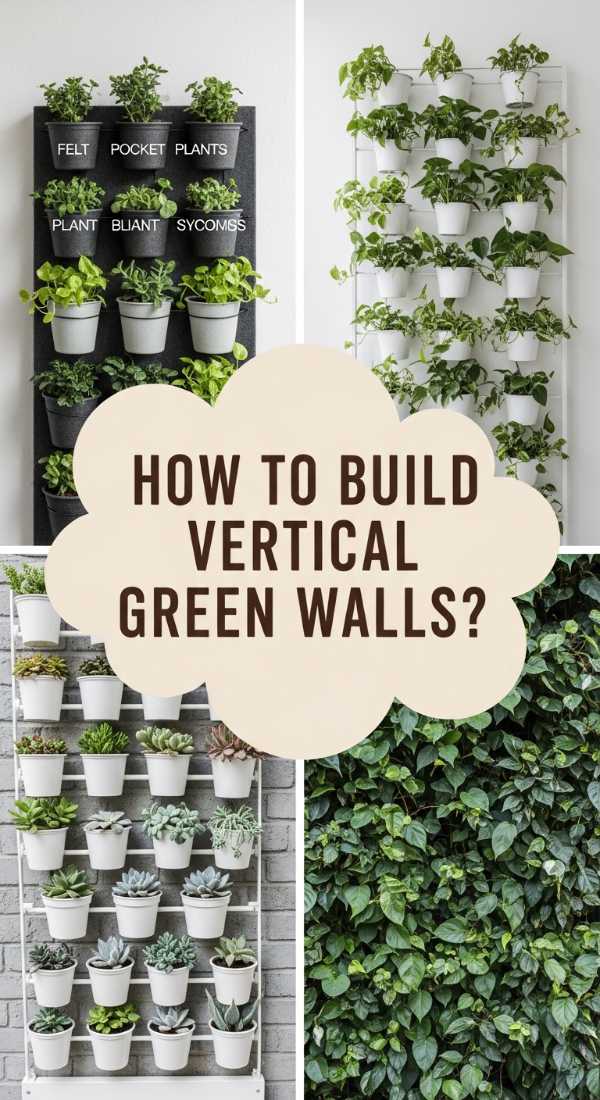
Why we love this
For those of us in urban environments, a vertical garden is a life-line to nature. It’s the feeling of a lush, oxygen-rich canopy squeezed into a square-foot footprint. We love the wild, untamed texture of trailing vines like Ivy or Hoya as they spill down the wall, creating a tapestry of varying greens and waxy leaves. It brings a cooling effect to the room and provides a constant, gentle reminder of the outdoor world, even in the middle of a concrete jungle. It’s pure, unadulterated botanical bliss.
Essential Elements:
- Modular vertical planter system (self-watering preferred)
- Lightweight expanded clay pebbles for drainage
- High-quality organic potting mix
- Trailing and upright plant varieties (Creeping Fig, Ferns, Spider Plants)
- Wall-mounted plant scissors for easy maintenance
- Small circulating fan to ensure air movement
How to make it
- Identify a wall that receives at least 4-6 hours of bright, indirect sunlight; if your space is dark, plan to install high-output full-spectrum grow lights above the installation.
- Secure the modular mounting rails to the wall, using a level to ensure the vertical columns are perfectly straight and the weight is evenly distributed.
- Prepare your plants by gently loosening the root balls and placing them into the individual planter inserts filled with lightweight clay pebbles at the bottom for drainage.
- Fill the remaining space with a high-quality potting mix, ensuring the ‘crown’ of each plant is slightly above the soil line to prevent rot.
- Click the individual planters into the wall rails, starting from the bottom and working your way up to create a full, overlapping ‘shingle’ effect with the foliage.
- Establish a strict watering schedule, or fill the central reservoir if using a self-watering system, and mist the leaves weekly to keep the humidity levels high and the foliage dust-free.
How to Integrate a Wood Fence Wall for Organic Interior Texture

Why we love this
Bringing exterior elements like a wood fence wall inside creates an incredible sense of warmth and rugged texture. The smell of natural timber—whether it’s reclaimed barn wood or smooth white oak—adds an earthy, grounded quality to a bedroom or office. We love how the repetitive vertical or horizontal lines add height to a room, while the natural knots and grain variations offer a ‘perfectly imperfect’ beauty that feels authentic and hand-crafted. It’s the ultimate way to add ‘soul’ to a modern, flat-walled home.
Essential Elements:
- Reclaimed wood planks or ship-lap boards
- Surface-prep sander and various grits of sandpaper
- Clear matte polyurethane or wax finish
- Heavy-duty construction adhesive (Liquid Nails)
- Finishing nails and a hammer or nail gun
- Black or dark-colored felt for gaps (optional)
How to make it
- Clean and sand your wood planks thoroughly to remove any splinters while preserving the natural character and silvered patina of the wood.
- Apply a clear matte finish to the wood before installation; this protects the fibers and makes the wall easy to dust without changing the natural color.
- Paint the wall behind the wood a dark charcoal or black; this ensures that any small gaps between the planks look like deep shadows rather than glimpses of white drywall.
- Apply a ‘S’ pattern of construction adhesive to the back of the first plank, press it firmly against the wall starting at the floor, and secure with two finishing nails at each stud.
- Use a small scrap of wood as a ‘tapping block’ to ensure each subsequent board is seated tightly against the one before it, checking for level every three rows.
- Trim the final top board to fit snugly against the ceiling, and use a matching wood filler to hide any visible nail heads for a clean, professional appearance.
How to Personalize a Grand Entrance Foyer for a Lasting Impression

Why we love this
A grand foyer should feel like a curated gallery of your life’s greatest hits. By personalizing this wall with a massive floor-to-ceiling gallery or a custom-painted mural, you create an immediate emotional connection with anyone who enters. We love the way a collection of mismatched frames, all unified by a single color, creates a ‘collected over time’ vibe that feels both sophisticated and deeply human. It’s an opportunity to showcase your travels, your family, and your art in a way that feels intentional and grand, rather than cluttered.
Essential Elements:
- A diverse collection of frames (different sizes, same color family)
- High-quality art prints or personal photography
- Picture hanging wire and heavy-duty hooks
- Command strips for small adjustments
- Gallery-style ‘art lights’ or spotlights
- Parchment paper for layout planning
How to make it
- Trace every frame you intend to hang onto large sheets of parchment paper and cut them out to create ‘templates’ for your layout.
- Tape these templates to the wall using painter’s tape, rearranging them until you find a balanced composition that flows with the architecture of the foyer.
- Aim for a ‘weighted’ look, placing larger, heavier frames near the bottom or center and smaller, lighter frames toward the edges of the arrangement.
- Nail directly through the parchment paper templates to ensure your hooks are placed exactly where they need to be, then tear the paper away.
- Hang your frames, using a small spirit level on top of each one to ensure they are perfectly horizontal; use Command strips on the bottom corners to keep them from shifting.
- Install a battery-operated or hardwired picture light above the most prominent pieces to give the entire wall a professional, high-end gallery glow at night.
How to Refresh Every Living Room Wall for a Complete Home Transformation
![]()
Why we love this
Sometimes, the most viral transformation isn’t about one wall, but the way all four walls work together to create a cohesive ‘mood.’ A total refresh involves layering texture, color, and light to completely shift the energy of the home. We love the ‘enveloping’ feeling of a room where the walls are treated as a unified design element, using soft-touch paints or subtle tonal wallpapers that change with the light throughout the day. It’s about creating a holistic environment that feels finished, polished, and ready for whatever life throws your way.
Essential Elements:
- Cohesive color palette (3-4 complementary tones)
- High-quality low-VOC paint in a plush finish (Suede or Velvet)
- Textured wall coverings (Grasscloth or Linen)
- Architectural crown molding or baseboards
- Dimmable perimeter lighting
- Updated hardware (switch plates and vent covers)
How to make it
- Start by stripping the room of all old decor and patching every single hole or imperfection in the drywall; a flawless surface is the foundation of a professional refresh.
- Apply a high-quality primer if you are changing color families, as this ensures the new pigment appears rich and true to the swatch.
- Paint three walls in a soft, neutral ‘anchor’ color, and use the fourth wall for a subtle texture like a natural linen wallcovering to add depth without overwhelming the space.
- Install updated, oversized baseboards and crown molding to ‘frame’ the walls, painting them in a semi-gloss version of your wall color for a sophisticated, tonal look.
- Swap out dated plastic light switches and outlet covers for high-end metal or matte versions that match your room’s new hardware.
- Layer your lighting by adding floor lamps and wall-mounted picture lights, ensuring all bulbs are on dimmers so you can adjust the ambiance from ‘bright and airy’ to ‘cozy and intimate.’
Conclusion
Transforming your space is one of the most rewarding journeys you can take. By focusing on your walls, you aren’t just changing a color or adding a shelf; you are redefining the boundaries of your world. Whether you chose the living serenity of a green wall or the structured elegance of modern molding, your home now reflects the very best version of your style. Remember, the most viral homes aren’t those that follow every trend, but those that feel authentically lived-in and loved. Now, go enjoy your beautiful new view!