
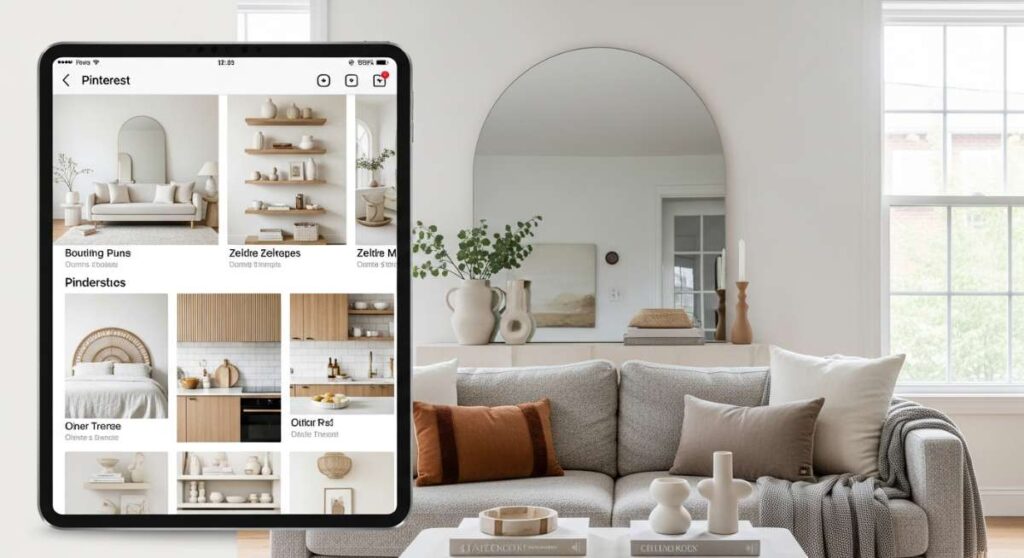
Have you ever spent hours scrolling through your Pinterest feed, pinning dream living rooms and serene gardens, only to look up and feel like your own space is a bit… lackluster? We’ve all been there. There is a specific kind of magic in those curated images—the way the light hits a velvet cushion or how a single olive tree can make a hallway feel like a Mediterranean villa. For the longest time, I thought these looks were reserved for people with unlimited budgets and a team of professional designers on speed dial. But here’s a little secret I’ve learned: transforming your home isn’t about buying a whole new life; it’s about capturing the feeling of those pins through intentional, stylish projects.
Today, I’m pulling back the curtain on how to turn those viral ‘saves’ into your reality. We are diving deep into the elements that make a home feel expensive, peaceful, and uniquely yours. From the tactile warmth of a vertical garden to the sleek sophistication of a custom media wall, we’re covering the high-impact designs that are currently taking the interior world by storm. Grab a cup of tea, get your measuring tape ready, and let’s turn your home into the sanctuary you deserve.
How to Create a Lush Vertical Garden for Natural Serenity
Why we love this
There is something inherently soul-soothing about being surrounded by greenery, and a vertical garden brings that forest-floor freshness right into your eye line. Imagine the gentle rustle of fern fronds as you walk by and the earthy, crisp aroma of damp moss and oxygen-rich leaves filling your living room. The texture is a wild, organic contrast to the hard lines of modern furniture, offering a soft, velvet-like wall of life that literally breathes with you. It’s a sensory masterpiece that turns a cold wall into a vibrant, humid sanctuary where the stress of the day simply melts away.
Essential Elements:
- Wall-mounted planter pockets or a modular felt system
- Waterproof backing membrane (Plexiglass or PVC sheet)
- Moisture-wicking potting soil mix
- Selection of low-to-medium light plants (Pothos, Philodendrons, Ferns, and Spider plants)
- Integrated drip irrigation system (optional but recommended)
- Full-spectrum LED grow lights
How to make it
- Prepare the Wall: Start by securing a waterproof barrier to your wall surface using heavy-duty screws. This prevents moisture from seeping into your drywall. Ensure the barrier is slightly larger than your planter area.
- Install the Framework: Attach your modular planter grid or felt pockets directly onto the waterproof backing. Use a spirit level to ensure every row is perfectly horizontal, as any tilt will cause uneven water distribution.
- Potting the Plants: Remove your chosen plants from their nursery pots. Gently loosen the root balls and wrap them in a small amount of moisture-retaining felt or place them directly into the pockets with the specialized potting mix. High-density planting is key for that “lush” look.
- Irrigation Setup: If using a manual system, ensure you have a catchment tray at the bottom. If using a drip system, run the microtubing along the top row of pockets, ensuring each emitter is tucked securely behind the foliage.
- Lighting and Maintenance: Position grow lights approximately 12-24 inches from the plants. Prune dead leaves weekly to encourage new growth and mist the wall every few days to maintain the humidity levels these tropical plants crave.
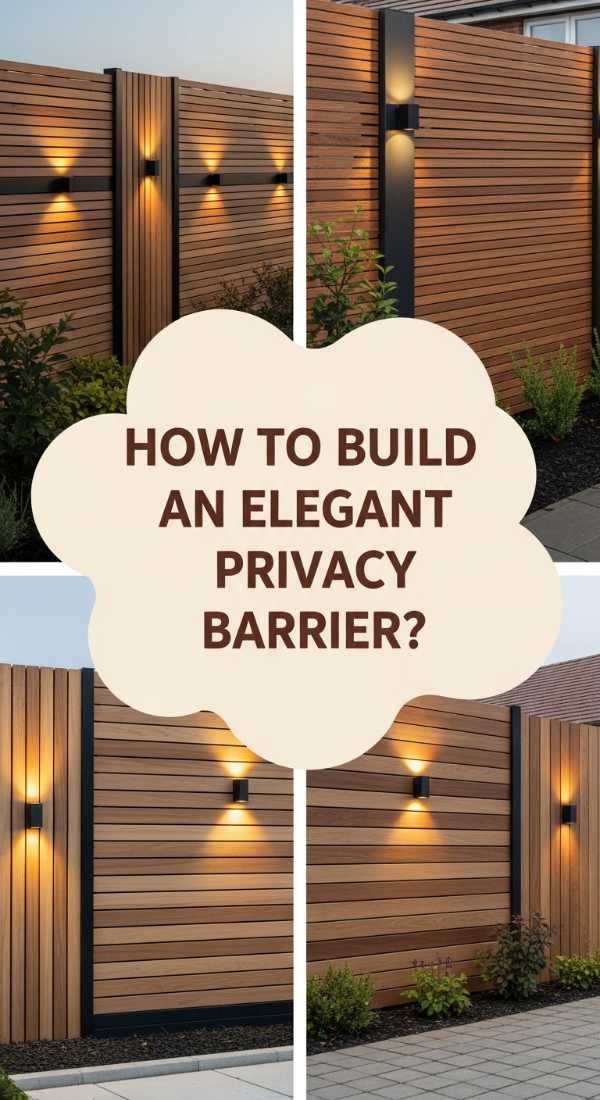
How to Build an Elegant Privacy Barrier for a Peaceful Retreat

Why we love this
An elegant privacy barrier is more than just a fence; it is a structural embrace that defines your outdoor sanctuary. The visual rhythm of narrow wood slats creates a play of light and shadow that feels both architectural and intimate. You’ll love the scent of cedar or redwood warming under the sun, paired with the tactile smoothness of sanded timber. It provides a sense of seclusion without feeling closed in, allowing gentle breezes to filter through while keeping the prying eyes of the world at bay, turning your patio into a private boutique getaway.
Essential Elements:
- Pressure-treated 4×4 posts for structural support
- Premium cedar or composite horizontal slats (1×2 or 1×3 dimensions)
- Stainless steel deck screws (black finish for a modern look)
- High-quality exterior wood stain or UV-protectant sealer
- Spacers (1/2 inch or 1/4 inch) for consistent gapping
How to make it
- Post Setting: Dig post holes at least 2 feet deep, spacing them no more than 6 feet apart. Set your 4×4 posts in quick-set concrete, ensuring they are perfectly plumb. Allow the concrete to cure for at least 24 hours before proceeding.
- Leveling the First Slat: Start from the top or bottom depending on your ground level. Use a long level to ensure the first slat is perfectly straight; this serves as the foundation for the entire wall.
- Installation with Spacers: Place your spacers on top of the first slat, then set the second slat on top. Drive two screws through each end of the slat into the posts. Pre-drilling is essential here to prevent the wood from splitting near the edges.
- Staining Technique: Once the structure is built, apply an oil-based stain using a natural bristle brush. Work in the direction of the grain, ensuring you coat the inside edges of the slats for a professional, uniform finish.
- Final Sealing: Apply a second coat of UV sealer after the stain has dried to protect the wood from graying and water damage over time.
How to Design a Sleek Entertainment Hub for Modern Living
Why we love this
The modern entertainment hub is the heart of the contemporary home, where technology meets high-end aesthetics. We love this look because it eliminates the visual clutter of tangled wires and bulky stands, replacing them with clean, matte surfaces and floating elements. The cool touch of a stone-look console and the soft glow of integrated LED backlighting create a cinematic atmosphere that feels incredibly expensive. It’s the perfect backdrop for a cozy movie night, offering a polished, “adult” version of the classic TV room that feels organized and effortlessly chic.
Essential Elements:
- Low-profile floating media console
- In-wall cable management kit
- Smart LED strip lighting (RGBW for color temperature control)
- Acoustic wall panels or oversized porcelain tiles
- Minimalist soundbar and hidden subwoofer
How to make it
- Wall Preparation: Identify the location of your studs. If you are installing heavy porcelain tiles or acoustic panels, ensure the wall can support the weight. Cut holes for your in-wall cable management system behind where the TV and console will sit.
- Mounting the Console: Install a heavy-duty French cleat or the manufacturer-provided bracket for your floating console. Use a stud finder and ensure it is bolted into at least two studs for maximum security.
- Creating the Backdrop: Apply your aesthetic panels (wood slats or large-format tiles) around the TV area. If using tiles, use a high-bond adhesive and ensure uniform grout lines for a seamless look.
- Lighting Integration: Adhere LED strips to the back of the TV and the underside of the floating console. Connect these to a smart hub so you can dim the lights via your phone or voice command.
- Cable Tucking: Pull all HDMI and power cables through the wall kits. Group them with velcro ties inside the console to keep the interior as tidy as the exterior.
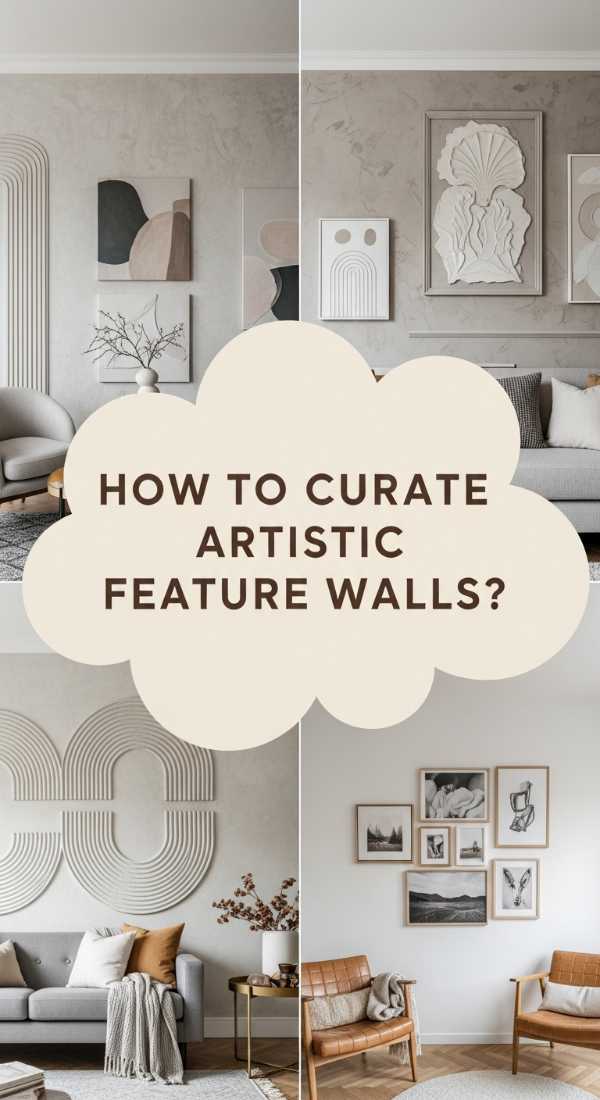
How to Curate Artistic Feature Walls for a Sophisticated Home
Why we love this
An artistic feature wall is the ultimate expression of your personality, acting as a grand gallery within your own four walls. There is a deep satisfaction in the balance of colors—the way a deep navy or a muted terracotta can make gold frames pop and textures sing. Whether it’s a collection of vintage oil paintings or a bold, hand-painted geometric mural, this section of your home becomes a conversation starter. The visual depth created by layering different mediums, from canvas to framed textiles, adds a sophisticated soul to the room that a plain white wall simply can’t provide.
Essential Elements:
- Cohesive color palette (3-4 complementary tones)
- Selection of frames in varying sizes but consistent finishes
- Picture rail molding or decorative wainscoting
- High-quality matte wall paint
- Dimmable art spotlights or “picture lights”
How to make it
- Concept Mapping: Lay all your art pieces on the floor in front of the wall. Rearrange them until the balance of size, color, and subject matter feels right. Take a photo of this layout for reference.
- Wall Base Prep: Paint your feature wall in your chosen bold hue. For a more sophisticated look, install simple picture rail molding 12 inches below the ceiling or traditional picture frame molding on the lower half of the wall.
- Hanging Strategy: Start with the largest piece as your anchor (usually slightly off-center). Use a laser level to keep the “eye line” of the gallery consistent, generally 57 to 60 inches from the floor.
- Spacing Precision: Keep a consistent gap (usually 2-3 inches) between all frames. Use Command strips on the bottom corners of the frames to keep them perfectly level and prevent them from shifting.
- Lighting the Masterpiece: Install battery-operated or hardwired picture lights above your primary pieces. This adds a warm, museum-quality glow that highlights the textures of the art.
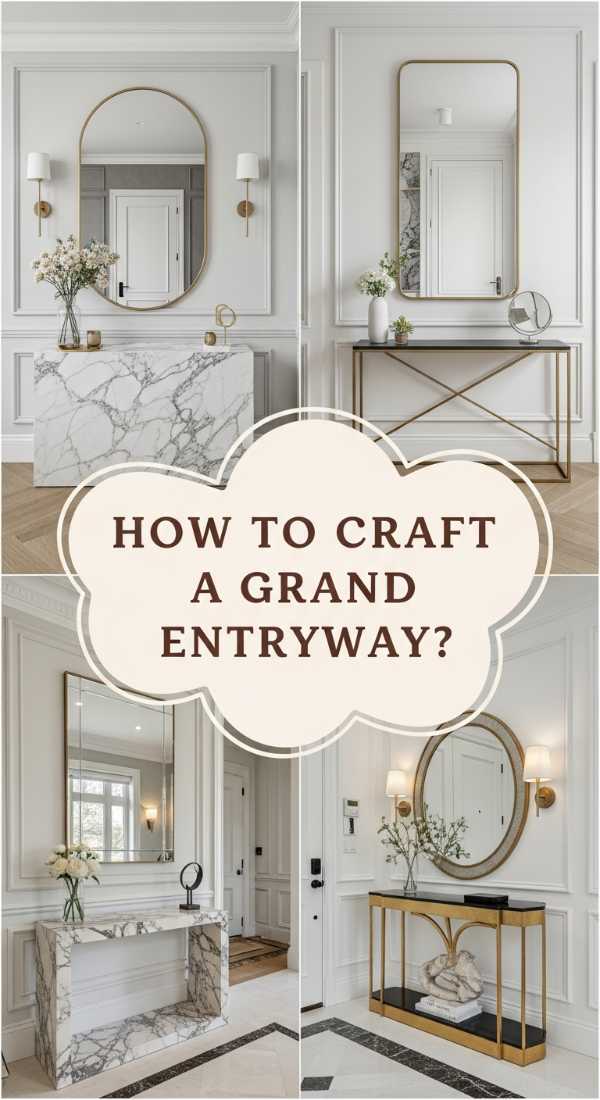
How to Craft a Grand Entryway for a Lasting Impression
Why we love this
They say you never get a second chance to make a first impression, and a grand entryway is the “hello” your home gives to every guest. We love the feeling of walking into a space that feels intentional—the scent of a luxury candle, the cool surface of a marble console table, and the bright reflection of an oversized mirror. It sets a tone of order and elegance for the rest of the house. It’s where functionality meets high fashion, providing a designated spot for your keys and coat while making you feel like you’ve just stepped into a boutique hotel every time you come home.
Essential Elements:
- Statement console table (marble, fluted wood, or wrought iron)
- Extra-large round or arched mirror
- Designer rug or runner with high durability
- Large-scale sculptural vase with seasonal branches
- Ambient lighting (table lamp or wall sconces)
How to make it
- The Anchor: Position your console table centrally against your longest entryway wall. Ensure there is enough clearance for the door to swing fully open without obstruction.
- The Reflection: Mount your mirror at least 6-8 inches above the console. The mirror should be roughly two-thirds the width of the table to maintain visual proportion and maximize light reflection.
- Layering Height: On one side of the console, place a tall sculptural vase with dried eucalyptus or cherry blossoms. On the other, place a shorter stack of coffee table books topped with a decorative bowl for keys.
- Textile Foundation: Lay down a high-quality runner. Choose a low-pile material like wool or a synthetic blend that can handle heavy foot traffic while adding warmth to the floor.
- Sensory Finishing: Place a high-end reed diffuser or a signature candle on the table. Add a warm-toned LED lamp to provide a soft glow during evening hours, creating a welcoming atmosphere.
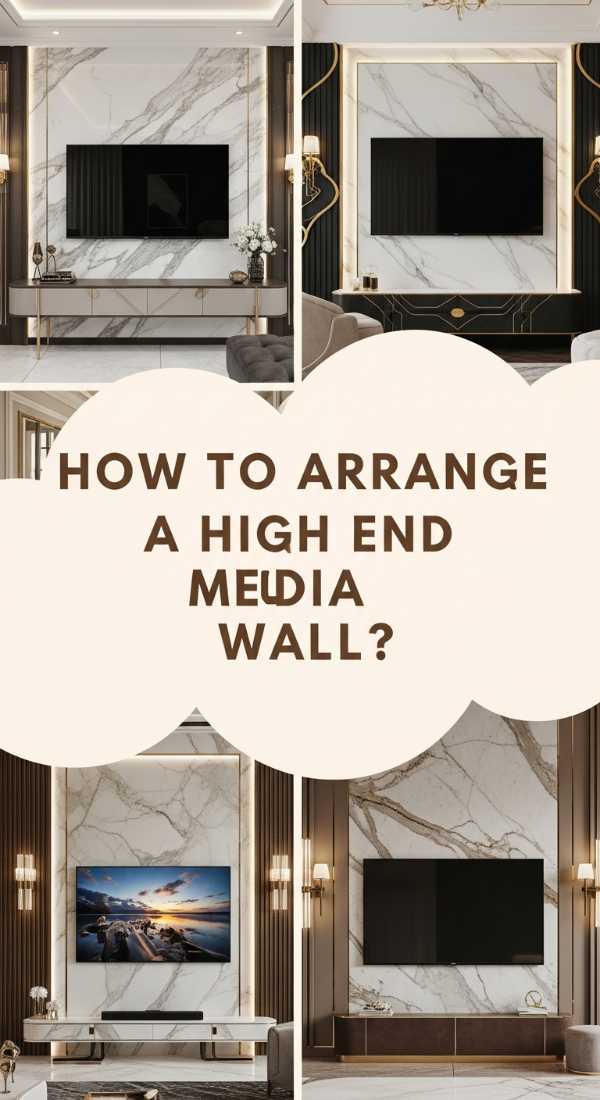
How to Arrange a High End Media Wall for a Lavish Experience
Why we love this
A high-end media wall is the ultimate fusion of architecture and entertainment. It transforms a flat wall into a 3D masterpiece using custom cabinetry, stone veneers, and precision lighting. We love the way this design commands the room, hiding all the “tech” and leaving only a beautiful, textured surface behind. The mix of cool stone, warm wood, and the ambient glow of recessed LEDs creates a lavish, multi-sensory experience that rivals any luxury lounge. It’s about creating a destination within your home that feels expensive, curated, and deeply relaxing.
Essential Elements:
- Stone veneer panels or large-format porcelain slabs
- Custom-built lower cabinetry or floating wood shelves
- Recessed COB LED strips
- Flush-mount TV bracket
- Matte black or brass hardware accents
How to make it
- Framing and Electrical: Build a shallow “bump-out” frame using 2x4s if you want the TV and fireplace to be perfectly flush with the wall. Run all electrical outlets and HDMI ports inside this frame.
- Stone Application: Apply your stone veneer or porcelain slabs to the face of the bump-out. Use a high-tack construction adhesive and spacers to ensure the lines are crisp. For stone, you may need to grout the joints for a seamless finish.
- Shelving and Storage: Install your custom lower cabinets. If building floating shelves, use heavy-duty internal brackets that can support the weight of books and decor without sagging.
- Integrated Lighting: Install aluminum LED channels into the underside of the shelves or behind the TV recess. This hides the light source while providing a soft, expensive-looking wash of light across the stone texture.
- Final Styling: Place the TV on its flush mount. Add a few high-quality decor pieces—think heavy glass knots or ceramic vessels—in the shelving units to soften the look of the technology.
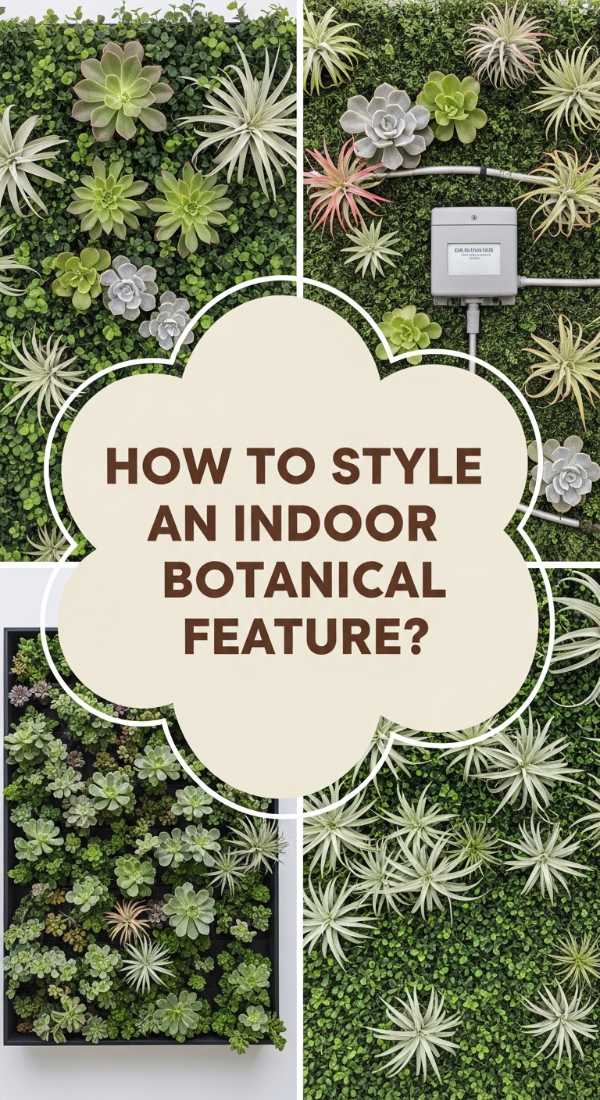
How to Style an Indoor Botanical Feature for Fresh Vibes
Why we love this
An indoor botanical feature is like a breath of fresh air for your interior design. Unlike a single potted plant, a curated botanical feature uses grouping, height, and varying leaf shapes to create a mini-ecosystem in a corner of your room. We love the vibrant pop of emerald green against neutral walls and the way the different textures—from the waxy leaves of a Fiddle Leaf Fig to the delicate fronds of a Maidenhair Fern—interact to create visual depth. It brings a dynamic, living energy to the home that changes with the seasons and makes any room feel instantly more expensive and intentional.
Essential Elements:
- Trio of planters in varying heights (Large, Medium, Small)
- Complementary planter materials (e.g., Terracotta, Glazed Ceramic, and Woven Fiber)
- Plants with diverse heights and leaf textures
- Decorative top-dressing (river stones, moss, or black pebbles)
- Plant stands for added elevation
How to make it
- Selection Strategy: Choose one “hero” plant that is at least 4-5 feet tall (like a Bird of Paradise). Pair it with a mid-sized plant with a different leaf shape (like a Monstera) and a low, trailing plant (like a String of Pearls).
- Vessel Coordination: Pick pots that share a common color thread but differ in texture. This keeps the look cohesive but not “matchy-matchy.” Ensure all pots have drainage or use a cachepot system.
- The Rule of Three: Arrange the pots in a triangular formation. Place the tallest in the back, the mid-sized to the left, and the smallest, trailing plant to the front right to create a pleasing visual flow.
- Top Dressing: Cover the soil of each plant with decorative river stones or preserved moss. This hides the brown dirt, retains moisture, and provides a polished, professional finish.
- Lighting Check: Position your botanical feature near a window with bright, indirect light. Rotate the pots 90 degrees every week so the plants grow straight rather than leaning toward the light.
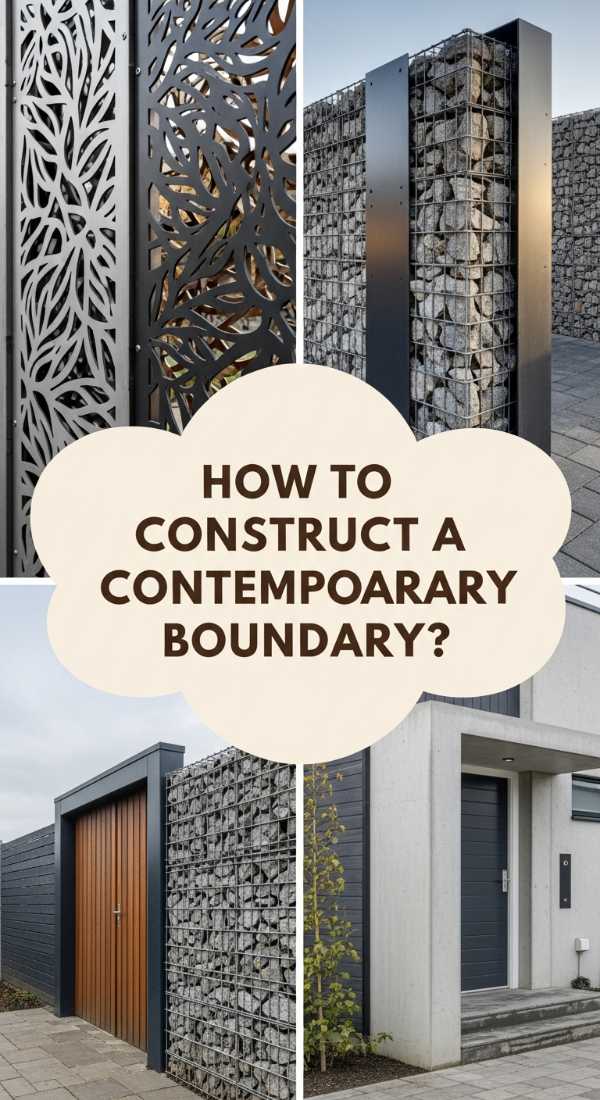
How to Construct a Contemporary Boundary for Architectural Charm
Why we love this
A contemporary boundary, such as an internal glass and metal partition or a geometric room divider, adds incredible architectural charm without the permanence of a wall. We love this for its ability to define zones—like a home office or a dining nook—while keeping the space feeling airy and light-filled. The sleek, dark lines of metal against glass feel industrial yet refined, offering a clear view while providing a physical sense of structure. It’s a sophisticated way to add “bones” to a modern home, creating a high-end, custom-built feel that is both functional and visually stunning.
Essential Elements:
- Black aluminum or steel framing profiles
- Tempered glass panels (clear, reeded, or smoked)
- Heavy-duty floor and ceiling tracks
- Silicon glazing gaskets
- Industrial-style door hardware
How to make it
- Precise Measurement: Measure the height and width of your opening at three different points. Walls are rarely perfectly square, and for metal frames, precision is non-negotiable.
- Track Installation: Secure your top and bottom tracks. Ensure they are perfectly aligned using a plumb bob or laser level. If installing on carpet, you will need to cut a strip away to mount the track directly to the subfloor.
- Frame Assembly: Assemble the vertical and horizontal metal profiles according to the kit instructions. Use a rubber mallet to ensure all joints are tight and flush.
- Glass Insertion: Carefully slide the tempered glass panels into the frame. Use glazing gaskets or clear silicone to secure the glass and prevent it from rattling within the frame.
- Finishing Touches: Clean the glass with a lint-free microfiber cloth. If your boundary includes a door, install the handle and check the swing or slide for smooth operation, adjusting the rollers if necessary.
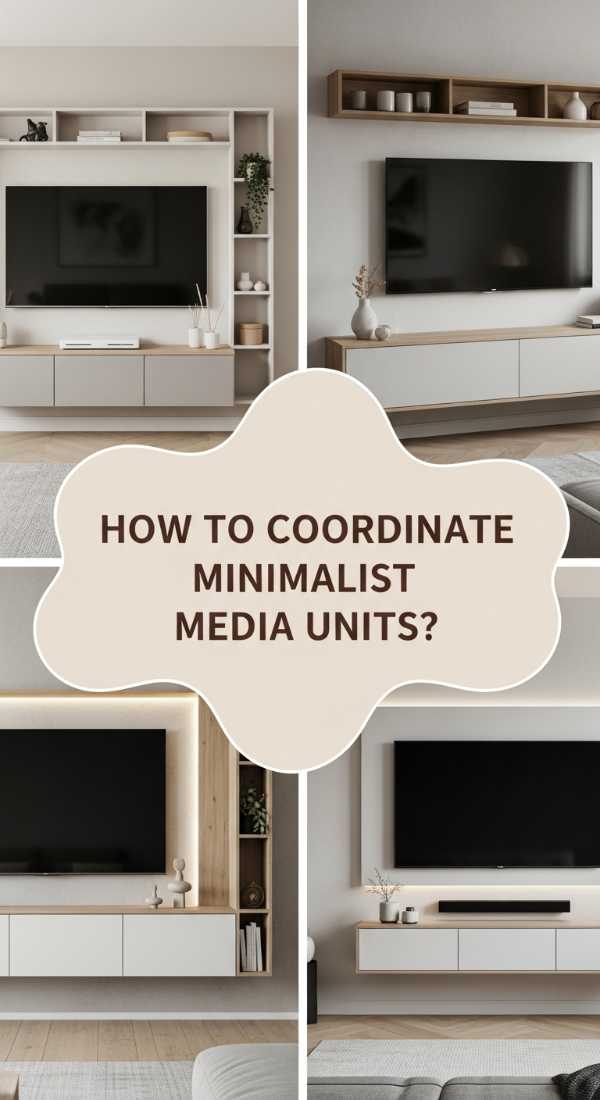
How to Coordinate Minimalist Media Units for a Seamless Look
Why we love this
Minimalism is about the luxury of space and the absence of chaos, and a coordinated media unit embodies this perfectly. We love the seamless, “built-in” look that camouflages storage and technology into the very fabric of the room. By using handle-less doors and matching the unit color to the wall, the furniture almost disappears, making the room feel twice as large. The smooth, satin finishes and perfect 45-degree miters create a sense of calm and precision that is incredibly soothing to live in. It’s the ultimate solution for the modern homeowner who wants a high-tech home that doesn’t look like an electronics store.
Essential Elements:
- Push-to-open cabinet doors (no handles)
- Custom-cut filler panels for a wall-to-wall look
- Matching wall paint or high-quality furniture wrap
- Internal cable routing holes
- Low-profile mounting hardware
How to make it
- Unit Assembly: Build your modular base units. If you are using pre-made units (like IKEA Sektion or Besta), assemble them carefully, ensuring all boxes are perfectly square.
- Wall Anchoring: Line the units up against the wall. Use shims to level them if your floor is uneven. Screw the units together and then anchor them firmly into the wall studs.
- The “Built-In” Trick: Measure the gaps between the units and the side walls. Cut filler pieces of MDF to fit these gaps perfectly. This closes the space and makes the units look like custom cabinetry.
- Color Matching: Paint the units and the filler panels the exact same color as your wall. Use a spray gun or a high-quality foam roller to ensure a factory-smooth finish without brush marks.
- Seamless Tech: Drill a 2-inch hole through the top of the unit (hidden by the TV) and through the internal shelves. Feed all wires through these holes so that not a single cord is visible from the front.
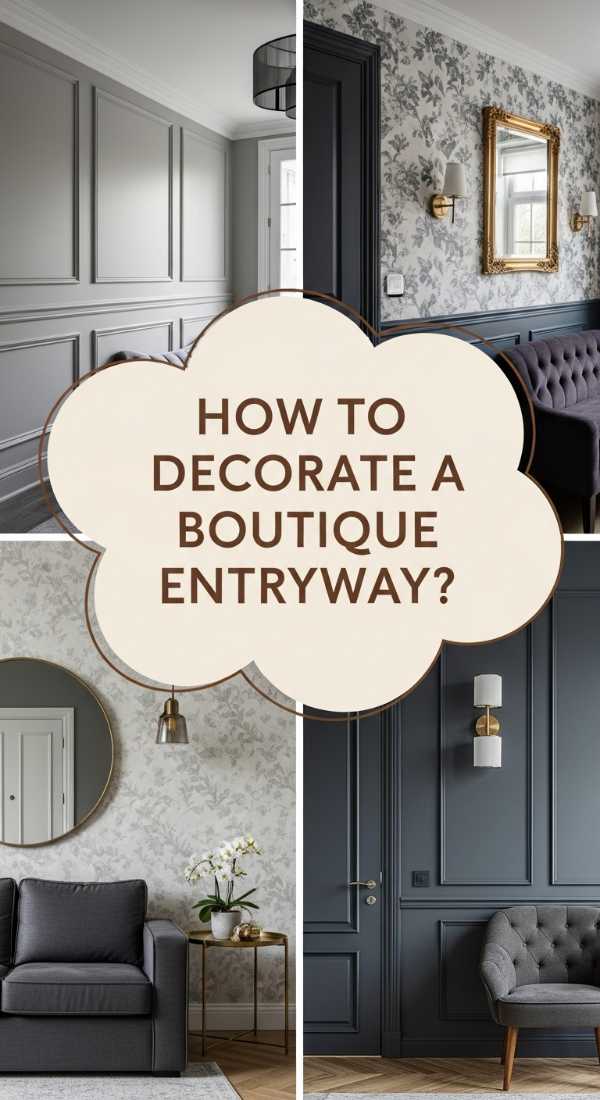
How to Decorate a Boutique Entryway for an Upscale Feel
[IMAGE_10]
Why we love this
A boutique entryway is all about the “jewelry” of the home—the small, high-end details that evoke a sense of curated luxury. We love the mix of soft and hard textures: a plush velvet ottoman tucked under a sleek glass console, or a heavy brass tray holding a crystal decanter. This style focuses on the tactile experience—the weight of a quality door handle, the softness of a silk rug, and the curated glow of a designer lamp. It feels like stepping into a high-end gallery or a Soho hotel, giving you a daily dose of glamour the moment you step through the front door.
Essential Elements:
- Small velvet-upholstered stool or ottoman
- Brass or gold-finished decorative tray
- Crystal or high-end glass vase
- Designer coffee table books
- Abstract sculptural object
How to make it
- The Foundation: Start with a narrow, elegant console table. If space is tight, a wall-mounted “floating” shelf in a rich wood like walnut works beautifully.
- The Power of Three: Group your decor in odd numbers. On one end of the table, place a stack of three luxury art books. Place a brass tray on top of the books to act as a “stage” for smaller items.
- Layering Texture: Place a velvet stool underneath the console. This adds a soft texture to contrast with the hard table and provides a functional spot to sit while putting on shoes.
- Sculptural Height: Add an abstract sculpture or a tall, thin lamp to provide height. The goal is to create a “landscape” for the eye to move across, rather than a flat line of objects.
- The Final Scent: A boutique feel isn’t complete without a scent. Choose a sophisticated fragrance like sandalwood, leather, or bergamot. Hide a small electric diffuser behind a photo frame for a continuous, invisible aroma.
Bringing Your Vision to Life
Transforming your home from a collection of Pinterest pins into a lived-in reality is a journey of patience and creativity. Remember, you don’t have to tackle all these projects at once. Start with the one that speaks to your soul—maybe it’s the freshness of a vertical garden or the organization of a minimalist media unit. Each change you make is a step toward a home that truly reflects who you are. Happy decorating!
Frequently Asked Questions
How can I make these projects more budget-friendly?
The best way to save is by doing the labor yourself and sourcing materials creatively. For example, instead of custom stone, use high-quality peel-and-stick stone veneers. For the botanical features, buy younger plants and let them grow into the space over time rather than buying mature specimens.
Do I need professional tools for these DIYs?
Most of these projects require basic tools like a drill, a level, a stud finder, and a measuring tape. For the more structural projects like the privacy barrier or media wall, a miter saw and a nail gun will make the job much faster and provide a more professional finish.
How do I maintain an indoor vertical garden without a mess?
The key is a proper waterproof backing and a catchment system. If you use felt pockets, ensure there is a plastic liner inside each one. Always water slowly to allow the soil to absorb the moisture, or better yet, install a simple gravity-fed drip system that controls the flow for you.