

There is something inherently magical about a shared meal that doesn’t require a formal seating chart or a stack of heavy porcelain plates. Lately, my social media feeds have been overflowing with the most stunning, effortless snack boards, and it’s easy to see why this trend is breaking the internet. It’s about more than just food; it’s about the tactile joy of grazing, the vibrant colors of peak-season produce, and that warm, fuzzy feeling of gathering your favorite people around a table filled with tiny, delicious treasures.
When I first started assembling these boards, I realized that the secret isn’t about spending hours in the kitchen, but rather about choosing simple, high-quality ingredients and preparing them with love. Whether it’s the crunch of a perfectly roasted vegetable or the sweet burst of a summer berry, each element tells a story of sun-drenched afternoons and slow living. Let’s dive into the components that will make your next food board the talk of the town!
How to make crispy zucchini

Why we love this
There is nothing quite like the satisfying snap of a golden, breaded zucchini slice that gives way to a tender, buttery interior. The aroma of toasted parmesan and dried oregano wafts through the kitchen as they crisp up, creating an irresistible snack that feels both indulgent and wholesome. When you bite into one, the delicate sweetness of the summer squash is perfectly balanced by the salty, savory crunch of the coating, making it the ultimate addition to any grazing board for that perfect texture contrast.
Ingredients
- 2 medium zucchinis, sliced into 1/4 inch rounds
- 1/2 cup Panko breadcrumbs
- 1/4 cup grated Parmesan cheese
- 1/2 teaspoon garlic powder
- 1/2 teaspoon dried oregano
- 2 eggs, beaten
- Salt and pepper to taste
How to make it
- Preheat your oven to 425°F (220°C) and line a large baking sheet with parchment paper to ensure the zucchini doesn’t stick and develops an even crust.
- In a shallow bowl, whisk the eggs with a pinch of salt. In a separate bowl, combine the Panko, Parmesan, garlic powder, and oregano, mixing thoroughly to distribute the seasoning.
- Dip each zucchini slice into the egg wash, letting the excess drip off, then press firmly into the breadcrumb mixture until both sides are heavily coated.
- Arrange the slices in a single layer on the baking sheet, ensuring they aren’t touching so the air can circulate, which is the key to achieving that high-heat crispiness.
- Bake for 15-18 minutes, flipping halfway through when the bottoms are golden brown; look for a deep amber color and a firm texture as your visual cue for doneness.
How to grill sweet corn

Why we love this
Grilled sweet corn is the quintessential taste of summer, offering a smoky, caramelized depth that you just can’t get from boiling. The sight of those charred, blackened kernels nestled against bright yellow rows is enough to make anyone’s mouth water, especially when finished with a melt-of-butter and a sprinkle of flaky sea salt. As the corn hits the high heat of the grates, the natural sugars intensify, releasing a sweet, roasted fragrance that defines backyard gatherings and long, warm evenings.
Ingredients
- 4 ears of fresh corn, husked
- 2 tablespoons melted butter
- 1 teaspoon smoked paprika
- 1 lime, cut into wedges
- Fresh cilantro for garnish
- Coarse sea salt
How to make it
- Preheat your grill to medium-high heat (about 400°F). Ensure the grates are clean and lightly oiled to prevent the delicate kernels from sticking.
- Brush each ear of corn generously with melted butter, ensuring all sides are coated to facilitate even browning and flavor absorption.
- Place the corn directly onto the grill grates. Close the lid and cook for about 10-12 minutes, turning every 2-3 minutes using tongs.
- Look for charred spots on all sides of the corn; the kernels should appear plump and slightly translucent, indicating they are steamed through but still have a crisp snap.
- Remove from the grill and immediately sprinkle with smoked paprika and salt, then squeeze fresh lime juice over the top to brighten the smoky flavors.
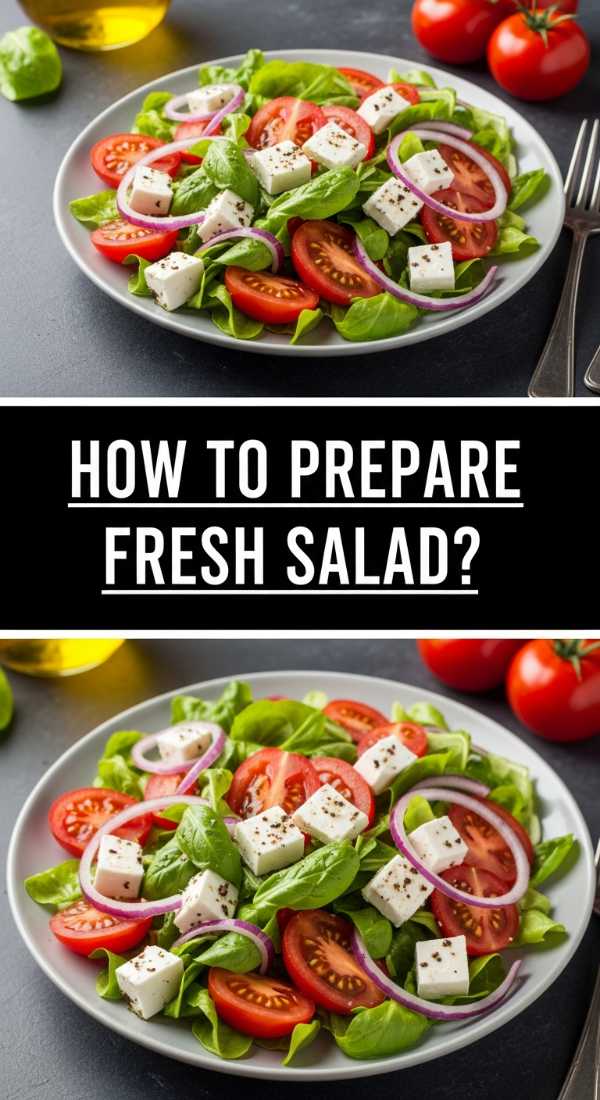
How to prepare fresh salad
Why we love this
A fresh salad serves as the cooling anchor of a snack board, providing a vibrant burst of color and a crisp, hydrating texture that cleanses the palate between richer bites. We love the way cold, snappy greens play against the acidic zing of a vinaigrette and the juicy pop of heirloom tomatoes. It feels like a celebration of the garden, offering a refreshing crunch and an earthy, green aroma that reminds us of the peak of the growing season, making every mouthful feel light and revitalizing.
Ingredients
- 4 cups mixed baby greens (arugula, spinach, butter lettuce)
- 1 cup cherry tomatoes, halved
- 1 cucumber, thinly sliced
- 1/4 red onion, shaved thin
- 3 tablespoons extra virgin olive oil
- 1 tablespoon lemon juice
- Salt and cracked black pepper
How to make it
- Begin by washing your greens in ice-cold water and using a salad spinner to dry them completely; damp leaves will prevent the dressing from adhering properly.
- In a large chilled bowl, whisk together the olive oil and lemon juice with a pinch of salt and pepper until the dressing is emulsified and slightly thickened.
- Add the shaved red onion to the dressing first and let it sit for 5 minutes; this technique, known as macerating, softens the onion’s bite and infuses the oil with flavor.
- Gently toss the greens, cucumbers, and tomatoes into the bowl using your hands or large tongs, lifting from the bottom to ensure every leaf is lightly kissed by the vinaigrette.
- Serve immediately to maintain the turgidity of the leaves; a perfect salad should look glossy and vibrant, never wilted or weighted down by excess moisture.
How to roast summer chicken

Why we love this
Summer roasting is all about infusing meat with bright, herbaceous notes that feel light rather than heavy. This roasted chicken features a crackling, golden-brown skin that hides incredibly succulent, tender meat infused with the oils of fresh rosemary and thyme. The aroma that fills the house is nothing short of nostalgic, blending the scent of savory poultry with the sharp, citrusy tang of roasted lemon slices, making it a sophisticated centerpiece for a board meant for sharing.
Ingredients
- 1 whole chicken (approx 3-4 lbs), patted dry
- 3 tablespoons softened butter
- 4 cloves garlic, smashed
- 1 lemon, sliced into rounds
- Fresh rosemary and thyme sprigs
- 1 teaspoon kosher salt
How to make it
- Preheat your oven to 425°F (220°C). Drying the chicken skin thoroughly with paper towels is the most critical step for achieving a professional-grade, crispy exterior.
- Generously rub the softened butter under the skin of the breasts and all over the exterior of the bird, then season heavily with kosher salt and cracked pepper.
- Stuff the cavity with the smashed garlic, half of the lemon slices, and the fresh herb sprigs to flavor the meat from the inside out as it roasts.
- Place the chicken on a roasting rack in a shallow pan and surround it with the remaining lemon slices. Roast for 50-60 minutes without opening the oven door to maintain a consistent high heat.
- The chicken is done when an instant-read thermometer hits 165°F (74°C) in the thickest part of the thigh; let it rest for at least 15 minutes before carving to allow the juices to redistribute.
How to bake berry dessert

Why we love this
There is a specific kind of joy in watching fresh berries bubble over the edges of a golden crust, their juices thickening into a sweet, jammy nectar. This dessert is a symphony of textures: the soft, bursting fruit against a buttery, slightly crumbly topping that smells of vanilla and toasted sugar. It captures the essence of a summer orchard, providing a warm, comforting end to a meal that feels both rustic and incredibly refined, especially when served with a dollop of cold cream.
Ingredients
- 3 cups mixed berries (blueberries, raspberries, blackberries)
- 1/2 cup granulated sugar
- 1 tablespoon cornstarch
- 1 cup all-purpose flour
- 1/2 cup cold butter, cubed
- 1 teaspoon vanilla extract
How to make it
- Preheat your oven to 375°F (190°C) and lightly grease a small baking dish or individual ramekins for a more rustic, personal presentation.
- In a medium bowl, toss the berries with 1/4 cup of sugar and the cornstarch until they are evenly coated; the cornstarch is essential for thickening the fruit juices into a glossy sauce.
- In another bowl, combine the flour and the remaining sugar. Use your fingers or a pastry cutter to work the cold butter into the flour until it resembles coarse crumbs the size of peas.
- Sprinkle the crumble mixture evenly over the fruit. Do not press it down; you want gaps for the steam and berry juices to bubble through the crust.
- Bake for 30-35 minutes until the topping is a deep golden brown and the berry juice is visibly bubbling and thick; allow it to cool slightly so the sauce sets before serving.
How to season grilled steak

Why we love this
A perfectly seasoned grilled steak is a masterclass in balance, offering a robust, savory crust that gives way to a melt-in-your-mouth interior. The scent of searing beef mingling with woodsmoke and cracked peppercorns is intoxicating, creating a sensory experience that feels primal and celebratory. We love the way the simple addition of coarse salt draws out the moisture to create a stunning Maillard reaction, resulting in a rich, umami-packed flavor profile that anchors the more delicate items on your food board.
Ingredients
- 2 Ribeye or New York Strip steaks (1.5 inches thick)
- 2 tablespoons coarse kosher salt
- 1 tablespoon coarsely ground black pepper
- 1 teaspoon garlic powder
- 1 tablespoon high-smoke point oil (like grapeseed)
How to make it
- Remove the steaks from the refrigerator at least 45 minutes before cooking; bringing the meat to room temperature ensures even cooking throughout the center.
- Pat the steaks completely dry with paper towels. Rub each side with a thin layer of oil, which acts as a conductor for the heat and helps the spices stick.
- Mix the salt, pepper, and garlic powder in a small bowl, then apply the seasoning generously to both sides and the edges, pressing it firmly into the meat fibers.
- Preheat your grill to high (450°F+). Place the steaks on the grates and sear for 4-5 minutes per side for a perfect medium-rare, looking for defined, dark grill marks.
- The visual cue for flipping is when the meat easily releases from the grate; once removed, tent with foil and rest for 10 minutes to ensure the juices stay inside the steak.
How to sear juicy shrimp
Why we love this
Searing shrimp is an exercise in speed and precision, resulting in a dish that feels elegant yet incredibly simple. When the shrimp hit the hot pan, they instantly transform from translucent grey to a beautiful, opaque pink, curling into perfect C-shapes while picking up golden-brown edges. The aroma of garlic and butter sizzling together is legendary, creating a silky sauce that coats each succulent bite, making these a fan-favorite for any snack board where guests can pick them up by the tail.
Ingredients
- 1 lb large shrimp, peeled and deveined
- 2 tablespoons unsalted butter
- 3 cloves garlic, minced
- 1/2 teaspoon red pepper flakes
- Fresh parsley, chopped
- Lemon zest
How to make it
- Pat the shrimp dry with paper towels to ensure they sear rather than steam; excess moisture is the enemy of a golden, caramelized exterior.
- Heat a heavy skillet (cast iron is best) over medium-high heat. Add the butter and wait until the foaming subsides and it begins to smell slightly nutty.
- Add the shrimp in a single layer, making sure they aren’t crowded. Sear for exactly 2 minutes on the first side without moving them to develop a deep color.
- Flip the shrimp and immediately add the minced garlic and red pepper flakes. Cook for only 1-2 more minutes; the shrimp are done when they are opaque and the garlic is fragrant but not burnt.
- Remove from heat immediately to prevent overcooking, which makes shrimp rubbery. Toss with fresh parsley and lemon zest for a bright, aromatic finish.
How to make peach cobbler

Why we love this
Peach cobbler is the ultimate comfort food of the summer, evoking images of porch swings and golden hour sunlight. There is something deeply satisfying about the way the stone fruit softens into a honey-like syrup, tucked under a blanket of cake-like topping that is crisp on the edges and soft in the middle. The warm scent of cinnamon and nutmeg combined with the floral aroma of ripe peaches creates an inviting atmosphere that beckons everyone to grab a spoon and dive in together.
Ingredients
- 4 cups sliced fresh peaches
- 1/2 cup brown sugar
- 1 teaspoon cinnamon
- 1 cup self-rising flour
- 1 cup whole milk
- 1/2 cup melted butter
How to make it
- Preheat your oven to 350°F (175°C). Pour the melted butter into a 9×13 inch baking dish, coating the bottom evenly to create a rich, fried-crust effect.
- In a small bowl, toss the sliced peaches with the brown sugar and cinnamon until the peaches start to release their natural juices and form a light syrup.
- Whisk the flour and milk together until just combined; it’s okay if there are a few small lumps, as over-mixing will lead to a tough, bready topping.
- Pour the batter directly over the melted butter in the baking dish—do not stir. Arrange the sugared peaches and their syrup on top of the batter.
- Bake for 40-45 minutes. As it bakes, the batter will rise up and around the fruit; it is finished when the top is a beautiful golden brown and the fruit is bubbling through.
How to craft summer pasta

Why we love this
A true summer pasta is a lesson in minimalism, relying on the heat of the freshly cooked noodles to gently wilt herbs and melt cheese rather than a heavy, simmered sauce. We love the glossy sheen of high-quality olive oil coating each strand of pasta, punctuated by the bright acidity of tomatoes and the peppery punch of fresh basil. It feels light and effortless, filling the air with the clean, garden-fresh scent of Italian summers and providing a satisfying, starchy component to an otherwise produce-heavy board.
Ingredients
- 1 lb spaghetti or linguine
- 1/2 cup extra virgin olive oil
- 2 cups cherry tomatoes, halved
- 3 cloves garlic, thinly sliced
- 1 cup fresh basil leaves, torn
- 1/2 cup shaved Pecorino Romano
How to make it
- Bring a large pot of heavily salted water to a rolling boil. Cook the pasta until it is ‘al dente’—firm to the bite—which usually takes 1-2 minutes less than the package instructions.
- While the pasta cooks, heat the olive oil in a large skillet over low heat. Add the sliced garlic and cook slowly for 3-4 minutes until it is pale gold and the oil is infused with its flavor.
- Increase the heat to medium and add the cherry tomatoes. Sauté for only 2-3 minutes until they just begin to soften and some skins start to blister.
- Reserve 1/2 cup of the starchy pasta water, then drain the pasta and add it directly to the skillet with the oil and tomatoes.
- Toss vigorously, adding the pasta water a tablespoon at a time to create a silky, emulsified sauce that clings to the noodles. Turn off the heat and fold in the basil and cheese right before serving.
How to stuff bell peppers

Why we love this
Stuffed bell peppers are like little edible gifts, each one packed with a savory, colorful filling that surprises the palate. We love the way the peppers soften in the oven, becoming sweet and tender while retaining their structural integrity to hold a hearty mix of grains and proteins. The aroma of roasting peppers is sweet and slightly charred, while the melted cheese on top provides a gooey, salty contrast that makes these a substantial and visually stunning addition to any shared food display.
Ingredients
- 4 large bell peppers, tops removed and seeded
- 2 cups cooked quinoa or rice
- 1 lb ground turkey or beef, browned
- 1 cup marinara sauce
- 1 teaspoon Italian seasoning
- 1 cup shredded mozzarella cheese
How to make it
- Preheat your oven to 375°F (190°C). Place the hollowed-out peppers in a baking dish with a splash of water at the bottom, which helps steam them into tenderness.
- In a large mixing bowl, combine the cooked grain, browned meat, marinara sauce, and Italian seasoning. Ensure the mixture is well-moistened; if it looks dry, add an extra splash of sauce.
- Spoon the filling into each pepper, pressing down gently to pack it tightly so the peppers stay upright and full during the roasting process.
- Cover the dish tightly with aluminum foil and bake for 30 minutes. This initial phase cooks the pepper walls until they are soft and vibrant in color.
- Remove the foil, sprinkle the mozzarella cheese generously over the tops, and bake for another 10-15 minutes uncovered until the cheese is bubbly and starting to brown.
The Art of the Shared Table
In a world that often feels rushed, the simple snack board trend reminds us to slow down and savor the moment. Whether you’re arranging crispy zucchini or serving a warm peach cobbler, the goal is always the same: to create a space where food is a bridge between people. These recipes are designed to be flexible, beautiful, and above all, delicious. So, grab a board, gather your friends, and let the flavors of the season do the talking.