
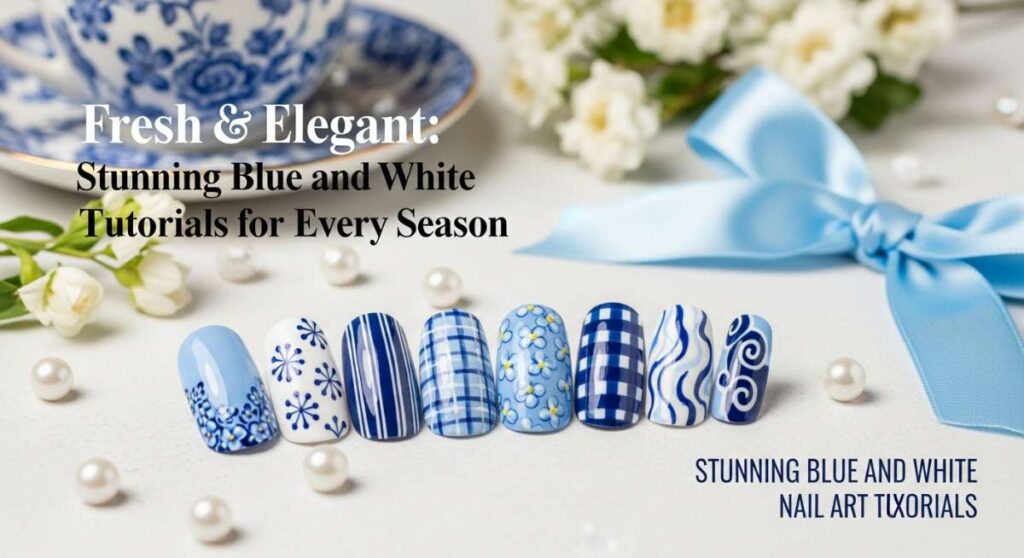
Fresh & Elegant: Stunning Blue and White Nail Tutorials for Every Season
Hello, my beautiful loves. There is something so incredibly soothing about the color blue, isn’t there? It reminds me of the first morning light catching a frost-covered window or the rhythmic dance of the ocean against a sandy shore. It’s a color that feels like a gentle hug for your soul, and when we pair it with the purity of white, it creates a canvas of absolute elegance.
Lately, I’ve been finding so much peace in the ritual of painting my nails. It’s that one hour of the week where the world slows down, the tea is warm, and I can focus on creating something tiny and perfect just for me. Whether you are looking for a whisper of baby blue or the bold confidence of royal indigo, I’ve gathered these tutorials to help you bring a little bit of that sky-high magic to your fingertips.
Grab your favorite cozy blanket and your polish collection, loves. Let’s dive into these dreamy blue and white designs together and find the perfect set to match your current heartbeat.
Dreamy Baby Blue Ombre Nails
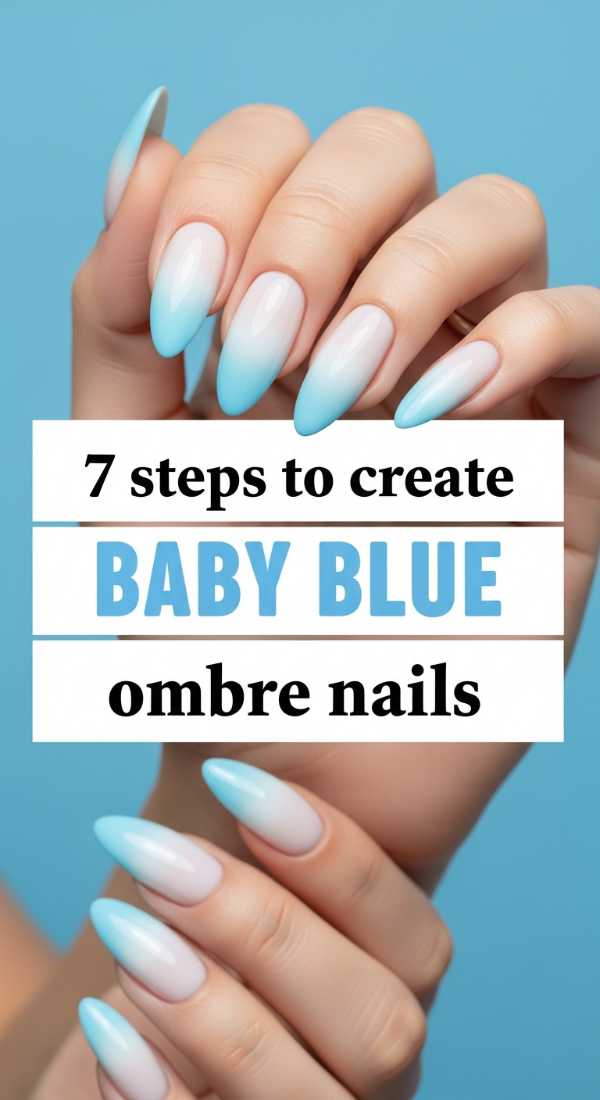
Why to love this Design:
This design is like a soft cloud drifting across a summer sky. It is subtle, sweet, and incredibly flattering on every nail shape, offering a seamless transition that feels sophisticated yet effortless.
Essential Elements:
- Soft baby blue polish
- Opaque white polish
- Latex-free makeup sponge
- Clear top coat
How to Prepare:
- Apply a clear base coat to protect your natural nails.
- Paint two thin coats of the white polish as your base color.
- Apply a strip of white and a strip of baby blue onto the makeup sponge.
- Gently dab the sponge onto the nail, overlapping the colors in the center.
- Repeat the dabbing process to build the desired intensity.
- Clean up any excess polish from the cuticles with a small brush and acetone.
- Seal the look with a high-shine top coat to blend the gradient perfectly.
Budget Range
- Essie ‘Saltwater Happy’ ($10)
- OPI ‘Alpine Snow’ ($11)
- Generic Makeup Sponges ($3)
Mastering Royal Blue Marble Art
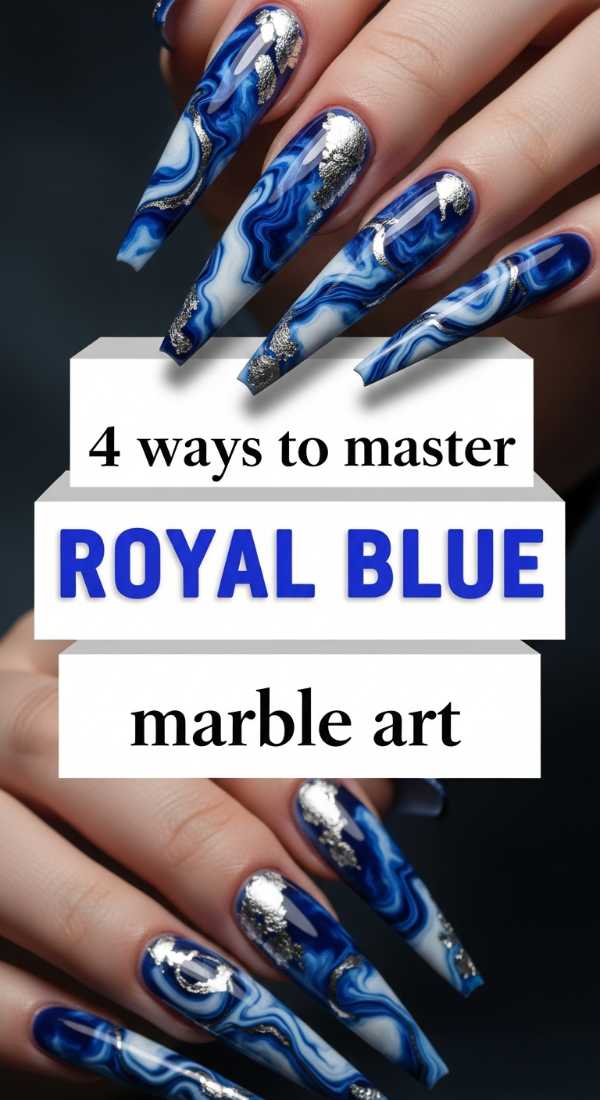
Why to love this Design:
Marble nails always feel so expensive and artistic. Using royal blue creates a look that is deep, mysterious, and reminiscent of fine porcelain or precious gemstones found deep within the earth.
Essential Elements:
- Deep royal blue polish
- White polish
- A thin detailing brush or toothpick
- Acetone or rubbing alcohol
How to Prepare:
- Way 1: The ‘Drop and Swirl’ – Drop both colors onto a palette and swirl lightly before lifting with a brush.
- Way 2: The ‘Wet-on-Wet’ – Apply white polish and immediately add blue dots, dragging a needle through them.
- Way 3: The ‘Saran Wrap’ – Scrunch plastic wrap, dip in blue, and tap over a white base for a textured marble.
- Way 4: The ‘Diluted Ink’ – Use blue polish thinned with acetone to create watercolor-style veins over white.
Budget Range
- Zoya ‘Blueberry’ ($12)
- Sally Hansen White On ($6)
- Nail Art Brush Set ($8)
Simple Tricks for Perfect Blue Stripes
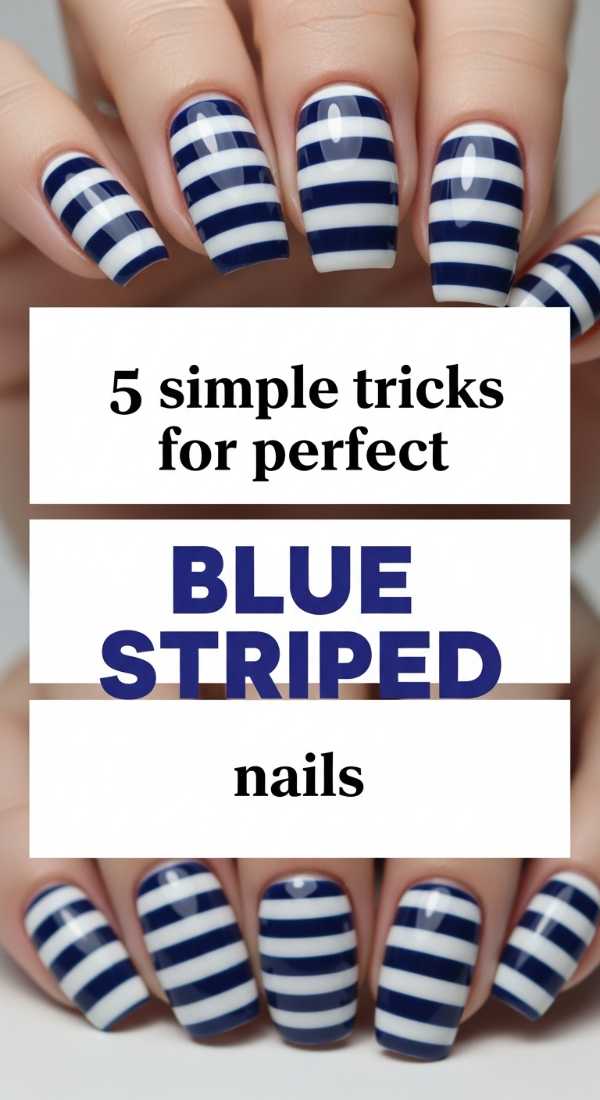
Why to love this Design:
Stripes offer a clean, nautical vibe that never goes out of style. They elongate the fingers and give your hands a tidy, intentional look that works for the office or the beach.
Essential Elements:
- Striping tape or a steady hand
- Navy blue and bright white polish
- Matte or glossy top coat
How to Prepare:
- Trick 1: Use striping tape for surgical precision; apply over a dry base and peel immediately after the second color.
- Trick 2: Use a long-haired liner brush to pull the stripe in one continuous motion rather than several small strokes.
- Trick 3: Anchor your pinky finger on a flat surface to steady your hand while drawing.
- Trick 4: Thin your polish slightly with a drop of thinner to ensure the line doesn’t go on ‘clumpy’.
- Trick 5: Rotate your finger, not the brush, when painting horizontal stripes for a more even wrap.
Budget Range
- Nail Striping Tape ($5)
- Holler and Glow Blue Polish ($8)
- Seche Vite Top Coat ($9)
Techniques for Mediterranean Blue Patterns
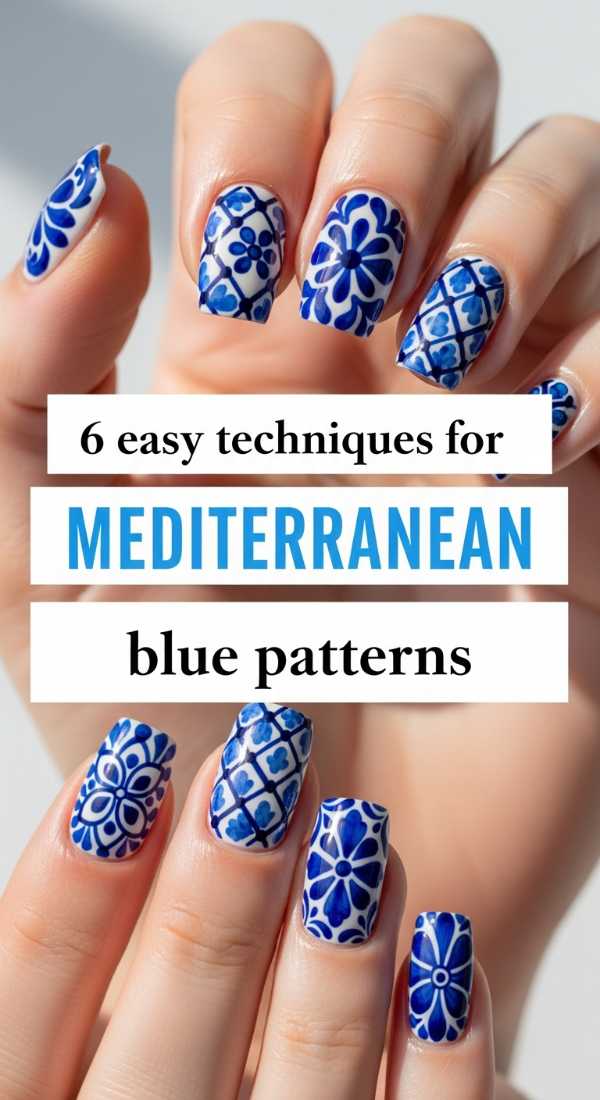
Why to love this Design:
Close your eyes and imagine the tiled floors of a villa in Santorini. This design brings that vacation energy to your daily life with intricate patterns and vibrant hues.
Essential Elements:
- Cerulean blue polish
- Fine-point nail art pen
- Stamping plates (optional)
How to Prepare:
- Technique 1: Use a dotting tool to create circular ’tile’ foundations in a grid.
- Technique 2: Connect the dots with very thin lines to form geometric diamonds.
- Technique 3: Add tiny white floral accents in the center of the blue shapes.
- Technique 4: Use a stamping plate with ‘Azulejo’ patterns for a professional finish.
- Technique 5: Layer different shades of blue to create a 3D mosaic effect.
- Technique 6: Finish with a matte top coat to mimic the texture of real ceramic tiles.
Budget Range
- Maniology Stamping Plate ($8)
- Revlon ‘Ultra HD’ Blue ($9)
- Nail Art Dotting Tools ($4)
Quick Tips for Silver Butterfly Charms
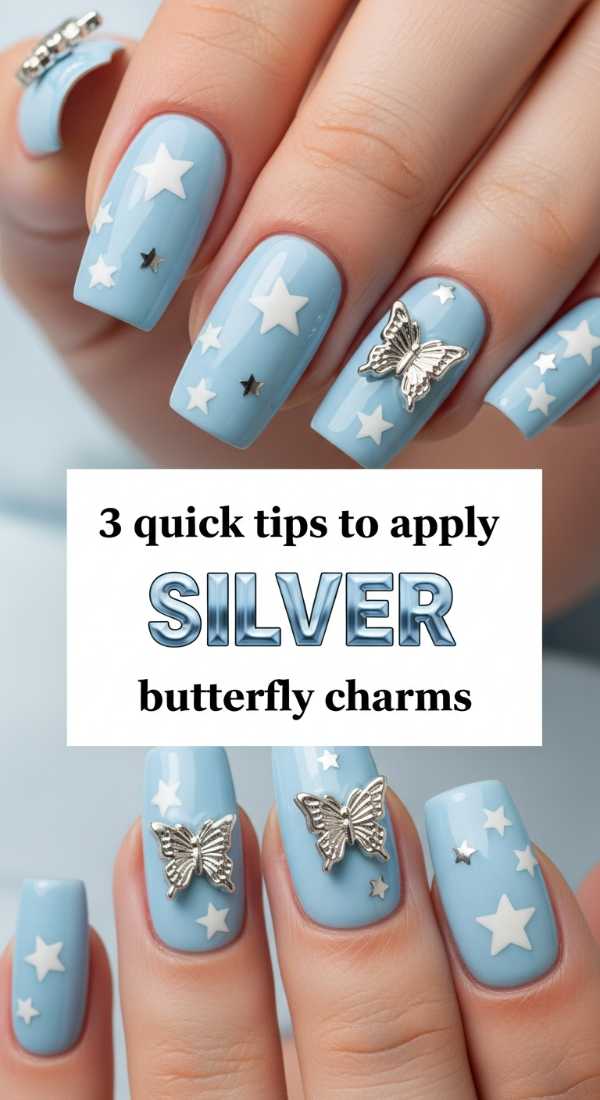
Why to love this Design:
Butterflies symbolize transformation and grace. Adding a 3D silver charm to a blue base creates a whimsical, fairy-tale aesthetic that catches the light beautifully.
Essential Elements:
- Silver butterfly nail charms
- Nail glue or thick builder gel
- Tweezers
How to Prepare:
- Tip 1: Apply a tiny bead of builder gel to the center of the nail where you want the butterfly to rest.
- Tip 2: Use tweezers to place the charm and hold it for 10 seconds to ensure it doesn’t slide.
- Tip 3: Seal the edges of the charm with a top coat using a tiny brush to prevent it from snagging on your hair or clothes.
Budget Range
- Butterfly Charm Pack ($6)
- Makartt Nail Glue ($7)
- Beetles Gel Top Coat ($8)
Steps for Double Blue French Tips
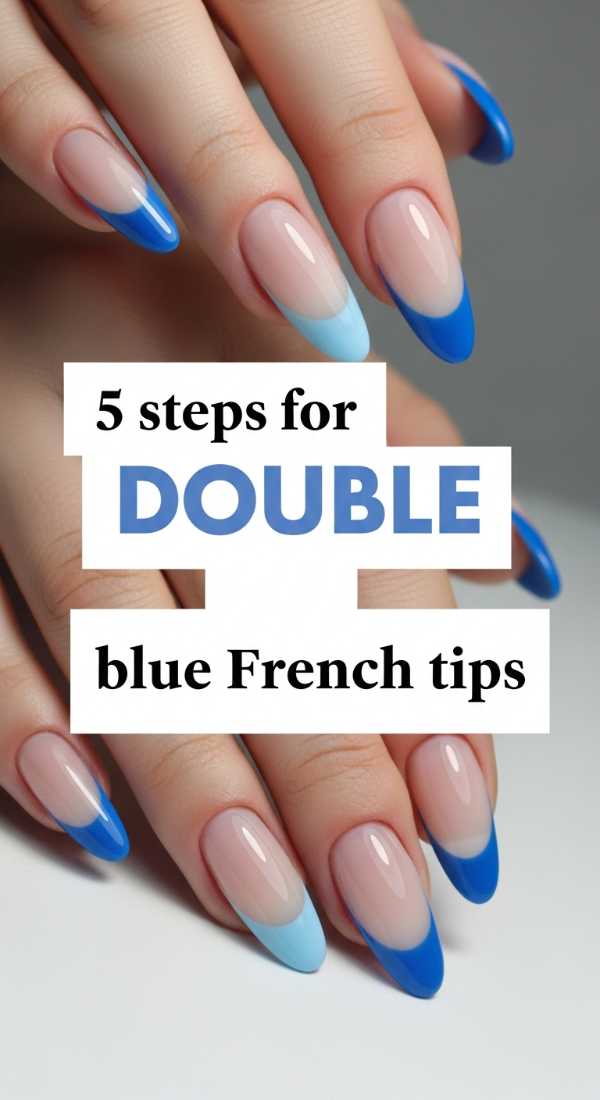
Why to love this Design:
The modern French mani is all about color! Double tips in two shades of blue add depth and a contemporary twist to the most classic nail design in history.
Essential Elements:
- Light blue polish
- Dark blue polish
- French tip guides or stickers
How to Prepare:
- Paint your entire nail with a sheer nude or pale pink base and let dry completely.
- Place a guide sticker slightly below the free edge and paint the darker blue on the very tip.
- Once dry, move the sticker slightly higher and paint the lighter blue stripe just below the first.
- Carefully remove the stickers while the polish is still slightly tacky for a crisp line.
- Finish with a high-gloss top coat to level out the layers.
Budget Range
- French Manicure Guides ($4)
- Butter London ‘Skive’ ($18)
- Nails Inc. ‘Cornwall’ ($15)
Designing Y2K Blue Star Nails
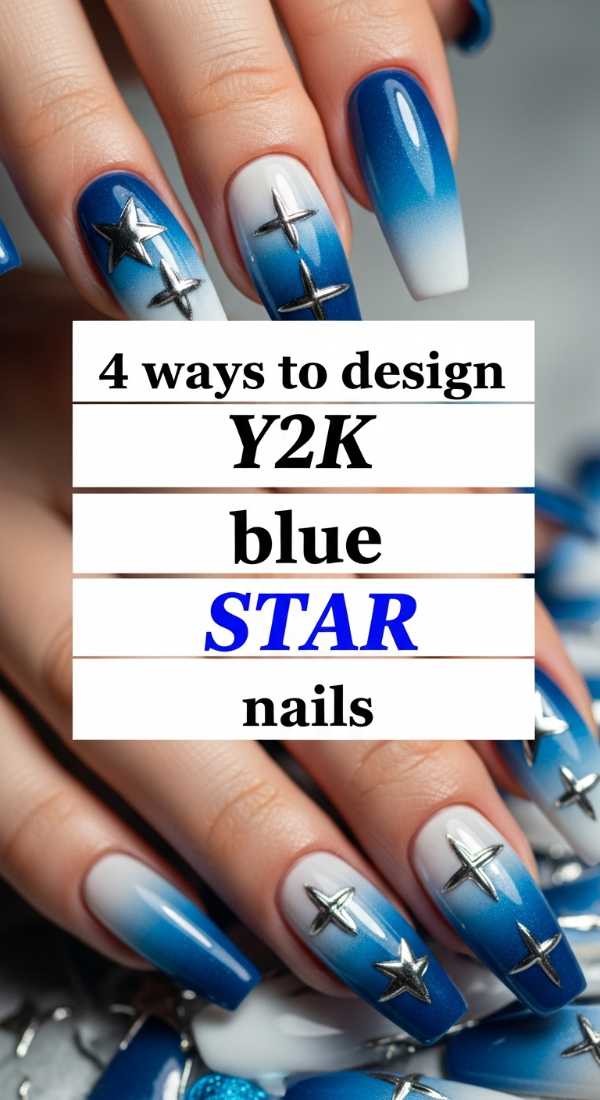
Why to love this Design:
This design is pure nostalgia! It’s playful, energetic, and brings back those early 2000s vibes with a fresh, modern blue palette.
Essential Elements:
- Electric blue polish
- Star-shaped stencils or stickers
- Holographic top coat
How to Prepare:
- Way 1: Use a small star stencil and sponge white polish over a blue base.
- Way 2: Hand-draw stars using five small dots and dragging them toward a center point.
- Way 3: Apply pre-made holographic star decals for an instant ‘pop’.
- Way 4: Create ‘negative space’ stars by placing a sticker, painting over it, and peeling it off.
Budget Range
- Star Nail Stickers ($5)
- China Glaze ‘Shocking Pink’ ($7)
- ILNP Blue Holographic ($12)
Steps for Baby Blue Coquette Nails
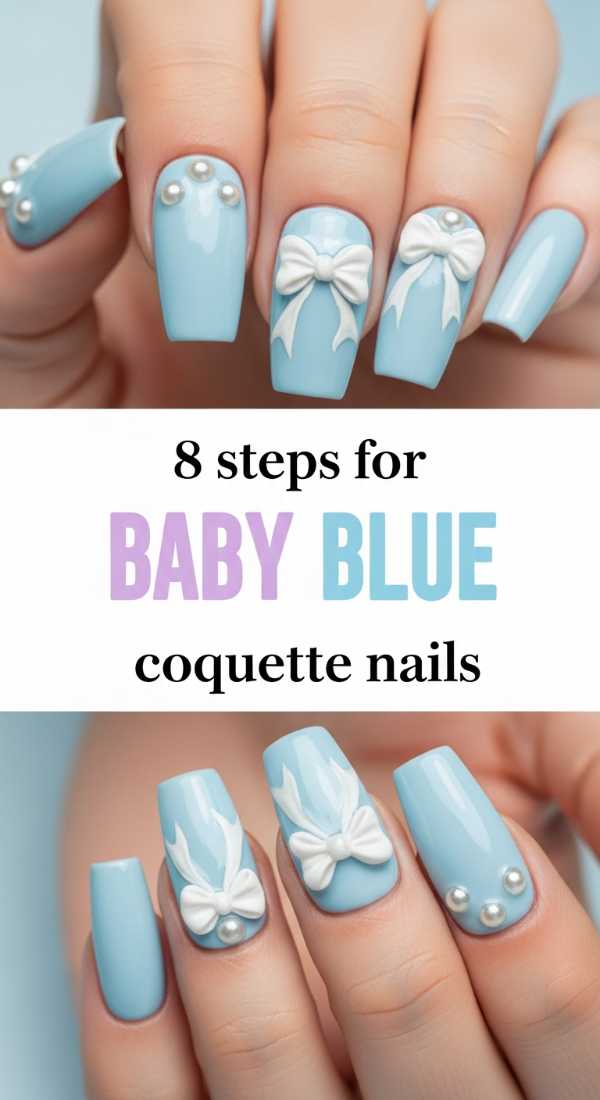
Why to love this Design:
The coquette aesthetic is all about hyper-femininity and vintage charm. Think bows, pearls, and soft blues that look like they belong in a Victorian tea room.
Essential Elements:
- Pastel blue polish
- Miniature pearl decals
- White ribbon nail art stickers
How to Prepare:
- Apply a soft pastel blue base coat.
- Apply a matte top coat to give it a ‘porcelain’ feel.
- Place a white ribbon sticker at the base of the accent nail.
- Use a dotting tool to add tiny white dots (Swiss dots) across the other nails.
- Apply a tiny drop of glue to the center of the bow.
- Set a mini pearl onto the glue.
- Add small pearls at the cuticle line of your ring finger.
- Finish with a light layer of top coat only over the flat parts to keep the 3D elements secure.
Budget Range
- Pearl Nail Art Kit ($9)
- Bow Stickers ($5)
- Rom&nd Mood Pebble Polish ($10)
Styling Royal Blue with Silver Glitter
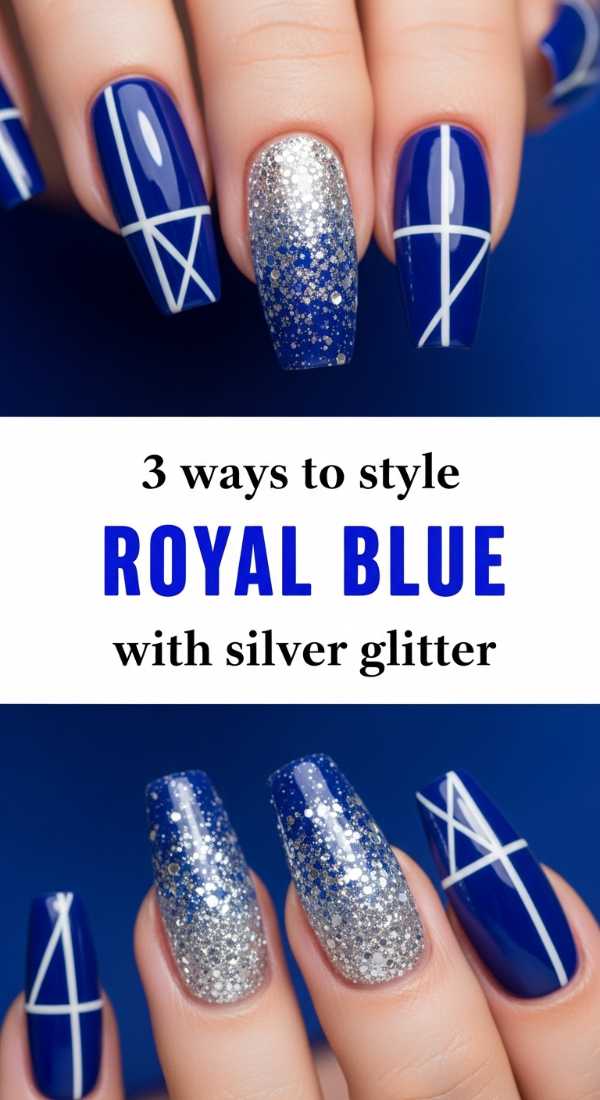
Why to love this Design:
There is nothing quite as striking as the contrast between a deep, midnight blue and sparkling silver. It’s like a starry night sky right on your hands.
Essential Elements:
- Rich royal blue polish
- Silver chunky glitter or loose glitter
- Fan brush
How to Prepare:
- Way 1: The ‘Glitter Gradient’ – Sponge silver glitter from the tip of the nail downward over a blue base.
- Way 2: The ‘Full Accent’ – Paint one nail entirely in silver glitter while the others remain solid royal blue.
- Way 3: The ‘Glitter Veining’ – Use a thin brush to paint silver glitter ‘cracks’ over a blue marble base for extra drama.
Budget Range
- KBShimmer Silver Glitter ($11)
- Orly ‘Blue Suede’ ($10)
- Nail Art Fan Brush ($4)
Tips for Blue and White Minimalist Nails
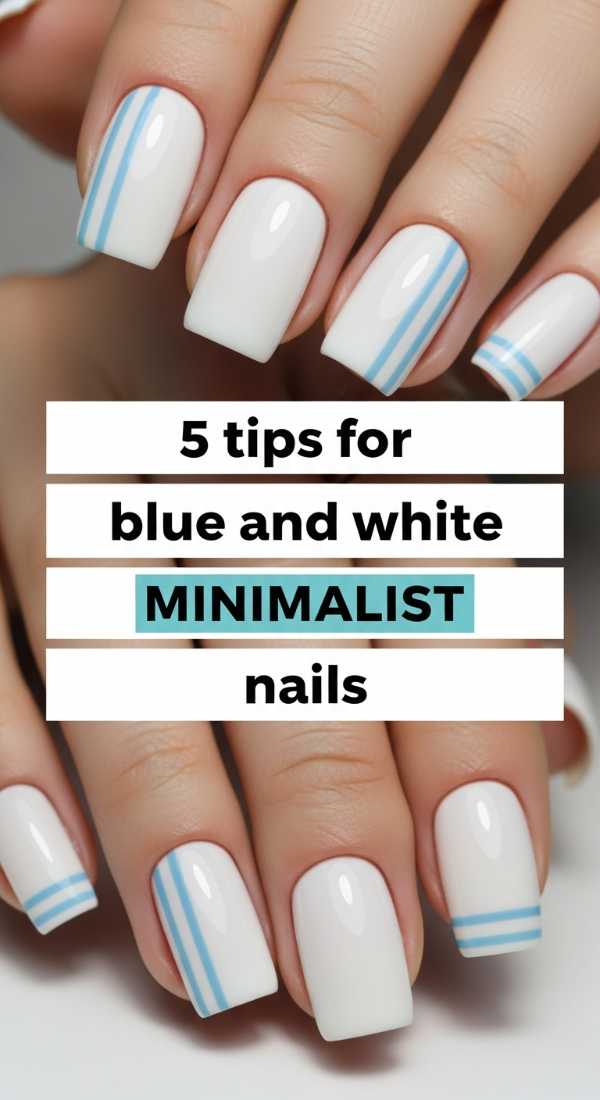
Why to love this Design:
Sometimes, less truly is more. Minimalist designs are for the girl who loves a clean aesthetic—just a tiny pop of blue to make a statement without being overwhelming.
Essential Elements:
- Sheer ‘milk’ white polish
- Cobalt blue polish
- A very fine detailing brush
How to Prepare:
- Tip 1: Use a ‘milky’ white base instead of a stark white for a softer, more modern look.
- Tip 2: Place a single, tiny cobalt blue dot at the center of the cuticle line on each nail.
- Tip 3: Paint a single vertical line down only the ring finger for an architectural feel.
- Tip 4: Keep the shapes geometric and sharp; avoid any blending or gradients.
- Tip 5: Ensure your top coat is ‘non-smear’ so the tiny blue details stay crisp against the white.
Budget Range
- Cirque Colors ‘Milkshade’ ($12)
- Bio Seaweed Gel ‘Cobalt’ ($18)
- Moyra Liner Brush ($10)
Wrapping Your Heart in Blue
I hope these tutorials bring a little sparkle and serenity to your week, my loves. Whether you chose the softest ombre or the boldest royal blue marble, remember that this time you spend on yourself is precious. Your hands do so much for you—they hold coffee mugs, they write letters, they hug the people you love. They deserve to be treated with a little bit of art and a whole lot of care. Until next time, stay soft, stay inspired, and keep shining.