
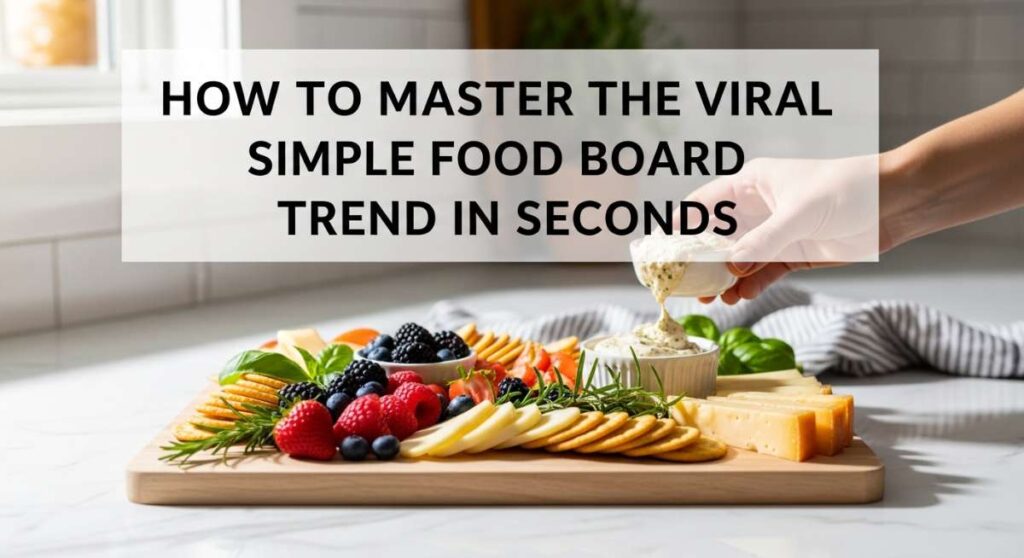
How to Master the Viral Simple Food Board Trend in Seconds
There is something inherently magical about gathering around a table filled with vibrant colors, textures, and aromas that tell a story of togetherness. We’ve all seen those stunning food boards taking over our social media feeds—the kind that look almost too beautiful to eat, yet beckon you to grab a cracker and dive in. Whether it’s a lazy Sunday afternoon with family or a high-energy summer party, the ‘Simple Food Board’ trend is all about celebrating the joy of easy, accessible, and delicious components arranged with love.
The secret to a viral-worthy board isn’t found in expensive, hard-to-find ingredients, but in the way we combine nostalgia with fresh, seasonal flavors. It’s about that perfect Shoney’s-style pie sitting next to a bowl of creamy dip, or the crisp snap of a cucumber salad paired with smoky grilled veggies. In this guide, I’m sharing my absolute favorite recipes and hacks to help you master this trend, ensuring your next gathering is as effortless as it is unforgettable.
How to make Shoneys strawberry pie?

Why we love this
This pie is pure nostalgia served on a plate, featuring a glossy, ruby-red glaze that coats plump, juicy strawberries nestled in a buttery, flaky crust. As you take a bite, the sweetness of the berries bursts against the creamy backdrop of whipped topping, creating a sensory experience that feels like a warm hug from childhood. The aroma of fresh fruit mixed with the subtle scent of baked pastry is enough to draw anyone into the kitchen. It’s the ultimate centerpiece for a dessert board, offering a vibrant pop of color and a refreshing, cool texture that balances heavier savory snacks.
Ingredients
- 1 pre-baked 9-inch pie crust
- 1.5 lbs fresh strawberries, hulled and cleaned
- 1 cup granulated sugar
- 3 tablespoons cornstarch
- 1 cup water
- 3 tablespoons strawberry-flavored gelatin (like Jell-O)
- Whipped cream for garnish
How to make it
- Begin by selecting the most vibrant, firm strawberries; wash them thoroughly, remove the green hulls, and pat them completely dry to ensure the glaze adheres perfectly.
- In a medium saucepan over medium heat, whisk together the sugar and cornstarch until no lumps remain, then slowly pour in the water while stirring constantly.
- Cook the mixture, stirring frequently, until it reaches a boil and transforms from a cloudy liquid into a thick, translucent, and glossy syrup; this usually takes about 5-7 minutes.
- Once thickened, remove the pan from the heat and immediately stir in the strawberry gelatin powder until it is fully dissolved, giving the glaze its iconic bright red color and fruity punch.
- Allow the glaze to cool to room temperature (but do not let it set completely) while you arrange your whole strawberries pointed-side up in the pre-baked pie shell.
- Slowly pour the cooled glaze over the strawberries, ensuring every single berry is generously coated and the gaps are filled; then, refrigerate the pie for at least 3-4 hours until the glaze is firm and set.
How to make Rotel dip?

Why we love this
Rotel dip is the undisputed king of party appetizers, offering a rich, velvety texture that clings perfectly to every salty tortilla chip. The combination of molten, gooey cheese with the zesty kick of diced tomatoes and green chilies creates a flavor profile that is both comforting and exhilarating. As the dip warms, the savory aroma of browned sausage or beef fills the air, signaling to everyone that the party has officially started. It’s a messy, glorious, and communal experience that brings people together, making it a mandatory addition to any viral food board looking for a savory, spicy punch.
Ingredients
- 1 lb Velveeta cheese, cubed
- 1 can (10 oz) Ro-Tel Diced Tomatoes and Green Chilies, undrained
- 1 lb ground sausage or lean ground beef
- 1/2 teaspoon garlic powder
- Optional: Fresh cilantro and jalapeños for garnish
How to make it
- In a large skillet over medium-high heat, crumble and brown your choice of meat (sausage adds a lovely spice, while beef is a classic) until it is fully cooked and no longer pink.
- Drain the excess fat thoroughly from the skillet to ensure your dip remains creamy and not oily; this is a crucial step for that perfect, smooth consistency.
- Lower the heat to medium-low and add the cubed Velveeta cheese and the entire can of Ro-Tel (do not drain the liquid, as it provides essential flavor and moisture).
- Stir the mixture continuously with a wooden spoon or silicone spatula, allowing the cheese to melt slowly and incorporate the meat and tomatoes into a cohesive, golden sauce.
- Once the dip is completely smooth and bubbling slightly, sprinkle in the garlic powder and stir one last time to distribute the seasoning.
- Transfer the dip to a small slow cooker on the ‘warm’ setting or a heated ceramic bowl to maintain its pourable, dipping consistency throughout your event.
How to pack beach snacks?
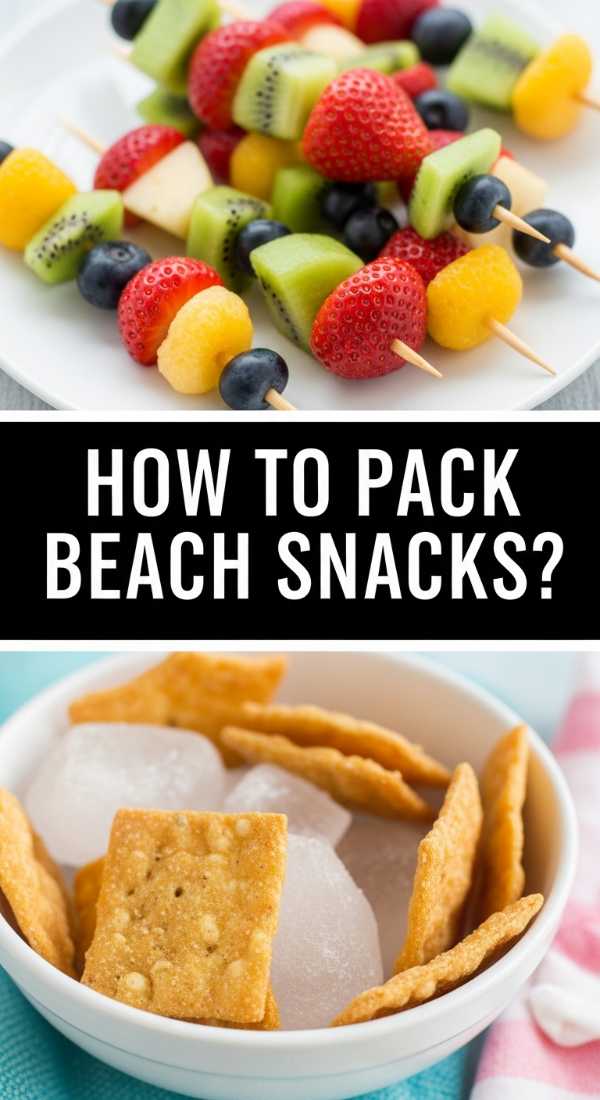
Why we love this
There is nothing quite like the feeling of the sun on your skin and the sound of waves crashing, only to be made better by a perfectly packed, sand-free snack. Beach snacks should be refreshing, hydrating, and easy to handle with one hand while you hold a book or a cold drink in the other. We love the crisp crunch of chilled grapes, the salty satisfaction of pretzels, and the way a well-organized bento box keeps everything tidy. It’s about creating a portable feast that survives the heat and provides a burst of energy for a day of swimming and relaxation.
Ingredients
- Individual bento boxes or airtight containers
- Frozen grapes and berries
- Pre-cut vegetable sticks (carrots, cucumbers, celery)
- Hummus or guacamole in sealed pods
- Salty crackers or pretzels
- Cheese cubes or string cheese
- Ice packs
How to make it
- Start by choosing containers with tight-sealing lids; bento boxes with compartments are ideal to prevent flavors from mixing and to keep crackers from getting soggy.
- Freeze your fruit (like grapes or blueberries) the night before; they act as delicious, edible ice packs that stay chilled and refreshing even in the midday sun.
- Prep your vegetables into long, easy-to-grab sticks and place them in a container with a damp paper towel at the bottom to maintain their snap and hydration.
- Place heavier, sturdier items like cheese and dips at the bottom of your cooler bag, closest to the ice packs, to ensure they stay at a food-safe temperature.
- Pack crackers and pretzels in a separate, completely dry container or silicone bag to protect them from any condensation that might occur inside the cooler.
- Always include a small pack of wet wipes and a dedicated “trash bag” in your kit so you can clean your hands before eating and leave the beach as beautiful as you found it.
How to make whipped butter?

Why we love this
Whipped butter is the ultimate luxury that transforms a simple piece of bread into a gourmet experience. It has a cloud-like, airy texture that melts instantly on the tongue, releasing a rich, salty flavor that is far more intense than standard cold butter. The sight of soft, swirling peaks of butter on a board is visually stunning and invites guests to spread it generously on everything from warm rolls to charred corn. It’s an effortless way to elevate your food board, providing a silky, decadent element that feels incredibly sophisticated yet remains wonderfully simple to create.
Ingredients
- 1 cup (2 sticks) high-quality salted butter, softened to room temperature
- 2 tablespoons whole milk or heavy cream
- Optional: Flaky sea salt or honey for topping
How to make it
- Ensure your butter is perfectly softened—it should be soft enough that your finger leaves an indent easily, but it shouldn’t be oily or melting; this temperature is key for aeration.
- Place the softened butter into a chilled mixing bowl and use a stand mixer with the whisk attachment or a hand mixer on medium speed to break the butter down.
- Slowly increase the speed to high and whip the butter for about 2-3 minutes until it begins to look pale, almost white, and significantly increases in volume.
- Pour in the milk or heavy cream while continuing to whip; the liquid helps create an even lighter, spreadable consistency that mimics high-end restaurant butter.
- Whip for another 2 minutes until the mixture forms stiff, airy peaks that hold their shape beautifully when scooped.
- Transfer the butter to a small bowl or spread it directly onto your food board in artistic swooshes, finishing with a sprinkle of flaky sea salt or a drizzle of honey for a sweet-savory contrast.
How to prep camping meals?
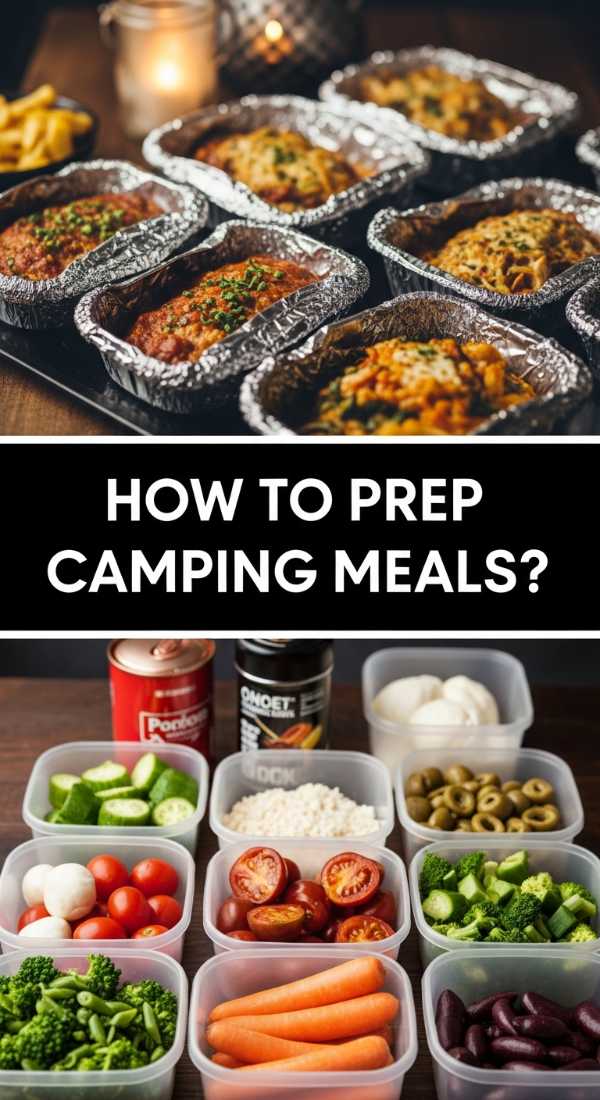
Why we love this
Camping meals are all about the romance of the great outdoors—the smoky scent of a campfire, the crisp night air, and the satisfaction of a hearty meal after a day of hiking. We love meal prepping for camping because it removes the stress of outdoor cooking, allowing you to focus on the experience rather than the prep work. Imagine unwrapping a foil packet to find perfectly seasoned proteins and tender vegetables, all infused with a hint of woodsmoke. It’s about rustic, soul-warming food that tastes better because it’s eaten under the stars, surrounded by nature and good company.
Ingredients
- Pre-marinated proteins (chicken thighs, steak tips, or tofu)
- Heavy-duty aluminum foil
- Pre-chopped hardy vegetables (potatoes, bell peppers, onions)
- Olive oil and seasoning blends
- Reusable silicone bags for storage
How to make it
- Two days before your trip, chop your vegetables into uniform sizes to ensure even cooking; stick to hardy veggies like potatoes and carrots that won’t get mushy in the cooler.
- Place your proteins in silicone bags with a marinade of olive oil, acid (like lemon or vinegar), and spices; this allows the meat to tenderize and flavor-infuse during the journey.
- Assemble “foil packets” by placing a portion of meat and veggies onto a large square of heavy-duty foil, drizzling with extra oil, and folding the edges tightly to create a leak-proof seal.
- Label each packet with a permanent marker so you know exactly what’s inside and how long it needs to cook over the flame.
- Store all prepped items in a high-quality cooler, layering ice at the bottom and keeping the raw meat packets at the very base to prevent cross-contamination and keep them coldest.
- When ready to eat, simply place the packets on a grill grate over the fire or directly in the hot coals, turning occasionally until the meat is cooked through and the vegetables are fork-tender.
How to make cucumber salad?
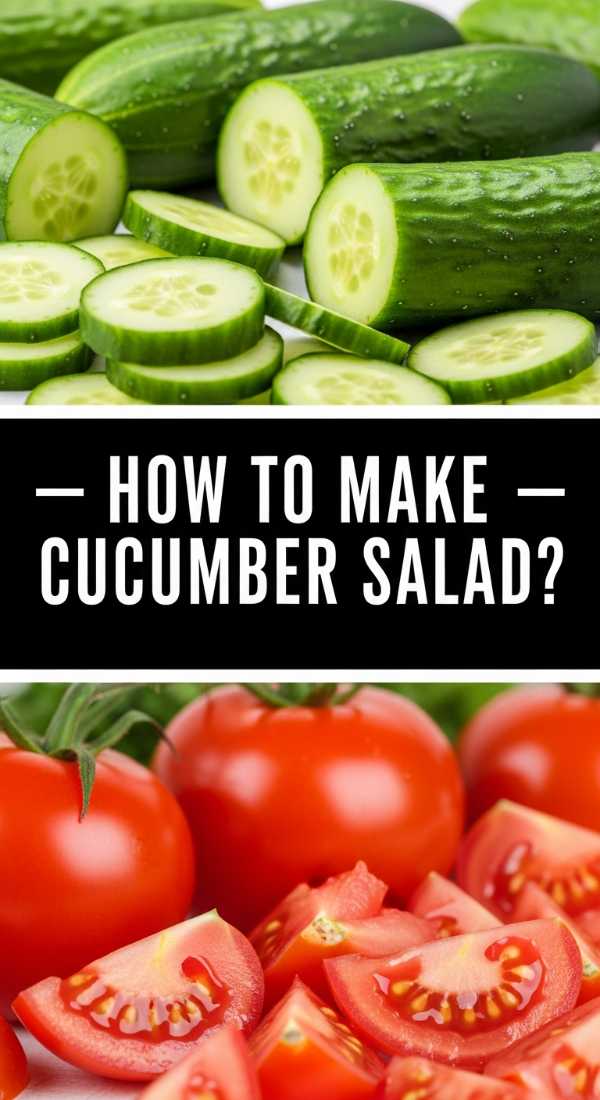
Why we love this
This cucumber salad is the quintessential summer side dish, offering a refreshing, vinegary bite that cleanses the palate between heavier bites of grilled meats or cheeses. The crunch of the chilled cucumber slices, combined with the sharp tang of red onion and a hint of sweetness in the dressing, creates a vibrant harmony of flavors. Its bright green appearance adds a fresh, garden-plucked aesthetic to any board, and the cooling sensation of the cucumbers is incredibly welcome on a hot afternoon. It’s light, healthy, and provides that essential “snap” that every great food board needs.
Ingredients
- 2 large English cucumbers, thinly sliced
- 1/2 small red onion, thinly sliced into half-moons
- 1/2 cup white wine vinegar or apple cider vinegar
- 2 tablespoons granulated sugar
- 1 teaspoon salt
- 1/4 cup fresh dill, chopped
- Black pepper to taste
How to make it
- Using a mandoline or a very sharp knife, slice the English cucumbers into thin, uniform rounds; using English cucumbers is preferred because their skin is thin and they have fewer seeds.
- In a small bowl, whisk together the vinegar, sugar, and salt until the sugar is completely dissolved to create the pickling liquid.
- Place the sliced cucumbers and red onions in a large glass bowl and toss them together to ensure the onions are evenly distributed.
- Pour the vinegar mixture over the vegetables and toss thoroughly so every slice is coated; the salt will start to draw out some of the cucumber juice, creating a delicious brine.
- Cover the bowl and refrigerate for at least 30 minutes to an hour; this chilling time allows the flavors to meld and the cucumbers to become slightly pickled while remaining crisp.
- Just before serving, fold in the fresh chopped dill and a crack of black pepper, then use a slotted spoon to transfer the salad to your board, leaving excess liquid behind.
How to grill fresh veggies?
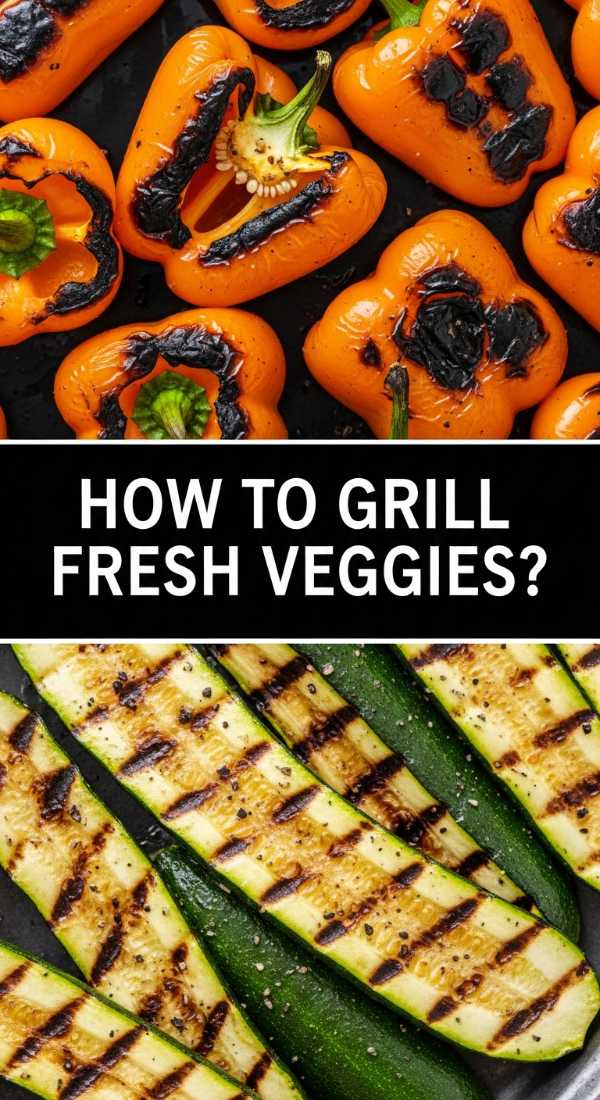
Why we love this
Grilling vegetables transforms them from simple garden sides into charred, smoky masterpieces with concentrated natural sweetness. There is something deeply satisfying about the sear marks on a bright bell pepper or the tender-crisp texture of a grilled asparagus spear. The aroma of caramelized onions and scorched corn husks is the literal scent of summer, promising a meal that is both healthy and indulgent. On a food board, grilled veggies provide a rustic, earthy element and a variety of colors that make the entire spread look like a professional harvest bounty.
Ingredients
- Assorted vegetables (zucchini, bell peppers, asparagus, corn on the cob)
- 1/4 cup olive oil
- 2 tablespoons balsamic vinegar
- 1 teaspoon dried oregano
- Salt and cracked black pepper
How to make it
- Preheat your grill to medium-high heat (about 400°F) and ensure the grates are cleaned and lightly oiled to prevent sticking.
- Cut your vegetables into large, flat pieces or thick spears; for example, slice zucchini lengthwise and cut peppers into wide strips to maximize surface area for charring.
- In a large bowl, whisk together the olive oil, balsamic vinegar, oregano, salt, and pepper, then toss the vegetables in the mixture until they are well-coated but not dripping.
- Place the sturdier vegetables like corn and peppers on the hottest part of the grill first, as they take longer to soften and char.
- Add the more delicate vegetables like asparagus and zucchini toward the end, grilling for 3-5 minutes per side until they show clear grill marks and feel tender when pierced with a fork.
- Remove the veggies from the heat and arrange them on your board while still warm, perhaps drizzling with a tiny bit more balsamic glaze for a glossy finish and extra punch.
How to cook summer dinner?

Why we love this
A perfect summer dinner is all about ease, brightness, and minimizing time spent over a hot stove. It’s a meal that feels light yet satisfying, often featuring a lean protein paired with the best produce the season has to offer. We love the effortless flow of a summer dinner—starting with a cold drink, moving to a board filled with fresh finds, and ending with something grilled. It’s a relaxed way of eating that encourages slow conversations and lingering at the table as the sun begins to set, embodying the carefree spirit of the warmer months.
Ingredients
- Grilled chicken breast or salmon fillets
- Fresh heirloom tomatoes
- Fresh mozzarella pearls or burrata
- Basil leaves
- Extra virgin olive oil and balsamic reduction
- A crusty baguette
How to make it
- Focus on a ‘deconstructed’ approach by preparing a simple protein like grilled chicken or fish, seasoned only with salt, pepper, and lemon to let the quality of the meat shine.
- While the protein rests, slice ripe heirloom tomatoes into thick rounds and arrange them on a platter with mozzarella and fresh basil to create a quick Caprese base.
- Toast slices of a crusty baguette on the grill for 30 seconds per side until they are charred and warm, perfect for mopping up juices.
- Arrange the protein and the tomato-mozzarella salad on a large wooden board, filling the gaps with the toasted bread and perhaps some olives or nuts.
- Drizzle the entire board with high-quality olive oil and a thick balsamic reduction right before the guests sit down to create a cohesive, restaurant-style look.
- Serve everything family-style, allowing guests to build their own plates and enjoy the variety of fresh, seasonal flavors without the formality of a plated meal.
How to make summer lunch?

Why we love this
Summer lunch should be a vibrant, energizing break in the middle of a sunny day, designed to keep you feeling light and hydrated. We love the simplicity of a lunch that requires little to no actual cooking, relying instead on the assembly of high-quality, cold ingredients. Think crisp greens, juicy fruits like peaches or watermelon, and a bit of salty feta or goat cheese. It’s a meal that looks like a rainbow on a plate, providing a sensory delight of sweet and savory notes that perfectly match the high-energy vibe of a summer afternoon.
Ingredients
- Mixed baby greens or arugula
- Sliced peaches or strawberries
- Crumbled feta cheese
- Toasted walnuts or pecans
- Honey-mustard vinaigrette
- Prosciutto or deli turkey slices
How to make it
- Start with a large, shallow bowl or a flat board as your base and layer a generous bed of fresh, cold arugula or mixed greens.
- Scatter your sliced summer fruit—peaches are particularly lovely when they are ripe and fragrant—over the greens to provide a juicy sweetness.
- Add the crumbled feta and toasted nuts; the cheese provides a creamy saltiness while the nuts add a much-needed crunch and healthy fats.
- Roll your deli meats (like prosciutto) into small “roses” or cylinders and nestle them around the edges of the greens for a boost of savory protein.
- Prepare a quick dressing by whisking honey, dijon mustard, apple cider vinegar, and olive oil until emulsified, but keep it in a small side jar.
- Drizzle the dressing over the top only at the very last second to ensure the greens stay crisp and the fruit doesn’t become too macerated before eating.
How to prep summer meals?
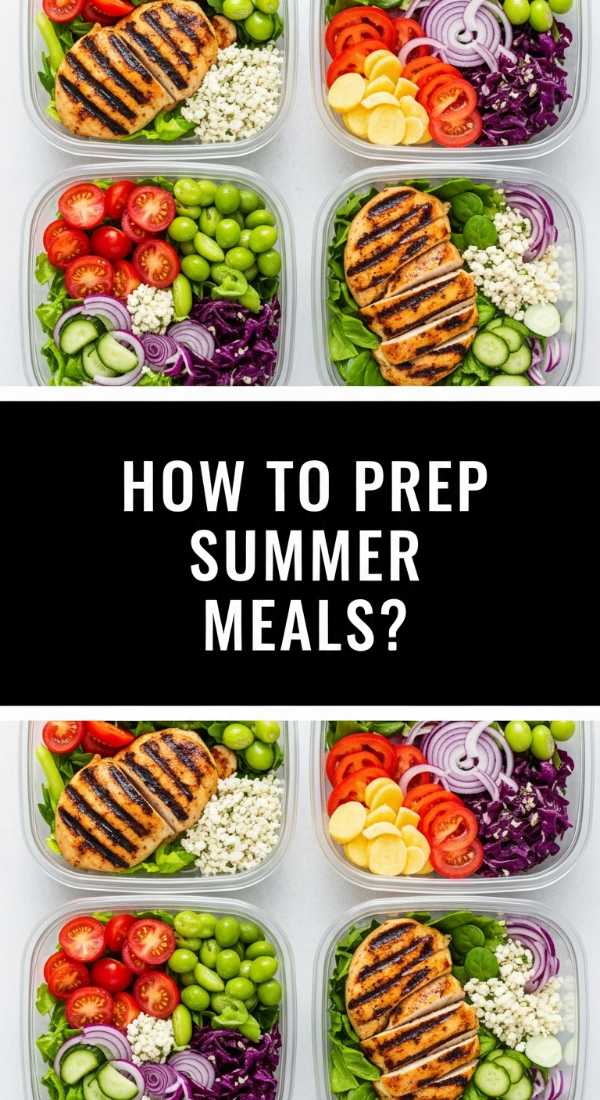
Why we love this
Summer meal prep is the ultimate gift to your future self, ensuring that you can spend more time at the pool or in the garden and less time in the kitchen. It’s about being strategic with ingredients—roasting a big batch of veggies, boiling eggs, or washing all your berries at once so everything is ready to grab and go. We love the feeling of opening a fridge stocked with colorful, prepped components that can be thrown together into a salad, a wrap, or a snack board in under five minutes. It makes healthy, seasonal eating the easiest choice you’ll make all day.
Ingredients
- Bulk grains (quinoa or farro)
- Hard-boiled eggs
- Washed and spun salad greens
- Jarred vinaigrettes
- Pre-cut fruit salad
- Airtight glass storage containers
How to make it
- Dedicate one hour on Sunday morning to “cold prep”: wash all berries in a vinegar-water soak, dry them thoroughly, and store them in glass jars with a paper towel to keep them fresh for days.
- Boil a dozen eggs for 9 minutes (for a perfect slightly jammy yolk) or 11 minutes (for a firm yolk), then shock them in an ice bath and peel them immediately for easy snacks or salad toppers.
- Cook a large pot of a hearty grain like quinoa or farro in vegetable broth; once cooled, fluff with a fork and store in the fridge to use as a base for various bowls throughout the week.
- Chop a variety of “crunchy” veggies like peppers, radishes, and carrots and store them in water-filled containers to keep them incredibly crisp.
- Mix a large batch of your favorite all-purpose vinaigrette (3 parts oil to 1 part acid) and keep it in a mason jar; homemade dressing is cheaper and tastes vastly superior to store-bought.
- Organize your fridge so the prepped items are at eye level, making it effortless to assemble a “Viral Food Board” or a quick summer meal whenever hunger strikes.
Conclusion
Mastering the viral simple food board trend is really about embracing the season and the people you share it with. Whether you’re whipping up a nostalgic strawberry pie or packing the perfect kit for the beach, the goal is to keep things fresh, flavorful, and focused on connection. By following these detailed steps, you’ll not only create stunning visuals for your social feed but also delicious memories for your friends and family. So, grab your favorite board, start prepping, and enjoy the effortless beauty of summer hosting!