

Hello, my loves! Welcome back to our little corner of the internet where we turn everyday moments into something truly magical. Today, I’m so excited to dive into our collective obsession: the viral food board. You know the one—those gorgeous, aesthetic spreads that fill our feeds and make our hearts skip a beat. There is something so healing about spending time in the kitchen, isn’t there? It’s not just about the food; it’s about the soft light hitting the flour, the rhythmic sound of a whisk, and the joy of sharing something beautiful with the people you adore most in this world.
I’ve spent the last few weeks testing, tasting, and perfecting the most requested recipes that have been making waves online. From the tang of sourdough to the whimsical beauty of floral cakes, I wanted to gather them all in one place for you. Think of this as your digital recipe box, filled with a cloud-soft embrace and the promise of a delicious afternoon. So, grab your favorite apron, pour a cup of tea, and let’s create some kitchen magic together that is as pleasing to the eye as it is to the soul.
The Secret To Perfectly Crunchy Caesar Salads
Why we love this
There is nothing quite like the satisfying snap of a fresh romaine leaf coated in a silky, rich dressing that has just the right amount of tang. This salad is the ultimate palette cleanser, bringing a bright and vibrant energy to your dinner table that everyone will keep coming back for. We love it because it transforms simple ingredients into a gourmet experience that feels both indulgent and incredibly refreshing at the same time. It’s the perfect base for any meal, offering a symphony of textures that dance on the tongue with every single bite.
Ingredients
- 2 heads of fresh Romaine lettuce
- 1 cup sourdough bread cubes
- 1/2 cup shaved Parmesan cheese
- 2 tbsp olive oil
- 1 tsp garlic powder
- Sea salt and cracked black pepper
How to make it
- Begin by washing your Romaine leaves in ice-cold water to ensure they stay incredibly crisp, then pat them completely dry with a soft cloth.
- Toss your sourdough cubes in a bowl with olive oil, garlic powder, salt, and pepper until every piece is beautifully coated and ready for the oven.
- Toast the bread cubes at 375°F for about 10-12 minutes, turning them halfway through until they are a gorgeous, golden brown and perfectly crunchy.
- Tear the lettuce into bite-sized pieces and place them in a large wooden bowl, adding the freshly made croutons and plenty of shaved Parmesan.
- Drizzle with your favorite dressing and toss gently with your hands or tongs to ensure every leaf is kissed by the flavors before serving immediately.
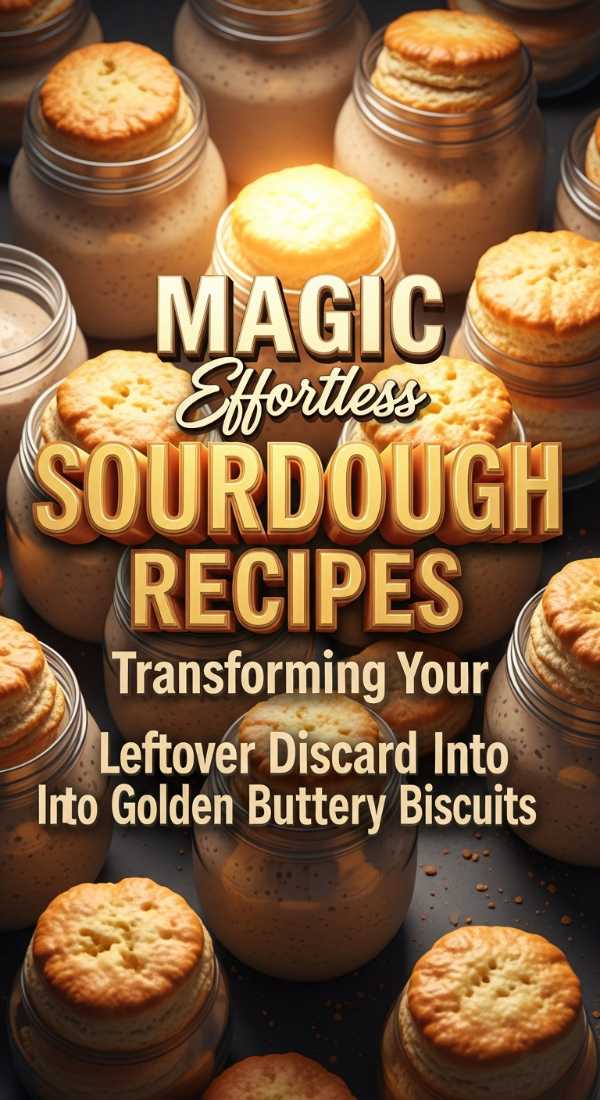
Easy Sourdough Discard Buttery Biscuits

Why we love this
There is something so incredibly soulful about using every bit of your sourdough starter, turning what would be waste into golden, flaky layers. These biscuits are the kind of comfort that feels like a warm hug on a rainy Sunday morning, melting in your mouth with a richness that only real butter can provide. I find myself making these whenever I need a little kitchen therapy, watching them rise in the oven until they are perfectly puffed and bronzed. It’s a beautiful way to honor the slow rhythm of fermentation while treating your family to something truly spectacular and homemade.
Ingredients
- 2 cups all-purpose flour
- 1 cup sourdough discard (unfed)
- 1/2 cup cold salted butter, grated
- 1/2 cup cold buttermilk
- 1 tbsp baking powder
- 1 tsp honey
How to make it
- In a large chilled bowl, whisk together your flour and baking powder until the mixture is light and airy, creating the perfect base for your biscuits.
- Add the cold, grated butter to the flour, using your fingertips to gently rub it in until the mixture looks like coarse crumbs with pea-sized bits of butter.
- Slowly pour in the sourdough discard, buttermilk, and honey, stirring with a wooden spoon just until a soft, shaggy dough begins to form.
- Turn the dough out onto a floured surface and fold it over itself five or six times to create those signature, sky-high flaky layers we all love.
- Cut into circles, place them close together on a baking sheet, and bake at 425°F for 15-18 minutes until the tops are a stunning golden hue.
How To Make Rich Whipped Coffee At Home

Why we love this
This drink is pure whimsy in a glass, a frothy and cloud-like creation that makes your morning routine feel like a visit to a high-end Parisian cafe. We adore the contrast between the dark, intense coffee foam and the cold, creamy milk resting beneath it, creating a visual masterpiece. It’s a moment of luxury that you can whisk up in just minutes, proving that you don’t need fancy equipment to enjoy a truly decadent treat. Every sip is a velvety dream, reminding us to slow down and savor the simple pleasures that make life so sweet and caffeinated.
Ingredients
- 2 tbsp instant coffee granules
- 2 tbsp granulated sugar
- 2 tbsp boiling water
- 1 cup milk of choice (oat or whole milk works best)
- Ice cubes
How to make it
- Combine the instant coffee, sugar, and boiling water in a small glass bowl, ensuring the proportions are exactly equal for the best chemical reaction.
- Use a hand mixer or a whisk to beat the mixture vigorously until it transforms from a dark liquid into a thick, stiff, toffee-colored foam.
- Continue whisking for about 3-5 minutes until the peaks are firm enough to hold their shape, creating that iconic, pillowy texture that looks so dreamy.
- Fill a tall glass with ice and pour in your cold milk, leaving about two inches of space at the top for the star of the show.
- Spoon the thick coffee clouds over the milk and give it a gentle swirl with a straw before taking that first, magical, velvety sip.
Elegant Mother’s Day Floral Cake Design

Why we love this
A cake decorated with edible flowers is more than just a dessert; it is a blooming garden of love and appreciation for the special women in our lives. This design captures the delicate essence of spring, bringing a soft and ethereal beauty to any celebration that feels deeply personal and handmade. We love how the vibrant colors of the petals pop against the creamy frosting, creating a centerpiece that is almost too beautiful to eat. It’s a way to speak the language of flowers through baking, making every slice feel like a gentle, sweet bouquet for the soul.
Ingredients
- 1 double-layer vanilla sponge cake
- 3 cups white buttercream frosting
- Assorted edible flowers (pansies, violas, or lavender)
- Fresh berries for accent
- Organic honey for a light glaze
How to make it
- Begin with a fully cooled cake and apply a thin ‘crumb coat’ of buttercream, chilling it for thirty minutes to ensure a perfectly smooth final finish.
- Apply the remaining buttercream with an offset spatula, creating soft, organic swirls that mimic the gentle movement of clouds or flowing silk.
- Carefully wash and dry your edible flowers, ensuring they are free of any moisture so they adhere beautifully to the sides and top of the cake.
- Using tweezers, gently press the flowers into the frosting in a cascading pattern, mixing different sizes and colors to create a natural, meadow-like effect.
- Finish with a light drizzle of honey over the berries and a few sprigs of lavender for a design that looks as though it was plucked from a fairy tale.
The Fluffiest Gourmet Cupcake Flavors

Why we love this
These cupcakes are like little bites of heaven, each one a miniature canvas for flavor combinations that excite the imagination and delight the senses. We love this recipe because it focuses on a tender, moist crumb that stays soft for days, providing the perfect foundation for any topping. Whether you prefer zesty citrus or deep chocolate, these gourmet treats elevate the humble cupcake into something sophisticated and truly memorable. They are the perfect little gifts to share with neighbors or friends, wrapped in paper liners and topped with a swirl of love.
Ingredients
- 1.5 cups cake flour
- 1 cup granulated sugar
- 1/2 cup unsalted butter, softened
- 2 large eggs, room temperature
- 1/2 cup sour cream
- 1 tsp vanilla bean paste
How to make it
- Cream the softened butter and sugar together for at least five minutes until the mixture is pale, fluffy, and looks like whipped cream.
- Add the eggs one at a time, beating well after each addition to ensure the batter remains emulsified and light for that perfect gourmet rise.
- Whisk together the dry ingredients and add them to the butter mixture in three parts, alternating with the sour cream for ultimate moisture.
- Fold in the vanilla bean paste gently, being careful not to overmix the batter, which keeps the final texture incredibly soft and delicate.
- Bake in lined tins at 350°F for 18-20 minutes, then let them cool completely on a wire rack before adding your favorite artisanal frosting swirls.
Softest Whipped Honey Butter Squishy Texture

Why we love this
There is a tactile joy in this whipped honey butter that is hard to describe until you feel it yourself; it’s airy, light, and wonderfully squishy. It spreads across warm bread like a dream, melting into every nook and cranny with a sweetness that is balanced by a hint of sea salt. We love how this simple condiment can make a plain piece of toast feel like a five-star breakfast experience in your own kitchen. It’s a staple in my home because it brings a touch of golden sunshine to the table, making everything it touches feel a little more special.
Ingredients
- 1 cup high-quality salted butter, softened
- 1/4 cup raw local honey
- 1/2 tsp vanilla extract
- Pinch of flaky sea salt
- 1/4 tsp cinnamon (optional)
How to make it
- Place your softened butter in a stand mixer fitted with the whisk attachment, making sure the butter is soft but not melting for the right structure.
- Whisk on medium-high speed for about 3 minutes until the butter becomes noticeably paler and has increased in volume, looking light and airy.
- Slowly drizzle in the raw honey while the mixer is still running, allowing it to fully incorporate into the butter without weighing it down.
- Add the vanilla extract, sea salt, and cinnamon, then continue to whip on high for another 2 minutes until the texture is incredibly soft and squishy.
- Transfer the butter to a pretty glass jar and serve it at room temperature to maintain that beautiful, cloud-like consistency that spreads so easily.
The Ultimate Satisfying Food Feast Platter
![]()
Why we love this
Hosting becomes an act of art when you assemble a feast platter that is as abundant and colorful as a harvest festival. This approach to eating is all about connection and grazing, allowing everyone to pick their favorite bits and pieces while engaging in deep conversation. We love the variety of flavors—from salty cheeses to sweet fruits—all nestled together in a way that feels intentional and overflowing with generosity. It’s the ultimate way to feed a crowd without the stress of a formal dinner, creating a relaxed and joyous atmosphere for everyone involved.
Ingredients
- 3 types of artisanal cheeses (soft, hard, and blue)
- 2 types of cured meats
- Fresh grapes, figs, and apple slices
- A handful of Marcona almonds and walnuts
- Crackers, baguette slices, and honey dipper
How to make it
- Start by placing your larger items like the cheese blocks and small bowls of honey or olives on a large wooden board to anchor the design.
- Fan out your crackers and baguette slices in a curving path across the board, creating a sense of movement that leads the eye around the feast.
- Fold your meats into delicate ribbons or roses and tuck them into the empty spaces, ensuring they are easy for guests to grab with a small fork.
- Fill the remaining gaps with clusters of fresh grapes, sliced figs, and nuts, making sure the board looks completely full and vibrantly colorful.
- Garnish the entire platter with a few sprigs of fresh rosemary or thyme for an aromatic touch that completes the gourmet, satisfying aesthetic.
Crystal Clear Fruit Flavored Lollipops

Why we love this
Making your own candy feels like a step back into a simpler time, and these crystal-clear lollipops are a true testament to kitchen patience and beauty. They look like tiny pieces of stained glass, capturing the light and showcasing the delicate pieces of dried fruit or petals trapped inside them forever. We love the glass-like finish that is achieved with just a few ingredients, making them a stunning gift or a whimsical party favor for guests. Every lick is a burst of nostalgia and sweetness, reminding us that the most beautiful things often require just a little bit of heat and time.
Ingredients
- 2 cups granulated sugar
- 2/3 cup light corn syrup
- 3/4 cup water
- 1 tsp fruit flavoring oil
- Dried fruit slices or edible gold leaf
How to make it
- Combine the sugar, corn syrup, and water in a heavy-bottomed saucepan, stirring gently until the sugar is dissolved over a medium-low heat.
- Clip a candy thermometer to the side of the pot and bring the mixture to a boil without stirring, which helps prevent unwanted sugar crystals.
- Cook the syrup until it reaches exactly 300°F (the hard-crack stage), then immediately remove it from the heat to stop the cooking process.
- Stir in your flavoring oil and a drop of color if desired, then carefully pour the hot liquid into round lollipop molds containing your fruit.
- Insert the sticks and let the lollipops sit undisturbed at room temperature for at least an hour until they are completely hard and crystal clear.
Zesty Creamy Parmesan Salad Dressing

Why we love this
A good dressing is the soul of a salad, and this creamy Parmesan version is so vibrant it could make even the simplest greens taste like a masterpiece. It strikes the perfect balance between the sharp bite of lemon and the nutty richness of aged cheese, creating a flavor profile that is addictive. We love that it’s made with real, wholesome ingredients that you likely already have in your pantry, making it a quick way to elevate any weekday lunch. It’s silky, bold, and has a way of clinging to every vegetable, ensuring that no bite is ever left feeling lonely or dry.
Ingredients
- 1/2 cup high-quality mayonnaise
- 1/4 cup freshly grated Parmesan cheese
- 2 tbsp fresh lemon juice
- 1 clove garlic, minced fine
- 1 tsp Dijon mustard
How to make it
- In a medium glass bowl, whisk together the mayonnaise and Dijon mustard until the base is perfectly smooth and free of any lumps or streaks.
- Add the freshly grated Parmesan cheese, ensuring you use a fine grater so the cheese melts seamlessly into the creamy liquid of the dressing.
- Stir in the fresh lemon juice and the minced garlic, which provides that essential zesty kick and a beautiful aromatic depth to the flavor.
- Season with a generous amount of cracked black pepper and a tiny pinch of salt, then whisk vigorously until the dressing is thick and emulsified.
- Store in a mason jar in the fridge for at least thirty minutes before serving to allow all the beautiful flavors to meld together perfectly.
Tangy Sourdough Discard Fluffy Pancakes
[IMAGE_10]
Why we love this
Mornings are meant for slow starts and stacks of pancakes that are so light they practically float off the plate with their airy, golden goodness. These pancakes use sourdough discard to add a subtle tang that perfectly complements a generous pour of sweet, dark maple syrup and fresh berries. We love how the batter bubbles and puffs up on the griddle, filling the kitchen with a scent that promises a cozy and productive day ahead. It’s a wonderful way to use your starter while bringing a touch of gourmet flair to the traditional family breakfast table we all cherish.
Ingredients
- 1 cup sourdough discard
- 1 egg, lightly beaten
- 2 tbsp melted butter
- 1 cup all-purpose flour
- 1 tsp baking soda
- 1/2 cup milk
How to make it
- In a large mixing bowl, whisk the sourdough discard, egg, and melted butter together until the mixture is cohesive and slightly bubbly from the starter.
- Sift the flour and baking soda into a separate bowl, then gently fold them into the wet ingredients to keep the air inside the batter.
- Slowly add the milk, stirring only until a thick but pourable batter forms; remember that a few small lumps are perfectly okay for fluffy results.
- Heat a lightly greased griddle over medium heat and pour 1/4 cup of batter for each pancake, waiting for bubbles to form on the surface.
- Flip gently and cook for another minute until both sides are a beautiful golden brown, then serve in a tall stack with a pat of butter.
A Note From My Heart to Yours
As we wrap up this journey through our viral food board, I hope your heart feels as full as your kitchen surely will. These recipes are more than just instructions; they are invitations to create, to share, and to find beauty in the steam rising from a pan or the crunch of a fresh salad. Cooking is such a profound way to care for ourselves and those we love, and I am so honored to be a small part of your culinary adventures. Until next time, keep whisking, keep tasting, and always remember to sprinkle everything you make with a little bit of extra love.