
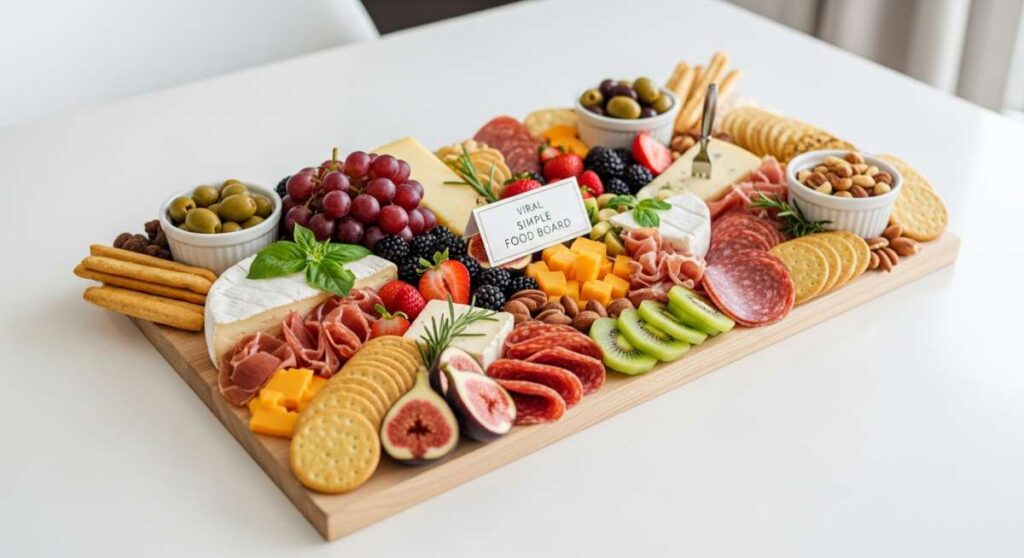
How to Master the Viral Food Board Trend for Your Next Party
There is something truly magical about the way a shared meal can turn a simple evening into a lifelong memory. As the sun begins to set and the golden hour light spills across the patio, there’s nothing quite like the sight of a vibrant, overflowing food board. It’s not just about the food; it’s about the communal spirit, the laughter shared over a grazing platter, and that feeling of effortless hospitality that makes every guest feel like family.
Lately, I’ve been obsessed with the ‘Viral Simple Food Board’ aesthetic—it’s that perfect mix of high-end catering and ‘come as you are’ comfort. Whether you are hosting a sprawling backyard bash or an intimate sunset gathering, mastering these individual components will allow you to build a board that is as delicious as it is Instagram-worthy. Let’s dive into the recipes that will make your next party the talk of the season!
How to make rotel dip?

Why we love this
There is something almost magical about the way the cheese stretches and flows, catching the flecks of spice and savory meat in a golden, molten embrace. As the bowl hits the center of the board, the spicy, earthy aroma of green chilies wafts through the air, instantly drawing a crowd with its nostalgic, comforting warmth. It’s the ultimate icebreaker, providing a creamy, rich texture that contrasts perfectly with the sharp, salty crunch of a thick tortilla chip, making it impossible to stop at just one dip.
Ingredients
- 1 lb Velveeta cheese, cubed
- 1 can (10 oz) Ro-Tel Diced Tomatoes and Green Chilies
- 1 lb ground beef or pork sausage
- 1/2 tsp taco seasoning
- Fresh cilantro for garnish
- Tortilla chips for serving
How to make it
- Begin by browning your ground meat in a large skillet over medium-high heat. Use a wooden spoon to break the meat into small, uniform crumbles to ensure even cooking. Continue cooking until the meat is deeply browned and no longer pink, which usually takes about 7-10 minutes.
- Once the meat is cooked, drain the excess fat carefully into a heat-safe container. Return the skillet to the stove and sprinkle in the taco seasoning, stirring for about 60 seconds to toast the spices and release their oils.
- Lower the heat to medium-low and add the cubed Velveeta cheese. It is crucial to cut the cheese into small 1-inch cubes beforehand to ensure it melts smoothly without scorching the bottom of the pan.
- Pour in the entire can of Ro-Tel, including the liquid. The acidity from the tomato juice helps emulsify the cheese into a velvety sauce.
- Stir constantly with a heat-resistant spatula using a folding motion. Watch for the cheese to transform from solid chunks to a glossy, homogenous pour. If the dip feels too thick, you can whisk in a tablespoon of whole milk at a time until you reach your desired consistency.
- Transfer the dip to a pre-heated ceramic bowl or a small slow cooker set to ‘warm’ to keep it fluid throughout the party. Garnish with a handful of chopped cilantro for a pop of freshness.
How to make summer pasta?

Why we love this
Summer pasta is the embodiment of the season, smelling like a fresh garden after a light rain and tasting like pure sunshine. The delicate balance of high-quality olive oil, pungent garlic, and the burst of vine-ripened tomatoes creates a sauce that is light enough for a hot day yet deeply satisfying. Each forkful offers a silken texture and the bright, herbaceous punch of fresh basil, reminding us that sometimes the simplest ingredients create the most sophisticated flavors on the plate.
Ingredients
- 1 lb Linguine or Angel Hair pasta
- 2 cups cherry tomatoes, halved
- 4 cloves garlic, thinly sliced
- 1/2 cup extra virgin olive oil
- 1/2 cup fresh basil leaves, torn
- 1/4 tsp red pepper flakes
- Freshly grated Parmesan cheese
How to make it
- Bring a large pot of heavily salted water to a rolling boil. The water should taste like the sea to properly season the pasta from the inside out. Add your pasta and cook for 1-2 minutes less than the package directions to achieve a true ‘al dente’ bite.
- While the pasta cooks, heat the olive oil in a wide skillet over medium heat. Add the sliced garlic and red pepper flakes. Watch the garlic closely; you want it to become translucent and golden around the edges, but not brown, as burnt garlic will turn the entire dish bitter.
- Toss the halved cherry tomatoes into the skillet. Increase the heat slightly and sauté for about 4-5 minutes. You are looking for the skins to blister and pucker, releasing their sweet juices into the oil to create a natural, light sauce.
- Before draining the pasta, reserve exactly one cup of the starchy pasta water. This is your ‘liquid gold’ that will help the sauce cling to the noodles.
- Add the cooked pasta directly into the skillet with the tomatoes. Pour in half of the reserved pasta water and toss vigorously with tongs. The agitation of the starch and oil will create a glossy emulsion.
- Remove from heat and fold in the torn basil and a generous handful of Parmesan cheese. The residual heat will wilt the basil perfectly without turning it black.
How to brew sun tea?

Why we love this
Brewing sun tea is a slow, rhythmic ritual that utilizes the gentle power of the afternoon sun to extract a smooth, mellow flavor that boiling water simply can’t replicate. The liquid turns a deep, translucent amber in the glass jar, glowing like a jewel on your porch while it steeps in the natural warmth. When poured over a glass full of ice, it carries a subtle sweetness and a crisp, clean finish that feels incredibly refreshing, capturing the very essence of a lazy, hazy summer afternoon.
Ingredients
- 8 black tea bags (or 4 large family-size bags)
- 1 gallon filtered water
- 1 lemon, sliced into rounds
- Fresh mint sprigs
- Honey or simple syrup (optional)
How to make it
- Select a large, clear glass gallon jar with a tight-fitting lid. Ensure the jar is scrubbed completely clean to prevent any bacterial growth during the low-temperature steeping process.
- Fill the jar with cool, filtered water. Using filtered water prevents mineral buildup from clouding the tea, resulting in a clearer, more professional look.
- Place the tea bags into the water, draped so the strings hang outside the jar for easy removal. Do not agitate the bags; let them sink naturally.
- Secure the lid and place the jar in a spot that receives direct, unobstructed sunlight. A south-facing porch or a stone walkway is ideal as the stone retains heat.
- Leave the tea to steep for 3 to 4 hours. You will see the dark tea concentrate swirling down from the bags. Avoid leaving it out for more than 4 hours, as prolonged exposure to low heat can encourage bitterness.
- Bring the jar inside and remove the tea bags immediately. Stir in your sweetener while the tea is still slightly warm from the sun so it dissolves completely.
- Refrigerate until chilled. Serve in tall glasses filled to the brim with ice, garnished with a fresh lemon round and a slapped mint sprig to release the aromatic oils.
How to grill chicken kabobs?

Why we love this
There is nothing quite like the sizzle of marinated chicken hitting a hot grill, sending up plumes of smoke that smell of caramelized onions and charred spices. These kabobs are a visual feast, featuring vibrant peppers and tender meat that carry those irresistible grill marks and a subtle wood-fired depth. The contrast between the smoky, slightly crisp exterior of the chicken and the juicy, succulent center makes every bite an explosion of texture and savory delight.
Ingredients
- 1.5 lbs chicken breast, cut into 1.5-inch cubes
- 2 bell peppers (mixed colors), cut into chunks
- 1 red onion, cut into wedges
- 1/4 cup olive oil
- 3 tbsp lemon juice
- 2 tsp dried oregano and 1 tsp garlic powder
- Wooden or metal skewers
How to make it
- If using wooden skewers, submerge them in water for at least 30 minutes prior to grilling. This prevents the wood from igniting and breaking while over the open flame.
- In a large bowl, whisk together the olive oil, lemon juice, oregano, and garlic powder. Add the chicken cubes and toss to coat. Let this marinate in the refrigerator for at least 45 minutes, but no more than 4 hours, as the lemon juice will begin to ‘cook’ the meat and change its texture.
- Thread the skewers, alternating between chicken, pepper, and onion. Don’t crowd the pieces too tightly; leaving a tiny bit of space ensures the heat can circulate around each piece of meat for even browning.
- Preheat your grill to medium-high (about 400°F). Clean the grates thoroughly with a wire brush and lightly oil them to prevent sticking.
- Place the kabobs on the grill. Cook for 12-15 minutes, turning every 3-4 minutes. Use tongs to rotate them a quarter-turn each time to achieve beautiful, uniform char marks on all sides.
- The chicken is done when the internal temperature reaches 165°F. Remove from the grill and let the kabobs rest on a platter for 5 minutes before serving to allow the juices to redistribute back into the meat.
How to flavor fresh lemonade?

Why we love this
Freshly squeezed lemonade is a nostalgic masterpiece, but when you infuse it with real fruit purees or aromatic herbs, it becomes a gourmet experience that awakens the palate. The sharp, zesty tang of the lemons is beautifully softened by the sweetness of macerated berries or the cooling notes of cucumber, creating a complex flavor profile that is both sophisticated and deeply thirst-quenching. It looks stunning in a glass pitcher, with flecks of fruit and herbs dancing in the icy, pale-yellow liquid.
Ingredients
- 1 cup fresh lemon juice (about 6-8 lemons)
- 1 cup granulated sugar
- 1 cup water (for simple syrup)
- 4 cups cold water
- Flavoring choice: 1 cup muddled raspberries, strawberries, or 2 tbsp lavender buds
How to make it
- Start by making a simple syrup. Combine the sugar and 1 cup of water in a small saucepan over medium heat. Stir until the sugar is completely dissolved and the liquid is clear. Do not let it boil vigorously; a gentle simmer is enough.
- If you are using lavender or mint, add the herbs to the hot syrup and remove from heat. Let it steep for 10 minutes, then strain. If using fruit, muddle the fruit in a separate bowl until it is a pulpy consistency.
- Juice your lemons until you have a full cup. For the best flavor, use room-temperature lemons and roll them on the counter with your palm before cutting to break the juice vesicles.
- In a large pitcher, combine the lemon juice, the flavored simple syrup, and the muddled fruit. Stir vigorously to combine the concentrated base.
- Add the 4 cups of cold water. Taste the mixture; if it’s too tart, add a splash more water or syrup. If it’s too sweet, add another squeeze of lemon.
- Chill for at least an hour to let the flavors meld. Serve over plenty of ice, using a fine-mesh strainer if you prefer a pulp-free drink, and garnish with a sprig of the corresponding herb or a whole berry.
How to make pasta salad?

Why we love this
A great pasta salad is a symphony of textures, combining the chewy bite of rotini with the sharp crunch of fresh vegetables and the creamy tang of feta cheese. Every bite is coated in a zesty, herbaceous vinaigrette that seeps into the ridges of the pasta, ensuring a burst of vinegar-forward brightness in every mouthful. It’s the ultimate make-ahead dish that actually tastes better as it sits, allowing the various components to marry into a harmonious, savory side that anchors any food board.
Ingredients
- 1 lb Rotini or Fusilli pasta
- 1 cucumber, diced
- 1 pint cherry tomatoes, halved
- 1/2 cup Kalamata olives, sliced
- 1/2 cup crumbled feta cheese
- Dressing: 1/2 cup olive oil, 1/4 cup red wine vinegar, 1 tsp dried oregano
How to make it
- Cook the pasta in boiling salted water until it is just past al dente. For cold salads, you want the pasta slightly softer than usual because it will firm up significantly once it is chilled in the refrigerator.
- Drain the pasta and immediately rinse it under cold running water. This stops the cooking process and washes away excess starch, preventing the noodles from sticking together in a clump.
- In a large mixing bowl, whisk together the olive oil, red wine vinegar, oregano, salt, and pepper. Adding a pinch of sugar can help balance the acidity of the vinegar if it feels too sharp.
- Add the cooled pasta to the dressing while it is still slightly damp. This helps the pasta absorb the flavors of the vinaigrette more effectively.
- Fold in the diced cucumbers, halved tomatoes, and olives. These ingredients add the necessary water content and saltiness to round out the dish.
- Finish by gently tossing in the feta cheese. Chill the salad for at least two hours before serving. Give it one final toss right before putting it on the board, adding a tablespoon of water or oil if the pasta has absorbed all the dressing and looks dry.
How to bake summer desserts?
Why we love this
Summer baking is all about celebrating the fleeting beauty of stone fruits and berries, encased in a crust that is so buttery and flaky it practically melts on the tongue. As a galette or cobbler bakes, the fruit breaks down into a thick, jammy syrup that bubbles over the edges, filling the kitchen with an intoxicating aroma of vanilla and toasted sugar. The result is a rustic, effortless dessert that tastes like the height of harvest, especially when paired with a melting scoop of cold vanilla bean ice cream.
Ingredients
- 3 cups fresh peaches or blueberries
- 1/2 cup granulated sugar
- 1 tbsp lemon juice
- 1 tbsp cornstarch
- 1 pre-made or homemade pie crust
- 1 egg (for egg wash)
How to make it
- Preheat your oven to 400°F (200°C). If you are using peaches, slice them into uniform 1/2-inch wedges. If using berries, ensure they are washed and completely dried to avoid a soggy crust.
- In a large bowl, gently toss the fruit with the sugar, lemon juice, and cornstarch. The cornstarch is vital here; it acts as a thickener for the fruit juices, turning them into a luscious glaze rather than a watery mess.
- Roll out your pie crust on a sheet of parchment paper until it is roughly 12 inches in diameter. You don’t need a pie tin for a rustic galette—the imperfection is part of the charm.
- Mound the fruit mixture in the center of the dough, leaving a 2-inch border all the way around the edge.
- Fold the edges of the dough up and over the fruit, pleating the crust as you go. The center of the fruit should still be exposed.
- Beat the egg with a teaspoon of water and brush it generously over the crust. Sprinkle the crust with coarse turbinado sugar for an extra crunch. Bake for 25-30 minutes until the crust is a deep golden brown and the fruit center is vigorously bubbling.
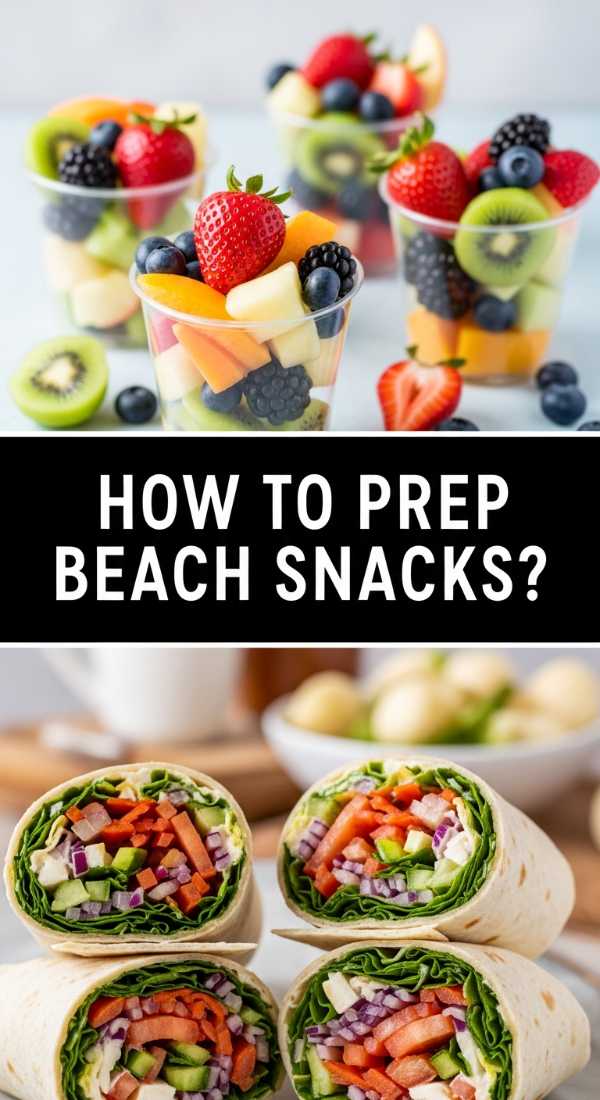
How to prep beach snacks?

Why we love this
The perfect beach snack is a refreshing oasis in the heat, offering a crisp, hydrating crunch that revitalizes the senses after a dip in the salt water. Think of vibrant bell pepper strips, cool cucumber coins, and snap peas paired with a chilled, creamy hummus that feels light yet filling. These snacks are designed to be portable and mess-free, providing a clean, bright flavor profile that complements the sea breeze and keeps you feeling energized throughout a sun-drenched day.
Ingredients
- 1 container classic hummus
- 2 large carrots, peeled and cut into sticks
- 1 bunch celery, cut into sticks
- 1 bag mini sweet peppers
- 1 pack pita crackers
- Small airtight containers or mason jars
How to make it
- Preparation is key for beach snacks to prevent them from becoming soggy or sandy. Start by washing all vegetables in ice-cold water to crisp them up.
- Slice the carrots and celery into uniform sticks that are roughly the same height as your storage container. This makes for an easy ‘grab and go’ experience.
- For the mini peppers, leave them whole or slice them in half lengthwise, removing the seeds. Whole peppers stay crunchy longer in a cooler.
- Use the ‘dip-at-the-bottom’ method for individual servings: Spoon 3 tablespoons of hummus into the bottom of a wide-mouth mason jar. Stand the veggie sticks upright directly into the hummus. This keeps the dip contained and ensures every veggie stick is pre-portioned.
- If packing a communal board, keep the hummus in its original container and nestle it into a bowl of ice within your cooler to maintain its thick, creamy texture.
- Store crackers and pita chips in a separate, hard-sided container (like a plastic bento box) to prevent them from being crushed by heavier items in the beach bag.
How to make picnic sides?

Why we love this
Picnic sides like a classic potato salad are the ultimate comfort food, offering a creamy, velvety texture punctuated by the sharp tang of pickles and the freshness of dill. There is something so satisfying about the way the earthy potatoes soak up the creamy dressing, creating a rich and savory profile that pairs perfectly with outdoor air. It’s a dish that feels like a hug in a bowl, providing a cooling contrast to grilled meats and a hearty base that keeps the picnic spirit going for hours.
Ingredients
- 3 lbs Yukon Gold potatoes, cubed
- 1/2 cup mayonnaise
- 2 tbsp yellow mustard
- 1/2 cup diced red onion
- 1/4 cup chopped dill pickles
- 2 tbsp fresh dill, chopped
- 3 hard-boiled eggs, chopped
How to make it
- Place the cubed potatoes in a large pot and cover with cold water. Starting with cold water ensures the outside of the potato doesn’t turn to mush before the inside is cooked. Bring to a boil and cook for about 10-12 minutes until fork-tender.
- Drain the potatoes and, while they are still steaming hot, splash them with a tablespoon of pickle juice or apple cider vinegar. This ‘secret step’ allows the potatoes to absorb acidity while their pores are open.
- Allow the potatoes to cool to room temperature. Adding mayo to hot potatoes will cause the oil to separate, resulting in an oily, unappealing mess.
- In a separate bowl, whisk together the mayonnaise, mustard, salt, and pepper. This ensures the dressing is perfectly smooth before it hits the bulky ingredients.
- Fold in the cooled potatoes, onions, pickles, and chopped eggs. Use a large rubber spatula and work gently to avoid mashing the potatoes into a paste.
- Fold in the fresh dill last to preserve its bright green color and punchy aroma. Refrigerate for at least 4 hours—potato salad is always better once the flavors have had a chance to get to know each other.
How to craft summer coffee?
[IMAGE_10]
Why we love this
Summer coffee is a luxurious, icy treat that transforms your morning caffeine into a spa-like experience, featuring a velvety mouthfeel and deep, chocolatey undertones. The aroma of cold-brewed beans is smoother and less acidic than hot coffee, creating a refreshing base that feels incredibly clean on the palate. When a splash of cream hits the dark liquid, it swirls into beautiful, marbled clouds, offering a rich and indulgent texture that makes the heat of the day feel miles away.
Ingredients
- 1 cup coarsely ground coffee beans
- 4 cups cold filtered water
- Ice cubes (coffee ice cubes are even better!)
- Milk or cream of choice
- Optional: Vanilla or caramel syrup
How to make it
- Use a ‘coarse’ grind for your coffee beans—it should look like sea salt. If the grind is too fine, the coffee will be over-extracted and bitter, and it will be difficult to filter.
- Combine the ground coffee and cold water in a large glass jar or a French press. Stir gently to ensure all the grounds are fully saturated.
- Cover and let the mixture steep at room temperature for 12 to 18 hours. Do not refrigerate during the steeping process, as the cold temperatures slow down the extraction too much.
- Strain the mixture through a fine-mesh sieve lined with a paper coffee filter or a piece of cheesecloth. Do not squeeze the grounds; let the gravity do the work to keep the liquid clear and sediment-free.
- This creates a ‘cold brew concentrate.’ To serve, fill a glass with ice and fill it halfway with the concentrate.
- Top the rest of the glass with cold water or milk. If you like it sweet, stir in your syrup now. For a viral look, pour the cream in last and watch the beautiful ‘bleeding’ effect as it mixes with the dark coffee.
The Final Touch for Your Food Board
Building the perfect viral food board is all about the balance of flavors and the joy of sharing. By mastering these ten essential summer recipes, you have everything you need to create a centerpiece that is both beautiful and bountiful. Remember, the best boards are the ones that reflect your personal style, so don’t be afraid to mix and match these elements. Happy hosting!
Frequently Asked Questions
Got questions about your next party spread? We’ve got the answers to help you host like a pro.