
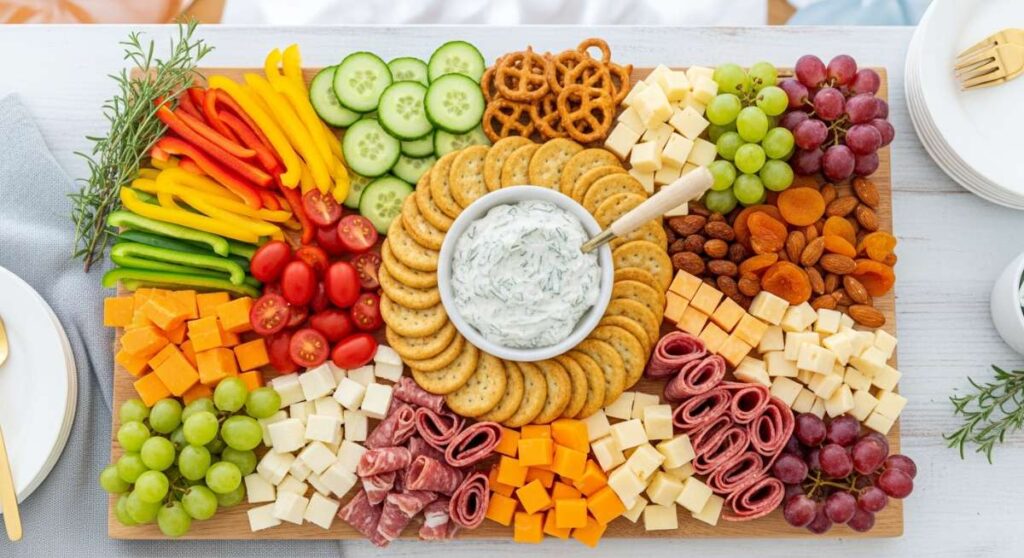
The Only Simple Food Board Recipe You’ll Need for Your Next Party
There is a certain magic that happens when friends gather around a table filled with an abundance of colors and textures, isn’t there? I remember the first time I hosted a summer gathering; I was so stressed about individual plating that I barely spent five minutes actually talking to my guests. That’s when the ‘Viral Simple Food Board’ changed my life. It’s not just about the food; it’s about that shared sigh of relief when the sun starts to set, the wine is poured, and everyone just reaches in for a bite of something delicious and homemade.
The secret to a truly viral board isn’t perfection—it’s variety and soul. It’s that effortless mix of zesty pasta, crusty sourdough snacks, and chilled drinks that makes people feel truly at home. In this guide, I’m breaking down every single component you need to create a spread that will have your guests snapping photos and asking for your recipes before the night is even over. Let’s dive into the ultimate guide to the only board you’ll ever need to master.
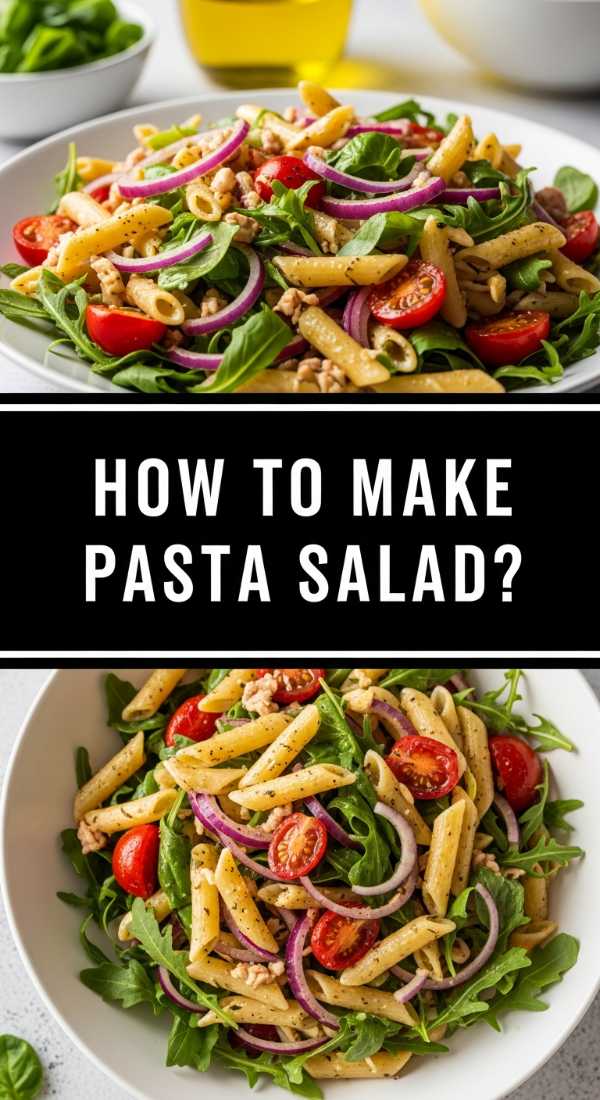
How to make pasta salad
Why we love this
This isn’t your grandmother’s heavy, mayo-laden deli salad; this is a vibrant, Mediterranean-inspired masterpiece that dances on the tongue. Imagine the silky texture of olive oil coating perfectly al dente rotini, interspersed with the sharp, salty punch of feta cheese and the bright, acidic burst of sun-ripened cherry tomatoes. Every forkful offers a crunch of fresh cucumber and the aromatic whisper of dried oregano, making it the refreshing backbone of any summer food board. It’s the kind of dish that tastes even better as it sits, soaking up all those golden flavors.
Ingredients
- 1 lb Rotini or Fusilli pasta
- 1/2 cup Extra virgin olive oil
- 1/4 cup Red wine vinegar
- 1 cup Cherry tomatoes, halved
- 1 cup Cucumber, diced
- 1/2 cup Kalamata olives, pitted
- 1/2 cup Feta cheese, crumbled
- 1 tbsp Dried oregano
- Salt and cracked black pepper to taste
How to make it
- Begin by bringing a large pot of heavily salted water to a rolling boil. Adding enough salt—it should taste like the sea—is crucial as this is your only chance to season the pasta itself.
- Drop the pasta and cook for exactly one minute less than the package instructions. You are looking for a firm ‘al dente’ bite, as the pasta will soften slightly once it begins to absorb the vinaigrette.
- While the pasta cooks, whisk together the olive oil, red wine vinegar, oregano, salt, and pepper in a large mixing bowl until the dressing is emulsified and slightly thickened.
- Drain the pasta and immediately toss it into the dressing while it is still steaming hot. This technique allows the pasta to soak up the flavors deep into its core rather than just sitting on the surface.
- Allow the pasta to cool to room temperature before folding in your tomatoes, cucumbers, olives, and feta. This prevents the vegetables from wilting and the cheese from melting, ensuring a crisp, fresh texture.
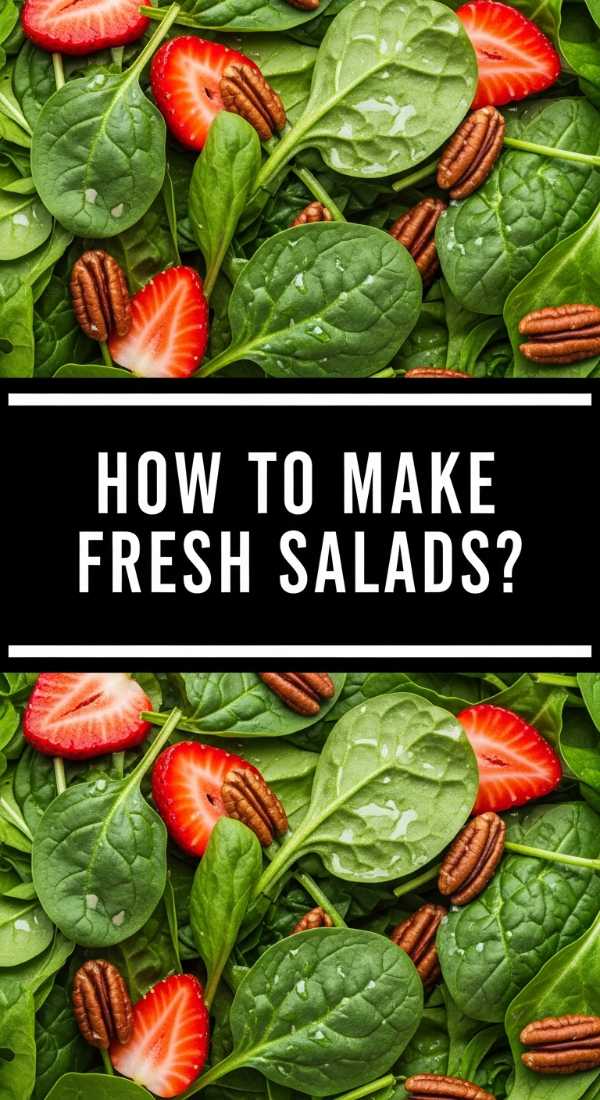
How to make fresh salads
Why we love this
A fresh salad provides the essential ‘crunch’ and visual height that every viral food board requires to look professional. We love using a mix of bitter arugula and sweet butter lettuce to create a sophisticated flavor profile that cleanses the palate between heavier bites. The aroma of freshly torn mint and basil leaves mingled with a citrus-heavy dressing creates an olfactory experience that screams ‘garden party.’ It’s light, ethereal, and provides that beautiful pop of emerald green that makes the other colors on your board truly sing.
Ingredients
- 4 cups Mixed baby greens (Arugula, Spinach, Butter Lettuce)
- 1/2 cup Fresh mint and basil leaves
- 1/4 cup Toasted pine nuts or slivered almonds
- 1 Lemon, zested and juiced
- 3 tbsp Avocado oil
- 1 tsp Honey
- Flaky sea salt
How to make it
- Start by washing your greens in ice-cold water. This ‘shocks’ the leaves, ensuring they remain crisp for hours on the board. Spin them completely dry; water is the enemy of a good salad as it prevents the dressing from adhering.
- In a small jar, combine the lemon juice, zest, honey, and avocado oil. Shake vigorously until the honey is fully integrated and the liquid looks opaque.
- Just before serving, place the greens in a wide, shallow bowl. Hand-tear the herbs rather than chopping them with a knife to prevent bruising and to release the maximum amount of essential oils.
- Drizzle the dressing around the perimeter of the bowl and toss gently with your hands or tongs, ensuring every leaf has a microscopic coating of oil without being weighed down.
- Top with the toasted nuts and a final sprinkle of flaky sea salt for a textured finish that provides a satisfying snap in every mouthful.
How to make summer drinks

Why we love this
Nothing complements a food board quite like the clinking of ice in a glass and the refreshing scent of muddled berries. These summer drinks are designed to be low-alcohol or alcohol-free, focusing instead on the botanical complexity of fresh thyme and sparkling mineral water. The condensation forming on a cold pitcher and the deep magenta hues of macerated fruit add a layer of tactile and visual refreshment to your party. It’s the ultimate thirst-quencher that feels like a spa day in a glass, keeping your guests hydrated and happy.
Ingredients
- 2 cups Sparkling water or Club soda
- 1 cup Fresh blackberries or raspberries
- 2 tbsp Agave nectar
- 4 sprigs Fresh thyme
- 1 Lime, sliced into rounds
- Crushed ice
How to make it
- In the bottom of a large glass pitcher, place your fresh berries and agave nectar. Use a muddler or the back of a wooden spoon to crush the berries until they release their deep, vibrant juices.
- Rub the fresh thyme sprigs between your palms to bruise them slightly, then toss them into the pitcher. This manual bruising releases the oils without making the drink taste ‘grassy.’
- Fill the pitcher halfway with crushed ice. This provides more surface area than cubes, chilling the drink instantly and creating that desired frosty look.
- Slowly pour the sparkling water over the ice, stirring gently with a long spoon to pull the berry syrup from the bottom up through the liquid.
- Garnish with lime rounds and extra whole berries. Serve immediately in chilled glasses to maintain the carbonation and the crisp, refreshing temperature.
How to use sourdough discard

Why we love this
There is a rustic, fermented depth to sourdough discard crackers that store-bought versions simply cannot replicate. We love the way the tangy notes of the starter play against coarse sea salt and the nuttiness of toasted sesame seeds. These crackers provide a sturdy, crunchy vessel for your dips, and the satisfaction of knowing you’ve turned ‘waste’ into a gourmet snack is unparalleled. The aroma of them baking in the oven fills the kitchen with a cozy, bakery-like scent that sets the perfect mood before guests even arrive.
Ingredients
- 1 cup Sourdough discard (unfed)
- 1/4 cup All-purpose flour
- 2 tbsp Melted butter or Olive oil
- 1 tsp Herbes de Provence
- 1/2 tsp Sea salt
- Coarse salt for topping
How to make it
- Preheat your oven to 325°F (165°C). In a medium bowl, mix the discard, flour, fat, and herbs until a smooth, slightly tacky dough forms.
- Place the dough on a large sheet of parchment paper and top with a second sheet. Roll it out as thin as humanly possible—aim for about 1/16th of an inch. The thinner the dough, the more shatteringly crisp the cracker.
- Remove the top sheet of parchment and brush the surface lightly with a tiny bit of water or oil, then sprinkle generously with coarse salt.
- Bake for 15 minutes, then remove from the oven to score the dough into squares or diamonds using a pizza cutter. This ensures clean breaks later.
- Return to the oven for another 15-20 minutes. Watch for a deep golden brown color at the edges; they should feel firm and not ‘bendy’ when touched. Let them cool completely on the pan to reach maximum crispness.
How to make creamy dips

Why we love this
A board without a creamy dip is like a story without a protagonist. This whipped feta and roasted garlic dip is the velvety anchor of the entire spread. The texture is incredibly airy, almost cloud-like, providing a luxurious mouthfeel that contrasts beautifully with the crunchy sourdough crackers. The mellow, sweet aroma of roasted garlic replaces the sharp bite of raw cloves, creating a sophisticated flavor profile that lingers pleasantly. It’s the dish that everyone will be scraping the bowl for, trying to get every last savory bit.
Ingredients
- 8 oz Feta cheese, room temperature
- 1/2 cup Greek yogurt (full fat)
- 1 head of Garlic
- 1 tsp Lemon zest
- 2 tbsp Extra virgin olive oil
- Fresh dill for garnish
How to make it
- Prepare the garlic by cutting the top off the bulb, drizzling with oil, wrapping in foil, and roasting at 400°F (200°C) for 40 minutes until the cloves are golden and spreadable like butter.
- In a food processor, combine the room-temperature feta and Greek yogurt. Processing at room temperature is key to preventing a grainy texture.
- Squeeze the roasted garlic cloves out of their skins directly into the processor. Add the lemon zest and a tablespoon of olive oil.
- Pulse until the mixture is completely smooth, then let the processor run on high for a full minute to incorporate air, making the dip exceptionally light and fluffy.
- Transfer to a serving bowl, create a ‘swirl’ on top with the back of a spoon, and fill that well with more olive oil and fresh dill. Chill for at least 30 minutes before serving to let the flavors marry.
How to make camping meals

Why we love this
Even if you aren’t in the woods, bringing the ‘camping meal’ vibe to a food board adds a layer of smoky, charred nostalgia. We love flame-grilled corn ribs or foil-packet potatoes because they introduce a caramelized sweetness and a rugged texture that sets the board apart from a standard deli tray. The scent of charred husks and melted butter infused with smoked paprika evokes memories of starlit nights and crackling fires. It’s hearty, tactile food that encourages people to eat with their hands and truly engage with the meal.
Ingredients
- 4 ears of Corn, cut into ‘rib’ quarters
- 2 tbsp Melted butter
- 1 tsp Smoked paprika
- 1/2 tsp Cumin
- Fresh cilantro
- Lime wedges
How to make it
- Carefully quarter each ear of corn lengthwise. This requires a sharp knife and a steady hand, but the result is corn that curls into ‘ribs’ when cooked.
- Whisk the smoked paprika and cumin into the melted butter. Brush this mixture generously over the kernels, ensuring you get into all the nooks and crannies.
- Heat a grill or a heavy cast-iron skillet to high heat. You want to see wisps of smoke before you add the corn.
- Place the corn ribs on the heat source. Cook for 3-4 minutes per side until the kernels are charred and the ‘rib’ has naturally curved. The char provides a bitter-sweet contrast to the corn’s natural sugars.
- Remove from heat and immediately hit them with a squeeze of lime and a shower of chopped cilantro. Serve warm on the board for a smoky, high-impact component.
How to make picnic food

Why we love this
The essence of picnic food is portability and the ability to stay delicious at room temperature, which is exactly what a food board needs. We love individual puff pastry tarts topped with heirloom tomatoes and pesto. They offer a buttery, flaky crunch that shatters upon impact, followed by the savory warmth of the basil. The visual of golden pastry edges against the deep reds and yellows of the tomatoes adds an artisanal, ‘French-countryside’ aesthetic to your spread. It’s sophisticated yet entirely approachable.
Ingredients
- 1 sheet Frozen puff pastry, thawed
- 2 Heirloom tomatoes, thinly sliced
- 1/4 cup Basil pesto
- 1 Egg (for egg wash)
- Balsamic glaze for drizzling
How to make it
- Preheat your oven to 400°F (200°C). Roll out the puff pastry slightly and cut into 3-inch squares or circles.
- Using a paring knife, score a smaller border about half an inch from the edge of each square. This allows the edges to rise while the center stays flat to hold the toppings.
- Spread a thin layer of pesto within the scored center, then top with a single, beautiful slice of heirloom tomato that has been patted dry with a paper towel (this prevents a soggy bottom).
- Brush the outer border of the pastry with a beaten egg wash. This is the secret to achieving that professional, glossy, deep-golden sheen.
- Bake for 12-15 minutes until the pastry is puffed and golden. Remove from the oven and let cool slightly before drizzling with a thick balsamic glaze for a sweet-tart finish.
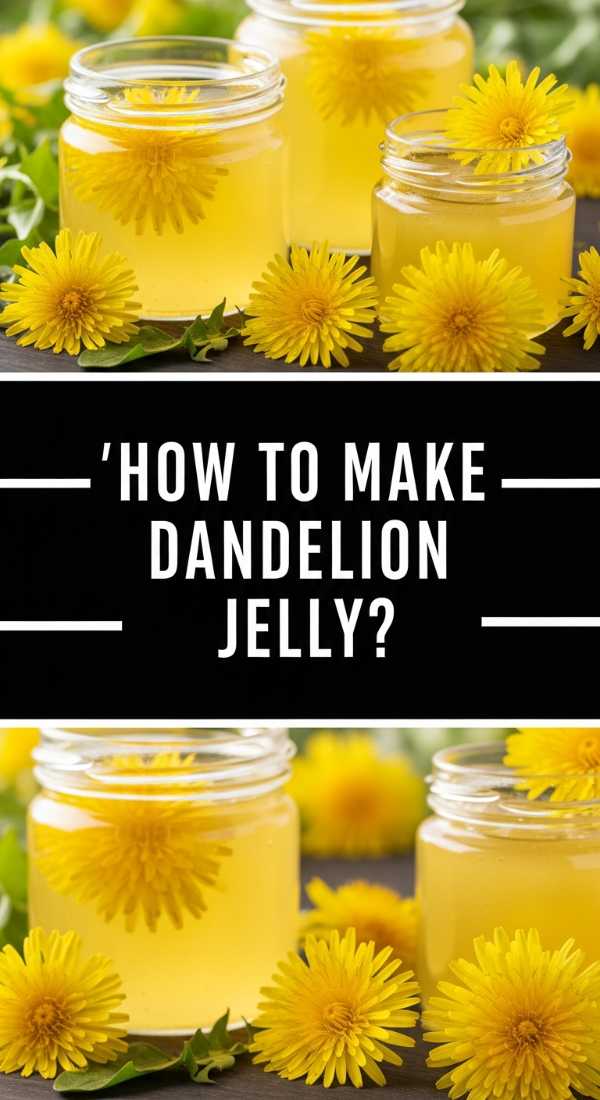
How to make dandelion jelly
Why we love this
Adding a jar of dandelion jelly to your food board is the ultimate conversation starter. It’s literally ‘sunshine in a jar,’ with a delicate, honey-like flavor and a floral aroma that is subtle and enchanting. We love the bright, translucent yellow color it adds to the board, especially when paired with sharp cheeses or salty crackers. It brings an element of foraging and whimsy, reminding everyone of the simple beauty found in nature. It’s sweet, light, and feels like a secret garden treasure shared among friends.
Ingredients
- 2 cups Dandelion petals (yellow parts only)
- 4 cups Water
- 1 box (1.75 oz) Powdered pectin
- 2 tbsp Lemon juice
- 3 cups Granulated sugar
How to make it
- Start by gathering fresh dandelions. Crucial tip: remove every bit of the green sepal and stem, as these are very bitter; you only want the fluffy yellow petals.
- Bring 4 cups of water to a boil, pour over the petals, and let them steep overnight in the fridge. This creates a potent, floral ‘sunshine tea.’
- Strain the liquid through a fine-mesh sieve or cheesecloth, squeezing to get every drop of flavor. You should have about 3 cups of liquid.
- In a large pot, combine the dandelion tea, lemon juice, and pectin. Bring to a full rolling boil that cannot be stirred down.
- Add the sugar all at once and return to a boil for exactly 1-2 minutes. Skim off any foam that rises to the top to ensure a crystal-clear jelly. Pour into jars and let set for 24 hours until it reaches a soft, spreadable consistency.
How to make steamed dumplings

Why we love this
Steamed dumplings bring a sense of warmth and delicate craftsmanship to a food board. We love the translucent, slightly chewy wrappers that give way to a succulent, ginger-scented filling. The sight of steam rising from a bamboo basket creates an immediate ‘wow’ factor and an interactive element as guests dip them into spicy soy sauce. The aroma of toasted sesame oil and green onions is irresistible, offering a savory, umami-rich counterpoint to the fresher fruits and vegetables on the board. It’s a comforting, bite-sized luxury.
Ingredients
- 1 pack Gyoza or Dumpling wrappers
- 1/2 lb Ground pork or finely chopped mushrooms
- 2 Green onions, minced
- 1 tbsp Fresh ginger, grated
- 1 tbsp Soy sauce
- 1 tsp Sesame oil
How to make it
- Mix your filling (pork or mushrooms) with the onions, ginger, soy sauce, and sesame oil. Mix vigorously in one direction; this develops the proteins and creates a cohesive, juicy ‘meatball’ inside the wrapper.
- Place a teaspoon of filling in the center of a wrapper. Wet the edges with a finger dipped in water to create a seal.
- Fold the wrapper in half and create small pleats along one side, pressing firmly to seal. These pleats aren’t just for looks—they create ‘pockets’ that hold the dipping sauce later.
- Line a steamer basket with cabbage leaves or parchment paper with holes poked in it to prevent sticking. Arrange the dumplings so they aren’t touching.
- Steam over boiling water for 8-10 minutes. The wrappers should look translucent and feel slightly tacky to the touch. Serve immediately while they are at their most supple and juicy.
How to make summer dinners

Why we love this
The best summer dinners are those that don’t require you to stand over a hot stove for hours. We love this ‘deconstructed’ approach where the board itself becomes the meal, anchored by a light protein like chilled shrimp or grilled chicken skewers. It’s a relaxed way to eat, allowing everyone to customize their plate with the various salads and dips you’ve prepared. The feeling is one of abundance and ease, where the focus is on the quality of ingredients rather than the complexity of the technique. It’s the ultimate expression of summer living.
Ingredients
- 1 lb Large shrimp, peeled and deveined
- 1 Lemon, halved
- 2 Bay leaves
- 1 tsp Old Bay seasoning
- Fresh parsley for garnish
How to make it
- Bring a pot of water to a simmer (not a hard boil) with the lemon halves, bay leaves, and Old Bay. Simmering instead of boiling prevents the shrimp from becoming rubbery.
- Add the shrimp to the water. Watch them closely; they are done the second they turn opaque and form a ‘C’ shape. An ‘O’ shape means they are overcooked. This usually takes only 2-3 minutes.
- Immediately plunge the cooked shrimp into an ice bath. This stops the cooking process instantly, locking in a crisp, snappy texture and a bright pink color.
- Once chilled, pat them dry. Tossing them while wet will dilute any sauces or other flavors on the board.
- Arrange the shrimp in a dedicated corner of your food board, garnished with fresh parsley and extra lemon wedges for an easy, protein-rich ‘dinner’ element that feels light and sophisticated.
Conclusion: Bring the Board to Life
Creating a viral food board is less about following a strict set of rules and more about embracing the joy of hosting. When you combine the tang of sourdough discard crackers with the floral sweetness of dandelion jelly or the smoky char of corn ribs, you aren’t just serving food—you’re curated an experience. Remember to keep things colorful, keep your textures varied, and most importantly, keep your kitchen full of music and laughter while you prep. Your guests will feel the love you put into every component. Now, go forth and host the most beautiful, stress-free party of the season!