

There is something inherently magical about gathering friends around a table covered in a vibrant, overflowing food board. It’s more than just a meal; it’s an interactive experience that turns dinner into an event where everyone can customize their perfect bite. I remember the first time I set out a DIY taco board for a Sunday brunch—the room was instantly filled with laughter, the clinking of lime wedges against glass, and the sight of steam rising from perfectly seasoned fillings. It creates a relaxed, ‘help-yourself’ atmosphere that removes all the stress of formal plating.
The viral food board trend isn’t just about aesthetics; it’s about the sheer joy of variety. In our fast-paced lives, having a spread that caters to every craving—from the crunch of a golden shell to the zesty kick of a homemade crema—is the ultimate way to show love to your guests. Whether you are hosting a festive party or just want to elevate your Tuesday night family dinner, these taco board concepts are designed to be effortless yet unforgettable. Let’s dive into the many ways you can master this taco board trend and become the ultimate host.
HOW TO MAKE CRISPY TACOS?

Why we love this
There is a profound satisfaction in that first shattering bite of a perfectly golden, crispy taco shell. The contrast between the rigid, salty exterior and the succulent, warm filling inside creates a sensory symphony that reminds us of childhood kitchen counters and summer festivals. As the shell breaks, it releases a toasted corn aroma that pairs beautifully with the cooling sensation of shredded lettuce and melted cheese. It’s the ultimate comfort food that feels like a celebration of texture in every single mouthful.
Ingredients
- Hard corn taco shells
- Lean ground beef
- Taco seasoning blend
- Shredded iceberg lettuce
- Sharp cheddar cheese
- Diced tomatoes
How to make it
- Begin by preheating your oven to 350°F (175°C). Place your hard shells on a baking sheet, standing them upright if possible, and toast them for 5-7 minutes. This step is crucial because it awakens the oils in the corn, making them extra crunchy and preventing them from tasting stale.
- In a large skillet over medium-high heat, brown the ground beef. Use a wooden spoon to break the meat into very fine crumbles to ensure an even texture. Drain any excess grease to keep the shells from getting soggy later.
- Add your taco seasoning and a splash of water (about 1/4 cup) to the beef. Lower the heat to a simmer and stir constantly for 3-4 minutes until the liquid has reduced and formed a thick, glossy sauce that coats every morsel of meat.
- To assemble, place a generous tablespoon of meat into the bottom of the warm shell. Follow immediately with a layer of cheese so it begins to melt against the heat of the beef. Top with a mountain of crisp lettuce and juicy tomatoes, then serve immediately while the shells are at their peak crispness.
HOW TO MAKE ZESTY TACOS?

Why we love this
Zesty tacos are like a burst of sunshine on a plate, bringing a bright, acidic energy that wakes up your palate instantly. The combination of lime-marinated proteins and cilantro-heavy garnishes provides a refreshing lift that cuts through the richness of traditional taco fats. We love how the fragrance of fresh citrus zest fills the air as you assemble these, making the kitchen feel like a coastal escape. It’s the kind of meal that leaves you feeling energized and satisfied, thanks to the high notes of ginger, lime, and fresh herbs.
Ingredients
- Chicken breast strips
- Lime juice and lime zest
- Fresh cilantro, chopped
- Red onion, finely diced
- Minced garlic
- Cumin and coriander
How to make it
- Create a marinade by whisking together the juice of two limes, one tablespoon of lime zest, minced garlic, cumin, and coriander in a glass bowl. Submerge your chicken strips in this mixture and let them marinate for at least 30 minutes in the refrigerator to allow the acids to tenderize the meat.
- Heat a cast-iron skillet over medium heat with a drizzle of avocado oil. Once the pan is shimmering, add the chicken strips in a single layer. Do not crowd the pan, as this will cause the meat to steam rather than sear.
- Cook the chicken for 4-5 minutes per side. You are looking for a beautiful golden-brown caramelization on the edges, which indicates that the natural sugars in the lime juice have charred perfectly. Ensure the internal temperature reaches 165°F.
- While the meat rests, toss your diced red onion and fresh cilantro together with an extra squeeze of lime. Top your warm tortillas with the zesty chicken and a heavy heap of the onion-cilantro mix for a bright, pungent finish.
HOW TO MAKE EASY TACOS?

Why we love this
Sometimes the best meals are the ones that require the least effort, allowing us to spend more time at the table and less time at the stove. Easy tacos are the unsung heroes of weeknight dinners, offering a reliable, delicious baseline that never fails to please a crowd. We love the simplicity of using high-quality pantry staples to create a meal that tastes like it took hours of preparation. The warm, earthy scent of simmering beans and seasoned meat provides a nostalgic backdrop for a stress-free evening where the focus is entirely on connection and flavor.
Ingredients
- Canned black beans (rinsed)
- Rotisserie chicken (shredded)
- Store-bought salsa verde
- Flour tortillas
- Sour cream
How to make it
- Start by shredding a store-bought rotisserie chicken while it is still warm, as the meat pulls away from the bone much easier at this temperature. Place the shredded meat in a small saucepan.
- Add half a jar of salsa verde to the chicken and heat over low flame. Stir occasionally for about 5 minutes just to let the chicken absorb the tangy, herby flavors of the salsa without drying out the meat.
- In a separate small pot, warm the black beans with a pinch of salt and a teaspoon of water. Use the back of a fork to lightly mash a few of the beans; this releases their starch and creates a creamier consistency that holds better inside a taco.
- Warm your flour tortillas in the microwave for 20 seconds between damp paper towels to keep them soft and pliable. Layer the beans, then the saucy chicken, and finish with a simple dollop of sour cream for a complete meal in under fifteen minutes.
HOW TO COOK FISH TACOS?

Why we love this
Fish tacos transport your senses straight to a seaside cabana, combining the light, flaky texture of white fish with the cool crunch of a vinegar-based slaw. There is an elegance to fish tacos that sets them apart from their beef counterparts—the way the mild fish absorbs the smoky char of the pan or the brightness of a citrus rub. We love the delicate balance of flavors, where the creaminess of an avocado slice meets the snap of a pickled radish, creating a sophisticated profile that feels incredibly gourmet yet remains totally accessible for home cooks.
Ingredients
- White fish fillets (Cod or Tilapia)
- Chili powder and paprika
- Shredded cabbage mix
- Apple cider vinegar
- Sliced avocado
- Corn tortillas
How to make it
- Pat the fish fillets completely dry using paper towels. This is the most important step for achieving a good sear rather than boiling the fish in its own moisture. Season both sides generously with a blend of chili powder, paprika, salt, and pepper.
- Heat a non-stick skillet over medium-high heat with a tablespoon of light oil. Place the fish in the pan and sear for 3 minutes. Carefully flip the fillets using a wide spatula; the fish should be opaque and starting to flake. Cook for another 2-3 minutes.
- While the fish cooks, whisk together a quick slaw using shredded cabbage, apple cider vinegar, a pinch of sugar, and salt. Let it sit for 5 minutes to soften the cabbage fibers and develop a tangy bite.
- Break the cooked fish into large chunks and place them into charred corn tortillas. Top with a generous portion of the tangy slaw and a thick slice of creamy avocado to balance the acidity and spice.
HOW TO MAKE SPICY TACOS?

Why we love this
For those who crave a little heat, spicy tacos offer an exhilarating culinary adventure that dances across the tongue and warms the soul. The depth of flavor found in dried chilies and fresh jalapeños provides a complex heat that isn’t just about ‘burn,’ but about enhancing the natural richness of the protein. We love the way the spicy oils mingle with the juices of the meat, creating a vibrant, red-hued sauce that looks as bold as it tastes. It’s an invigorating dish that encourages bold garnishes like cooling crema or sweet pineapple to create a perfect flavor equilibrium.
Ingredients
- Pork shoulder (cubed)
- Chipotle peppers in adobo sauce
- Fresh jalapeños, sliced
- Cayenne pepper
- Canned pineapple chunks
- Small corn tortillas
How to make it
- In a blender, pulse two chipotle peppers with a tablespoon of the adobo sauce until smooth. Toss this spicy paste with your pork cubes, ensuring every side is thoroughly coated. Let it sit for 20 minutes to penetrate the fibers of the meat.
- Heat a heavy skillet or Dutch oven over medium heat. Sear the pork in batches to ensure a deep brown crust. Once all the meat is seared, add a splash of water, cover the pot, and reduce heat to low, simmering for 20 minutes until the pork is tender and the sauce has thickened.
- While the pork simmers, quickly sauté your sliced jalapeños in a dry pan until they develop blistered skin and a smoky aroma, which mellows their raw bite into a more complex heat.
- Serve the spicy pork on warm tortillas, topped with the charred jalapeños and a few pineapple chunks. The sweetness of the pineapple is essential here, as it provides a necessary contrast to the intense heat of the chipotle.
HOW TO MAKE GRILLED TACOS?

Why we love this
There is no substitute for the deep, smoky flavor that only a live flame can provide. Grilled tacos bring a rustic, charred element to the board that feels like the ultimate backyard celebration. The sound of the sizzle as the meat hits the grates and the sight of those iconic grill marks make the preparation just as enjoyable as the eating. We love how the heat of the grill intensifies the natural sweetness of onions and peppers, turning simple ingredients into caramelized masterpieces that carry the essence of a summer barbecue in every bite.
Ingredients
- Skirt steak or Flank steak
- Bell peppers and onions, sliced thick
- Olive oil
- Garlic salt and black pepper
- Large flour tortillas
How to make it
- Preheat your grill to high heat (about 450°F). Lightly coat your steak and the thick-sliced vegetables with olive oil, garlic salt, and cracked black pepper. Using oil with a high smoke point is key to preventing sticking on the grates.
- Place the steak on the hottest part of the grill. For medium-rare, grill for about 4-5 minutes per side. Do not move the steak once it’s down; this allows the Maillard reaction to occur, creating that flavorful crust.
- On the cooler side of the grill, place your peppers and onions in a grill basket or directly on the grates. Cook until they are tender and have developed dark, charred edges, which usually takes about 8-10 minutes.
- Once the steak is done, let it rest for at least 10 minutes before slicing against the grain into thin strips. Briefly warm your tortillas on the grill for 30 seconds until they puff up slightly, then fill with the smoky steak and grilled vegetables.
HOW TO MAKE FRESH TACOS?
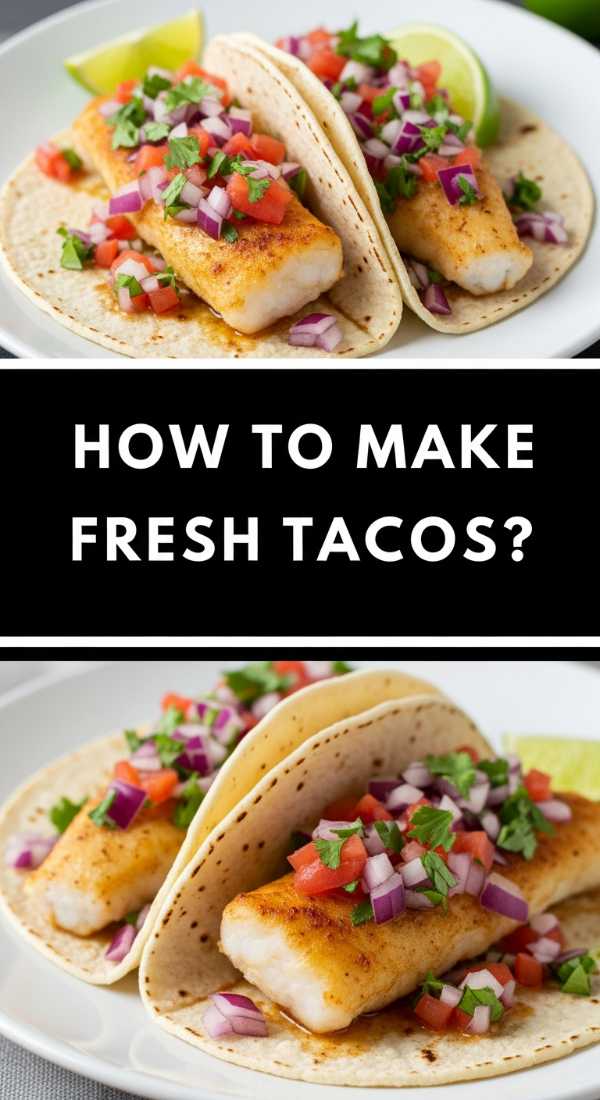
Why we love this
Fresh tacos are a celebration of the garden, focusing on raw, crisp, and vibrant ingredients that feel incredibly light and nourishing. This style is perfect for those days when you want something that tastes clean and garden-fresh, highlighting the peak of seasonal produce. We love the crunch of raw radish, the creaminess of hand-mashed avocado, and the bite of scallions against a soft, cool tortilla. The colors alone—bright greens, deep purples, and vivid reds—make this taco style the star of any food board, looking like a literal work of edible art.
Ingredients
- Jicama or Radishes, thinly sliced
- Fresh corn kernels (raw or lightly blanched)
- Black beans
- Diced cucumber
- Feta or Cotija cheese
- Microgreens
How to make it
- Prepare your vegetables by slicing the radishes and cucumbers into paper-thin rounds. If using jicama, cut it into matchsticks for a satisfying, watery crunch that mimics the texture of an apple.
- If using fresh corn, cut the kernels straight off the cob. For a ‘fresh’ style, you can leave them raw to enjoy their natural sweetness and ‘pop,’ or quickly blanch them in boiling water for 60 seconds followed by an ice bath.
- Toss the corn, black beans, and cucumber together with a drizzle of olive oil and a pinch of sea salt. This creates a chunky salsa-like base that is full of vitamins and minerals.
- Assemble your tacos using cool, room-temperature tortillas. Layer the bean and corn mixture, then top with the sliced radishes, a sprinkle of salty Cotija cheese, and a handful of microgreens for a delicate, peppery finish.
HOW TO MAKE BEST TACOS?

Why we love this
The ‘Best’ taco is the one that achieves the perfect equilibrium between salt, fat, acid, and heat. It’s an expertly layered masterpiece where every ingredient has a purpose, from the deeply seasoned protein to the final hit of fresh lime. We love this version because it doesn’t take shortcuts; it respects the tradition of the taco while ensuring every component is of the highest quality. The result is a bite that feels complete—where the richness of the meat is cut by the sharp onion, and the soft tortilla holds everything together in a warm, comforting embrace.
Ingredients
- High-quality Ribeye or Chuck, finely diced
- White onion, minced
- Fresh cilantro
- Homemade salsa roja
- Small corn tortillas (nixtamalized if possible)
- Limes
How to make it
- Start with the meat: dice your beef into very small, uniform cubes (about 1/4 inch). In a piping hot stainless steel skillet, sear the beef in small batches with just salt and a little oil. The goal is a deep, dark brown crust on the outside while keeping the inside juicy.
- While the meat cooks, prepare your ‘con todo’ garnish: mix your finely minced white onion with chopped cilantro. The ratio should be about 2 parts onion to 1 part cilantro. This provides a sharp, fresh contrast to the fatty beef.
- Warm your corn tortillas on a dry griddle (comal) until they are soft and have developed a few brown toasted spots. If you have time, dip the edge of the tortilla in the beef juices before warming for extra flavor.
- Assemble by piling the beef onto two stacked tortillas (the ‘street taco’ way). Top with the onion-cilantro mix, a spoonful of salsa roja, and a mandatory squeeze of fresh lime juice right before taking your first bite.
HOW TO MAKE TACO SAUCE?
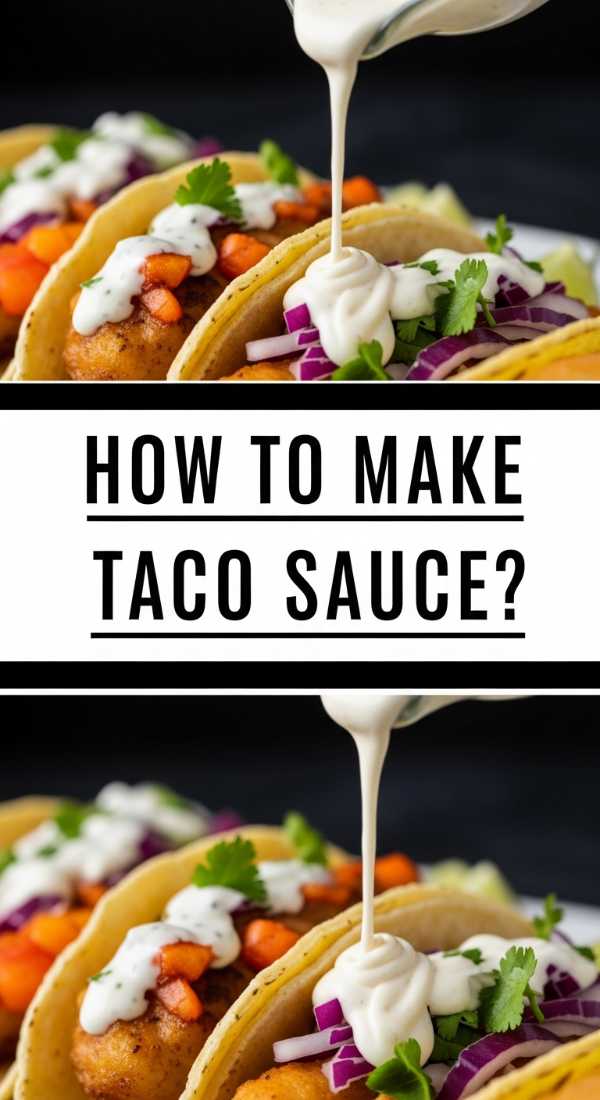
Why we love this
No taco board is complete without the ‘glue’ that holds all the flavors together—a luxurious, velvety taco sauce. A good sauce is the secret weapon of any host, capable of transforming a simple taco into a restaurant-quality dish. We love the way a well-made sauce drapes over the ingredients, seeping into the crevices of the meat and softening the crunch of the vegetables. Whether it’s creamy, tangy, or smoky, the sauce provides that final layer of moisture and a concentrated punch of flavor that lingers on the tongue long after the meal is over.
Ingredients
- Greek yogurt or Sour cream
- Adobo sauce (from canned chipotles)
- Garlic powder and Onion powder
- Lime juice
- Honey or Agave nectar
- Salt
How to make it
- In a medium mixing bowl, start with a base of 1 cup of Greek yogurt or sour cream. Greek yogurt is a fantastic healthy alternative that provides a natural tanginess similar to Mexican crema.
- Whisk in 1 to 2 tablespoons of adobo sauce depending on your heat tolerance. The adobo sauce provides a deep, smoky red color and a complex earthy flavor without the intense heat of the actual peppers.
- Add 1/2 teaspoon of garlic powder, 1/2 teaspoon of onion powder, and the juice of half a lime. To balance the acidity and smoke, add a teaspoon of honey or agave; this ‘secret ingredient’ rounds out the flavors perfectly.
- Whisk vigorously until the sauce is completely smooth and no lumps remain. Transfer to a squeeze bottle and refrigerate for at least 30 minutes before serving. Chilling allows the dried spices to hydrate and the flavors to fully meld together.
HOW TO MAKE CRUNCHY TACOS?

Why we love this
While crispy tacos are often baked, ‘crunchy’ tacos take it a step further by shallow-frying the entire assembly to create a shell that is practically infused with flavor. There is an unmistakable aroma of frying corn that signals a truly special meal is underway. We love the slightly messy, indulgent nature of a crunchy taco, where the shell is bubbly and irregular, providing different levels of crunch in every bite. It’s a nostalgic nod to classic American-style taco nights, elevated by fresh ingredients and the perfect golden-brown finish.
Ingredients
- Yellow corn tortillas
- Seasoned ground turkey or beef
- Refried beans (as a binder)
- Shredded Monterey Jack cheese
- Vegetable oil (for frying)
How to make it
- The secret to a perfect crunchy taco is using the ‘fry-in-place’ method. Spread a thin layer of refried beans onto a soft corn tortilla, then add a small amount of seasoned meat and cheese to one half of the tortilla.
- Heat about 1/2 inch of vegetable oil in a heavy skillet over medium heat (around 350°F). You can test the heat by dipping a corner of a tortilla; if it sizzles immediately, the oil is ready.
- Carefully fold the tortilla over the filling and place it into the hot oil. Hold it closed with tongs for the first 30 seconds to set the shape. Fry for about 2 minutes per side until the shell is a deep golden brown and covered in tiny bubbles.
- Drain the tacos on a wire rack rather than paper towels; this allows air to circulate around the entire taco, ensuring the bottom doesn’t get greasy or soggy while you finish the rest of the batch.
Conclusion
Building a viral food board is less about perfection and more about the abundance of choices and the joy of sharing. Whether you prefer the coastal lightness of fish tacos or the deep, smoky indulgence of a grilled steak, these ideas prove that the humble taco is the ultimate canvas for creativity. So, clear off your biggest wooden board, gather your favorite people, and let the DIY taco magic begin. Your next viral hosting moment is just a few toppings away!