
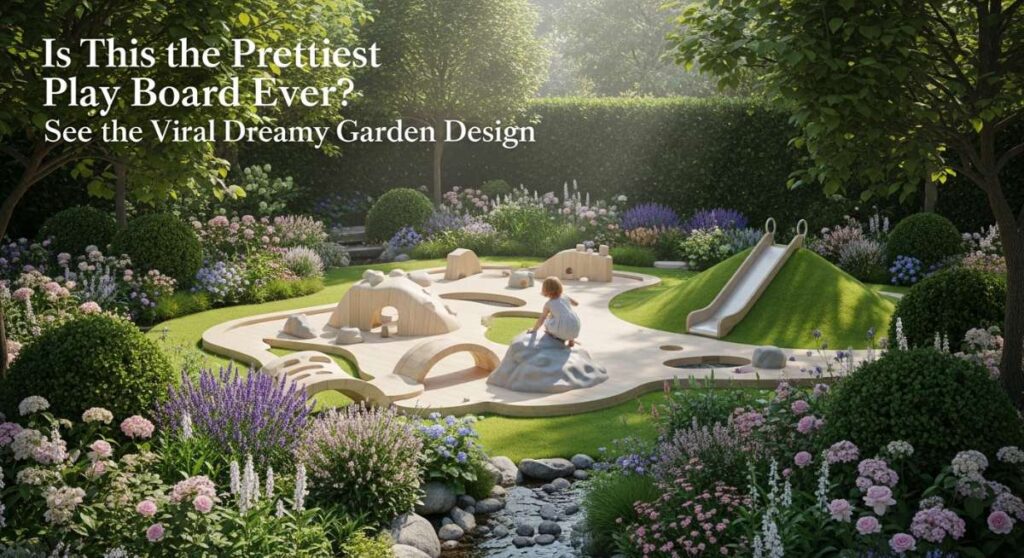
Is This the Prettiest Play Board Ever? See the Viral Dreamy Garden Design
Have you ever stepped into your backyard and felt like you were walking straight into a storybook? There is a certain kind of magic that happens when we stop treating our outdoor spaces as mere chores and start viewing them as extensions of our souls. Lately, I’ve been mesmerized by the way a simple garden can transform into a sanctuary for both the weary adult and the imaginative child.
The viral ‘dreamy garden’ trend isn’t just about expensive landscaping; it’s about the textures, the scents, and those small, intentional DIY touches that make a space feel lived-in and loved. Whether it is the sound of a bird splashing in a hidden corner or the sight of a child lost in sensory play, these elements weave together to create a home that breathes with life. Today, I’m sharing how you can bring that viral aesthetic to your own home without breaking the bank.
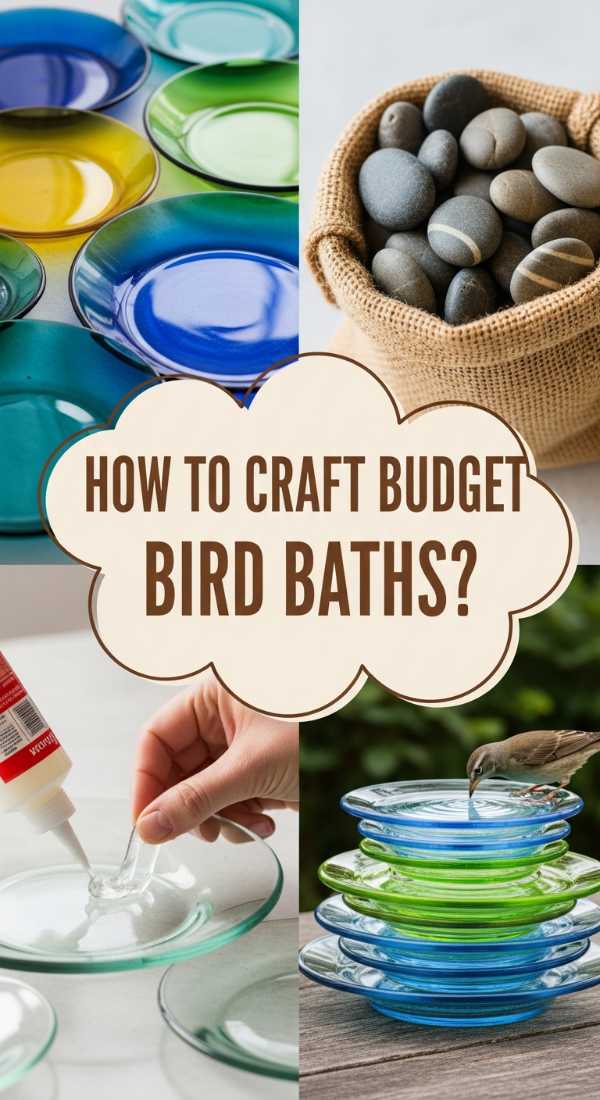
How to Craft a Budget Bird Bath for Garden Magic
Why we love this
The gentle, rhythmic splash of water against a ceramic bowl is nature’s own white noise, instantly lowering the heart rate and inviting a sense of peace. We love this budget bird bath because it bridges the gap between high-end garden sculpture and accessible DIY, offering a shimmering focal point that attracts colorful visitors. There is something deeply therapeutic about watching a robin shake its feathers dry in the morning sun, surrounded by the earthy scent of damp garden soil and the cool touch of stone. It turns a quiet corner of your yard into a living, breathing ecosystem that feels both wild and intentionally curated.
Essential Elements:
- Two oversized terracotta pots or one decorative pillar.
- A wide, shallow ceramic saucer or heavy-duty plastic tray.
- Weatherproof construction adhesive.
- Outdoor-grade spray paint or masonry sealant.
- Smooth river stones or glass pebbles.
- Solar-powered fountain pump (optional for movement).
How to make it
- Begin by selecting your base. If using terracotta pots, flip one upside down to act as the pedestal; ensure it is placed on a level patch of ground to prevent wobbling or tipping.
- Thoroughly clean the bottom of your saucer and the top of your base with a damp cloth to remove dust, as this ensures the strongest possible bond for your adhesive.
- Apply a generous bead of waterproof construction adhesive to the rim of the base pot, then carefully center the saucer on top, pressing down firmly to create a seal.
- Allow the adhesive to cure for at least 24 to 48 hours in a dry environment; do not rush this step, as the weight of the water will require a fully set bond.
- Once cured, you can paint the entire structure with outdoor-rated spray paint for a uniform look, or leave it natural for a rustic, Mediterranean feel.
- Place river stones in the center of the saucer to provide a safe landing spot for smaller birds, then fill with fresh, cool water, making sure the depth does not exceed two inches.
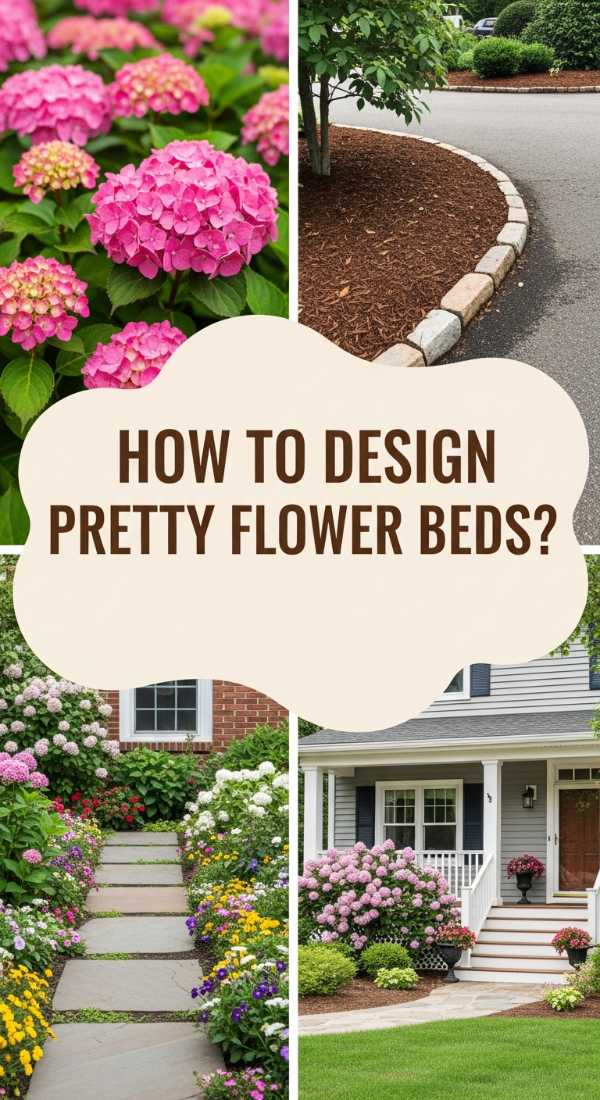
How to Design a Front Yard Flower Bed for Instant Curb Appeal
Why we love this
There is nothing quite like the pride of pulling into your driveway and being greeted by a riot of blooms that look like they belong on the cover of a magazine. A well-designed flower bed doesn’t just add value to your home; it creates a welcoming atmosphere that begins long before you reach the front door. We love the interplay of tall, architectural foxgloves against the soft, pillowy mounds of hydrangeas, creating a sensory experience of visual depth and floral fragrance. The soft rustle of leaves in the breeze and the vibrant colors of the petals create an ever-changing art piece that evolves with the seasons.
Essential Elements:
- Natural stone edging or plastic landscape borders.
- Nutrient-rich garden soil and organic compost.
- A mix of perennials (Hostas, Peonies) and annuals (Petunias, Marigolds).
- Wood chip or pine bark mulch.
- Landscaping fabric (to suppress weeds).
- Hand trowel and garden rake.
How to make it
- Mark the perimeter of your new bed using a garden hose or spray paint; curved lines look more organic and ‘viral’ than sharp, straight angles.
- Remove the existing grass or weeds within the marked area using a spade, ensuring you dig deep enough to remove the root systems to prevent regrowth.
- Lay down a layer of landscaping fabric if you are prone to heavy weeding, then top it with 4-6 inches of a high-quality mix of garden soil and compost to provide a nutrient-rich foundation.
- Arrange your plants while they are still in their nursery pots; place taller species at the back and shorter, spreading varieties toward the front to create a tiered effect.
- Dig holes twice the width of each plant’s root ball, gently tease the roots out, and set them into the ground, firming the soil around them to remove air pockets.
- Apply a 2-3 inch layer of mulch over the entire surface to retain moisture and regulate soil temperature, then water deeply with a gentle spray setting on your hose.
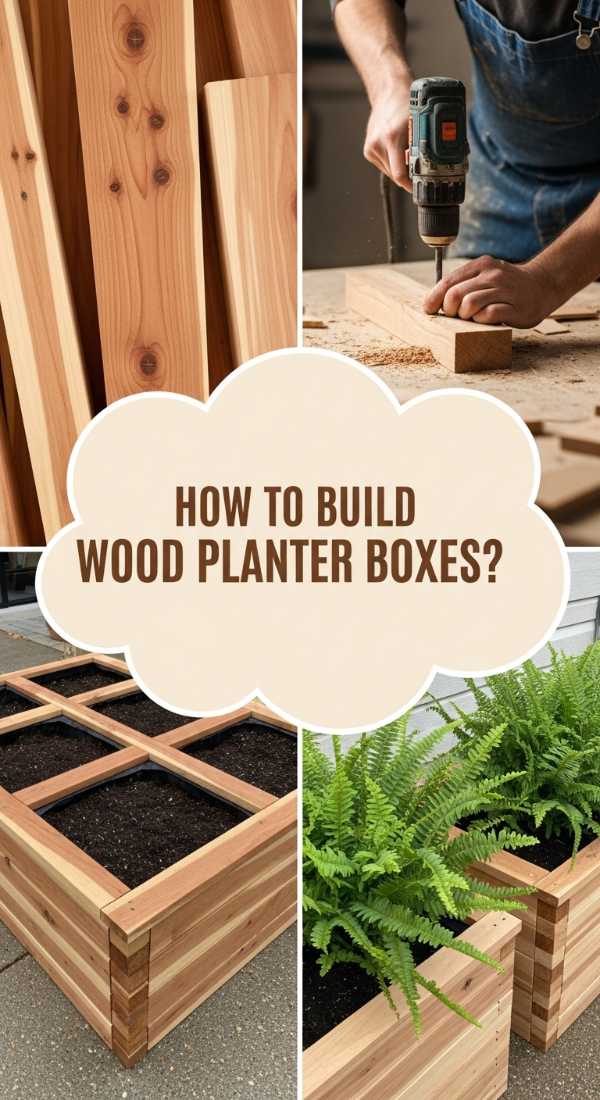
How to Build a Rustic Wood Planter Box for Modern Porch Style
Why we love this
Rustic wood has a way of grounding a modern home, adding a touch of organic warmth to sleek concrete or glass surfaces. These planter boxes are a favorite because they offer a high-end, custom look for a fraction of the cost of boutique garden stores. We love the scent of cedar or pine as it warms in the sun, and the way the wood grain develops a beautiful silver patina over time. It’s the perfect home for a lush topiary or a trailing ivy, creating a structured yet wild aesthetic that brings the forest right to your doorstep.
Essential Elements:
- Cedar or pressure-treated wood planks (1×6 or 2×4).
- Exterior-grade wood screws.
- Wood glue (waterproof).
- Drill and driver bits.
- Plastic liner or heavy-duty landscape plastic.
- Sanding block or electric sander.
How to make it
- Measure and cut your wood into four equal sides for the box walls and one square piece for the base; ensure your cuts are perfectly square for a professional finish.
- Sand all edges and surfaces thoroughly to remove splinters and create a smooth, touchable texture that highlights the natural beauty of the wood grain.
- Apply a line of waterproof wood glue to the edge of one side piece, then secure it to the adjacent piece using exterior screws, pre-drilling holes to prevent the wood from splitting.
- Repeat this process until you have a four-sided frame, then fit the base inside the bottom, securing it with screws from the sides for a hidden look.
- Drill several half-inch holes in the base to allow for proper water drainage, which is critical for preventing root rot in your future plants.
- Line the interior with plastic to protect the wood from constant moisture, making sure to poke holes through the plastic where the drainage holes are located.
How to Create an Outdoor Play Area for Endless Summer Fun
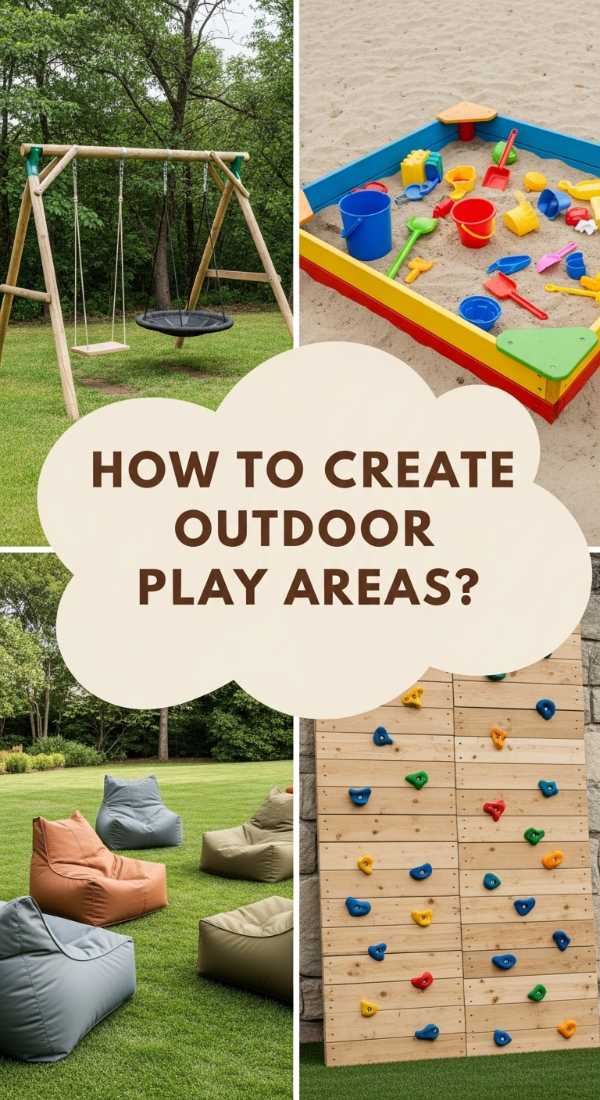
Why we love this
An outdoor play area is the heart of a childhood summer, a place where dirt becomes chocolate cake and the lawn becomes a vast ocean. We love this concept because it moves children away from screens and into the tactile, sensory world of the outdoors. Imagine the feeling of soft grass under bare feet, the sound of wind chimes hanging from a nearby branch, and the sheer joy of unstructured play. This space isn’t just about equipment; it’s about creating a ‘core memory’ zone where children feel safe to explore, imagine, and grow amidst the beauty of nature.
Essential Elements:
- Rubber mulch or soft wood chips for safety surfacing.
- Timber or plastic borders to contain the play zone.
- Play equipment (swing set, slide, or climbing dome).
- Outdoor-rated chalkboard or weather-resistant toys.
- Sun shade sail or large patio umbrella.
- Weatherproof storage bins for smaller accessories.
How to make it
- Select a level area in your yard that is visible from the house but far enough away from garden beds or fragile landscaping to allow for vigorous movement.
- Excavate the grass in the chosen area to a depth of about 3-4 inches; this ensures your safety surfacing will sit flush with the rest of the yard.
- Install your containment border (like pressure-treated timbers) around the perimeter, securing them with long metal spikes driven into the ground.
- Lay down a heavy-duty weed barrier fabric to prevent grass from growing through your play mulch, securing the edges with landscaping staples.
- Fill the area with your chosen safety surface (cedar chips are great for scent and soft landings) to a depth of at least 3 inches.
- Install your main play structures according to the manufacturer’s instructions, ensuring they are anchored properly to the ground to prevent tipping during use.
How to Style Mud Kitchen Accessories for Creative Backyard Play

Why we love this
The mud kitchen is the ultimate ‘messy play’ dream, and styling it with the right accessories is what truly brings it to life. We love how stainless steel pots clink together, mixing with the earthy, damp smell of potting soil and the bright colors of silicone utensils. It’s a sensory feast that encourages fine motor skills and role-play. Seeing a child carefully ‘garnish’ a mud pie with yellow dandelions and smooth grey pebbles is a reminder of the simple beauty in creative discovery. It’s organized chaos at its finest, wrapped in a chic, rustic aesthetic.
Essential Elements:
- Stainless steel bowls, pots, and pans.
- Wooden spoons, whisks, and spatulas.
- Clear glass jars (plastic is safer for younger kids) filled with ‘ingredients’ like dried beans or shells.
- Chalkboard for the ‘Daily Menu.’
- Small watering cans for ‘liquid ingredients.’
- Hanging hooks for organzing utensils.
How to make it
- Start by clearing your mud kitchen counter and cleaning it with a mild soap to provide a fresh canvas for your ‘chef’s station.’
- Install a row of small brass or stainless steel hooks along the backsplash of the kitchen to hang whisks and spoons, keeping them within easy reach for little hands.
- Categorize your accessories by material; group wooden items together and metal items together to create a visually appealing, ‘instagrammable’ look.
- Fill several clear containers with natural elements like acorns, pebbles, or dried flower petals, and arrange them on a shelf to act as the ‘pantry.’
- Place a large pot or basin in the ‘sink’ area and keep a small watering can nearby to allow children to control the flow of water into their creations.
- Add a personalized touch with a chalkboard sign, allowing the kids to write out the specials of the day, which adds an educational element to the play.
How to Curate a Relaxing Hot Tub Area for Ultimate Home Wellness

Why we love this
Imagine the steam rising into the cool night air, the soft glow of fairy lights reflecting off the bubbling water, and the scent of eucalyptus oil lingering in the breeze. We love a well-curated hot tub area because it transforms a backyard into a private spa retreat. It is the ultimate luxury for the mind and body, offering a space to decompress and reconnect with yourself or your partner. The contrast between the warm water and the fresh outdoor air creates a sensory experience that is both invigorating and deeply calming, making it the crown jewel of any wellness-focused home.
Essential Elements:
- Hot tub or inflatable spa.
- Privacy screens (slatted wood or bamboo).
- Outdoor rug (water-resistant).
- Towel rack or decorative hooks.
- Dimmable outdoor lighting or solar lanterns.
- Side table for drinks and aromatherapy.
How to make it
- Ensure your chosen location is a reinforced, level surface like a concrete pad or a sturdy deck that can support the weight of the tub when filled with water.
- Install privacy screens or tall potted plants around the perimeter to create an enclosed, intimate feel that shields you from neighbors’ views.
- Lay down a high-quality outdoor rug that is soft on the feet but mold-resistant, providing a non-slip surface for when you exit the tub.
- Set up a nearby ‘comfort station’ with a weather-resistant towel rack and a small table to hold essentials like water bottles, speakers, or essential oils.
- String warm-toned LED cafe lights overhead or place solar-powered lanterns along the path to the tub to create a safe and enchanting nighttime ambiance.
- Test and balance the water chemistry according to the manufacturer’s guidelines, aiming for a temperature between 100°F and 104°F for the perfect soak.
How to Assemble a Pallet Mud Kitchen for Sustainable Outdoor Discovery
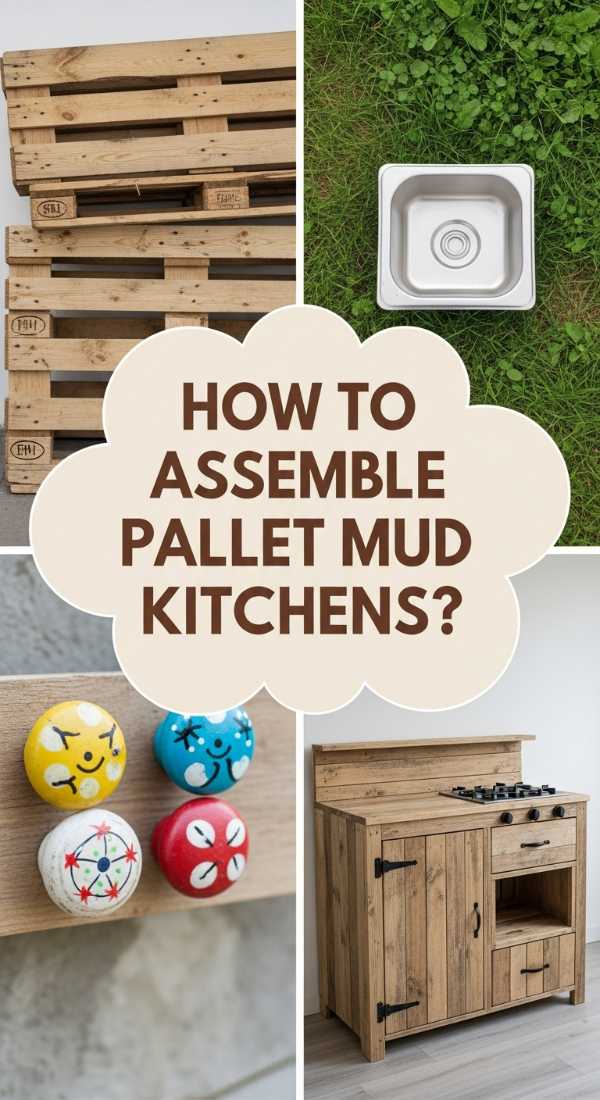
Why we love this
Sustainability meets play in this clever upcycling project that has taken the DIY world by storm. We love the pallet mud kitchen because it has a rugged, adventurous feel that encourages kids to get truly stuck in. The rough-hewn texture of the wood, combined with the smell of fresh mud and the sound of laughter, creates a rustic playground that feels authentic. It’s a project that teaches children the value of repurposing materials while providing a sturdy, oversized space for them to cook up their wildest imaginary feasts.
Essential Elements:
- Two to three heat-treated (HT) wooden pallets.
- Power saw and drill.
- Long wood screws and L-brackets.
- A stainless steel bowl (for the sink).
- Old faucet (non-functional, for aesthetics).
- Outdoor wood sealant or stain.
How to make it
- Source pallets that are marked with ‘HT’ (Heat Treated) rather than ‘MB’ (Methyl Bromide) to ensure they are safe for children’s play areas.
- Dismantle one pallet to use the individual slats for the countertop and shelving, while keeping two pallets whole to serve as the back and the base.
- Construct a sturdy frame by screwing the base pallet to the back pallet at a 90-degree angle, reinforcing the joint with heavy-duty L-brackets.
- Use a jigsaw to cut a hole in the countertop slats that is slightly smaller than the rim of your stainless steel bowl, allowing it to drop in securely as a sink.
- Sand every inch of the pallet thoroughly, starting with a coarse grit and moving to a fine grit, to ensure there are no splinters or rough edges for small hands.
- Apply two coats of an eco-friendly outdoor sealant to protect the wood from water and mud, then attach your non-functional faucet and hooks for the final touch.
How to Make a DIY Water Table for Hours of Sensory Splashing

Why we love this
On a hot July afternoon, there is nothing more refreshing than the cool splash of water. This DIY water table is a sensory masterpiece, offering a shimmering, translucent playground for little ones to explore. We love the way sunlight dances through the water, the tactile sensation of pouring and scooping, and the quiet concentration it brings to children. It’s a clean, refreshing way to play that keeps kids cool while stimulating their curiosity about physics, flow, and volume—all within the beautiful setting of your own garden.
Essential Elements:
- A large, shallow plastic storage bin or galvanized tub.
- PVC pipes or a wooden frame for the stand.
- Waterproof sealant (if using wood).
- Assorted plastic cups, funnels, and tubes.
- Small submersible water pump (optional for a waterfall effect).
- Food-grade blue dye (optional for visual fun).
How to make it
- Build a simple rectangular frame using 2×4 lumber or PVC piping that is the correct height for your child to stand comfortably and reach the bottom of the bin.
- Ensure the frame is extremely stable and wide enough to prevent the heavy water-filled bin from tipping over during enthusiastic play.
- Place the plastic bin into the frame, ensuring it is supported around the rim or by a cross-beam underneath to handle the weight of several gallons of water.
- If using a wooden frame, sand it down and apply a waterproof deck stain to prevent the wood from rotting or warping due to constant splashing.
- Fill the bin with clean water and add a few drops of blue food coloring if you want to create a ‘deep sea’ aesthetic that looks stunning in photos.
- Add a variety of scoops, funnels, and floating toys, or set up a PVC ‘pipe run’ above the table where kids can pour water and watch it flow down into the basin.
How to Arrange Lush Garden Borders for a Serene Sanctuary

Why we love this
Lush garden borders are the frame that turns a simple yard into a masterpiece of landscape design. We love the way a well-curated border feels like a natural hug, surrounding the lawn with soft textures and intoxicating scents like lavender and rosemary. The layered effect of different heights—from creeping groundcovers to towering ornamental grasses—creates a sense of mystery and depth. Walking along a path lined with these borders feels like a journey through a secret garden, where every step reveals a new bloom or a hidden bird’s nest, providing a truly serene sanctuary.
Essential Elements:
- A selection of ‘Anchor’ plants (evergreen shrubs).
- Filler plants (perennial flowers).
- Spiller plants (groundcovers like Creeping Jenny).
- High-quality mulch.
- Edging tool or spade.
- Slow-release fertilizer.
How to make it
- Define the shape of your border using a flexible garden hose; wide, sweeping curves are more visually pleasing and easier to mow around than tight corners.
- Dig out the edge of the border with a sharp spade, creating a ‘V’ shaped trench about 4 inches deep to create a clean break between the lawn and the garden bed.
- Mix organic compost into the existing soil to improve drainage and provide a nutrient-rich home for your new plants.
- Plant your ‘anchors’ first—these are larger shrubs or evergreens that provide structure and year-round interest even when flowers are dormant.
- Infill the spaces with perennials and annuals, grouped in odd numbers (3s or 5s) to create a more natural, drift-like appearance rather than a rigid line.
- Water the entire border thoroughly and finish with a thick layer of dark mulch to make the green foliage pop and to suppress any competing weed growth.
How to Construct Vertical Planter Boxes for Space Saving Greenery
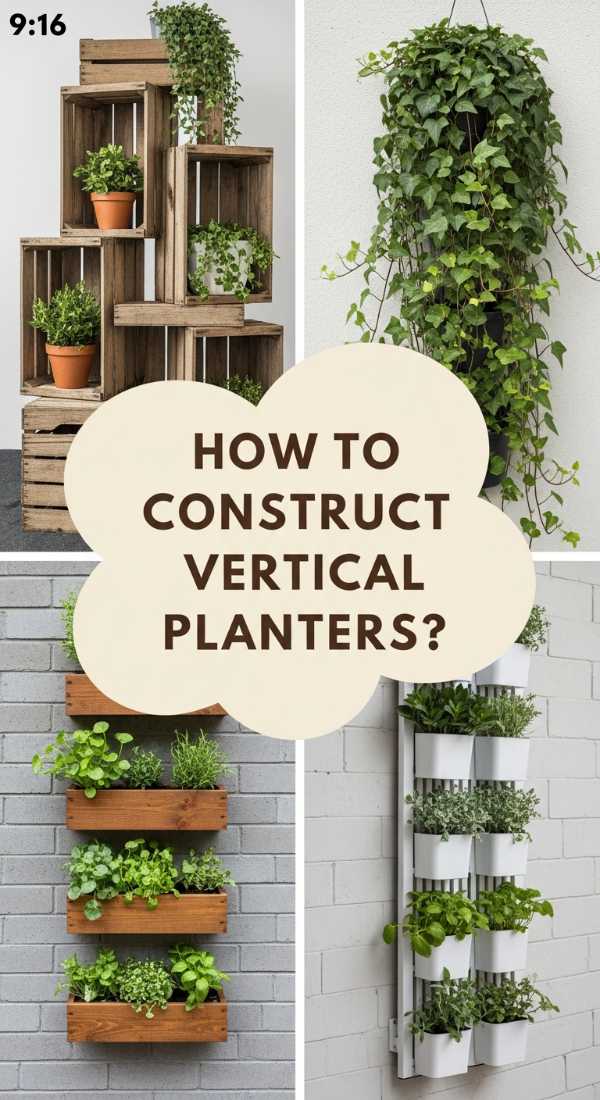
Why we love this
Vertical gardening is the ultimate solution for small spaces, turning a blank wall or a boring fence into a living, breathing tapestry of green. We love the way cascading vines of ivy or bright pops of petunias can soften hard architectural lines. There is something incredibly satisfying about harvesting fresh herbs at eye level, the scent of basil and mint wafting through the air as you brush past. It’s a modern, space-saving way to bring more nature into your life, proving that you don’t need a massive acreage to have a thriving, viral-worthy garden.
Essential Elements:
- Cedar planks for the planter boxes.
- A heavy-duty backing board or wall-mounting system.
- Rust-proof screws and wall anchors.
- Landscaping liner.
- Lightweight potting mix.
- Drip irrigation kit (optional but recommended).
How to make it
- Build several small, rectangular planter boxes out of cedar, ensuring they are light enough to be mounted but deep enough (at least 6 inches) for root growth.
- Drill drainage holes in the bottom of each box and line them with landscape fabric to prevent soil from washing out while still allowing water to pass through.
- Secure your vertical supports or backing board to a sturdy wall or fence using heavy-duty masonry anchors or lag bolts, checking with a level to ensure everything is straight.
- Attach the planter boxes to the backing board in a staggered pattern, which allows trailing plants from the top boxes to drape beautifully over the ones below.
- Fill each box with a high-quality, lightweight potting mix specifically designed for containers, as standard garden soil is too heavy for vertical structures.
- Plant a variety of herbs, succulents, or flowering annuals, and consider installing a simple gravity-fed drip line to ensure every level gets consistent hydration.
Conclusion
Creating a viral-worthy garden isn’t about perfection; it’s about creating spaces that invite joy and connection. From the rustic charm of a pallet mud kitchen to the tranquil ripples of a DIY bird bath, these projects allow you to infuse your personality into your outdoor world. By focusing on sensory details—the scent of cedar, the sound of water, and the vibrant colors of a well-tended border—you can transform any backyard into a dreamy sanctuary that feels both magical and deeply like home. So, grab your gloves and your imagination, and start building your own slice of garden paradise today!