
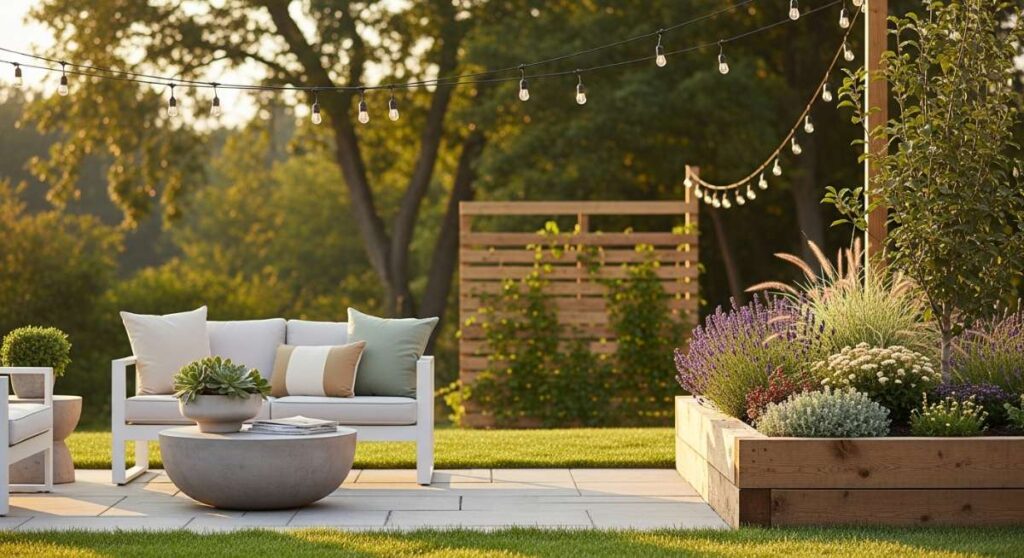
Close your eyes and imagine stepping out of your back door into a space that feels less like a yard and more like a high-end resort. There is something deeply soul-soothing about a perfectly curated outdoor sanctuary; it is where the morning coffee tastes sweeter amidst the birdsong and where the evening wind-down feels like a true escape from the digital noise of our daily lives. Creating this haven doesn’t require a lottery win—just a bit of sweat equity, some creative vision, and the willingness to get your hands a little dirty.
For years, I looked at my patchy lawn and felt a sense of ‘garden envy’ scrolling through Pinterest. But then it clicked: the most enchanting spaces aren’t bought off a showroom floor; they are built layer by layer with personal touches and intentional design. Whether you have a sprawling acreage or a tiny suburban patio, you can transform your patch of earth into a breathtaking retreat that restores your spirit and delights your family.
Today, I’m sharing my ultimate guide to a budget-friendly outdoor makeover. We are diving deep into everything from serene wildlife corners to modern play zones, ensuring every inch of your outdoor space serves a purpose. Let’s roll up our sleeves and turn that ‘someday’ dream into a reality you can enjoy this very weekend!
How to Build a Serene Bird Sanctuary for Ultimate Garden Peace
Why we love this
There is nothing quite as meditative as the soft flutter of wings and the melodic chirping of songbirds as you sit on your porch. A bird sanctuary adds a layer of kinetic energy to your garden, inviting vibrant colors and gentle movements that help you disconnect from stress. The scent of nectar-rich blossoms combined with the cooling sight of a sparkling water feature creates a sensory experience that feels like a warm hug from nature. It’s a low-maintenance way to feel connected to the local ecosystem while enjoying a living tapestry of activity right outside your window.
Essential Elements:
- Multiple bird feeders (tube, platform, and suet)
- A shallow, tiered birdbath
- Native shrubs for nesting (like Holly or Elderberry)
- High-quality birdseed and mealworms
- A quiet, wind-sheltered corner of the yard
How to make it
- Select the Prime Location: Scout for a spot that is visible from your windows but tucked away from high-traffic paths. Ensure it has a mix of sun and shade, and is located about 10-15 feet from dense bushes to give birds a quick escape route from predators like neighborhood cats.
- Install a Multi-Level Feeding Station: Use a shepherd’s hook or a sturdy tree branch to hang feeders at varying heights. Fill one with sunflower seeds for cardinals, a tube feeder with thistle for finches, and a suet cage for woodpeckers. Professional tip: Use a baffle on the pole to prevent squirrels from raiding the stash.
- Provide a Clean Water Source: Set up your birdbath on a level surface. To keep the water enticing, add a small solar-powered bubbler; the sound of moving water is a magnet for birds. Ensure the depth is no more than 2 inches, and add a few flat stones that break the surface so the birds have a safe place to land.
- Add Natural Cover: Plant a cluster of native evergreens or thick shrubs nearby. This provides ‘staging areas’ where birds can wait and survey the area before approaching the feeders. It also offers protection from harsh winds and rain.
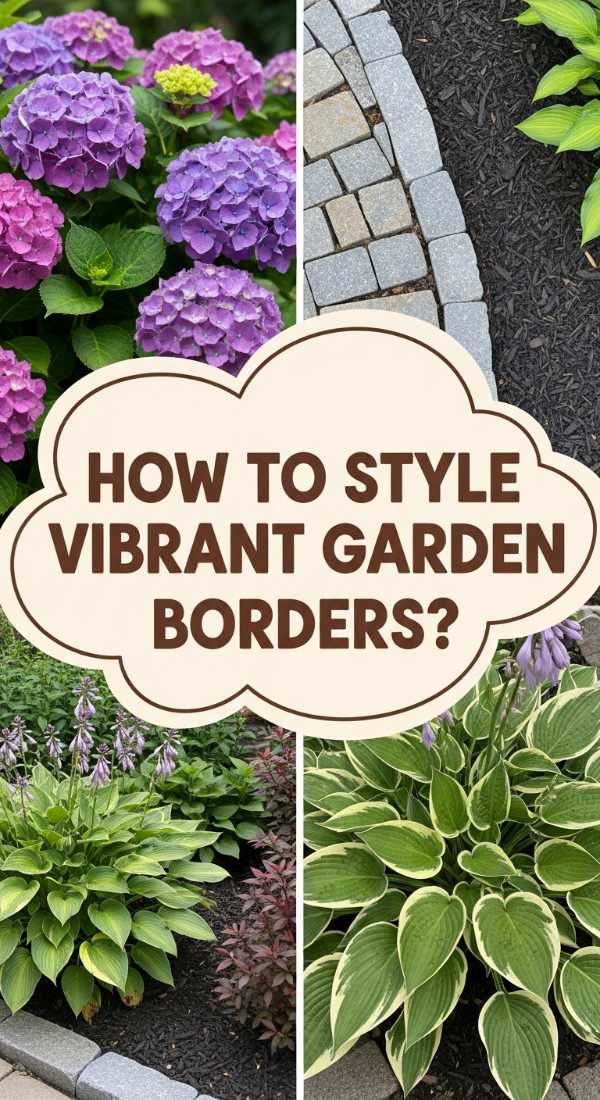
How to Design Enchanting Flower Beds for Curb Appeal Magic

Why we love this
Enchanting flower beds act as the frame for your home’s architectural beauty, offering a lush explosion of textures and fragrances that greet you every time you pull into the driveway. We love the way a well-planned bed transitions through the seasons, from the crisp, cool scent of spring hyacinths to the heavy, sun-drenched perfume of mid-summer lilies. The visual rhythm of varying heights and the soft rustle of leaves against a mulch-lined path create a sense of professional landscaping that instantly boosts your home’s value and your daily mood.
Essential Elements:
- Defined garden edging (stone, brick, or metal)
- Organic garden soil and compost blend
- Slow-release organic fertilizer
- Hardwood mulch
- A mix of ‘thriller, filler, and spiller’ plants
How to make it
- Map and Edge Your Space: Use a garden hose to lay out organic, flowing curves rather than rigid straight lines; this looks more natural and high-end. Once the shape is set, use a sharp spade to cut a 4-inch deep trench along the line to define the edge and prevent grass from creeping in.
- Prepare the Nutrient Base: Remove any existing sod and weeds. Turn the soil to a depth of 8 inches, mixing in a generous 3-inch layer of aged compost and a handful of organic fertilizer. The soil should feel crumbly and dark, providing the perfect ‘energy drink’ for your new arrivals.
- Arrange Using the Rule of Three: Before digging holes, set your plants out in their pots. Place ‘thrillers’ (tall, dramatic plants like Foxgloves) at the back, ‘fillers’ (mounding plants like Hostas) in the middle, and ‘spillers’ (creeping plants like Creeping Jenny) at the front edge. Space them according to their mature width to avoid overcrowding.
- Plant and Seal: Dig holes twice as wide as the root ball. Tease the roots gently if they are pot-bound. Set the plant so the top of the root ball is level with the soil. Once planted, apply a 2-3 inch layer of hardwood mulch, keeping it away from the plant stems to prevent rot, and water deeply until the soil is saturated.
How to Construct Rustic Cedar Planters for Fresh Porch Vibes
Why we love this
Cedar planters bring an earthy, sophisticated warmth to any porch or patio, smelling of deep forest and raw timber. The natural oils in cedar make it rot-resistant and incredibly durable, while its golden-red hue provides a stunning contrast to the vibrant green of herbs or the trailing silver of dichondra. We love the tactile, sturdy feel of these boxes; they provide a structured home for your favorite plants while elevating them to eye level, making your porch feel like a deliberate, designed extension of your living room.
Essential Elements:
- Rough-sawn cedar boards (1×6 or 1×8)
- Exterior-grade wood screws (stainless steel)
- Electric drill and pilot bits
- Landscape fabric liner
- Cedar 2x2s for interior corner bracing
How to make it
- Measure and Cut the Timber: Determine your desired dimensions. For a standard square planter, cut four equal lengths for the sides and four shorter pieces of 2×2 for the corner posts. Use a miter saw for crisp, 90-degree cuts. If you want a rustic look, don’t worry about sanding the faces—let the natural grain shine.
- Build the Framework: Stand two corner posts up and screw one side board into them. Ensure you drill pilot holes first; cedar is prone to splitting if you skip this step. The screws should be countersunk slightly below the wood surface. Repeat this until you have a four-sided box.
- Install the Floor: Cut slats for the bottom of the planter, leaving 1/4-inch gaps between them for drainage. Secure these by screwing them into the bottom edges of your side boards. Tip: Add small ‘feet’ using scrap 2×2 pieces to keep the bottom of the planter off the ground, which prevents moisture trapping.
- Line and Fill: Staple landscape fabric to the interior walls of the box. This prevents soil from washing out through the gaps while allowing excess water to escape. Fill with a high-quality potting mix (not garden soil) and you’re ready to plant.
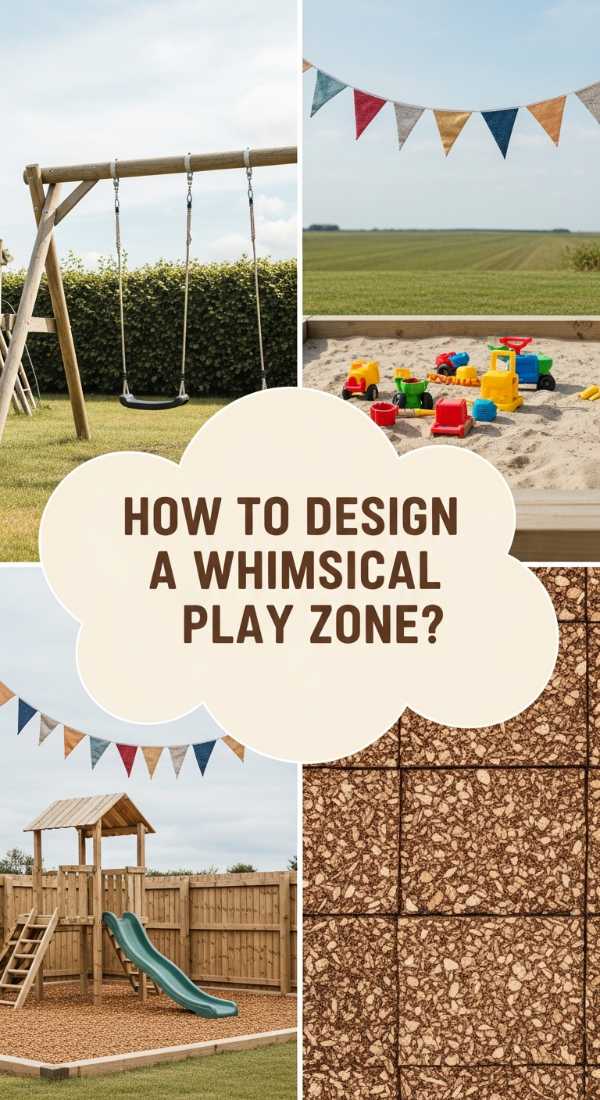
How to Create a Magical Backyard Playground for Endless Summer Joy

Why we love this
A backyard playground is more than just equipment; it’s a portal to imagination where the air is filled with the scent of sun-warmed wood and the sound of pure, unbridled laughter. We love the way a dedicated play zone keeps children active and engaged with the outdoors, creating memories of ‘the best summer ever’ without leaving home. From the smooth feel of a well-worn swing seat to the thrill of a speedy slide, it’s a sanctuary for childhood wonder that evolves with your family’s needs.
Essential Elements:
- Pressure-treated lumber or cedar beams
- Heavy-duty swing hangers and chains
- UV-resistant plastic slide
- Rubber mulch or engineered wood fiber
- Landscape timbers for containment
How to make it
- Level the Foundation: Choose a flat area at least 6 feet away from fences or structures. Use a line level and a shovel to remove high spots until the ground is perfectly flat. This is the most critical step for the safety and stability of the playground.
- Assemble the Main Structure: Start with the A-frame or the central tower. Use heavy-duty lag bolts rather than standard nails for all structural joints. Check for squareness and level at every step. Ensure all vertical posts are anchored into the ground using concrete or specialized ground anchors to prevent tipping.
- Install Play Features: Attach the swing beam, slide, and climbing elements. Tighten all hardware until the lock washers are compressed. For the slide, ensure the exit area is clear of obstructions. Test the weight capacity of all features yourself before letting children play.
- Apply Safety Surfacing: Build a border around the playground using landscape timbers. Fill the area with a 9-inch deep layer of rubber mulch or playground-grade wood chips. This ‘shock-absorbing’ layer is essential for preventing injuries from falls.
How to Curate Adorable Mud Kitchen Tools for Creative Sensory Play
Why we love this
The mud kitchen is the heart of sensory exploration, where ‘dirt’ becomes a five-star meal and water becomes a magical elixir. We love the gritty, squishy texture of the mud between fingers and the earthy aroma of wet moss and crushed petals used as garnishes. It’s a space where children can get messy without consequence, fostering a deep love for the tactile world. The clinking of old metal spoons against cast-iron pots provides a nostalgic soundtrack to an afternoon of creative, open-ended play.
Essential Elements:
- Old stainless steel or cast iron pots and pans
- Wooden spoons and ladles
- A variety of glass jars or plastic containers
- Functional water dispenser (juggler or pump)
- Natural ‘ingredients’ (pinecones, petals, stones)
How to make it
- Sourcing the ‘Hardware’: Visit thrift stores or garage sales to find real kitchen tools. Look for items with interesting textures—wavy whisks, heavy pots, and muffin tins. Avoid anything with sharp edges or lead-based paints. Real tools feel better in small hands and last longer outdoors than plastic toys.
- Organize for Flow: Mount hooks on your mud kitchen backboard for hanging spoons and pans. Use a low shelf for ‘spice jars’ filled with dried beans, sand, or pebbles. Having a designated spot for everything teaches children about order while keeping the play area inviting.
- The Water Element: A mud kitchen isn’t complete without a water source. Set up a large beverage dispenser with a spigot at a height children can reach. This allows them to control the ‘consistency’ of their mud creations independently, adding a layer of physics and autonomy to their play.
- Curate the Pantry: Provide a basket of natural materials. Include various textures: soft dried lavender, crunchy autumn leaves, smooth river stones, and prickly pinecones. These act as the ‘ingredients’ that spark imaginative recipes like ‘Pinecone Stew’ or ‘Stone Cake.’
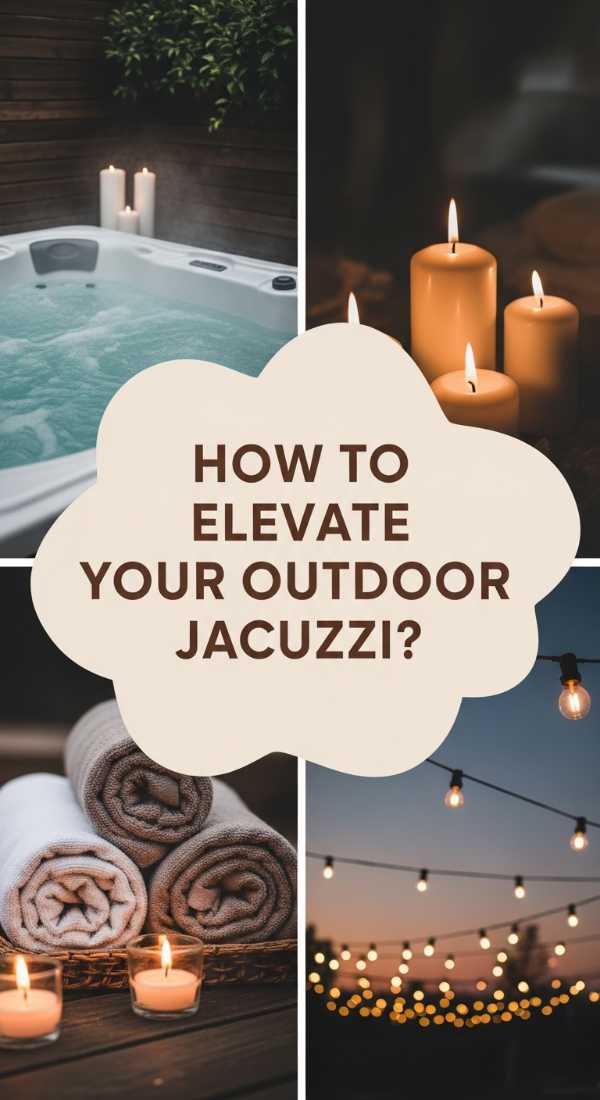
How to Style a Luxurious Spa Retreat for Total Evening Relaxation
Why we love this
Imagine the steam rising into the cool night air as the warm, bubbling water envelops your tired muscles. A backyard spa retreat offers a private sanctuary for decompression, smelling of eucalyptus and fresh cedar. We love the contrast of the crisp evening air against the heated water, and the way flickering candlelight dances on the surface. It’s a high-end experience that turns your backyard into a destination, providing the perfect venue for deep conversations or silent stargazing.
Essential Elements:
- Hot tub (inflatable or hard-shell)
- Outdoor string lights (warm Edison bulbs)
- Privacy screens (lattice or bamboo)
- All-weather rug and plush towels
- Aromatherapy diffusers or candles
How to make it
- Establish a Solid Base: Ensure your chosen spot can support the immense weight of a filled tub (roughly 2,000–3,000 lbs). A reinforced concrete pad or a heavy-duty deck is ideal. If using an inflatable tub on a patio, use a padded ground cloth to protect the bottom from punctures and help with insulation.
- Create Privacy: Install tall lattice panels or plant a row of ‘Green Giant’ arborvitae around the spa area. This creates a ‘room’ feeling and blocks the wind, which helps maintain water temperature. Drape weather-proof outdoor curtains for a resort-like aesthetic that can be closed for total seclusion.
- Layer the Lighting: Avoid harsh overhead floods. Instead, string warm LED bulbs overhead on a dimmer switch. Place solar-powered lanterns at ground level to light the path to the tub. The goal is a soft, amber glow that mimics a sunset and encourages the body to produce melatonin.
- Temperature and Chemical Balance: Set your spa to 100-104°F (37-40°C) depending on preference. Use a floating chlorine or bromine dispenser to keep the water crystal clear and safe. Test the water daily with strips to ensure the pH is balanced, which prevents skin irritation and keeps the water smelling fresh.
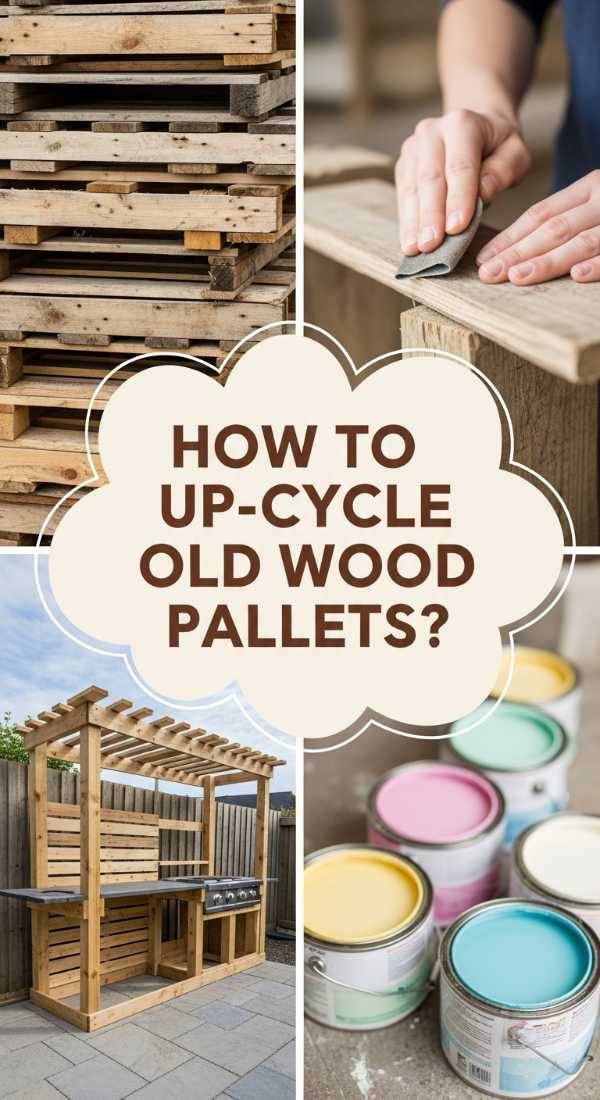
How to Repurpose Rustic Pallets for Sustainable Childhood Adventure
Why we love this
There is a rugged, adventurous charm to pallet projects that appeals to the inner explorer in every child. We love the sun-bleached look of the wood and the endless possibilities for customization, from secret forts to climbing walls. It’s a sustainable way to build, giving old shipping materials a second life as a backdrop for high-seas adventures or mountain-top expeditions. The slightly uneven, hand-built feel of a pallet structure encourages kids to see the world as something they can shape and build themselves.
Essential Elements:
- Heat-treated (HT) pallets
- Crowbar and reciprocating saw
- Orbit sander and 60/120 grit sandpaper
- Exterior wood stain or paint
- Heavy-duty deck screws
How to make it
- Source Safe Pallets: Only use pallets marked with an ‘HT’ (Heat Treated) stamp. Avoid those marked ‘MB’ (Methyl Bromide), as they contain harmful chemicals. Inspect the wood for spills or heavy staining, and choose the cleanest boards possible for kid-focused projects.
- Deconstruct and Sand: Use a reciprocating saw to cut through the nails holding the slats to the stringers. Once disassembled, sand every surface thoroughly. Start with a coarse 60-grit paper to remove splinters and finish with a 120-grit for a smooth-to-the-touch feel. This is the most time-consuming but vital step for safety.
- Build the Structure: For a simple fort, use four pallets as walls, securing them at the corners with 3-inch deck screws and L-brackets. For a climbing wall, screw horizontal pallet slats onto a sturdy 4×4 frame, leaving small gaps for handholds. Always check that the structure is rock-solid and won’t wobble when pushed.
- Finish for Longevity: Apply a high-quality exterior stain or a fun, vibrant outdoor paint. This seals the wood against moisture and UV rays, preventing the pallets from becoming brittle or rot-prone. Add a few ‘comforts’ like an old rug or some outdoor cushions inside the finished fort.
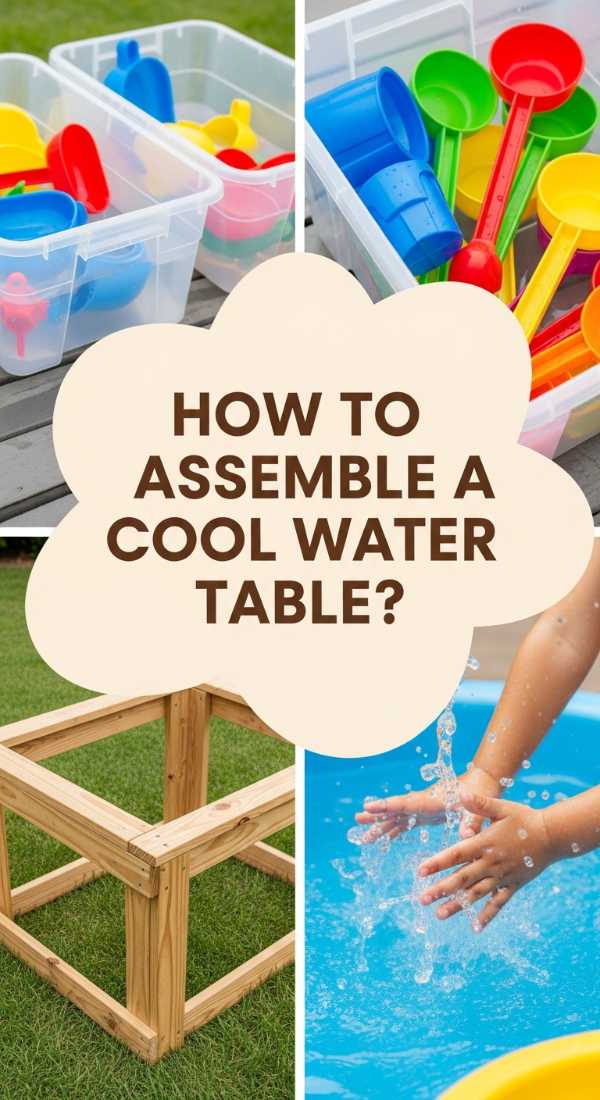
How to Build a Custom Splash Station for Refreshing Sunny Days

Why we love this
The splash station is the ultimate antidote to a sweltering July afternoon, offering a cool, mist-filled oasis right in your own yard. We love the rhythmic sound of water hitting the pavement and the sight of rainbows forming in the fine spray. It’s a low-water-usage way to keep the whole family cool, providing a tactile, refreshing break from the heat. The sensation of cold water on sun-warmed skin is the quintessential feeling of summer, making your backyard the most popular spot on the block.
Essential Elements:
- PVC pipes and various connectors (Ts, elbows, caps)
- PVC primer and cement
- Standard garden hose adapter
- Mist nozzles or small drill bits
- A sturdy base (weighted PVC or wooden stand)
- Zip ties
How to make it
- Dry-Fit the Design: Lay out your PVC pipes on the grass to create a ‘doorway’ or a ‘car wash’ shape. Use 3/4-inch PVC for a good balance of water pressure and stability. Cut the pipes to length using a PVC cutter for a clean, square edge. Assemble the pieces without glue first to ensure the height is right for your kids.
- Create the ‘Rain’: Use a very small drill bit (1/16-inch) to drill holes at 4-inch intervals along the top and side pipes. Angle the holes slightly inward so the water concentrates in the center of the frame. For a more professional feel, screw in brass misting nozzles which produce a finer, more cooling fog.
- Glue and Seal: Once the design is perfect, apply PVC primer followed by cement to each joint. Hold the joints firmly for 30 seconds to ensure a permanent, water-tight bond. Tip: Work in a well-ventilated area and avoid getting glue on the misting holes.
- Connect and Test: Attach the hose adapter to the bottom of the structure. Hook up your garden hose and turn the water on slowly. Adjust the pressure at the spigot until you get the perfect spray height. If the station is top-heavy, zip-tie it to a fence or use sand-filled PVC ‘feet’ at the base for stability.
How to Layer Perennial Blooms for Everlasting Seasonal Beauty

Why we love this
A perennial garden is a living investment that pays dividends in beauty year after year, offering a shifting kaleidoscope of colors and forms. We love the anticipation of seeing the first green shoots of peonies in the spring and the honey-sweet scent of lavender in the heat of August. Layering creates a sense of depth and abundance that makes even a small garden feel like a vast estate. It’s a sustainable way to landscape, as these hardy plants return stronger each season, filling your outdoor space with life and fragrance without the need for constant replanting.
Essential Elements:
- Perennial plants for your specific zone
- Long-handled shovel and garden fork
- Soaker hose for deep watering
- Root stimulator solution
- Shredded leaf mulch or pine bark
How to make it
- Understand Your Sun Exposure: Observe your garden at different times of day. Full sun (6+ hours) is perfect for Coneflowers and Sedum, while partial shade is better for Hostas and Bleeding Hearts. Grouping plants by their light and water needs (hydro-zoning) ensures they thrive with minimal intervention.
- Layer by Height and Bloom Time: Arrange plants so that something is always in bloom from April to October. Place tall ‘architectural’ plants like Delphiniums in the back, mid-height beauties like Black-Eyed Susans in the center, and low-growing groundcovers like Creeping Phlox at the front. This creates a 3D effect that looks professional and lush.
- Plant with Care: Dig a hole that is wider than the pot but no deeper. Mix some root stimulator into the soil to help the plants establish quickly. When placing the plant, ensure the crown (where the stems meet the roots) is just above the soil line; planting too deep can cause perennials to fail.
- Maintenance and Mulch: After planting, lay a soaker hose around the base of the plants to deliver water directly to the roots. Cover the area with 2 inches of organic mulch to retain moisture and suppress weeds. In the fall, leave the dried flower heads for the birds and to provide winter interest.
How to Craft a Modern Backyard Play Haven for Active Toddlers
[IMAGE_10]
Why we love this
Modern play havens blend sleek, minimalist design with high-energy fun, fitting seamlessly into a contemporary backyard aesthetic. We love the clean lines of natural wood and neutral tones that don’t overwhelm the landscape, while providing a safe, stimulating environment for toddlers to develop their motor skills. The scent of fresh pine and the smooth, cool touch of powder-coated steel create a sophisticated play area that looks just as good as the rest of your home. It’s a space where toddlers can climb, balance, and explore in a setting that feels both safe and incredibly stylish.
Essential Elements:
- Wooden climbing dome or geometric climber
- Sandpit with a custom wooden lid
- Geometric stepping stones
- Neutral-colored shade sail
- Non-toxic wood sealer
How to make it
- Select a Safe Surface: Toddlers are still mastering their balance, so the ground must be soft. Install a thick layer of premium cedar mulch or artificial turf with a padded underlay. Ensure the area is free of tripping hazards like large tree roots or uneven pavers.
- Build the Climbing Zone: Assemble a geometric climbing dome using galvanized, powder-coated hardware. These structures are excellent for developing upper body strength and coordination. Ensure every bolt is tightened and then covered with plastic safety caps to prevent scratches on little hands.
- The Interactive Sandpit: Build a low-profile sandpit using 2×6 cedar boards. Fill it with washed ‘play sand’ which is screened for debris and dust-free. The key to a modern look is a custom wooden lid that keeps the sand clean and doubles as a platform or stage when the pit isn’t in use.
- Add Vertical Interest and Shade: Install a neutral-toned (cream or slate grey) shade sail overhead to protect delicate skin from UV rays. This adds a modern ‘architectural’ element to the yard while keeping the play equipment cool to the touch even in direct sunlight. Finish by placing geometric stepping stones leading to the haven to define the space.
Conclusion: Your Dream Sanctuary Awaits
Transforming your outdoor space isn’t just about curb appeal; it’s about creating a lifestyle that embraces the beauty of the natural world. Whether you’re watching a cardinal splash in your new bird sanctuary, or enjoying a glass of wine in your private spa retreat, these DIY projects offer a sense of accomplishment that no store-bought item can match. Your dream sanctuary is just a few weekends away—start small, dream big, and enjoy every moment of the journey.