
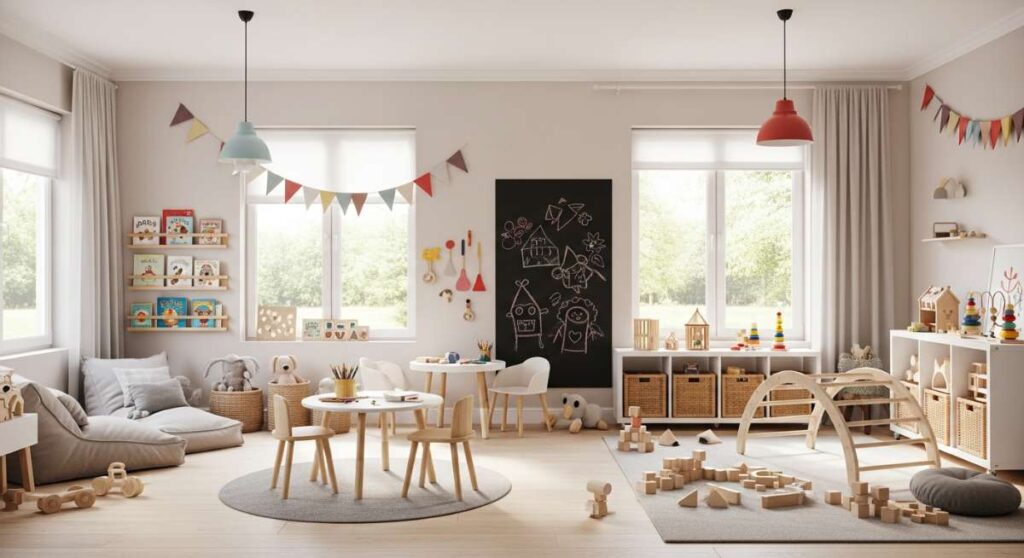
I remember the first time I saw my daughter lost in a world of her own making, whispering secrets to a cluster of dandelion fluff in the corner of our yard. It hit me then: our homes aren’t just boxes for living; they are the fertile soil where our children’s wildest dreams take root. We spend so much time curateing our kitchens and living rooms, but the playroom—whether it’s a corner of the lounge or an expansive backyard kingdom—is where the real magic happens.
Creating the ultimate space for little imaginations isn’t about buying the most expensive plastic gadgets. It’s about building a sanctuary that invites movement, tactile exploration, and a little bit of beautiful mess. It’s about that warm, fuzzy feeling of watching them conquer a climbing wall or find peace in a sensory garden. Today, I’m sharing my favorite ways to revolutionize how our kids play, from woodland retreats to sleek modern nooks.
How to Build a Natural Outdoor Playground for Organic Playtime

Why we love this
There is something deeply grounding about a space built entirely from the earth’s own bounty. We love this approach because it smells of fresh cedar and damp moss, inviting children to touch the rough texture of tree bark and the coolness of smooth river stones. It’s a sensory symphony that encourages slow, thoughtful play, where a fallen log becomes a balance beam and a circle of boulders becomes a dragon’s nest. The organic aesthetic blends seamlessly into your landscaping, making the playground feel like a natural extension of the forest floor.
Essential Elements:
- Untreated cedar logs and stumps
- Smooth river stones and pea gravel
- Hardwood mulch or wood chips
- Native non-toxic shrubs and ferns
- Weather-resistant hemp ropes
How to make it
- Begin by clearing a dedicated area of your yard, removing any sharp rocks or debris. Use a shovel to level the ground, ensuring a flat base for stability.
- Lay down a thick layer of landscape fabric to prevent weeds from poking through your play zone. This keeps the space looking intentional and clean.
- Place your heavy structural elements first. Position large, flat-topped boulders and thick cedar logs to create a perimeter. Dig shallow trenches to “set” the logs into the earth so they don’t roll when climbed upon.
- Fill the interior of the play area with 12 inches of certified playground-grade wood chips. This depth is crucial for safety, providing a soft landing for any tumbles.
- Install a “balancing path” by burying stumps at varying heights. Use a spirit level to ensure the tops are flat, then sand down any rough edges to prevent splinters.
- Finish by planting hardy, kid-friendly greenery like Boston ferns or hostas around the edges to soften the look and provide a lush, hidden-valley feel.
How to Design a Backyard Play Area for Kids to Spark Pure Adventure
Why we love this
This design is for the little explorers who have more energy than they know what to do with. We love it because it transforms a standard lawn into a high-octane adventure zone that feels like a private theme park. Imagine the wind rushing past as they zip through the air or the grit of the climbing holds under their fingers as they scale a backyard “mountain.” It’s a space that smells of sun-warmed rubber and excitement, designed to push boundaries and build physical confidence in the safest way possible.
Essential Elements:
- Heavy-duty zip line kit with trolley
- Plywood climbing wall with resin holds
- Commercial-grade rubber mulch
- Pressure-treated 4×4 timber posts
- Stainless steel hardware and anchors
How to make it
- Select two sturdy, healthy trees at least 30 feet apart for the zip line. If you don’t have trees, you will need to sink 6×6 pressure-treated posts 4 feet into the ground with concrete.
- Install the zip line cable at a slight incline (about 3-6%). Use a tensioning tool to ensure the cable is taut; a saggy line is a safety hazard. Test the line with a weight equal to your heaviest child before letting them ride.
- Construct the climbing wall against a sturdy fence or a free-standing A-frame. Use 3/4-inch exterior-grade plywood. Pre-drill holes for the resin climbing holds in a randomized pattern.
- Paint the plywood with a textured outdoor paint to provide extra grip for little feet. Secure the holds using zinc-plated bolts and T-nuts from the back.
- Dig out the landing zone under the zip line and wall, filling it with at least 9 inches of rubber mulch. This provides the best impact absorption for high-energy play.
- Add a “mission control” chalkboard station where kids can map out their next adventure or record their fastest zip line times.
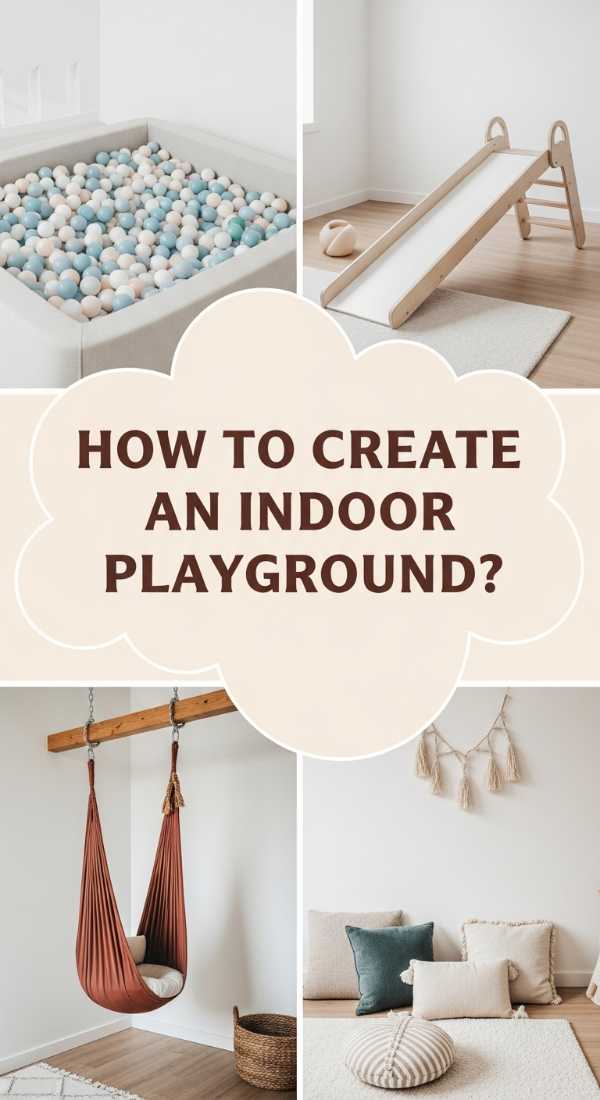
How to Create an Indoor Playground for Endless Rainy Day Fun
Why we love this
When the clouds roll in, the energy levels don’t drop—they just move inside! We love the indoor playground because it turns a forgotten basement or attic into a vibrant, cozy sanctuary. It smells of clean cotton and lavender-scented floor cleaners, with soft textures like velvet floor cushions and smooth birch plywood. It’s a place where the floor is lava and the ceiling is the limit, providing a safe, warm environment for burning off steam when the weather won’t cooperate.
Essential Elements:
- Swedish wall (stall bars) with pull-up bar
- Memory foam floor mats or rugs
- Ceiling-mounted sensory swing
- Birch plywood slide or ramp
- Soft-play foam blocks and wedges
How to make it
- Identify a load-bearing wall to mount your Swedish bars. Use a stud finder to locate the timber frames, as the bars must be securely bolted to the structure of the house to support a child’s weight.
- Lay down high-density interlocking foam mats across the entire play area. For a more aesthetic look, layer a plush, low-pile rug over the top to dampen sound.
- Locate a ceiling joist for the sensory swing. Drill a pilot hole and install a heavy-duty swivel hook. Ensure the hook is rated for at least 300 lbs to account for the dynamic force of swinging.
- Position a birch wood slide or ramp against the Swedish bars. Many modern sets come with hooks that allow you to adjust the incline of the slide based on the child’s age.
- Organize a “soft zone” with foam blocks of various shapes. These are great for building towers that are safe to knock down, preventing damage to walls and ears.
- Install dimmable LED strip lighting around the perimeter. This allows you to transition the space from high-energy bright light to a calm, cozy glow for wind-down time.
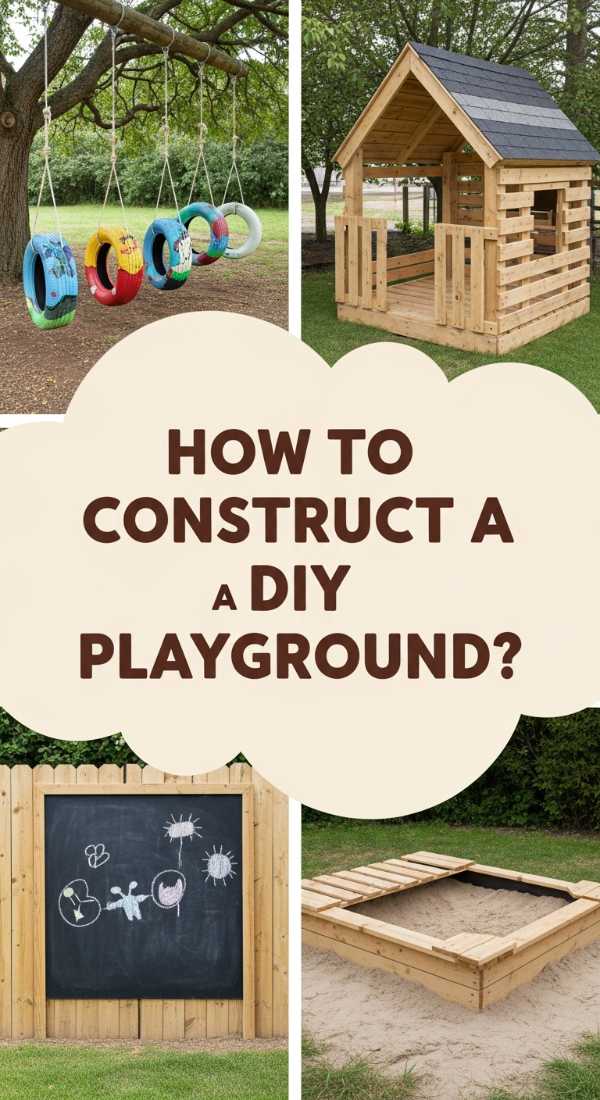
How to Construct a DIY Playground for a Budget Friendly Backyard

Why we love this
Budget-friendly doesn’t mean boring; it means getting creative with what you have. We love this approach because it celebrates the charm of upcycling and the satisfaction of building something with your own two hands. It smells of fresh paint and sun-dried wood, featuring clever hacks like tire swings and pallet houses. It’s a rustic, joyful space that proves love and imagination are far more valuable than a high price tag, giving your backyard a unique, handmade character.
Essential Elements:
- Upcycled tractor or car tires
- Discarded shipping pallets (HT – Heat Treated only)
- Leftover exterior house paint
- Sand and a plastic storage bin
- Heavy-duty rope and carabiners
How to make it
- Scrub your upcycled tires thoroughly with soap and water to remove any road grime. Paint them in bright, cheerful colors using an outdoor-grade spray paint designed for plastic and rubber.
- Create a vertical garden or a “shop window” using pallets. Sand them aggressively to remove all splinters, then seal with a non-toxic clear coat. Bolt them vertically to a fence or back-to-back to create a small play hut.
- For a budget sandbox, repurpose a large plastic storage tub. Drill small drainage holes in the bottom, fill with play sand, and use the lid to keep out neighborhood cats and rain.
- Build a tire tower by stacking three tires and bolting them together through the sidewalls. Fill the bottom tire with heavy rocks to prevent it from tipping.
- Hang a horizontal tire swing by drilling three holes in a large tire, attaching eye-bolts, and connecting them to a central rope with a heavy-duty carabiner.
- Add a DIY music wall using old pots, pans, and wooden spoons. Screw them onto a pallet or fence section to provide a tactile, auditory experience for pennies.
How to Organize Kids Outdoor Play for Mindful Sensory Growth
Why we love this
Mindful play is about slowing down and engaging all five senses, and this organized approach makes it easy for kids to do just that. We love this setup because it feels like an outdoor classroom or a tiny laboratory. It smells of crushed rosemary, wet clay, and pine needles. By providing specific “stations” for sensory exploration, you create a calm environment where children can focus on the delicate texture of a leaf or the way water flows through a series of bamboo pipes.
Essential Elements:
- Mud kitchen with a stainless steel sink
- Sensory bins filled with rice or beans
- Low-level herb garden (mint, lavender)
- Water wall with recycled bottles and tubes
- Natural sorting trays (divided wooden boxes)
How to make it
- Build or buy a simple wooden workbench to serve as a mud kitchen. Install a removable plastic basin or an old stainless steel sink in the center for water and mud mixing.
- Design a “herb smelling station” by planting fragrant, sturdy plants like rosemary and thyme in low pots that kids can easily reach and rub between their fingers.
- Construct a water wall on a vertical pallet. Use zip ties to attach various lengths of PVC pipe and recycled soda bottles at different angles, creating a path for water to travel from top to bottom.
- Set up a “nature laboratory” table. Provide magnifying glasses, tweezers, and wooden sorting trays where kids can categorize their finds—smooth stones, jagged bark, or dried petals.
- Rotate the contents of your sensory bins weekly. Use dyed chickpeas, kinetic sand, or water beads to keep the tactile experience fresh and engaging.
- Label everything with picture icons. This helps children understand where things belong, encouraging them to take ownership of tidying up their mindful space.
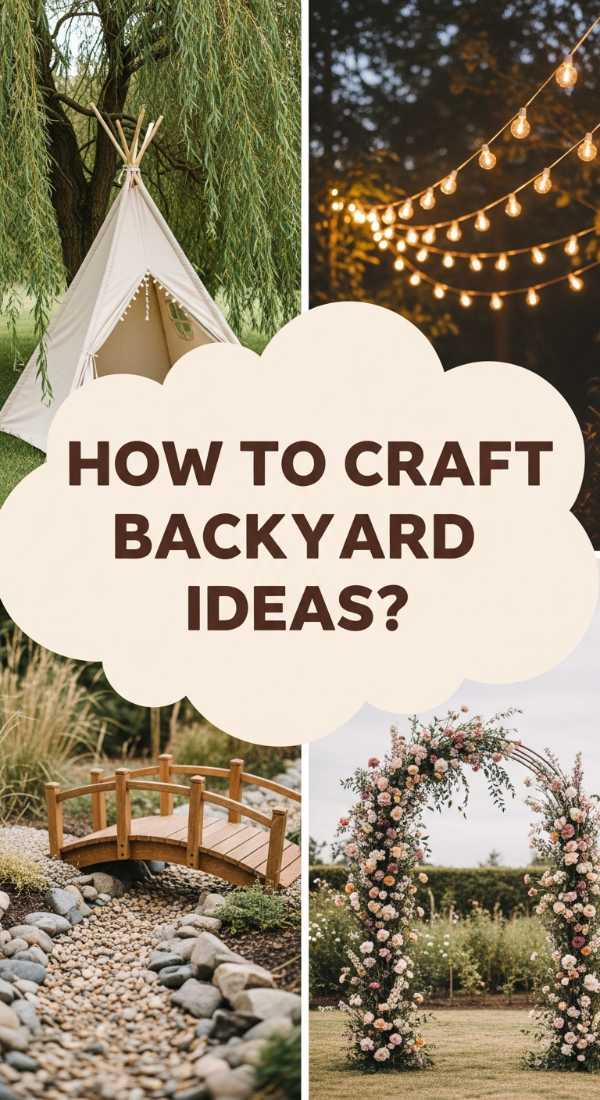
How to Craft Kids Backyard Ideas for a Whimsical Fairytale Escape
Why we love this
Step into a storybook where every corner holds a secret. We love the fairytale escape because it’s pure enchantment, designed to make children feel like they’ve discovered a hidden kingdom. It smells of sweet jasmine and old wood, featuring winding paths and magical nooks. This isn’t just a place to play; it’s a stage for epic tales of knights, fairies, and talking animals. It’s soft, ethereal, and brings a touch of wonder to the everyday mundane.
Essential Elements:
- Living willow tunnel or dome
- Mushroom-shaped wooden stools
- Solar-powered fairy lights (warm white)
- Hanging sheer drapes or outdoor lace
- Tiny “fairy house” kits for the base of trees
How to make it
- Plant a willow tunnel by pushing long, flexible willow rods into the ground in two rows and arching them over the top, securing with twine. Over time, these will grow into a living, leafy hallway.
- Create a “reading nook” under a large tree by hanging a hula hoop draped in sheer white outdoor fabric. Fill the base with weather-resistant floor cushions and a waterproof basket of books.
- Paint small wooden rounds to look like red toadstools with white spots. Secure them to stumps to create a magical seating circle for tea parties.
- String solar-powered fairy lights through the branches of trees and along the willow tunnel. Choose “warm white” bulbs to create a soft, golden glow that activates at dusk.
- Build a “gnome path” using mismatched colorful mosaic tiles or stepping stones painted with glow-in-the-dark paint to guide little feet through the garden at twilight.
- Scatter tiny wooden doors at the base of trees. This encourages imaginative play, as children look for the “residents” of the garden and leave small tokens like acorns or flowers.
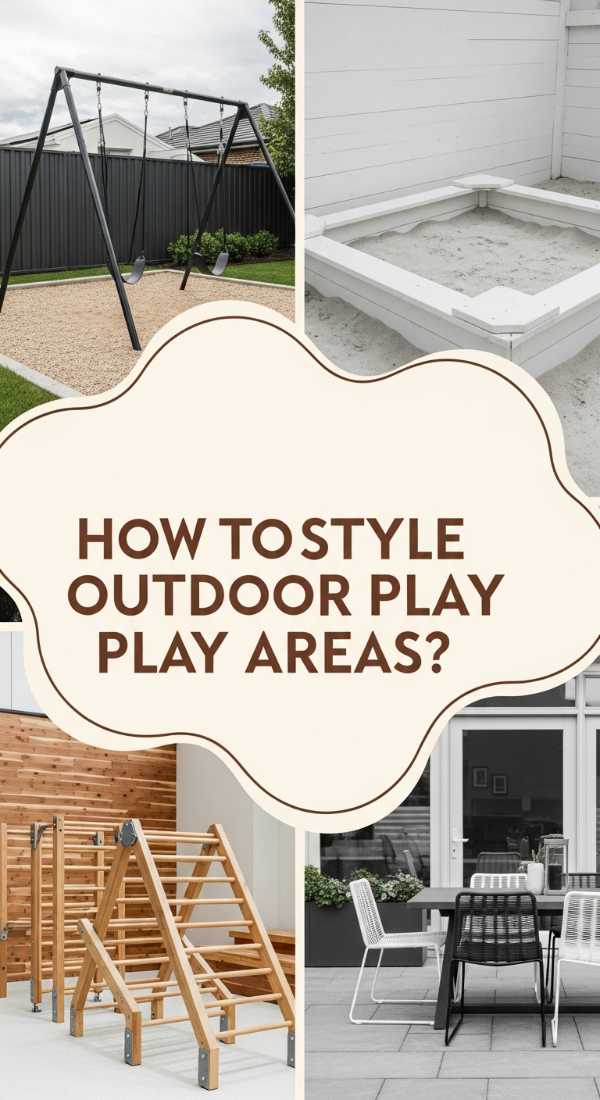
How to Style Outdoor Play Areas for a Sleek Modern Aesthetic

Why we love this
For the family that loves clean lines and a minimalist palette, the modern play area is a dream come true. We love it because it proves that kids’ spaces don’t have to be an eyesore of primary colors. It smells of fresh cedar and clean metal, featuring a monochromatic color scheme and architectural shapes. It’s a sophisticated take on play that looks like an art installation, allowing your backyard to maintain its chic, curated vibe while still being a paradise for the little ones.
Essential Elements:
- Black powder-coated metal frames
- Natural cedar slats for privacy and texture
- Geometric poured concrete pavers
- Minimalist monochrome swing set
- Synthetic turf or white pea gravel
How to make it
- Define the zone using a high-contrast palette—think matte black, charcoal grey, and light natural wood. Paint any existing wooden structures with a high-quality black exterior stain.
- Replace traditional plastic swing seats with sleek, black rubber belt seats and heavy-duty black chains. This immediately elevates the look of the entire set.
- Install a geometric sandbox. Instead of a circle or square, try an elongated hexagon built from smooth, mitered cedar planks. Use white sand for a crisp, clean finish.
- Use large-format concrete pavers with synthetic grass strips in between to create a clean, mud-free path to the play area. This prevents dirt from being tracked into the house.
- Add a “modern playhouse” with a shed-style roof and floor-to-ceiling slats. The slats provide safety while creating a beautiful play of light and shadow during the golden hour.
- Keep toys organized in matte black metal bins or sleek teak boxes. This ensures the aesthetic remains uncluttered when play is finished for the day.
How to Map Kids Outdoor Play Area Ideas for High Energy Exercise
Why we love this
This layout is designed to keep hearts pumping and muscles growing. We love it because it’s basically an obstacle course in your own backyard! It smells of freshly cut grass and determination. It’s a space where “cross-training” happens through play, focusing on agility, strength, and balance. It turns exercise into a game, ensuring that by the time dinner is ready, everyone is ready for a good night’s sleep. It’s vibrant, active, and incredibly rewarding.
Essential Elements:
- Agility ladder painted on the ground
- Ninja warrior slackline with hanging obstacles
- Tire hurdles and step-up stations
- Horizontal pull-up bars at varying heights
- Stopwatch station with a leaderboard
How to make it
- Map out a “circuit” around the perimeter of your yard. Start with an agility ladder—you can use outdoor spray paint to mark this directly onto the grass or patio.
- Install a “Ninja Line” between two trees. These kits come with various attachments like rings, knots, and monkey bars that can be moved to change the difficulty level as the kids grow.
- Set up a hurdle section using PVC pipes or painted tires partially buried in the ground. Space them out to encourage jumping and high-knee running.
- Install a series of pull-up bars made from galvanized steel pipes. Secure the vertical posts in concrete to ensure they can handle the dynamic movement of swinging and hanging.
- Create a “finish line” with a dedicated area for stretching. Use a waterproof chalkboard for a leaderboard where kids can race against their own personal best times.
- Provide “weighted” elements for older kids, like small logs or sand-filled balls, to incorporate into their obstacle course for added resistance.
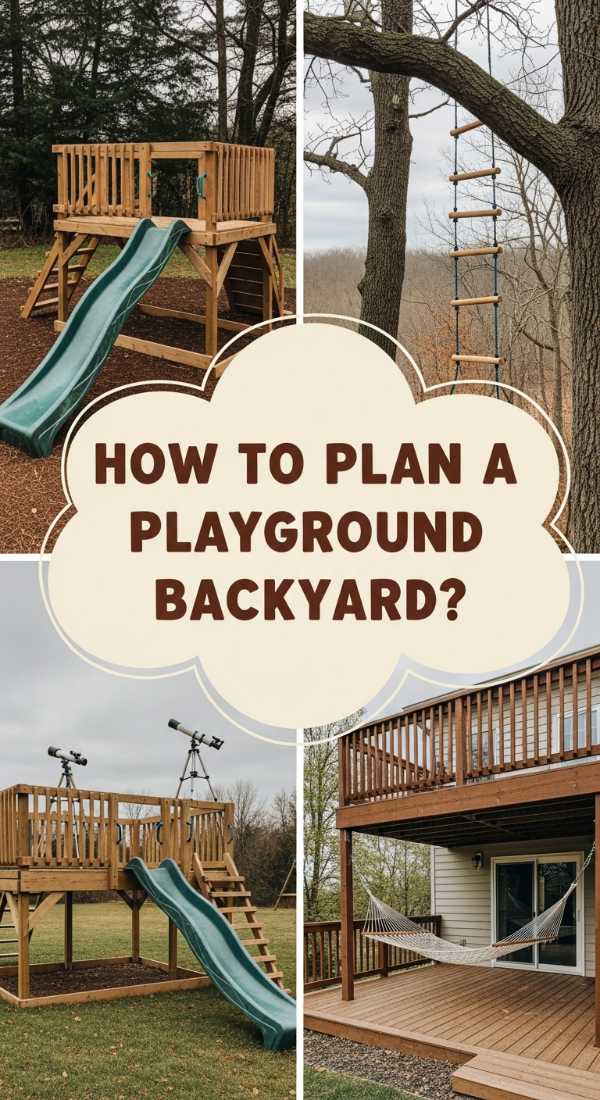
How to Plan a Playground Backyard for the Ultimate Treehouse Living
Why we love this
Is there anything more iconic than a treehouse? We love this because it’s the ultimate childhood dream realized—a secret clubhouse elevated above the world. It smells of pine needles and wind, offering a bird’s-eye view of the neighborhood. It’s a space for secret meetings, reading by flashlight, and feeling like the king or queen of the canopy. This design maximizes vertical space and creates a multi-sensory experience of height and discovery.
Essential Elements:
- Multi-level wooden platforms
- Rope bridge with safety netting
- Bucket and pulley system for “supplies”
- Solar lanterns and telescopes
- Trap door with a wooden ladder
How to make it
- Identify a cluster of trees or one very large, healthy oak or maple. Consult an arborist to ensure the tree can support the structure without being harmed.
- Use a “TAB” (Treehouse Attachment Bolt) system to secure your main beams. This allows the tree to grow and move in the wind without the house cracking or damaging the bark.
- Build the main platform using 2×8 joists and cedar decking. Install a high, sturdy railing (at least 36 inches) around the entire perimeter with vertical balusters no more than 4 inches apart.
- Connect two platforms with a rope bridge. Use heavy-duty nautical rope and ensure the floor of the bridge is solid wood slats for stable footing, backed by high-strength safety netting.
- Install a simple pulley and bucket system. This allows kids to haul up snacks, toys, or “top-secret” messages without having to climb up and down the ladder constantly.
- Add a telescope or binoculars on a swivel mount at the highest point of the treehouse to encourage nature watching and stargazing.
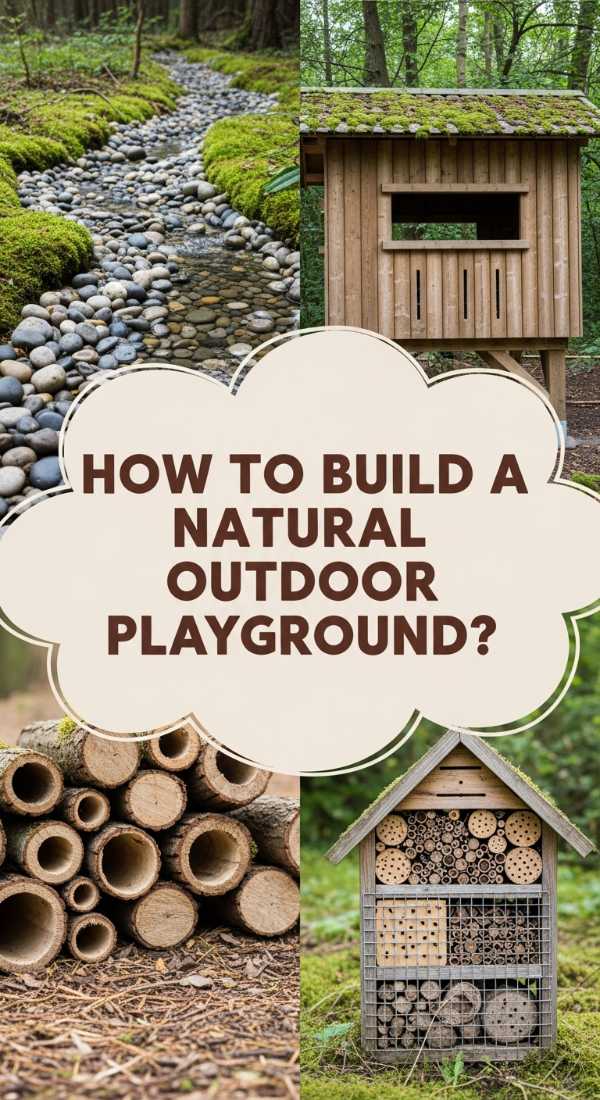
How to Build a Natural Outdoor Playground for Peaceful Woodland Discovery
[IMAGE_10]
Why we love this
This is the quietest version of play, focusing on observation and connection with nature. We love the woodland discovery space because it feels like a secret garden where the wild things are. It smells of damp earth, dried pinecones, and wildflower nectar. It’s a place for the quiet child to sit and watch a butterfly or for a group of friends to build a “bug hotel.” It’s peaceful, educational, and deeply respectful of the environment, teaching kids to be stewards of the earth.
Essential Elements:
- Camouflaged bird blind or willow screen
- Insect “hotel” made from bamboo and hollow logs
- Tree-stump seating around a “nature altar”
- Bird feeders and butterfly puddling stones
- Magnifying station with field guides
How to make it
- Create a “bird blind” using a simple wooden frame covered in camouflage netting or woven willow branches. Cut small peepholes at various heights so children can watch wildlife without being seen.
- Build an insect hotel by stacking wooden pallets or a small A-frame house and filling the gaps with pinecones, hollow bamboo sticks, dry leaves, and bark. This attracts bees, ladybugs, and other beneficial insects.
- Set up a “nature altar”—a flat stump or low table where kids can display their seasonal finds like empty nests, interesting feathers, or autumn leaves.
- Install a bird feeder nearby and provide a weather-resistant field guide so children can identify the species that visit their garden.
- Place a “puddling stone” in a sunny spot. This is simply a shallow stone with a dip in the center filled with sand and a bit of water, which provides essential minerals for butterflies.
- Keep the area mulch-heavy and wild-looking. Avoid manicured lawns here; instead, let native wildflowers grow to attract the very creatures the children are there to discover.
The Future of Play is in Your Hands
As we wrap up this journey through the playroom revolution, I hope you feel inspired to look at your space with fresh eyes. Whether you’re building a high-energy ninja course or a quiet woodland corner, the goal is always the same: to create a world where your children feel safe to explore, fail, and ultimately, fly. These spaces are the backdrops of their childhood memories, and by infusing them with intention, texture, and love, you’re giving them a gift that lasts far beyond their toddler years. Happy building, and may your home always be filled with the sound of happy, wandering imaginations!