

There is something inherently magical about the way a simple board of food can turn a chaotic Tuesday evening into a cozy celebration. We’ve all seen the viral trends, but the 5-minute snack board is taking the internet by storm because it honors the reality of our busy lives while still offering a touch of aesthetic bliss. It is more than just grazing; it is about reclaiming the joy of eating with our eyes first, using fresh, vibrant ingredients that require minimal fuss but offer maximum comfort.
In my own kitchen, I’ve found that the best boards are the ones that blend the high with the low—a mix of slow-cooked comforts, charred vegetables, and sweet treats that invite everyone to dig in. Whether you are hosting a backyard gathering or just looking to spice up your weeknight routine, these recipes represent the heart of this viral lifestyle movement. They are accessible, beautiful, and deeply satisfying to the soul.
As we dive into these internet-famous recipes, remember that the secret ingredient is always the intention behind the meal. From the smokiness of the grill to the nostalgic sweetness of a homemade tart, every bite tells a story of warmth and hospitality. Let’s explore the dishes that are currently defining our digital dinner tables and bringing a sense of culinary adventure back into the home.
How to make Appalachian chicken stew?

Why we love this
This stew is the definition of a hug in a bowl, carrying with it the rustic charm and deep history of the mountain regions. The aroma of simmering poultry, sweet corn, and tender potatoes fills the kitchen with a sense of timelessness that instantly grounds you after a long day. We love the way the rich, thick broth coats the back of a wooden spoon, offering a velvety texture that is both hearty and light enough to enjoy year-round. It is a slow-burn comfort food that feels like a shared secret between generations of home cooks.
Ingredients
- 2 lbs bone-in, skinless chicken thighs
- 4 cups chicken stock (low sodium preferred)
- 3 large Yukon gold potatoes, cubed
- 1 cup corn kernels (fresh or frozen)
- 1 large onion, diced
- 2 carrots, sliced into rounds
- 1 tablespoon butter
- Salt and cracked black pepper to taste
- 1 teaspoon dried thyme
How to make it
- Begin by melting the butter in a heavy-bottomed Dutch oven over medium-high heat until it begins to foam. Pat the chicken dry to ensure a good sear and season liberally with salt and pepper.
- Place the chicken in the pot and sear for 5-6 minutes per side until a golden-brown crust forms; this Maillard reaction is crucial for the depth of flavor in the broth. Remove chicken and set aside.
- Lower the heat to medium and add the onions and carrots, sautéing for about 8 minutes until the onions are translucent and slightly caramelized, scraping the brown bits (fond) from the bottom of the pot.
- Add the cubed potatoes and thyme, stirring for 2 minutes to toast the herbs. Pour in the chicken stock and return the chicken to the pot, ensuring it is mostly submerged.
- Bring the liquid to a boil, then immediately reduce to a low simmer. Cover and let it cook for 45-50 minutes. You’ll know it’s ready when the chicken is fork-tender and the potatoes are soft but not falling apart.
- During the last 10 minutes, stir in the corn. Once finished, shred the chicken slightly with two forks directly in the pot and serve hot with crusty bread.
How to grill the best summer chicken?

Why we love this
Summer isn’t complete without the quintessential charred aroma of chicken hitting a hot grate, a scent that signals leisure and sunshine. This recipe focuses on achieving that elusive balance of a crispy, smoky exterior and an interior that remains impossibly juicy and tender. The sensory experience of the hot grill marks, the glistening glaze of citrus and herbs, and the sound of the sizzle creates a festive atmosphere that turns a simple meal into an event. It’s the kind of dish that makes you want to linger at the table long after the sun has set.
Ingredients
- 4 large chicken breasts or thighs
- 1/4 cup olive oil
- 2 cloves garlic, minced
- Zest and juice of 1 lemon
- 1 tablespoon fresh rosemary, chopped
- 1 teaspoon smoked paprika
- Salt and pepper
How to make it
- Prepare your marinade by whisking together the olive oil, lemon zest, lemon juice, garlic, rosemary, paprika, and a generous pinch of salt and pepper in a large bowl.
- Place the chicken in the marinade, ensuring every inch is coated. Let it sit at room temperature for 30 minutes, or in the fridge for up to 4 hours; any longer and the lemon juice will begin to “cook” the fibers, making them tough.
- Preheat your grill to medium-high (about 400°F). Clean the grates thoroughly and oil them lightly using a folded paper towel dipped in oil held by tongs.
- Place the chicken on the grill. For breasts, cook for 6-7 minutes on the first side without moving them to get those perfect sear marks. Flip once the meat releases easily from the grate.
- Cook for another 5-7 minutes on the second side. Use a meat thermometer to check for an internal temperature of 165°F (74°C). The visual cue for doneness is when the juices run clear.
- Crucially, let the chicken rest on a cutting board for 5-10 minutes before slicing. This allows the juices to redistribute, ensuring a moist bite.
How to make a dirty alani drink?

Why we love this
The “dirty soda” trend has taken over social media, and this Alani version is the ultimate refreshing, guilt-free indulgence that tastes like a tropical vacation. We love the unexpected harmony between the sharp, caffeinated zing of the energy drink and the smooth, velvety richness of coconut cream. It’s a sparkling, creamy concoction that fizzes playfully on the tongue, offering a sweet escape that looks as beautiful in a glass as it tastes. It is the perfect afternoon pick-me-up that feels like a fancy mocktail but takes seconds to assemble.
Ingredients
- 1 can Alani Nu (Tropical Breeze or Peach flavor)
- 2 tablespoons coconut cream or heavy cream
- 1 tablespoon lime juice
- 1/2 tablespoon coconut syrup (optional)
- Fresh lime slices and ice
How to make it
- Start by filling a large, chilled glass (a mason jar works perfectly for the aesthetic) to the brim with pebble ice or crushed ice, which holds the temperature and the carbonation better.
- Pour the Alani Nu energy drink over the ice, leaving about an inch of space at the top of the glass for the “dirty” additions.
- Squeeze in the fresh lime juice. The acidity of the lime is essential to balance the sweetness of the energy drink and the richness of the cream.
- If you prefer a sweeter drink, stir in the coconut syrup now using a long bar spoon to ensure it integrates with the cold liquid.
- The final, viral step: gently pour the coconut cream or heavy cream over the top. Watch as it swirls and marbles through the drink in a beautiful “cloud” effect.
- Garnish with a fresh lime wheel and a straw, and give it a quick stir before sipping to enjoy the creamy, carbonated fusion.
How to bake a fresh plum tart?

Why we love this
There is a sophisticated elegance to a plum tart that belies how simple it is to construct, making it a staple of the viral “aesthetic” food scene. The deep purples and rubies of the fruit soften into a jammy consistency that contrasts beautifully with a crisp, buttery shortbread crust. We love the aroma of warm stone fruit and almond that wafts through the house, creating a sense of rustic French bakery charm. Every bite offers a perfect balance of tartness from the skins and honeyed sweetness from the flesh, making it a sophisticated finale to any meal.
Ingredients
- 1 sheet puffed pastry or shortcrust dough
- 6-8 ripe plums, sliced into wedges
- 1/4 cup granulated sugar
- 1/2 teaspoon cinnamon
- 1 tablespoon apricot jam (for glaze)
- 1 egg (for egg wash)
How to make it
- Preheat your oven to 400°F (200°C) and line a baking sheet with parchment paper to prevent the fruit sugars from sticking.
- Roll out your dough on a lightly floured surface. If using puff pastry, score a 1-inch border around the edge with a knife, being careful not to cut all the way through; this allows the edges to rise while the center stays flat.
- In a bowl, gently toss the plum wedges with the sugar and cinnamon. Arrange them in the center of the dough in overlapping rows or a circular pattern for a professional look.
- Brush the exposed edges of the pastry with a beaten egg. This provides that signature golden-brown sheen and a slight crunch to the crust.
- Bake for 20-25 minutes. Watch for the pastry to turn a deep golden brown and the plums to begin bubbling and releasing their vibrant juices.
- While still warm, heat the apricot jam in the microwave for 10 seconds and brush it lightly over the fruit. This creates a high-gloss finish that makes the tart look like it came from a professional patisserie.
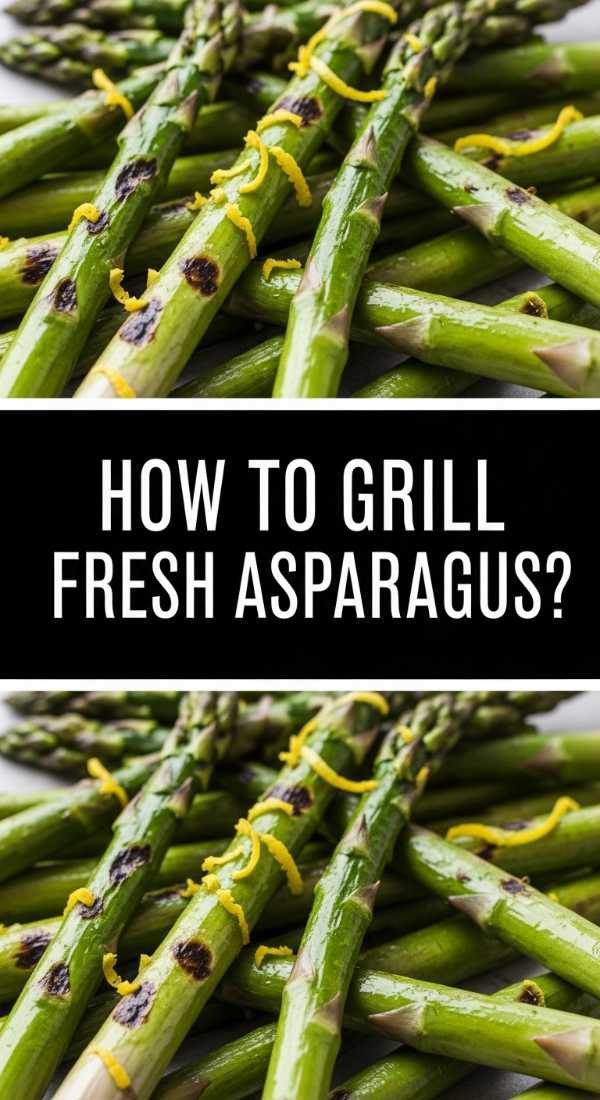
How to make crispy grilled asparagus?
Why we love this
Asparagus on the grill is a revelation, transforming a humble green stalk into a smoky, savory treat with charred tips that shatter like candy. We love the vibrant snap of the vegetable against the richness of olive oil and salt, a sensory experience that feels incredibly healthy yet indulgent. It’s the ultimate side dish for a snack board because it can be eaten with your fingers, offering a sophisticated earthy flavor that complements almost any protein. The bright green hue against the dark grill marks is a visual delight that screams fresh, seasonal cooking.
Ingredients
- 1 bunch fresh asparagus, woody ends trimmed
- 2 tablespoons extra virgin olive oil
- 1/2 teaspoon garlic powder
- Sea salt and cracked black pepper
- 1/2 lemon (for squeezing)
- Optional: Shaved parmesan cheese
How to make it
- Prep the asparagus by snapping off the woody bottom inch of each stalk; they will naturally break where the tender part begins. Pat them completely dry to ensure they roast rather than steam.
- In a large shallow dish, toss the stalks with olive oil, garlic powder, salt, and pepper. Use your hands to ensure every inch of the asparagus is thinly coated in oil.
- Heat your grill or a cast-iron grill pan to high heat. You want the surface to be screaming hot to achieve a quick char without overcooking the interior.
- Lay the stalks perpendicular to the grill grates so they don’t fall through. Grill for 3-5 minutes, turning occasionally with tongs.
- Look for the visual cues: the skins should be slightly blistered and the tips should look dark and crispy, while the stalk remains a bright, vivid green.
- Remove from the heat and immediately squeeze fresh lemon juice over the top. The acid brightens the smoky flavor instantly. Top with parmesan if desired for a salty finish.
How to make the ultimate tomato sandwich?

Why we love this
This sandwich is a cult classic for a reason; it is the absolute pinnacle of summer eating, celebrated for its messy, juicy, and unpretentious glory. We love the way the cold, salted tomato slices interact with the thick layer of creamy mayonnaise, creating a sort of spontaneous “sauce” that soaks into the soft white bread. It’s a texture-driven experience—the squish of the bread, the firm bite of a sun-ripened heirloom, and the crystalline crunch of sea salt. It tastes like garden soil, sunshine, and pure nostalgia, proving that the simplest things are often the best.
Ingredients
- 2 thick slices of high-quality white bread or brioche
- 1 large heirloom tomato (at room temperature)
- 3 tablespoons high-quality mayonnaise (like Duke’s)
- Flaky sea salt and coarse black pepper
How to make it
- The secret to this sandwich is the quality of the tomato. Slice the tomato into thick, half-inch rounds. Place them on a paper towel for one minute and season both sides liberally with flaky salt; this draws out the juices and intensifies the flavor.
- Spread an unapologetically thick layer of mayonnaise on both slices of bread. The mayo acts as a moisture barrier but also provides the necessary fat to balance the tomato’s acidity.
- Stack the salted tomato slices at least two layers deep onto the bread. The goal is a high tomato-to-bread ratio.
- Add a final, heavy dusting of cracked black pepper over the tomatoes.
- Close the sandwich and, this is the vital step: let it sit for 2 minutes before cutting. This allows the bread to slightly absorb the tomato juices and mayo.
- Cut diagonally and serve immediately, preferably over a plate to catch the inevitable (and delicious) drips.
How to make cadbury egg brownies?

Why we love this
These brownies are a seasonal sensation, combining the dense, fudgy decadence of a dark chocolate base with the whimsical, gooey center of a fondant-filled egg. We love the dramatic visual of the bright yellow and white “yolks” peeking through the rich cocoa crust, creating a dessert that is as playful as it is delicious. The aroma of melting milk chocolate and vanilla filling is intoxicating, and the texture is a delightful contrast between the chewy brownie edge and the liquid-gold center of the candy. It is the ultimate treat for chocolate lovers who want a bit of holiday magic in every bite.
Ingredients
- 1 box of your favorite fudgy brownie mix (plus ingredients required)
- 1/2 cup dark chocolate chips
- 6-8 full-size Cadbury Creme Eggs
- 1 teaspoon espresso powder (to enhance chocolate flavor)
How to make it
- Preheat your oven according to the brownie box instructions (usually 350°F) and grease an 8×8 inch baking pan. Line it with parchment paper for easy removal.
- Prepare the brownie batter as directed, but stir in the espresso powder and the dark chocolate chips for an extra-rich, professional flavor profile.
- Pour about two-thirds of the batter into the prepared pan, smoothing it into the corners with a spatula.
- Unwrap the Cadbury eggs. You can either place them in whole for giant pockets of goo or gently break them in half. Press the eggs into the batter, spacing them evenly so every square gets a piece.
- Pour the remaining batter over the eggs, covering them mostly but leaving a few peaks of the eggs showing for that viral aesthetic look.
- Bake for 25-30 minutes. Be careful not to overbake; the brownies should be set at the edges but slightly wobbling in the middle. Let them cool completely before slicing, as the fondant centers need time to firm up.
How to make hamburger casserole?

Why we love this
This dish is pure, unadulterated comfort—a nostalgic nod to family dinners that fills the house with the savory, mouth-watering scent of browned beef and melting cheese. We love the way the pasta shells cradle the rich, tomato-based meat sauce, creating a perfect bite every time that is both creamy and substantial. It is the kind of “ugly-delicious” food that doesn’t need to be fancy to be satisfying, offering a warm, cheesy blanket of flavors that appeals to kids and adults alike. It’s a one-pan wonder that feels like home, perfect for sharing directly from the dish.
Ingredients
- 1 lb lean ground beef
- 1 onion, finely chopped
- 2 cloves garlic, minced
- 1 can (15 oz) tomato sauce
- 1 tablespoon Worcestershire sauce
- 8 oz medium pasta shells, cooked al dente
- 2 cups shredded sharp cheddar cheese
- 1 teaspoon dried oregano
How to make it
- Preheat your oven to 375°F (190°C). While the oven heats, boil a large pot of salted water and cook your pasta shells for 2 minutes less than the package directions. They will finish cooking in the oven.
- In a large skillet over medium-high heat, brown the ground beef with the chopped onions. Break the meat apart with a spatula until it is crumbled and no longer pink.
- Drain the excess grease from the skillet, then stir in the garlic, oregano, tomato sauce, and Worcestershire sauce. Let the mixture simmer for 5 minutes to allow the flavors to marry.
- Combine the cooked pasta and the meat sauce in a large bowl, stirring in 1 cup of the cheddar cheese until it starts to melt and bind everything together.
- Transfer the mixture to a 9×13 inch baking dish. Spread it evenly and top with the remaining cup of cheese.
- Bake for 15-20 minutes until the cheese is bubbling and starting to brown at the edges. Garnish with fresh parsley if you’re feeling fancy and serve warm.
How to make light summer soup?

Why we love this
When the weather warms up, this light summer soup becomes a staple for its clean, refreshing flavors and vibrant garden-fresh appeal. We love the translucency of the herb-infused broth, which carries the delicate notes of lemon and basil without feeling heavy or oily. The sensory experience of crisp-tender zucchini and bright peas popping in your mouth is incredibly satisfying, making it a wonderful palate cleanser or a light lunch. It’s a bowl of liquid sunshine that celebrates the bounty of the season in the most elegant and hydrating way possible.
Ingredients
- 4 cups vegetable or chicken broth
- 2 zucchinis, diced into small cubes
- 1 cup frozen or fresh peas
- 1 bunch green onions, sliced
- Handful of fresh basil leaves, torn
- 1 tablespoon olive oil
- Juice of 1/2 lemon
- Salt and white pepper
How to make it
- In a large pot, heat the olive oil over medium heat. Add the white parts of the green onions and sauté for 2 minutes until soft but not browned.
- Add the diced zucchini to the pot. Sauté for another 3-4 minutes. The goal is to slightly soften the zucchini while maintaining its bright green color and a bit of structure.
- Pour in the broth and bring the mixture to a gentle simmer. Do not let it reach a rolling boil, as this can cloud the clear broth and overcook the delicate vegetables.
- Add the peas and cook for just 2 minutes until they turn a vibrant, neon green.
- Remove the pot from the heat. Stir in the lemon juice, the green tops of the onions, and the torn basil. The residual heat will wilt the basil and release its aromatic oils without turning it bitter.
- Season with salt and white pepper (white pepper keeps the broth looking clean). Serve in shallow bowls with a drizzle of high-quality olive oil on top.
How to make grilled chicken skewers?

Why we love this
Grilled chicken skewers are the ultimate party food, offering a charred, smoky, and highly customizable experience that is visually stunning on any snack board. We love the rhythmic assembly of alternating meat and colorful vegetables, which ensures that every bite is a perfect harmony of textures and flavors. The high heat of the grill caramelizes the edges of the peppers and onions while sealing the juices into the chicken, resulting in a savory-sweet profile that is addictive. There is something primal and fun about eating food off a stick that brings a sense of communal joy to the table.
Ingredients
- 1.5 lbs chicken breast, cut into 1-inch cubes
- 2 bell peppers (different colors), cut into chunks
- 1 red onion, cut into wedges
- 1/2 cup teriyaki or BBQ sauce for glazing
- 2 tablespoons olive oil
- Wooden or metal skewers
How to make it
- If using wooden skewers, soak them in water for at least 30 minutes prior to use to prevent them from burning on the grill.
- Toss the chicken cubes in a bowl with olive oil, salt, and pepper. In a separate bowl, do the same for the peppers and onions. This ensures everything is seasoned and won’t stick to the grates.
- Thread the ingredients onto the skewers, alternating between chicken, pepper, and onion. Don’t crowd them too tightly; leaving a tiny bit of space between items allows the heat to circulate and cook everything evenly.
- Preheat your grill to medium-high. Place the skewers on the grill and cook for about 10-12 minutes total.
- Flip the skewers every 3-4 minutes to ensure an even char on all sides. Use tongs to avoid piercing the meat and losing juices.
- During the last 2 minutes of grilling, brush your choice of sauce (teriyaki or BBQ) liberally over the skewers. The sugar in the sauce will caramelize quickly, so watch closely to prevent burning. Remove when the chicken reaches an internal temp of 165°F.
Conclusion
Creating a lifestyle around beautiful, simple food doesn’t require a culinary degree—it just requires a bit of curiosity and the right ingredients. Whether you’re assembling a viral snack board or simmering a pot of Appalachian stew, the goal is always the same: to find joy in the process and connection in the meal. I hope these recipes inspire you to get into the kitchen and create something that looks as good as it tastes. Happy cooking!