

Why Everyone is Obsessed with This Simple Snack Board Trend
There is something inherently magical about gathering around a table, not with formal plates and stiff linens, but with a sprawling, vibrant board that invites everyone to dig in. It is more than just a meal; it is a shared experience that celebrates the beauty of variety and the joy of picking exactly what your heart desires in that moment. The ‘viral board’ trend has taken over our social feeds for a reason—it strips away the stress of multi-course cooking and replaces it with a feast for the eyes and the soul, turning a Tuesday night into a rustic celebration.
I remember the first time I set down a massive wooden board piled high with charred vegetables, succulent meats, and zesty pastas. The room immediately filled with the sound of laughter and the clinking of glasses as my friends reached for their favorite bites. It captures that quintessential summer feeling: effortless, warm, and deeply nourishing. Whether you are hosting a backyard bash or just want to elevate your family dinner, these ten components are the secret to a board that people will be talking about for weeks.
The secret lies in the balance of textures and temperatures. You want that hit of salt from a perfectly seared steak, the crunch of a fresh salad, and the sweet, smoky finish of grilled fruit. By mastering these simple yet elevated techniques, you can curate a board that looks like a professional caterer put it together, but feels like home. Let’s dive into the elements that make this viral trend so irresistible.
How to grill crispy zucchini?
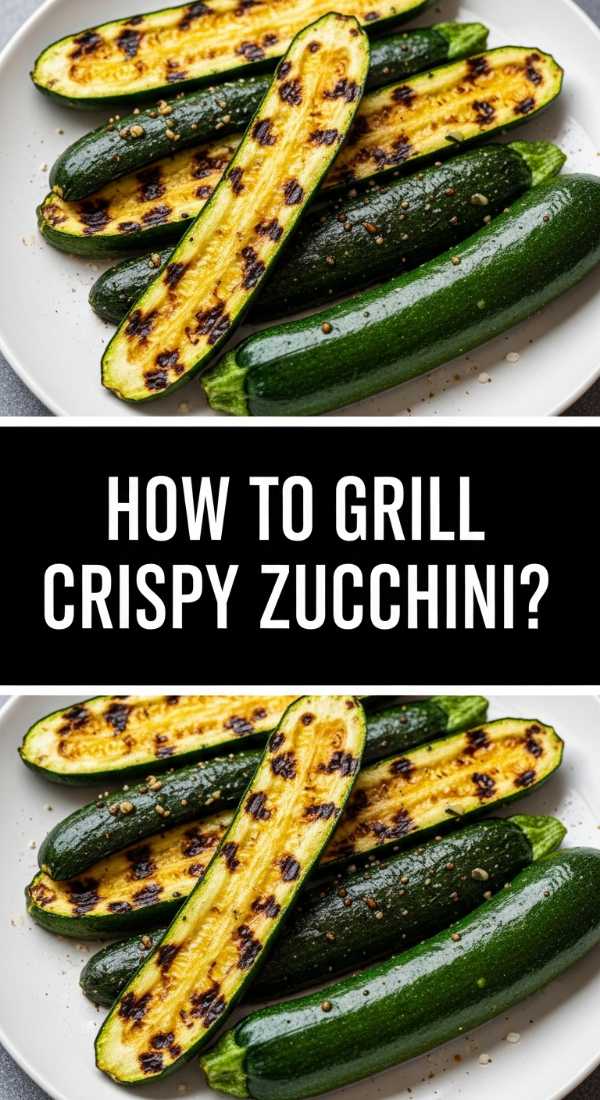
Why we love this
There is nothing quite like the transformation of a humble zucchini when it meets a screaming hot grill grate. The outside develops these gorgeous, deep brown char marks that provide a smoky bitterness, perfectly offsetting the natural, buttery sweetness of the softened interior. As you bite through the crispy skin, the flesh remains tender without becoming mushy, offering a satisfying snap that carries the aroma of charred herbs and high-quality olive oil. It is a light, earthy addition to any board that feels both indulgent and incredibly fresh.
Ingredients
- 4 medium zucchini, sliced into 1/4-inch thick rounds or long planks
- 3 tablespoons extra virgin olive oil
- 1 teaspoon sea salt
- 1/2 teaspoon cracked black pepper
- 1 teaspoon dried oregano
- Zest of one lemon
How to make it
- Begin by prepping your zucchini; if they are particularly watery, sprinkle the slices with a pinch of salt and let them sit for 10 minutes, then pat them dry with a paper towel to ensure maximum crispiness.
- In a large bowl, whisk together the olive oil, sea salt, black pepper, and dried oregano until well combined.
- Toss the zucchini slices in the oil mixture, ensuring every piece is thoroughly coated; this oil barrier is crucial for preventing sticking and achieving that golden-brown crust.
- Preheat your grill to medium-high heat (about 400°F). You want the grates to be hot enough that they sizzle immediately upon contact.
- Place the zucchini slices across the grates in a single layer. Grill for 3 to 4 minutes per side. Do not move them prematurely; you need that contact time to develop the distinct char lines.
- Once the zucchini is tender but still holds its shape, remove from the heat and immediately sprinkle with fresh lemon zest for a bright, citrusy finish that cuts through the smoky notes.
How to make fresh salad?

Why we love this
A fresh salad on a snack board acts as the ultimate palate cleanser, a vibrant burst of green that breathes life into the heavier grilled elements. We love the way the cold, crisp leaves of romaine or butter lettuce provide a structural crunch, while the fragrance of freshly torn mint and basil wafts up from the bowl. Every forkful is a symphony of textures—the juicy snap of a cucumber, the velvet creaminess of an avocado, and the sharp, acidic bite of a vinaigrette that awakens the senses and keeps you coming back for more.
Ingredients
- 1 head of butter lettuce or bibb lettuce, torn
- 1 cup English cucumber, thinly sliced
- 1/2 red onion, shaved paper-thin
- 1/4 cup fresh mint leaves
- 1/2 cup heirloom cherry tomatoes, halved
- 3 tablespoons white balsamic vinegar
- 1/4 cup avocado oil
- A pinch of flaky sea salt
How to make it
- Start with the greens: wash your lettuce in ice-cold water to ensure maximum crispness, then dry it thoroughly using a salad spinner; moisture is the enemy of a good dressing cling.
- Prepare your vegetables by slicing the cucumbers into half-moons and the red onions into translucent slivers; soaking the onions in cold water for 5 minutes can remove some of their harsh ‘bite.’
- In a small glass jar, combine the white balsamic vinegar and avocado oil. Shake vigorously until the mixture emulsifies into a cloudy, thick dressing.
- In a large chilled wooden bowl, layer the lettuce first, followed by the cucumbers, tomatoes, and onions.
- Wait until the very last second before serving to drizzle the dressing over the salad. Use your hands or large tongs to gently lift and turn the leaves, ensuring a light, even coating.
- Finish by tearing the fresh mint leaves over the top and adding a final sprinkle of flaky salt to make the vegetable flavors pop.
How to sear juicy steak?

Why we love this
A perfectly seared steak is the undisputed crown jewel of a food board, offering a rich, savory depth that grounds the lighter components. We are obsessed with the Maillard reaction—that dark, salty, caramelized crust that forms on the exterior, sealing in a fountain of warm, beefy juices. As you slice into it, the contrast between the crusty outside and the tender, rose-pink center is a visual and culinary delight. The aroma of browning butter and roasted garlic cloves infused into the meat creates an irresistible scent that draws everyone to the table.
Ingredients
- 2 thick-cut ribeye or New York strip steaks (at least 1.5 inches thick)
- 2 tablespoons high-smoke point oil (like grapeseed)
- 4 tablespoons unsalted butter
- 4 cloves garlic, smashed
- 3 sprigs fresh rosemary or thyme
- Coarse kosher salt and black pepper
How to make it
- Take the steaks out of the refrigerator 45 minutes before cooking to bring them to room temperature; this ensures the meat cooks evenly throughout rather than staying cold in the middle.
- Pat the steaks extremely dry with paper towels. Any moisture on the surface will create steam, preventing that iconic dark crust from forming.
- Season aggressively with kosher salt and cracked black pepper on all sides, including the edges.
- Heat a heavy cast-iron skillet over high heat until it starts to lightly smoke. Add the oil and swirl to coat the bottom.
- Carefully lay the steaks into the pan, pressing down slightly to ensure full contact. Sear undisturbed for 3 to 4 minutes until a deep brown crust forms.
- Flip the steaks. Immediately add the butter, smashed garlic, and herb sprigs to the pan. As the butter foams, tilt the pan and use a large spoon to continuously basting the steak with the hot, flavored fat for another 3 minutes.
- Use a meat thermometer to check for doneness (130°F for medium-rare). Remove the steak and let it rest on a cutting board for at least 10 minutes before slicing to allow the juices to redistribute.
How to roast sweet corn?

Why we love this
Roasting corn heightens its natural sugars, turning a simple summer staple into a candy-like treat that bursts with sunshine in every bite. There is something deeply nostalgic about the smell of roasting kernels, a scent that is both nutty and sweet. When roasted in the oven, the corn develops a slight chew on the outer skin while the inside remains explosively juicy. It adds a wonderful golden hue to your board and provides a rustic, handheld element that kids and adults alike can’t stop reaching for.
Ingredients
- 4 ears of fresh sweet corn, husks and silk removed
- 3 tablespoons melted butter
- 1 teaspoon smoked paprika
- 1/2 teaspoon garlic powder
- 1/4 cup grated parmesan cheese
- Fresh cilantro for garnish
How to make it
- Preheat your oven to 425°F (220°C). If you want a bit more char, you can set your oven to ‘Convection Bake’ to circulate the hot air more efficiently.
- Place the cleaned corn ears on a large rimmed baking sheet lined with parchment paper or aluminum foil for easy cleanup.
- In a small bowl, mix the melted butter with smoked paprika and garlic powder. Use a pastry brush to coat every inch of the corn with this seasoned butter.
- Roast the corn for 20 to 25 minutes. Every 8 minutes, use tongs to rotate the ears so they brown evenly on all sides.
- Look for the kernels to become slightly shriveled and develop small brown spots; this indicates the sugars have caramelized.
- Remove from the oven and, while still piping hot, sprinkle with the grated parmesan cheese so it adheres to the butter. Top with chopped cilantro before serving.
How to bake lemon salmon?

Why we love this
Baked salmon brings a sophisticated, melt-in-your-mouth elegance to the viral board. We love the delicate, fatty richness of the fish when it is treated with the bright, sharp acidity of fresh lemon. The texture should be buttery and flakey, gently falling apart at the touch of a fork. As the salmon bakes, the citrus slices caramelize on top, infusing the meat with a zesty aroma that balances the savory notes of the board. It is a protein that feels light yet deeply satisfying, providing a beautiful coral color that makes the whole spread pop.
Ingredients
- 1 large side of salmon (about 1.5 – 2 lbs)
- 1 lemon, thinly sliced into rounds
- 2 tablespoons honey
- 2 tablespoons Dijon mustard
- 3 cloves garlic, minced
- Fresh dill for garnish
How to make it
- Preheat your oven to 400°F (200°C) and line a baking sheet with a large piece of aluminum foil, leaving enough at the edges to fold over and create a packet.
- Place the salmon in the center of the foil. Pat the surface dry to help the glaze stick better.
- In a small bowl, whisk together the honey, Dijon mustard, and minced garlic until smooth. Pour this glaze over the salmon, using the back of a spoon to spread it evenly.
- Arrange the lemon slices in an overlapping pattern across the top of the fish; this protects the meat from drying out while adding intense citrus flavor.
- Fold the foil over the salmon and crimp the edges tightly to seal in the steam. This ‘en papillote’ style of cooking ensures the fish stays incredibly moist.
- Bake for 12 to 15 minutes. Open the foil carefully (watch out for the steam!) and bake for another 2 to 3 minutes under the broiler if you want the edges of the salmon to slightly caramelize. The fish is done when it reaches an internal temperature of 145°F and flakes easily.
How to mix summer pasta?

Why we love this
A room-temperature summer pasta is the glue that holds a snack board together, providing a comforting, carb-heavy base that pairs perfectly with everything else. We love the way short pasta shapes like fusilli or farfalle catch the light oils and herbs in their nooks and crannies. The sensation of ‘al dente’ pasta mixed with juicy, bursting cherry tomatoes and the creamy pull of fresh mozzarella is pure bliss. It’s a dish that tastes like a garden in full bloom—fragrant, herbaceous, and incredibly easy to share.
Ingredients
- 1 lb short pasta (rotini, gemelli, or penne)
- 1 pint cherry tomatoes, halved
- 8 oz fresh mozzarella pearls (bocconcini)
- 1/2 cup basil pesto (homemade or high-quality store-bought)
- 1/4 cup toasted pine nuts
- A splash of pasta water
How to make it
- Bring a large pot of heavily salted water to a rolling boil. Cook the pasta according to the package instructions, but aim for ‘al dente’—usually 1 to 2 minutes less than the full cook time—so it maintains its structure.
- Before draining, reserve about 1/2 cup of the starchy pasta water; this is the secret to getting your pesto sauce to coat the noodles perfectly.
- Drain the pasta and immediately toss it into a large mixing bowl. While it is still warm, add the pesto and a few tablespoons of the pasta water. Stir until the pasta is glossy and green.
- Let the pasta cool to room temperature. This prevents the mozzarella pearls from melting into a blob and keeps the tomatoes from becoming mushy.
- Once cooled, fold in the halved cherry tomatoes and the mozzarella pearls.
- Just before adding to your board, garnish with the toasted pine nuts for a crunch and a few whole basil leaves for a professional, fresh look.
How to cook shrimp tacos?

Why we love this
Shrimp tacos add a playful, interactive element to the board that encourages everyone to build their own perfect bite. The shrimp should have a distinct ‘snap’ when you bite into them, coated in a spicy, smoky seasoning that dances on the tongue. We love the contrast between the hot, spiced seafood and the cool, zesty slaw. The aroma of toasted corn tortillas mingling with the scent of lime and cilantro is the quintessential smell of a summer party, making these a guaranteed crowd-pleaser.
Ingredients
- 1 lb large shrimp, peeled and deveined
- 2 teaspoons chili powder
- 1 teaspoon cumin
- 1/2 teaspoon onion powder
- Small corn tortillas
- 2 cups shredded cabbage
- 1/4 cup Greek yogurt mixed with lime juice (for the crema)
How to make it
- In a bowl, toss the shrimp with chili powder, cumin, onion powder, and a tablespoon of oil until they are vibrant and fully coated.
- Heat a large non-stick skillet over medium-high heat. Add the shrimp in a single layer. Cook for only 2 minutes per side; you’ll know they are ready when they turn opaque and form a tight ‘C’ shape. Do not overcook, or they will become rubbery.
- While the shrimp are cooking, char your corn tortillas directly over a gas flame or in a dry pan for 30 seconds per side until they are soft and slightly blistered.
- Prepare a quick slaw by tossing the shredded cabbage with a squeeze of lime and a pinch of salt.
- To assemble for the board, place the tortillas in a stack and the shrimp in a separate pile. Provide the lime-yogurt crema in a small ramekin for drizzling.
- Garnish the shrimp with extra lime wedges to allow guests to add that final hit of acidity themselves.
How to prep greek salad?
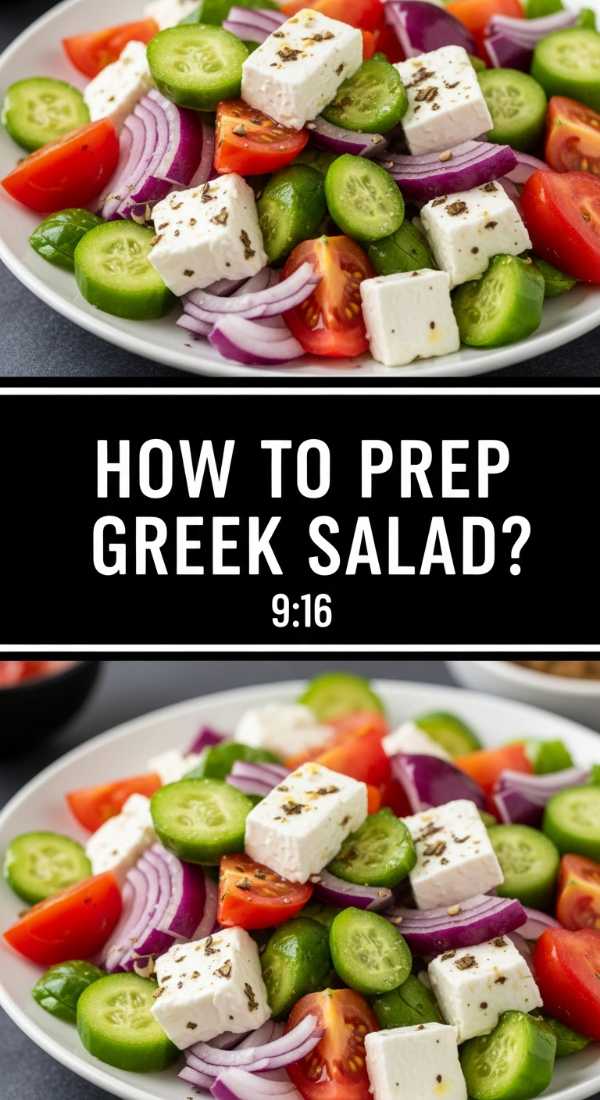
Why we love this
A classic Greek salad is all about the bold, unapologetic flavors of the Mediterranean. We love the briny, salty punch of Kalamata olives paired with the sharp, creamy tang of sheep’s milk feta cheese. The texture is a delightful mix of the watery crunch of bell peppers and the velvety skin of sun-ripened tomatoes. It smells like oregano and red wine vinegar, a combination that feels instantly cooling on a hot day. It’s the perfect savory sidekick that adds a beautiful, colorful mosaic to your food board.
Ingredients
- 3 large Roma tomatoes, chopped into chunks
- 1 large English cucumber, diced
- 1 green bell pepper, chopped
- 1/2 cup Kalamata olives, pitted
- 6 oz block of feta cheese, cubed or crumbled
- 1 teaspoon dried oregano
- 3 tablespoons red wine vinegar
- 1/3 cup extra virgin olive oil
How to make it
- In a large bowl, combine the tomatoes, cucumber, and green bell pepper. Using an English cucumber is best because the skin is thin and the seeds are minimal, preventing the salad from becoming too watery.
- Add the Kalamata olives. For the best flavor, buy olives that are still in brine rather than canned ones.
- In a small jar, whisk the red wine vinegar and olive oil with the dried oregano until the dressing is well combined.
- Pour the dressing over the vegetables and toss gently. Let it sit for at least 15 minutes before serving; this ‘marinating’ period allows the vegetables to release their juices and blend with the vinegar.
- Carefully fold in the feta cheese at the end. If you stir too much, the feta will break down and turn the dressing cloudy—you want those distinct white chunks to stand out.
- Serve with a few extra cracks of black pepper on top for a little bit of heat.
How to grill peach skewers?
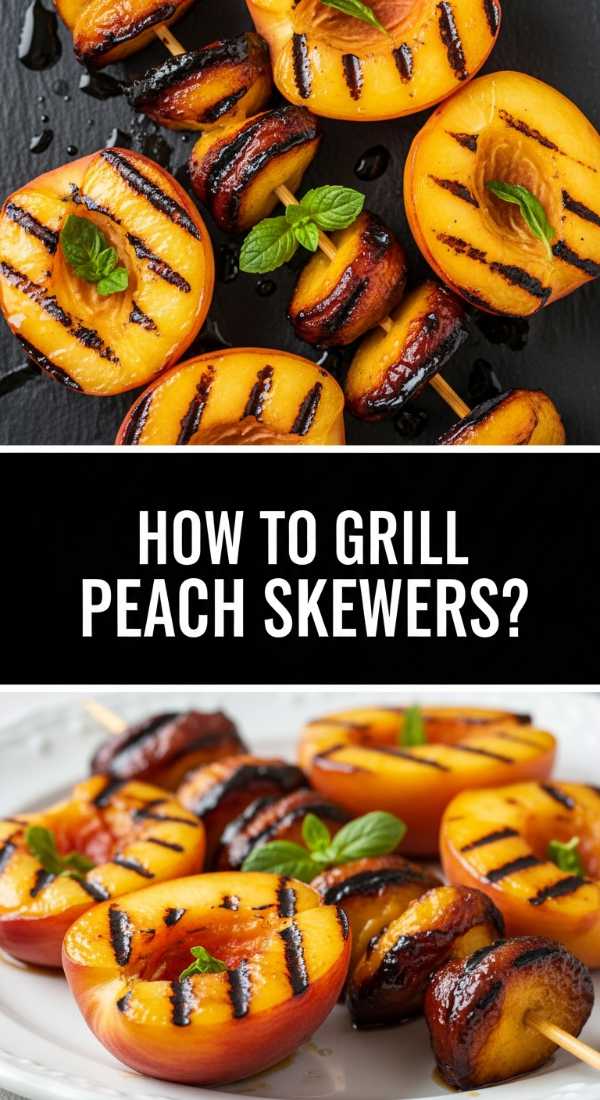
Why we love this
Grilled peaches are the unexpected star of the show, bridging the gap between savory dinner and sweet dessert. When the heat hits the peach, the natural sugars caramelize into a sticky, golden syrup that coats the fruit. The texture changes from firm to soft and jammy, while the grill adds a sophisticated smoky undertone. The smell is intoxicating—like a warm summer cobbler cooking right on the grates. These skewers add a touch of whimsy and a beautiful orange hue that makes the board feel truly seasonal.
Ingredients
- 4 firm-ripe peaches, pitted and cut into thick wedges
- 2 tablespoons honey
- 1 tablespoon balsamic glaze
- Fresh mint leaves for garnish
- Wooden skewers (soaked in water for 20 minutes)
How to make it
- Thread three to four peach wedges onto each soaked wooden skewer. Make sure the peaches are ‘firm-ripe’; if they are too soft, they will fall off the skewer when they heat up.
- Brush the peaches lightly with a neutral oil to prevent sticking, but hold off on the honey until the very end to avoid burning.
- Preheat the grill to medium heat. Place the skewers on the grates and grill for about 2 to 3 minutes per side. You are looking for clear grill marks and a slight softening of the fruit.
- Once the peaches look golden and slightly translucent, remove them from the grill.
- Immediately drizzle with the honey and the thick balsamic glaze while the fruit is still hot so the liquids thin out and coat the wedges perfectly.
- Top with a chiffonade of fresh mint to add a cooling herbal note to the warm, sweet fruit.
How to make honey chicken?

Why we love this
Honey chicken is that addictive, sticky-sweet protein that everyone reaches for twice. We love the way the honey creates a glossy, lacquer-like coating on the chicken that is slightly tacky to the touch and incredibly flavorful. The meat underneath stays juicy and tender, infused with garlic and soy. The aroma of bubbling honey and toasted sesame seeds is warm and inviting. It provides a savory-sweet profile that complements the salty steak and the acidic salads perfectly, making it a versatile powerhouse on the board.
Ingredients
- 1.5 lbs chicken thighs, cut into bite-sized pieces
- 1/2 cup honey
- 1/4 cup soy sauce
- 2 tablespoons apple cider vinegar
- 3 cloves garlic, minced
- 1 teaspoon fresh ginger, grated
- 1 tablespoon sesame seeds
How to make it
- In a medium bowl, whisk together the honey, soy sauce, apple cider vinegar, minced garlic, and grated ginger to create the marinade and glaze.
- Toss the chicken pieces in half of the sauce and let them marinate for at least 30 minutes in the refrigerator. Reserve the other half of the sauce for later.
- Heat a large skillet over medium heat with a tablespoon of oil. Add the chicken pieces in a single layer, making sure not to crowd the pan (cook in batches if necessary).
- Sear the chicken until it is golden brown and cooked through (about 6 to 8 minutes).
- Pour the reserved sauce into the pan with the cooked chicken. Turn the heat up slightly and simmer for 2 to 3 minutes. The sauce will begin to bubble and reduce into a thick, sticky glaze that clings to the meat.
- Once the chicken is thoroughly coated and the sauce has reached a syrupy consistency, remove from the heat and sprinkle generously with sesame seeds and sliced green onions.
Bringing It All Together
The beauty of this viral food board trend isn’t just in the individual recipes, but in the way they interact. The smoky zucchini sits next to the bright Greek salad, while the honey chicken provides a sweet counterpoint to the savory steak. By placing these diverse elements on one large surface, you encourage a style of eating that is relaxed, adventurous, and communal. It’s about taking the pressure off the ‘perfect plate’ and allowing the ingredients to speak for themselves. So, grab your largest board, fire up the grill, and get ready to see why the whole world is obsessed with this simple, stunning way to dine.
Frequently Asked Questions
What kind of board should I use? A large wooden cutting board, a marble slab, or even a clean baking sheet lined with parchment paper works perfectly. Just ensure it has enough surface area to keep the different elements from getting too crowded.
Can I make these components in advance? Absolutely. The salads and the pasta actually benefit from sitting for an hour or two. However, for the best experience, I recommend grilling the steak and the shrimp right before you plan to serve so they are warm and juicy.
How do I keep the board looking neat? Use small ramekins or bowls for the wetter items like the Greek salad or the sauces. This prevents the juices from running into the crispy items like the zucchini or the tortillas.