

The Ultimate Viral Food Board: Simple, Stunning, and Social Media Ready
There is something undeniably magical about a table overflowing with color, texture, and the intoxicating aroma of home-cooked comfort. In the age of digital sharing, we’ve moved past simple plated meals and into the era of the ‘Ultimate Food Board’—a visual and sensory feast that encourages everyone to dig in, share stories, and snap that perfect photo before the first bite. Whether you are hosting a cozy Sunday brunch or a lively Friday night gathering, the art of the board is about bringing people together through a curated selection of dishes that feel both effortless and indulgent.
I remember the first time I set out a massive wooden board instead of individual plates; the energy in the room shifted instantly. Instead of being tucked away in the kitchen, I was part of the conversation, watching my friends’ eyes light up as they reached for a crispy taco or a slice of golden corn bread. It’s not just about the food; it’s about the warmth that fills the home when a meal is presented with love and a bit of aesthetic flair. Let’s dive into the essential components that will make your next food board a viral sensation.
How to cook quick chicken?
Why we love this
There is nothing quite like the sound of a chicken thigh hitting a hot, oiled skillet—a sharp, promising sizzle that signals a delicious meal is only minutes away. When cooked correctly, quick pan-seared chicken offers a divine contrast between a crackling, golden-brown skin and a succulent, tender interior that practically melts in your mouth. The aroma of searing protein combined with a hint of smoky paprika and salt creates an inviting atmosphere that draws everyone to the kitchen, making it the perfect protein anchor for any vibrant food board.
Ingredients
- 4 boneless, skin-on chicken thighs
- 2 tablespoons olive oil
- 1 teaspoon sea salt
- 1/2 teaspoon cracked black pepper
- 1/2 teaspoon smoked paprika
- 2 cloves smashed garlic
- Fresh sprigs of thyme
How to make it
- Begin by removing the chicken from the refrigerator 15 minutes before cooking to bring it to room temperature, which ensures even cooking throughout.
- Pat the skin side of the chicken thoroughly dry with paper towels; moisture is the enemy of crispiness, and this step is vital for that viral golden crunch.
- Season both sides generously with salt, pepper, and smoked paprika, pressing the spices into the meat so they adhere during the sear.
- Heat a heavy-bottomed stainless steel or cast-iron skillet over medium-high heat. Add the olive oil and wait until it shimmers and just begins to show a faint wisp of smoke.
- Place the chicken thighs skin-side down in the pan. Do not crowd the pan, as this causes steaming rather than searing. Let them cook undisturbed for 6 to 8 minutes. You will see the fat rendering out and the edges turning a deep, toasted brown.
- Flip the chicken once the skin releases easily from the pan. Add the smashed garlic and thyme sprigs to the oil, spooning the flavored fat over the chicken as it finishes cooking for another 5-7 minutes.
- Check for an internal temperature of 165°F (74°C) using a meat thermometer. Remove from the heat and let the meat rest for 5 minutes before slicing to keep the juices locked inside.
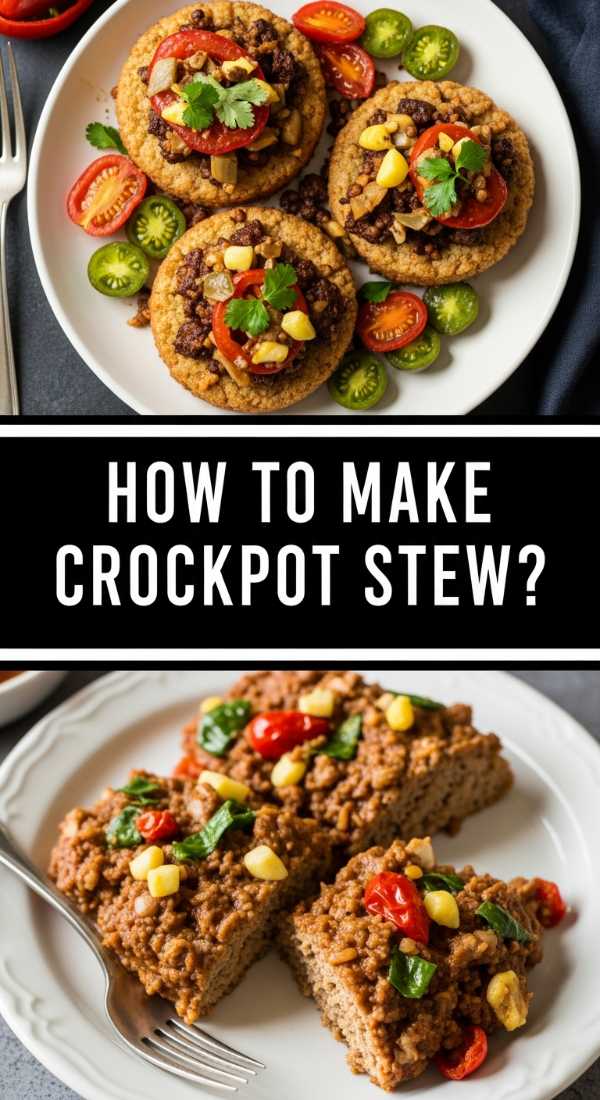
How to make crockpot stew?

Why we love this
Crockpot stew is the ultimate ‘set it and forget it’ comfort food that fills your entire home with a rich, savory perfume that lingers like a warm hug. We love the way the long, slow simmering process transforms humble root vegetables and tough cuts of beef into a silken, cohesive masterpiece where every spoonful is packed with depth. The texture of the beef becomes so tender it flakes apart at the mere suggestion of a fork, while the thickened broth carries the earthy notes of bay leaves and red wine, creating a rustic elegance that looks stunning in a ceramic bowl at the center of your board.
Ingredients
- 2 lbs beef chuck roast, cubed
- 4 large carrots, sliced into rounds
- 3 russet potatoes, peeled and cubed
- 1 yellow onion, diced
- 3 cups beef bone broth
- 1/2 cup dry red wine
- 2 tablespoons tomato paste
- 2 bay leaves
- 1 teaspoon dried rosemary
- Salt and pepper to taste
How to make it
- Start by searing your beef cubes in a hot pan with a splash of oil until they develop a dark brown crust on all sides; this ‘Maillard reaction’ is the secret to a deep, professional-grade stew flavor.
- Transfer the browned beef to the slow cooker and add the carrots, potatoes, and onions on top.
- In a separate small bowl, whisk together the beef broth, red wine, and tomato paste until smooth, then pour the mixture over the meat and vegetables.
- Add the bay leaves and rosemary, ensuring they are submerged in the liquid to infuse their herbal essence throughout the cooking process.
- Cover the crockpot and set it to ‘Low’ for 8 hours or ‘High’ for 4 to 5 hours. The low setting is preferred for the most tender results, as it allows the connective tissues in the beef to break down slowly.
- About 30 minutes before serving, taste the broth and adjust the seasoning with salt and pepper. If you prefer a thicker stew, mix a tablespoon of cornstarch with cold water and stir it in during the final phase.
How to grill perfect steaks?

Why we love this
Grilling the perfect steak is a primal art form that celebrates the marriage of fire, smoke, and high-quality beef. We love the dramatic visual of those distinct, charred grill marks against the backdrop of a juicy, pink center that promises a buttery texture and intense beefy flavor. There is an unmistakable sensory joy in the smell of woodsmoke and rendered fat, creating an outdoor dining vibe that translates beautifully to a social media-ready board when sliced thin and fanned out for guests to share.
Ingredients
- 2 thick-cut Ribeye or New York Strip steaks
- 3 tablespoons coarse Kosher salt
- 2 tablespoons cracked black pepper
- 2 tablespoons melted salted butter
- 1 clove minced garlic
- Fresh rosemary for garnish
How to make it
- Take the steaks out of the fridge at least 45 minutes before grilling to ensure the center isn’t cold when the exterior hits the heat; this prevents a ‘grey band’ of overcooked meat.
- Preheat your grill to high heat, aiming for a temperature between 450°F and 500°F. Ensure the grates are scraped clean and lightly oiled to prevent sticking.
- Liberally coat the steaks with coarse salt and cracked pepper. Don’t be shy; a thick steak needs a significant amount of seasoning to penetrate the meat.
- Place the steaks on the hottest part of the grill. For a 1.5-inch steak, cook for about 4-5 minutes on the first side without moving them to achieve perfect sear marks.
- Flip the steaks using tongs (never a fork, as piercing the meat loses juice) and cook for another 3-4 minutes for a perfect medium-rare (internal temp of 130°F-135°F).
- During the last minute of grilling, brush the steaks with a mixture of melted butter and minced garlic for a professional finish.
- Remove the steaks and let them rest on a warm plate for at least 10 minutes. This allows the muscle fibers to relax and reabsorb the juices, ensuring every bite is tender.
How to bake corn bread?
Why we love this
Corn bread is the golden, crumbly heart of a comfort food board, offering a sweet and savory balance that complements almost any dish. We love the way the edges get slightly caramelized and crisp when baked in a hot skillet, while the center remains moist, fluffy, and tender. The aroma of toasted cornmeal and honey wafting from the oven is enough to make anyone’s mouth water, and the vibrant yellow hue adds a sunny, rustic pop of color that looks incredible next to darker stews and meats.
Ingredients
- 1 cup yellow cornmeal
- 1 cup all-purpose flour
- 1/2 cup granulated sugar
- 1 tablespoon baking powder
- 1 teaspoon salt
- 1 cup buttermilk
- 1/2 cup melted butter
- 2 large eggs
- 2 tablespoons honey
How to make it
- Preheat your oven to 400°F (200°C). For the best crust, place a 9-inch cast-iron skillet inside the oven while it preheats so the pan is screaming hot.
- In a large mixing bowl, whisk together the cornmeal, flour, sugar, baking powder, and salt until there are no lumps.
- In a separate bowl, beat the eggs and then whisk in the buttermilk, melted butter, and honey until well combined.
- Make a well in the center of the dry ingredients and pour in the wet mixture. Fold gently with a spatula just until the flour streaks disappear; overmixing will lead to a tough, bready texture rather than a tender crumb.
- Carefully remove the hot skillet from the oven and grease it with a small pat of butter. Pour the batter in—it should sizzle immediately at the edges.
- Bake for 20-25 minutes, or until the top is golden brown and a toothpick inserted into the center comes out clean.
- Let it cool in the pan for 10 minutes before slicing into wedges or squares. Brush the top with extra honey-butter for a viral, glossy finish.
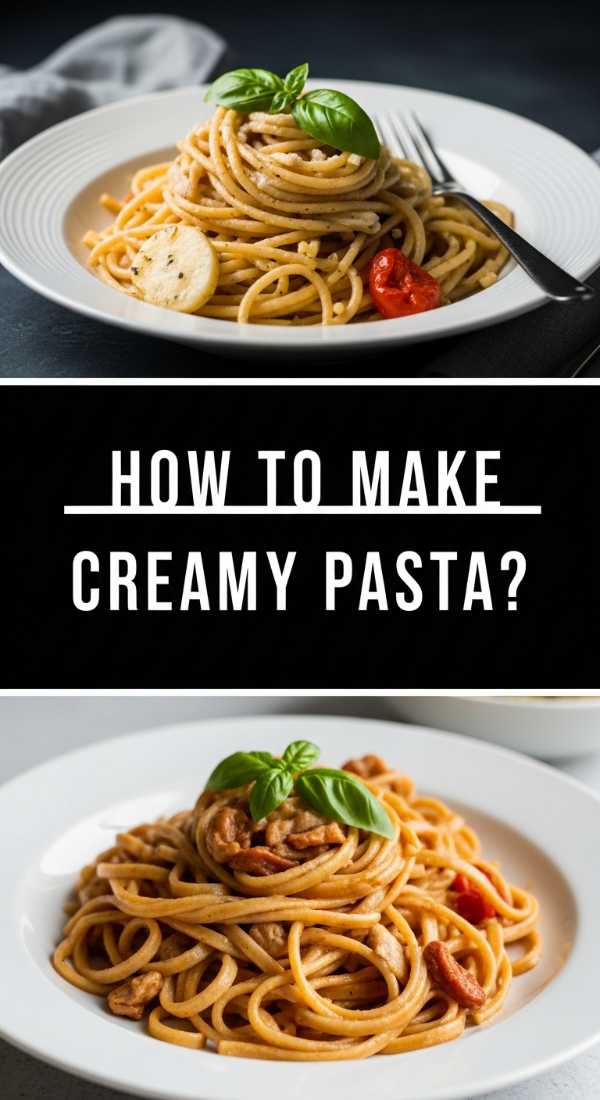
How to make creamy pasta?

Why we love this
Creamy pasta is the ultimate indulgence, a decadent swirl of silkiness that coats every strand of noodle in a rich, cheesy embrace. We love the way a well-made Alfredo or carbonara-style sauce clings to the pasta, creating a luxurious mouthfeel that is both comforting and sophisticated. The subtle scent of freshly grated parmesan and a hint of nutmeg or garlic creates a profile that is universally loved, making it the perfect ‘crowd-pleaser’ element to fill the gaps on a diverse food board.
Ingredients
- 1 lb Fettuccine or Pappardelle
- 2 cups heavy cream
- 1 cup freshly grated Parmesan cheese
- 4 tablespoons unsalted butter
- 3 cloves garlic, minced
- 1/4 teaspoon nutmeg
- Salt and white pepper to taste
- Fresh parsley for garnish
How to make it
- Bring a large pot of heavily salted water to a rolling boil. Cook the pasta until it is ‘al dente’—firm to the bite—as it will continue to cook slightly once added to the sauce.
- Reserved 1 cup of the starchy pasta water before draining; this liquid gold is the secret to emulsifying the sauce and making it stick to the noodles.
- In a large skillet over medium heat, melt the butter and sauté the minced garlic until it is fragrant but not browned, which takes about 1 minute.
- Pour in the heavy cream and bring to a gentle simmer. Let it reduce for about 3-5 minutes until it starts to thicken slightly.
- Whisk in the grated Parmesan cheese a handful at a time, stirring constantly to ensure a smooth, clump-free consistency. Add the nutmeg and pepper.
- Add the cooked pasta directly into the skillet with the sauce. Toss vigorously, adding splashes of the reserved pasta water as needed to reach a glossy, creamy coating.
- Serve immediately with a final dusting of cheese and parsley, as cream sauces thicken quickly as they cool.
How to roast juicy chicken?

Why we love this
Roasting a whole chicken is a centerpiece triumph that signifies a true home-cooked feast. We love the rustic, storybook appearance of a whole bird with its skin burnished to a deep mahogany, surrounded by roasted aromatics. The contrast between the crispy, salty skin and the steaming, herb-infused meat underneath is a culinary classic. It provides a visual anchor for your board that feels generous and traditional, inviting guests to participate in the carving and sharing process.
Ingredients
- 1 whole chicken (4-5 lbs)
- 4 tablespoons softened butter
- 1 lemon, halved
- 1 head of garlic, sliced crosswise
- Fresh rosemary and sage
- 2 teaspoons salt
- 1 teaspoon black pepper
How to make it
- Remove the giblets and pat the entire chicken dry, inside and out. This is crucial for achieving a crispy skin rather than a soggy, steamed one.
- Preheat your oven to 425°F (218°C). High heat at the start is the trick to locking in moisture while browning the exterior.
- Stuff the cavity of the chicken with the lemon halves, garlic head, and fresh herbs. This infuses the meat from the inside out with bright, earthy notes.
- Carefully loosen the skin over the breast meat and rub half of the softened butter directly onto the meat under the skin. Rub the remaining butter all over the outside of the bird.
- Season the skin very generously with salt and pepper. Tie the legs together with kitchen twine (trussing) to ensure even cooking.
- Place the chicken on a roasting rack in a pan and roast for about 60-75 minutes. Baste with the pan juices halfway through.
- The chicken is done when the juices run clear and the internal temperature in the thickest part of the thigh reaches 165°F. Let it rest for 20 minutes before carving to ensure the juices redistribute.
How to make crispy tacos?
Why we love this
Crispy tacos bring a playful, crunch-filled energy to any food board, offering a symphony of textures in every bite. We love the audible ‘snap’ of a freshly fried shell followed by the savory warmth of seasoned meat and the cool, refreshing hit of lime-tinged salsa. The vibrant colors of shredded lettuce, purple cabbage, and bright red tomatoes make these a visual standout, creating a fun, customizable experience that guests can’t help but share on their feeds.
Ingredients
- 12 corn tortillas
- 1 lb ground beef or shredded chicken
- 1 tablespoon taco seasoning (cumin, chili powder, garlic powder)
- Vegetable oil for frying
- Shredded cheddar cheese
- Diced tomatoes and onions
- Fresh cilantro and lime wedges
How to make it
- Brown your meat in a skillet over medium heat, draining any excess fat. Stir in the taco seasoning and a splash of water, simmering until the liquid is absorbed and the meat is deeply flavored.
- In a small frying pan, heat about half an inch of vegetable oil over medium-high heat until it shimmers.
- Using tongs, place a corn tortilla in the oil for 10 seconds until soft, then fold it in half. Hold it in a ‘U’ shape with the tongs, frying each side for about 30-45 seconds until golden and rigid.
- Drain the shells on paper towels and immediately sprinkle with a tiny pinch of salt while the oil is still wet.
- To assemble, place a generous spoonful of meat in the bottom of the shell, followed immediately by cheese so it starts to melt.
- Top with lettuce, tomatoes, and onions. Arrange them on your board propped up against each other to maintain their shape and prevent them from getting soggy.
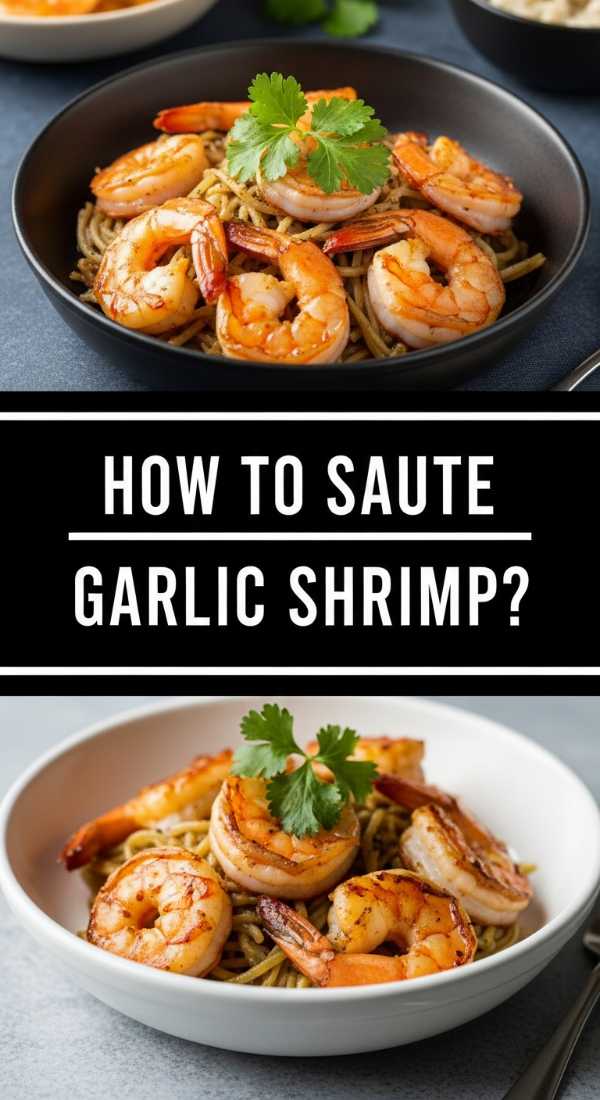
How to saute garlic shrimp?

Why we love this
Garlic shrimp is the epitome of quick, elegant cooking that feels like a luxury treat. We love the way the shrimp curl into perfect pink ‘C’ shapes in the pan, soaking up a golden sauce of melted butter, toasted garlic, and bright lemon zest. The aroma is instantly intoxicating—sweet, savory, and sharp all at once. Served on a board with crusty bread to soak up the leftover garlic butter, it provides a sophisticated seafood element that is as beautiful as it is delicious.
Ingredients
- 1 lb large shrimp, peeled and deveined
- 4 tablespoons unsalted butter
- 5 cloves garlic, minced
- 1/4 teaspoon red pepper flakes
- 1/4 cup dry white wine or chicken broth
- Juice of half a lemon
- Fresh parsley, chopped
How to make it
- Pat the shrimp dry with paper towels to ensure they sauté rather than steam; this helps them develop a slight exterior snap.
- Heat a large skillet over medium-high heat and melt the butter. Add the minced garlic and red pepper flakes, cooking for just 30-60 seconds until the garlic is fragrant and translucent. Do not let the garlic turn brown, as it will become bitter.
- Add the shrimp to the pan in a single layer. Cook for 2 minutes on the first side until the edges turn pink.
- Flip the shrimp and pour in the white wine and lemon juice. The liquid will bubble and deglaze the pan, picking up all the garlic bits.
- Cook for another 1-2 minutes just until the shrimp are opaque throughout. Overcooking will make them rubbery, so keep a close eye on the visual cue of the meat turning from translucent to solid white/pink.
- Remove from heat immediately, garnish with a handful of fresh parsley, and pour all that glorious butter sauce over them before serving.
How to make cheesy potatoes?
Why we love this
Cheesy potatoes are the ultimate ‘soul food’ side dish, offering a gooey, bubbling texture that is impossible to resist. We love the sight of a golden-brown cheese crust being broken to reveal tender, thinly sliced potatoes bathed in a velvety cream sauce. It’s a dish that evokes memories of holiday dinners and family gatherings, providing a heavy, satisfying component to the board that balances out lighter salads or grilled meats with its pure, unadulterated decadence.
Ingredients
- 2 lbs Yukon Gold potatoes, thinly sliced
- 2 cups shredded sharp cheddar cheese
- 1 cup shredded Gruyere or Swiss cheese
- 1.5 cups heavy cream
- 2 cloves garlic, minced
- 1/2 teaspoon onion powder
- Salt and pepper to taste
- Fresh chives for garnish
How to make it
- Preheat your oven to 375°F (190°C) and lightly grease a baking dish. Yukon Gold potatoes are best because their waxy texture holds up well under heat.
- In a medium bowl, whisk together the heavy cream, minced garlic, onion powder, salt, and pepper.
- Layer one-third of the potato slices in the bottom of the dish, overlapping them slightly like shingles. Sprinkle with one-third of the cheese mixture.
- Repeat the layers twice more, ending with a generous topping of cheese. Pour the cream mixture evenly over the top, allowing it to seep down between the potato layers.
- Cover the dish with foil and bake for 40 minutes. This steams the potatoes until they are fork-tender.
- Remove the foil and bake for another 15-20 minutes. This final blast of heat is what creates the viral-worthy bubbly, browned cheese top and crispy edges.
- Let the dish stand for 10 minutes before serving; this allows the sauce to set so it doesn’t run all over your board.
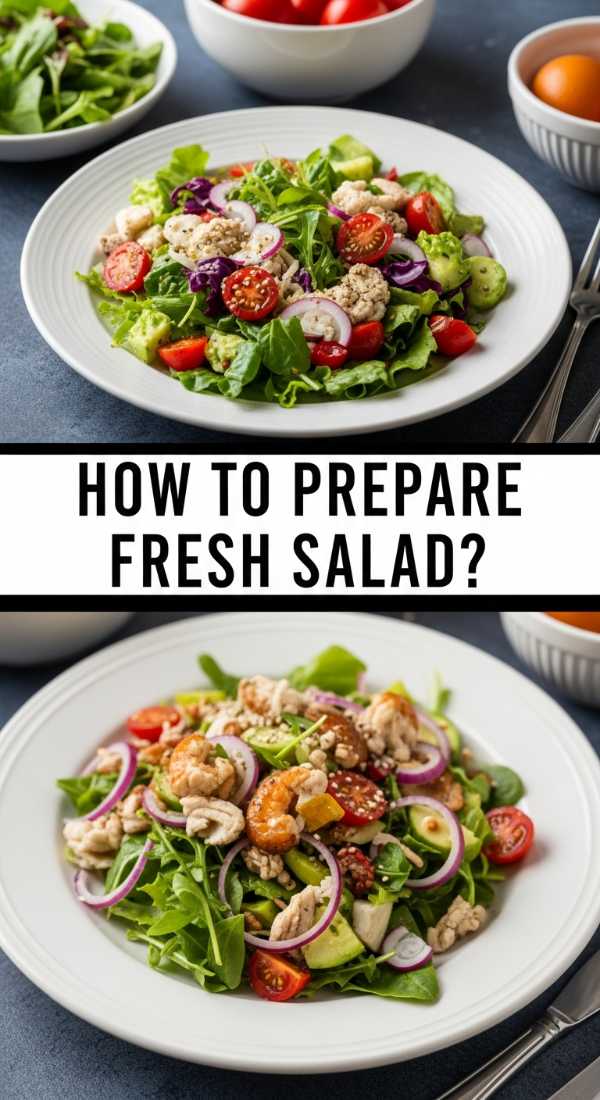
How to prepare fresh salad?
[IMAGE_10]
Why we love this
A fresh salad is the essential ‘breath of air’ on a crowded food board, providing a crisp, acidic counterpoint to the richer, heavier dishes. We love the vibrant palette of emerald greens, ruby radishes, and bright citrus that makes a board look alive and healthful. The sensation of a cold, crunchy leaf coated in a zesty, homemade vinaigrette cleanses the palate between bites of steak or cheesy potatoes, making the entire dining experience feel balanced and thoughtfully curated.
Ingredients
- 5 oz mixed spring greens or arugula
- 1/2 cup thinly sliced cucumbers
- 1/4 cup shaved radishes
- 1/4 cup crumbled feta or goat cheese
- 1/4 cup toasted sunflower seeds
- For Dressing: 3 tbsp olive oil, 1 tbsp apple cider vinegar, 1 tsp Dijon mustard, 1 tsp honey
How to make it
- Wash your greens in ice-cold water and use a salad spinner to get them bone-dry. Wet greens will reject the dressing and turn limp and unappealing on the board.
- In a small jar, combine the olive oil, vinegar, mustard, and honey. Shake vigorously until the mixture is emulsified and thick.
- Place the dried greens in a large chilled bowl. Add the cucumbers and radishes, which provide the structural ‘crunch’ of the salad.
- Drizzle the dressing over the greens just before serving. Use your hands or large tongs to gently toss the salad, ensuring every leaf is lightly coated but not swimming in liquid.
- Top with the crumbled cheese and toasted seeds for a variety of textures—creamy and crunchy.
- When placing on the board, keep the salad in a separate low-profile bowl or a distinct pile to prevent the dressing from touching the crispy elements like tacos or corn bread.
Conclusion
Creating the ultimate viral food board is about more than just following recipes; it’s about the joy of assembly and the celebration of variety. By combining these ten diverse, delicious elements—from the sizzle of quick chicken to the crunch of a fresh salad—you create an interactive dining experience that is as beautiful to look at as it is to eat. Remember to play with heights, colors, and textures, and don’t be afraid to let the dishes overlap slightly for that lush, ‘abundance’ look. Now, gather your favorite people, set the table, and enjoy the magic of a meal shared in style.