
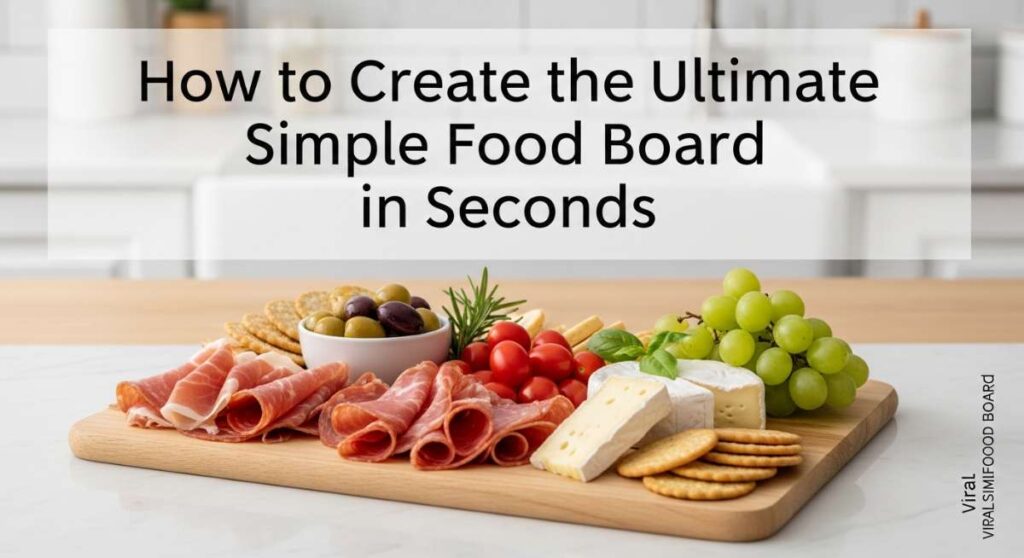
How to Create the Ultimate Simple Food Board in Seconds
We’ve all been there: the doorbell rings in twenty minutes, your friends are hungry, and you’re standing in the kitchen wondering how to turn a few fridge staples into a masterpiece. There is something truly magical about a well-composed food board; it’s more than just a meal, it’s an invitation to linger, talk, and share. It’s the ultimate centerpiece that says ‘I’m glad you’re here’ without you having to spend hours over a hot stove.
The beauty of a viral food board lies in its curated chaos. It’s that perfect blend of colors, textures, and flavors that looks like a work of art but feels entirely approachable. Whether you’re hosting a cozy movie night or a chic backyard brunch, mastering the art of the ‘seconds-flat’ board will turn you into the effortless host you’ve always dreamed of being. Let’s dive into the secrets of building a board that will have everyone reaching for their phones to take a photo before they take a bite.
How to pick the perfect base?
Why we love this
The base of your food board is the literal foundation of your aesthetic, and we love it because it sets the entire mood for the gathering. A heavy, dark walnut board feels rustic and warm, while a sleek marble slab whispers modern elegance and keeps chilled items cool. Choosing the right surface isn’t just about utility; it’s about the tactile experience of wood grain against your fingertips and the way the colors of your food pop against a neutral background, creating an instant sense of abundance and hospitality.
Ingredients
- Large wooden cutting board
- Marble pastry slab
- Slate tile
- Circular woven tray
- Clean parchment paper (for easy cleanup)
How to make it
- Assess your guest count and choose a board size that allows for ‘overflowing’ visual appeal; a board that is too large looks sparse, while a slightly smaller board looks lush.
- Clean the surface thoroughly with a food-safe mineral oil if using wood to bring out the deep, rich luster of the grain.
- Lay down a piece of parchment paper cut slightly smaller than the board if you are serving ‘wet’ items like oily olives or soft cheeses to prevent staining the wood.
- Place the board in the exact spot where it will be served to avoid the ‘moving disaster’ later; ensure it is at a height where guests can easily reach the center.
- Level the board if necessary using small felt pads underneath to ensure that honey or oils don’t run off the sides during the party.
How to fold the perfect salami rose?
Why we love this
The salami rose is the undisputed queen of viral food boards, providing a stunning vertical element that looks incredibly professional yet takes almost zero effort. We love the way the thin, salty layers of meat mimic delicate petals, offering a beautiful contrast to the hard lines of crackers and cheese. It’s a sensory delight—the peppery aroma of the cured meat combined with the visual ‘wow’ factor makes it the most talked-about item on the platter every single time.
Ingredients
- Thinly sliced salami (Genoa or Sopressata work best)
- A clean wine glass or champagne flute
- Small sprig of rosemary for garnish
How to make it
- Select a glass with a thin rim; the diameter of the glass will determine the size of your rose (a champagne flute makes a small bud, a wine glass makes a full bloom).
- Take your first slice of salami and fold it over the rim of the glass so that half is inside and half is outside.
- Place the second slice overlapping the first by about 50%, pressing it firmly against the rim to ensure it sticks.
- Continue this overlapping process for 3 to 4 layers, rotating the glass as you go, until you can no longer see the rim of the glass through the meat.
- Firmly press the layers together with your palm, then flip the glass upside down onto your board and gently twist to release the ‘rose’ in one perfect piece.
How to select the dreamiest cheeses?
Why we love this
Cheese is the soul of the board, and we love the curated journey it takes your palate on, from the sharp, crystalline crunch of an aged cheddar to the buttery, velvet-like coat of a triple-cream brie. There is something deeply satisfying about the way a room-temperature cheese yields to a knife, releasing complex aromas of earth, cream, and grass. It provides the essential richness that anchors all the other components, making every bite feel like a decadent indulgence.
Ingredients
- One soft cheese (Brie or Camembert)
- One hard cheese (Manchego or Aged Gouda)
- One ‘funkier’ cheese (Gorgonzola or Blue)
- One familiar cheese (Sharp White Cheddar)
How to make it
- Remove your cheeses from the refrigerator at least 45 to 60 minutes before serving; cheese served at room temperature has a significantly better texture and flavor profile.
- Slice the hard cheeses into uniform wedges or cubes using a sharp chef’s knife to allow guests to grab them easily without struggling.
- For the soft cheeses, keep them whole but cut a small ‘pilot’ wedge out to signal to guests that it’s okay to dig in.
- Place the cheeses at opposite corners of the board to create ‘anchor points’ for your design.
- Provide a dedicated knife for each cheese type to prevent the flavors (like a strong blue) from migrating to the milder varieties.
How to stack the crunchiest crackers?

Why we love this
Crackers are the unsung heroes that provide the essential structural support and the audible ‘crunch’ that makes a food board so satisfying to eat. We love the variety of textures they bring—from the light, airy snap of a water cracker to the hearty, seeded density of an artisanal crisp. They act as the perfect neutral vessel, carrying the weight of the cheese and the sweetness of the fruit while adding a subtle toasted aroma that rounds out the flavor profile.
Ingredients
- Butter crackers
- Multi-grain seeded crisps
- Thin sourdough flatbreads
- Gluten-free nut crackers
How to make it
- Create ‘rivers’ of crackers by fanning them out in a curved line across the board, which guides the eye and creates a sense of movement.
- Vary the shapes; put round crackers next to rectangular flatbreads to create visual interest through geometric contrast.
- Stack some crackers vertically in small wooden bowls or glass jars to add height to your board and save space for other ingredients.
- Ensure you have at least two crackers per person initially, but keep a backup box in the pantry for quick refills throughout the night.
- Position the sturdier, seeded crackers near the harder cheeses and the lighter, flaky crackers near the soft spreads.
How to style fresh berries and grapes?
Why we love this
Fruit brings the ‘pop’ of color and the necessary acidity to cut through the richness of the meats and cheeses, and we love the freshness they inject into the display. Seeing a cluster of frosted grapes or a pile of ruby-red strawberries feels like a celebration of the season. The sweet, bursting juice of a blackberry paired with a salty slice of prosciutto is a flavor explosion that keeps your taste buds excited and prevents the board from feeling too heavy.
Ingredients
- Red or green grapes on the vine
- Fresh strawberries (stems on)
- Blueberries or blackberries
- Slices of crisp apple or pear
How to make it
- Wash and thoroughly dry all fruit; moisture is the enemy of a food board as it can make crackers soggy and cheeses ‘weep’.
- Keep grapes on the vine but use kitchen shears to cut the large bunch into smaller ‘mini-clusters’ of 3-5 grapes so guests can easily pick them up.
- Slice apples or pears just before serving and toss them in a tiny bit of lemon juice to prevent browning from oxidation.
- Nestle smaller berries like blueberries into the ‘gaps’ or crevices between larger items like cheese blocks and cracker stacks to act as a filler.
- Place a large cluster of grapes over the edge of the board to create a ‘cascading’ effect that looks lush and abundant.
How to nestle savory dip bowls?

Why we love this
Dips and spreads add a creamy, interactive dimension to the board that we absolutely adore. Whether it’s a zesty hummus or a spicy mustard, these bowls act as little flavor ‘hubs’ that encourage guests to customize their bites. We love the visual contrast of a small ceramic bowl tucked into the arrangement—it provides a break in the texture and offers a glossy, reflective surface that catches the light, making the entire board look more dynamic and gourmet.
Ingredients
- Hummus or Whipped Feta
- Dijon or Whole Grain Mustard
- Artichoke heart tapenade
- Spinach and artichoke dip
How to make it
- Choose small, mismatched bowls in complementary colors to add a ‘collected’ and cozy vibe to the board.
- Fill the bowls nearly to the brim to create an ‘overflowing’ look, but use a spoon to create a decorative swirl or well in the center.
- Top dips with a drizzle of high-quality olive oil, a sprinkle of paprika, or fresh herbs to give them a finished, professional look.
- Place the bowls on the board first, before the crackers and cheese, as they are the ‘heavy’ items that define the layout.
- Provide small spreading knives or spoons for each bowl, making sure the handles are pointing outward toward the guests for easy access.
How to drizzle the golden honey?

Why we love this
Honey is the liquid gold of the food board world, and we love the way it adds a sophisticated, floral sweetness that elevates even the simplest ingredients. There is a primal joy in watching a slow, viscous drizzle of honey trail over a wedge of blue cheese or a pile of walnuts. It creates a beautiful sheen on the food and provides a sticky, sweet element that perfectly balances the saltiness of the charcuterie, making for a truly harmonious bite.
Ingredients
- High-quality wildflower or clover honey
- Honeycomb (optional, for extra texture)
- Small honey dipper or silver spoon
How to make it
- Place a small jar of honey or a piece of actual honeycomb directly on the board, ideally near the soft cheeses like Brie or Goat cheese.
- Warm the honey slightly if it has crystallized to ensure it has a smooth, pourable consistency.
- Drizzle a small amount over the top of the soft cheese just before guests arrive so it looks fresh and inviting.
- If using a honey dipper, rest it inside the jar or on a small saucer to prevent honey from getting all over the board and making everything sticky.
- Scatter a few crushed walnuts or red pepper flakes over the honey to add a layer of texture and a hint of unexpected heat.
How to scatter the salty nuts?
Why we love this
Nuts are the ‘space-fillers’ that take a board from looking ‘okay’ to looking ‘designed,’ and we love them for the earthy, toasted crunch they provide. They are the perfect snack for someone who wants a quick nibble without committing to a full cracker build. The aroma of roasted almonds or buttery pecans adds a comforting, savory depth to the air, and their various shapes and shades of brown add a rustic, organic feel to the overall composition.
Ingredients
- Marcona almonds
- Candied pecans
- Salted pistachios (shelled)
- Walnut halves
How to make it
- Identify the ‘holes’ or empty spots on your board where the wood or parchment paper is showing through.
- Scatter the nuts in these gaps in small, organic-looking piles rather than keeping them in a single pile.
- Mix different types of nuts together for a ‘trail mix’ vibe, or keep them separate to highlight their individual colors and textures.
- Use salted or spiced nuts to provide an extra punch of flavor that complements the richness of the cheese.
- Ensure you place a few nuts near the fruit and honey sections to encourage guests to try the ‘sweet and salty’ pairing.
How to tuck in fresh herbs?

Why we love this
Herbs are the secret weapon of the food board stylist, and we love how a few sprigs of green can instantly breathe life into the display. They provide a beautiful, aromatic fragrance—the woody scent of rosemary or the bright, peppery note of basil—that enhances the overall sensory experience. Visually, the vibrant green acts as a ‘reset’ for the eyes, breaking up the beige and brown tones of the breads and meats and making everything look garden-fresh and vibrant.
Ingredients
- Fresh Rosemary sprigs
- Thyme branches
- Fresh Basil leaves
- Sage leaves
How to make it
- Choose herbs with sturdy stems like rosemary or thyme that won’t wilt quickly at room temperature.
- Tuck the stems under cheeses or meat roses so the leafy ends ‘peek out’ naturally.
- Use large basil leaves as ‘liners’ or ‘plates’ for small items like mozzarella pearls or cherry tomatoes.
- Gently bruise the herbs between your fingers before placing them to release their natural oils and heighten the aroma for your guests.
- Distribute the greenery evenly around the board to create a sense of balance and to ensure every ‘section’ has a touch of color.
How to serve for maximum impact?
[IMAGE_10]
Why we love this
The presentation is the final flourish, and we love the moment when the board is finally revealed to your guests. It’s the culmination of your creativity, and seeing their faces light up is the ultimate reward. A well-served board creates a communal focal point, drawing people together and sparking conversation. We love the way it transforms a simple gathering into an event, making the food feel like a gift you’ve curated specifically for the people you love.
Ingredients
- The finished food board
- Small cocktail napkins
- Wine or sparkling cider
- Atmospheric lighting (candles)
How to make it
- Place the board in a central, well-lit area where guests can walk all the way around it, preventing a ‘traffic jam’ at one end.
- Set out a small ‘discard bowl’ nearby for things like olive pits, grape stems, or nut shells so the board stays clean.
- Dim the overhead lights and light a few unscented candles nearby to create a warm, inviting glow that makes the food look even more appetizing.
- Have a stack of small plates and napkins available, but keep them slightly away from the board to encourage people to linger and nibble directly if they choose.
- Take a quick photo from a top-down angle (the ‘flat lay’) before anyone touches it—you’ll want to remember this masterpiece!
Conclusion
Creating a viral food board isn’t about perfection; it’s about the joy of assembly and the magic of sharing. By focusing on a few simple techniques—like the salami rose or the perfect cheese selection—you can create a stunning display in literally seconds. Remember, the best boards are the ones that reflect your personality and make your guests feel right at home. So, grab a board, raid your pantry, and start building your own edible masterpiece today!