
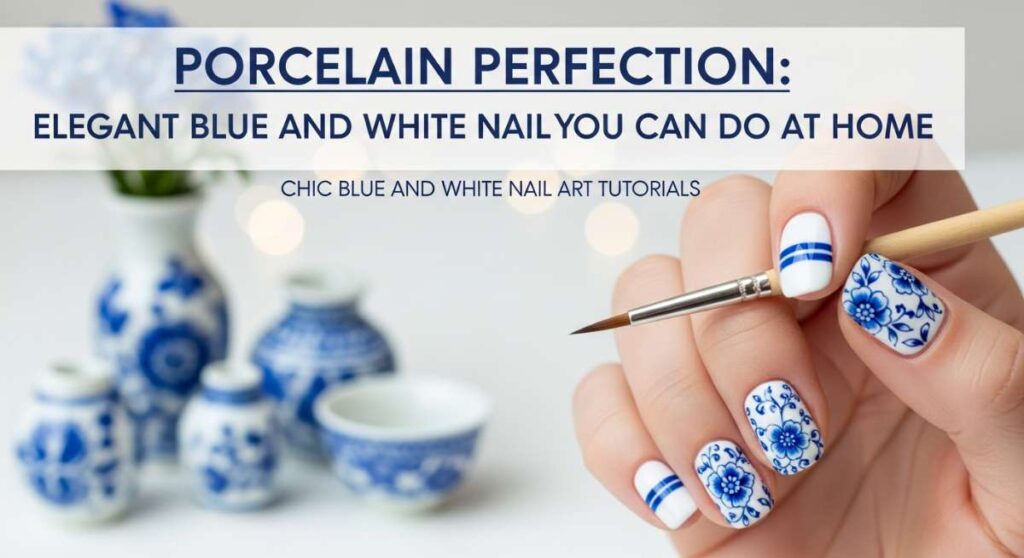
Porcelain Perfection: Elegant Blue and White Nail Art You Can Do at Home
Hello, my beautiful loves. Grab a warm cup of jasmine tea and settle into your favorite cozy chair for a moment. Today, I want to talk about something that feels like a gentle hug for your hands—the timeless, serene beauty of blue and white nail art. There is something so incredibly calming about these shades together, isn’t there? They remind me of delicate ginger jars, summer skies meeting fluffy clouds, and that quiet peace we all deserve to carry with us through the day.
Painting my nails has always been a form of meditation for me, a soft ritual where I can slow down and focus on creating something lovely just for myself. You don’t need a professional studio to achieve that high-end porcelain look. All you need is a little bit of patience, a dash of self-love, and these simple guides I’ve put together just for you. Let’s turn your fingertips into tiny canvases of grace together.
5 Easy Steps to Royal Blue Tips
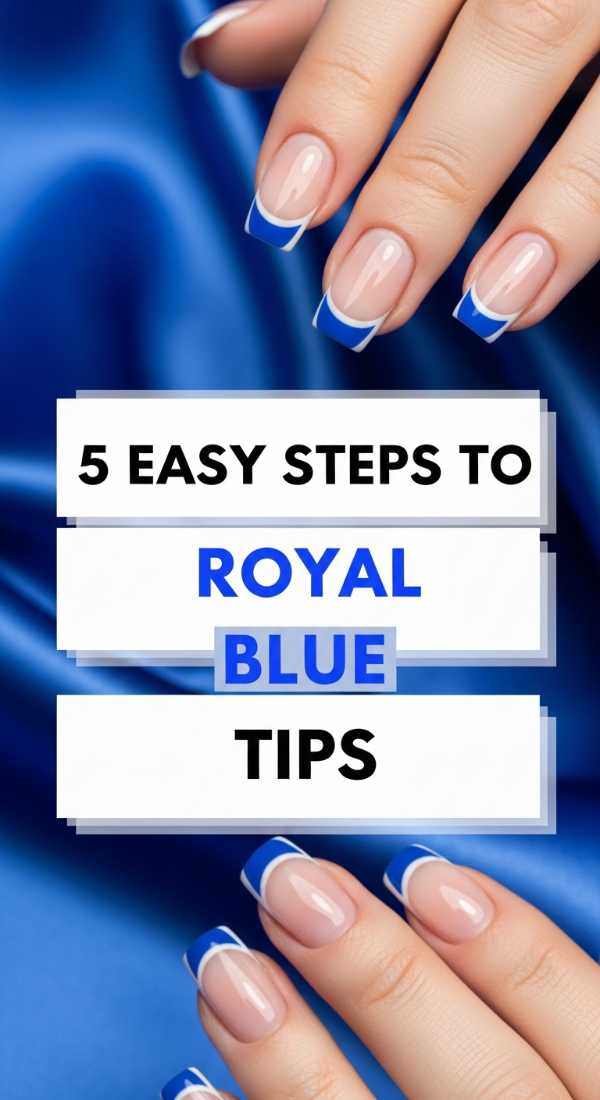
Why to love this Design:
There is something so incredibly grounding about a deep, royal blue. It feels like a midnight sky or the deepest parts of the ocean, giving your hands a regal, sophisticated presence that whispers confidence without needing to shout.
Essential Elements:
- Rich Royal Blue Polish
- Clear Top Coat
- Nail Guide Stickers
- Base Coat
How to Prepare:
- Apply a nourishing base coat to protect your natural nail.
- Place a guide sticker just below the tip of your nail.
- Apply two thin coats of royal blue to the exposed tip.
- Peel the sticker away while the polish is slightly tacky.
- Seal with a high-shine top coat for that glass-like finish.
Budget Range
- Essie ‘Butler Please’ – $10.00
- OPI Top Coat – $11.50
- Manicure Guide Tape – $4.00
4 Ways to Master Baby Blue Swirls
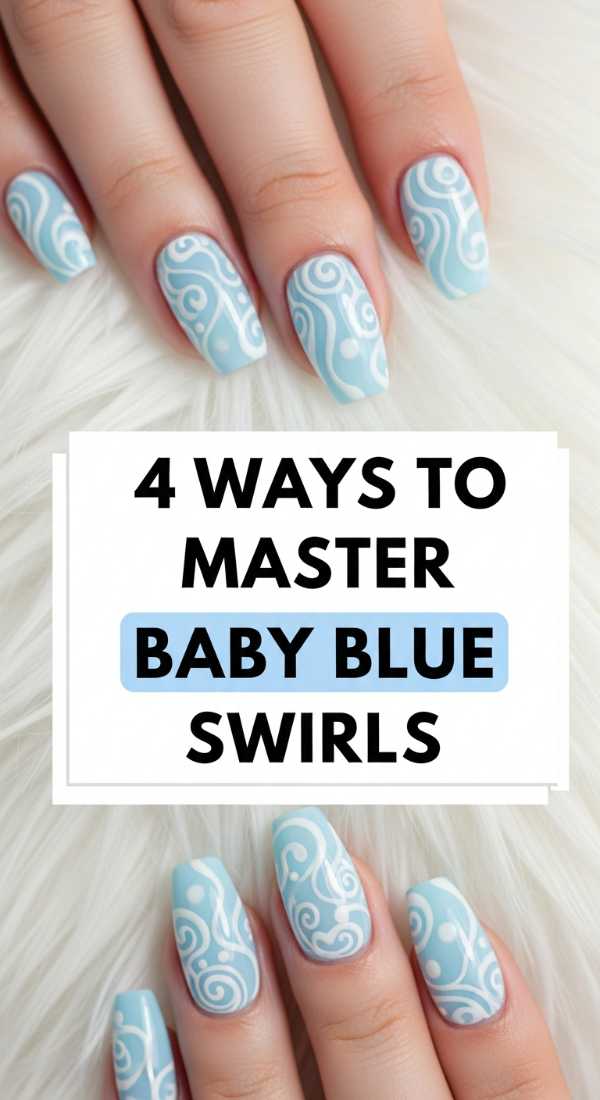
Why to love this Design:
These swirls are like a soft breeze captured on your nails. They are whimsical, dreamy, and perfectly imperfect, making them so forgiving for us beginners who just want to play with color.
Essential Elements:
- Soft Baby Blue Polish
- Crisp White Polish
- Ultra-thin Liner Brush
- Matte or Glossy Top Coat
How to Prepare:
- Paint your base with a sheer white or nude.
- Dip your thin brush into the baby blue and draw a curved ‘S’ shape.
- Add a thinner white line hugging the curve of the blue.
- Repeat in different corners of the nail for a flowing effect.
Budget Range
- Sally Hansen ‘Arctic Blue’ – $7.00
- Nail Art Detail Brushes (Set) – $8.00
- Zoya ‘Purity’ White – $12.00
3 Tips for Perfect Blue Striped Nails
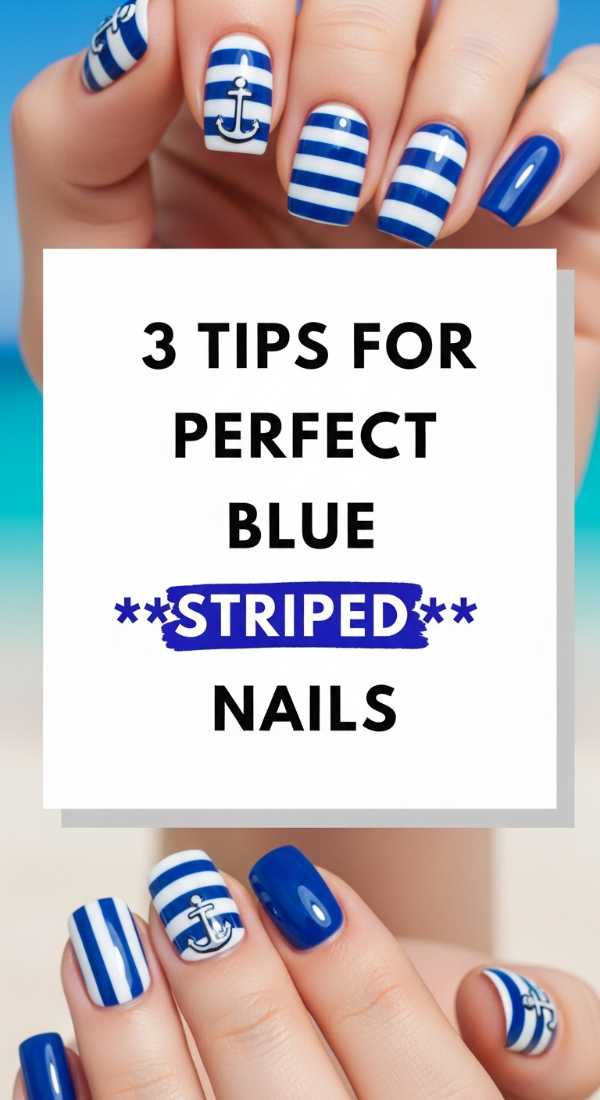
Why to love this Design:
Nautical and chic, stripes are the ultimate ‘clean girl’ aesthetic. They look crisp against a white background and make your nails appear longer and more elegant instantly.
Essential Elements:
- Navy Blue Polish
- Striping Tape
- Precision Tweezers
How to Prepare:
- Ensure your white base is 100% dry before starting.
- Apply thin strips of tape horizontally or vertically.
- Paint navy over the tape, then peel immediately for sharp lines.
Budget Range
- Holo Taco Striping Tape – $5.00
- Essie ‘Infinity Cool’ – $9.00
- Revlon ‘Core’ Tweezers – $6.00
6 Steps for Dark Blue Velvet Nails
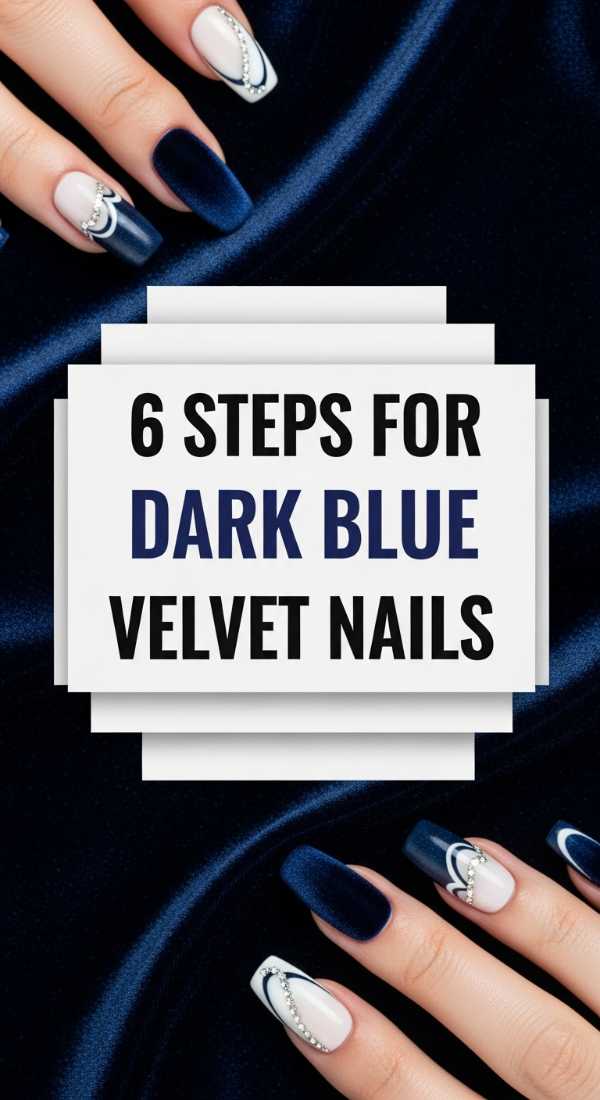
Why to love this Design:
This is pure luxury, my darlings. The way the light dances off velvet nails is like looking into a magical galaxy. It’s textured, deep, and feels so expensive.
Essential Elements:
- Magnetic ‘Cat Eye’ Polish in Navy
- Strong Magnet Wand
- UV/LED Lamp (if using gel)
How to Prepare:
- Apply a dark base coat and cure.
- Apply a thick layer of magnetic blue polish.
- Hold the magnet wand 0.5cm above the nail for 10 seconds.
- Watch the ‘velvet’ shimmer move into place.
- Cure immediately to lock the design.
- Apply a top coat and cure one last time.
Budget Range
- ILNP ‘Deep Space’ Magnetic Polish – $12.50
- Nail Magnet Tool – $3.00
- SUNUV LED Lamp – $25.00
5 Minutes to Paint White Daisy Nails
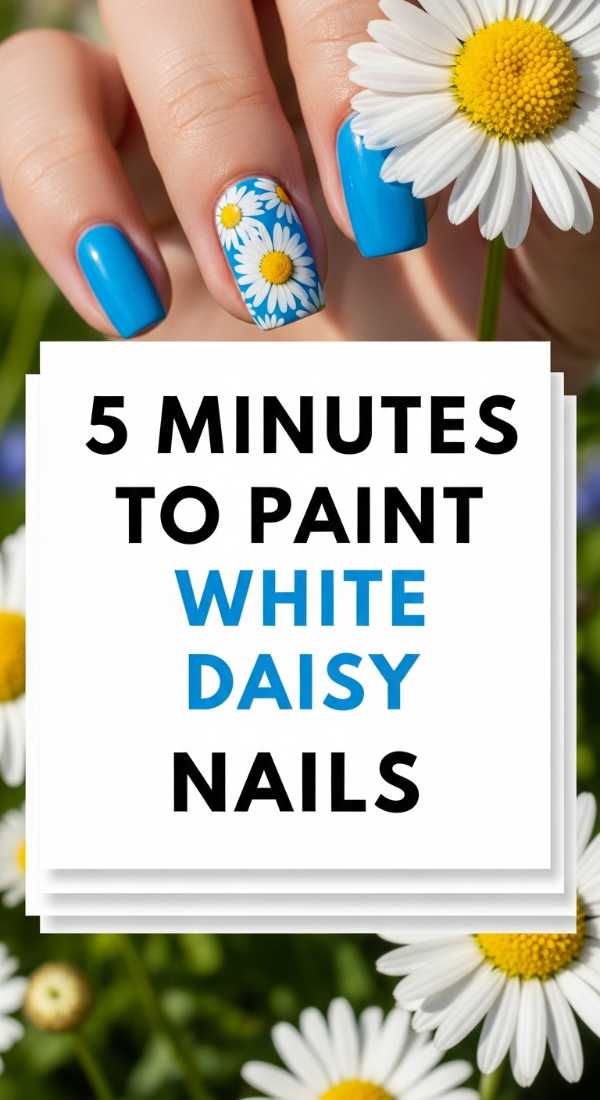
Why to love this Design:
Cottagecore at your fingertips! These little daisies are so cheerful and sweet. They remind us that even the smallest things can bloom with beauty if we give them a little attention.
Essential Elements:
- Dotting Tool (or a toothpick!)
- White Polish
- Sunshine Yellow Polish
How to Prepare:
- Start with a solid blue base color.
- Place one yellow dot in the center of your nail.
- Dot five white circles around the yellow center.
- Repeat on 2-3 nails for an accent look.
- Finish with a quick-dry top coat.
Budget Range
- Sinful Colors ‘Snow Me White’ – $3.00
- Sally Hansen ‘Lemon Zen’ – $6.00
- Dotting Tool Set – $5.00
3 Secrets for Crisp Blue French Tips
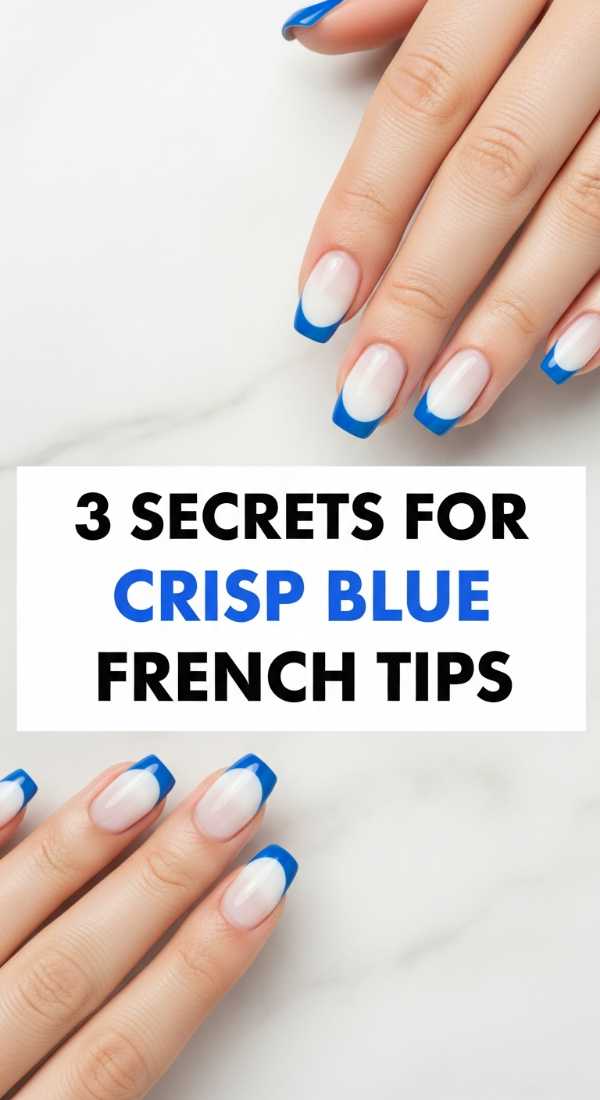
Why to love this Design:
A modern twist on a classic! Instead of the traditional white, using a soft sky blue makes your French manicure feel fresh, modern, and so very ‘you’.
Essential Elements:
- Sky Blue Polish
- Silicone Nail Stamper
- Base Polish (Nude/Pink)
How to Prepare:
- Apply blue polish onto the silicone stamper head.
- Press your nail tip gently into the stamper at a 45-degree angle.
- Clean the edges with a brush dipped in remover for a perfect smile line.
Budget Range
- Orly ‘Blue Suede’ – $12.00
- Silicone Nail Stamper – $7.00
- Clean-up Brush – $4.00
4 Easy Steps for Blue Marble Nails
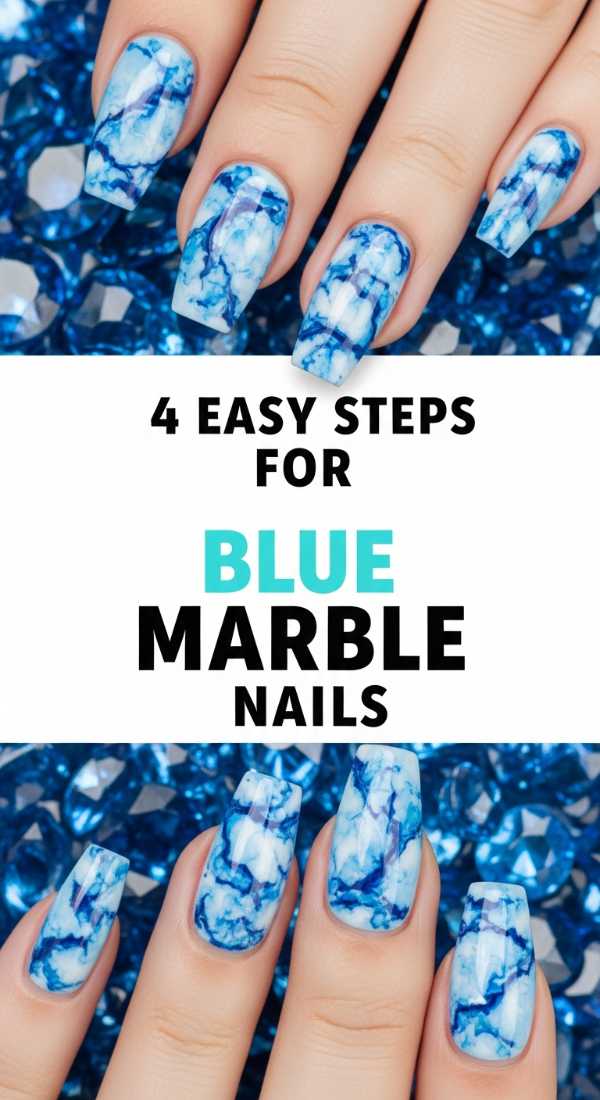
Why to love this Design:
Marble nails look like expensive stone or fine porcelain. The organic veins of color are unique on every single finger, making your manicure truly one-of-a-kind.
Essential Elements:
- Sapphire Blue Polish
- Plastic Wrap or a Sponge
- Acetone for thinning
How to Prepare:
- Paint a white base and let it dry.
- Dot small amounts of blue and white polish on a piece of plastic wrap.
- Dab the wrap onto your nail to swirl the colors together.
- Softly blend any harsh edges with a tiny bit of acetone on a brush.
Budget Range
- China Glaze ‘Frostbite’ – $7.50
- Up&Up Acetone – $3.00
- Plastic Wrap – Kitchen Staple
5 Steps to Add Cute White Hearts
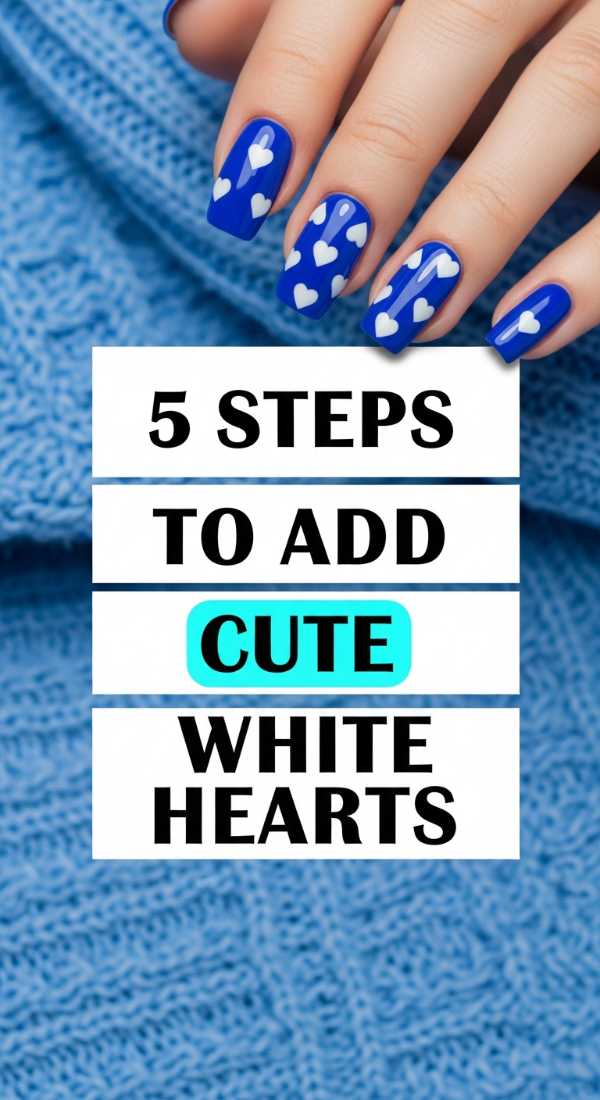
Why to love this Design:
This is for the romantics! Small white hearts over a blue base look like little love notes. It’s a subtle way to carry a bit of affection with you throughout your busy day.
Essential Elements:
- White Striper Polish
- Dotting Tool
- Cobalt Blue Base
How to Prepare:
- Apply your cobalt blue base coat.
- Place two white dots side-by-side where you want the heart.
- Drag the polish from each dot down to a center point.
- Fill in the middle to create the perfect heart shape.
- Let dry completely before top-coating.
Budget Range
- Essie ‘Aruba Blue’ – $10.00
- Beetles White Liner Gel – $8.00
- Sally Hansen Top Coat – $6.00
3 Ways to Blend Blue and White Ombre
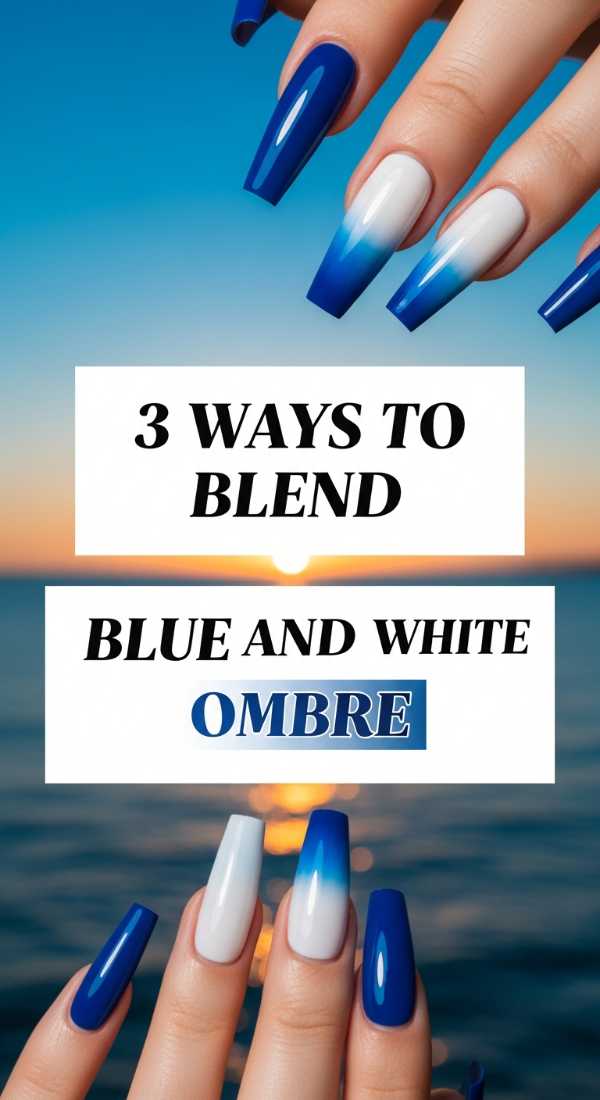
Why to love this Design:
The ombre effect is like a gradient of a beautiful morning sky. It’s soft, seamless, and looks incredibly professional while being surprisingly simple to do.
Essential Elements:
- Makeup Wedge Sponge
- Latex Tape (optional)
- Two shades of blue
How to Prepare:
- Paint your nail white and let dry.
- Paint stripes of blue and white directly onto the makeup sponge.
- Dab the sponge onto the nail repeatedly until the colors blend perfectly.
Budget Range
- Wedge Sponges (50pk) – $5.00
- OPI ‘It’s a Boy!’ Blue – $11.50
- Liquid Latex Barrier – $9.00
4 Steps to Design Blue Geometric Art
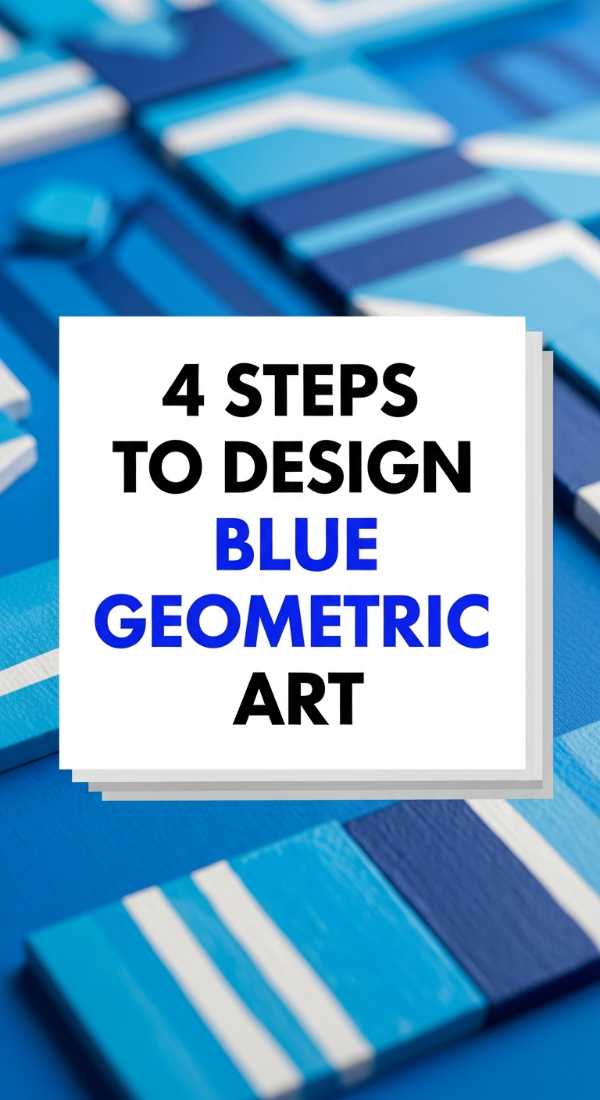
Why to love this Design:
For my loves who like things a bit more structured! Geometric art is modern, bold, and shows off your artistic side. It’s like wearing a piece of modern art.
Essential Elements:
- Washi Tape or Painters Tape
- Cornflower Blue Polish
- Matte Top Coat
How to Prepare:
- Apply tape in triangles or diagonal shapes over a dry base.
- Paint your cornflower blue in the open spaces.
- Remove tape immediately for sharp, clean edges.
- Apply a matte top coat for a contemporary, non-shiny finish.
Budget Range
- Zoya ‘Bela’ Base – $12.00
- Essie ‘Saltwater Happy’ – $10.00
- OPI Matte Top Coat – $11.50
A Soft Farewell to Your Creative Session
Thank you so much for spending this time with me, loves. I hope these designs bring a little bit of ‘porcelain perfection’ to your week. Remember, it’s not about having a perfect salon finish—it’s about the joy of the process and the little sparkle you feel when you look down at your hands. You are an artist in your own right, and your self-care matters. Until next time, stay soft, stay inspired, and keep shining.