
I remember the first time I truly felt connected to my backyard. It wasn’t when the grass was perfectly mowed or when the deck was freshly stained; it was the moment I noticed a monarch butterfly landing on a milkweed plant I’d tucked into a corner almost by accident. That tiny flicker of life changed everything. Suddenly, my outdoor space wasn’t just a ‘yard’ to maintain—it was a living, breathing sanctuary that I had the privilege of co-creating with nature. It felt like a warm hug from the earth itself.
In today’s fast-paced, digital-first world, there is a deep, soul-level craving for something real. We want to feel the soil between our fingers, smell the intoxicating scent of jasmine on a summer breeze, and know that our small slice of the world is doing something good for the planet. Eco-chic isn’t just a trend; it’s a lifestyle shift toward intentionality, beauty, and sustainability. It’s about transforming your backyard (or even just a tiny balcony) into a lush paradise that feeds your spirit as much as it feeds the local bees.
Whether you’re a seasoned green thumb or someone who has never successfully kept a succulent alive, this journey is for you. We’re going to dive into how to curate a space that feels luxe yet grounded, sophisticated yet wild. From vertical veggie towers to the art of ‘slow gardening,’ let’s explore how you can turn your outdoor area into the sustainable retreat of your dreams.
How to Foster Childlike Curiosity for a Family Bonding Experience
Why we love this
There is an undeniable magic in seeing the garden through the eyes of a child, where every pebble is a treasure and every earthworm is a tiny marvel of engineering. This approach fosters a deep, sensory connection to the earth, filling the air with the scent of crushed mint and the sound of joyful laughter as you explore together. It’s about the tactile joy of muddy hands and the quiet anticipation of waiting for a seed to sprout, creating a shared rhythm that grounds the whole family in the present moment.
Essential Elements:
- Magnifying glasses and nature journals
- Kid-sized ergonomic shovels and buckets
- A dedicated ‘discovery’ patch of soil
- Pollinator-friendly flowers like Zinnias or Sunflowers
- A bug hotel or birdhouse kit
How to make it
- Begin by designating a specific corner of the garden as the ‘Adventure Zone,’ ensuring it is free from thorny plants or delicate prize-winners to allow for unrestricted exploration.
- Introduce the concept of ‘Micro-Hikes’ where you and your children use magnifying glasses to examine a single square foot of ground, identifying different leaf shapes, insects, and soil textures.
- Set up a simple ‘Weather Station’ using a rain gauge and a homemade wind vane, encouraging children to record daily changes in a dedicated nature journal with sketches and pressed leaves.
- Engage in ‘Seed Bombs’ preparation by mixing clay, compost, and native wildflower seeds, rolling them into small balls by hand to provide a tactile, messy, and rewarding experience.
- Schedule ‘Quiet Observation’ sessions at dusk to watch for evening pollinators, teaching the value of patience and the subtle beauty of the garden’s nocturnal transition.
How to Maximize Small Balconies for a Luxe Urban Retreat

Why we love this
Even the smallest concrete square can be transformed into a lush, emerald escape that feels miles away from the city’s hustle. There’s a particular sophistication in a well-curated balcony garden, where the fragrance of lavender mingles with the cool evening air and soft textures like outdoor rugs and velvet pillows invite you to linger. It’s an intimate, jewel-box sanctuary that proves you don’t need an acre to experience the profound peace of living among greenery and sipping tea surrounded by swaying leaves.
Essential Elements:
- Tiered wooden shelving or a metal plant stand
- High-quality railing planters with secure brackets
- Weather-resistant floor cushions and a textured outdoor rug
- Solar-powered fairy lights or Edison bulbs
- Dwarf citrus trees or fragrant herbs
How to make it
- Assess your balcony’s weight capacity and light exposure—noting how many hours of direct sun it receives—before selecting containers and soil mixes.
- Utilize vertical height by installing a multi-tiered shelving unit against a wall, placing sun-loving plants at the top and shade-tolerant varieties, like ferns, on the lower levels.
- Choose a unified color palette for your pots (such as terracotta or matte charcoal) to create a cohesive, designer look that makes the space feel larger and more intentional.
- Incorporate ‘Softscape’ elements by layering an outdoor rug over the concrete and adding plush, water-resistant seating to transform the area from a plant storage space into a living room.
- Install automated drip irrigation kits designed for small spaces to ensure consistent hydration for your pots without the hassle of daily manual watering.
How to Wear Practical Fashion for a Comfortable Day in the Sun
Why we love this
Gardening is an athletic endeavor of love, and the right attire makes the experience feel like a pampered ritual rather than a chore. We adore the ‘garden-to-table’ aesthetic—think breathable linens that move with your body, wide-brimmed straw hats that cast soft shadows over your face, and sturdy boots that feel like an extension of the earth. There is a tactile satisfaction in wearing fabrics that grow softer with every wash and pockets deep enough to hold a pair of shears and a handful of freshly harvested cherry tomatoes.
Essential Elements:
- Breathable linen or organic cotton overalls
- A wide-brimmed UPF-rated sun hat with a chin strap
- Reinforced leather or bamboo fiber gardening gloves
- Ergonomic, waterproof garden clogs or boots
- A multi-pocket utility apron
How to make it
- Select base layers made of moisture-wicking natural fibers like bamboo or light wool to regulate body temperature during high-intensity tasks like digging or weeding.
- Choose outerwear with ‘articulated’ joints—specifically knees and elbows—to allow for a full range of motion without the fabric binding or pulling during repetitive movements.
- Invest in high-quality, vegetable-tanned leather gloves that will mold to the shape of your hands over time, providing both protection and a tactile ‘second-skin’ feel for delicate tasks.
- Apply a high-SPF, mineral-based sunscreen to all exposed areas 20 minutes before heading out, focusing on the back of the neck and ears which are often overlooked.
- Organize your utility apron with essential tools (snips, twine, labels) so they are always at hip-reach, reducing the need to constantly stand and bend, thus preserving your energy.
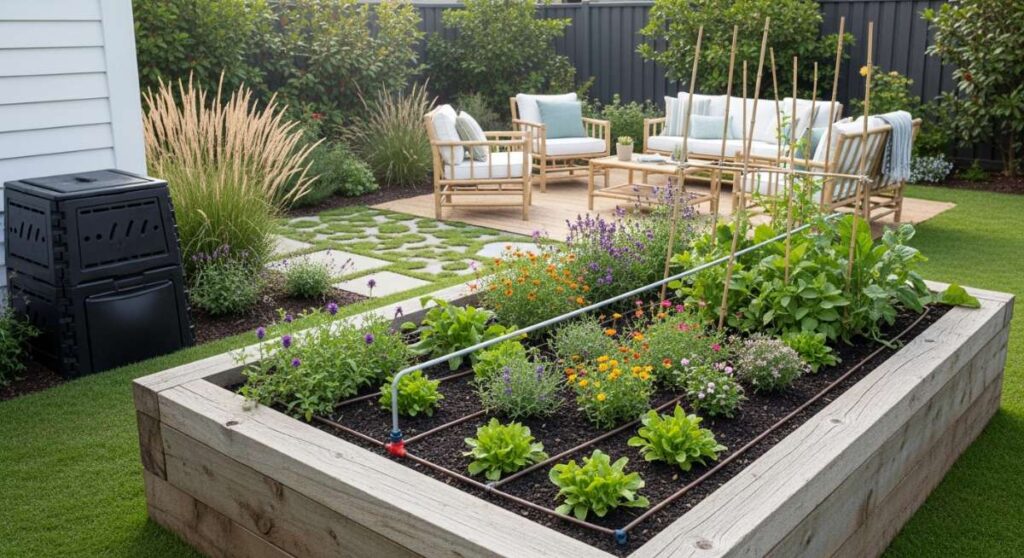
How to Grow Vertical Vegetables for a Bounty of Fresh Produce
Why we love this
There is nothing quite as rewarding as reaching up to harvest a sun-warmed cucumber or a cluster of sugar-snap peas hanging like emerald earrings from a trellis. Vertical gardening is a visual and sensory feast, turning a flat garden into a three-dimensional cathedral of vines and blossoms. The air is sweeter when it’s filtered through a living wall of greenery, and the convenience of picking produce at eye level makes the ‘garden-to-plate’ transition feel effortless and incredibly elegant.
Essential Elements:
- Sturdy A-frame trellises or cattle panels
- Climbing vegetable varieties (pole beans, cucumbers, vining tomatoes)
- Soft garden twine or Velcro plant ties
- High-nitrogen organic liquid fertilizer
- Heavy-duty anchoring stakes
How to make it
- Install your vertical support structures before planting, ensuring they are anchored at least 12 inches deep into the soil to withstand the weight of a full-grown plant and wind resistance.
- Select ‘Indeterminate’ or vining varieties of vegetables, as bush varieties will not have the natural inclination to climb and will require excessive manual training.
- Plant seeds or seedlings at the base of the structure, spacing them 4 to 6 inches apart to allow for proper airflow, which is critical for preventing powdery mildew in vertical systems.
- Gently guide the young tendrils onto the support using soft twine in a loose ‘figure-eight’ knot, providing support without strangling the stem as it expands.
- Prune the ‘suckers’ or lower leaves regularly to direct the plant’s energy upward and ensure that sunlight can reach the developing fruit hidden within the dense foliage.
How to Seed Wild Landscapes for a Low Maintenance Beauty
Why we love this
A wild-seeded landscape is a love letter to the local ecosystem, offering a shifting tapestry of colors and textures that requires very little from you but rewards you with so much. We love the effortless, ‘undone’ look of native grasses swaying against a backdrop of wildflowers; it feels like a meadow from a storybook. The aroma is complex—earthy, honeyed, and fresh—and the sound of bees humming through the blooms creates a soundtrack of pure, unadulterated tranquility that managed lawns simply can’t match.
Essential Elements:
- Regional native wildflower seed mix
- Sand (for even seed distribution)
- A metal garden rake
- Biodegradable erosion control blankets (for slopes)
- A light straw mulch
How to make it
- Clear the designated area of all existing grass and invasive weeds using a shallow tilling method or solarization (covering with black plastic) to ensure a clean seedbed.
- Mix your tiny wildflower seeds with a bucket of dry sand at a ratio of 1 part seed to 4 parts sand; this allows you to see where you have cast the seeds and ensures even coverage.
- Broadcast the seed-sand mix by hand in a cross-hatch pattern, walking north-to-south then east-to-west to cover every inch of the prepared soil.
- Press the seeds into the soil using a lawn roller or by walking over the area; most wildflowers need light to germinate, so they should be ‘pressed in’ rather than ‘buried.’
- Water the area with a fine mist setting daily for the first three weeks until seedlings are roughly two inches tall, then gradually reduce frequency to encourage deep root growth.
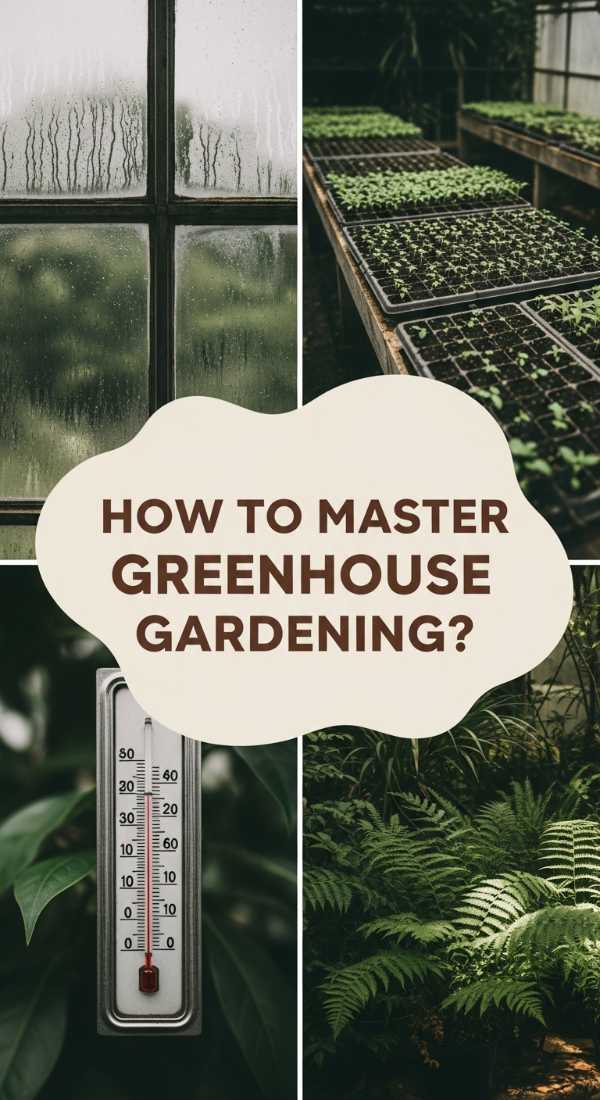
How to Manage Glass Houses for a Year Round Botanical Escape
Why we love this
Stepping into a glass house in the middle of winter is like entering another dimension where it is always spring. The air is thick with humidity and the sweet, heavy scent of damp earth and tropical blooms, providing a stark, beautiful contrast to the frosty world outside. We love the architectural elegance of glass and steel, and the way it captures the pale winter light, creating a luminous sanctuary where you can nurture exotic orchids or crisp winter greens while the snow falls silently against the panes.
Essential Elements:
- Tempered glass or polycarbonate greenhouse structure
- Minimum/Maximum thermometer and hygrometer
- Automatic solar-powered vent openers
- Staging benches with slatted tops
- Circulation fans for airflow
How to make it
- Orient your glass house so the longest side faces south to maximize solar gain during the short days of winter, providing natural warmth and light to your plants.
- Install automatic roof vents that open based on internal temperature; this is vital to prevent ‘heat shock’ on sunny days where temperatures can spike rapidly even in cold weather.
- Organize your ‘staging’ (benches) with heavier clay pots on the bottom to act as a thermal mass, absorbing heat during the day and releasing it slowly through the night.
- Monitor humidity levels strictly; if the air becomes too dry, ‘damping down’ (spraying the floor with water) will raise the moisture levels, which is essential for tropical species.
- During summer months, apply a specialized glass shading paint or install internal blinds to prevent leaf scorch and keep the internal temperature manageable for the gardener.
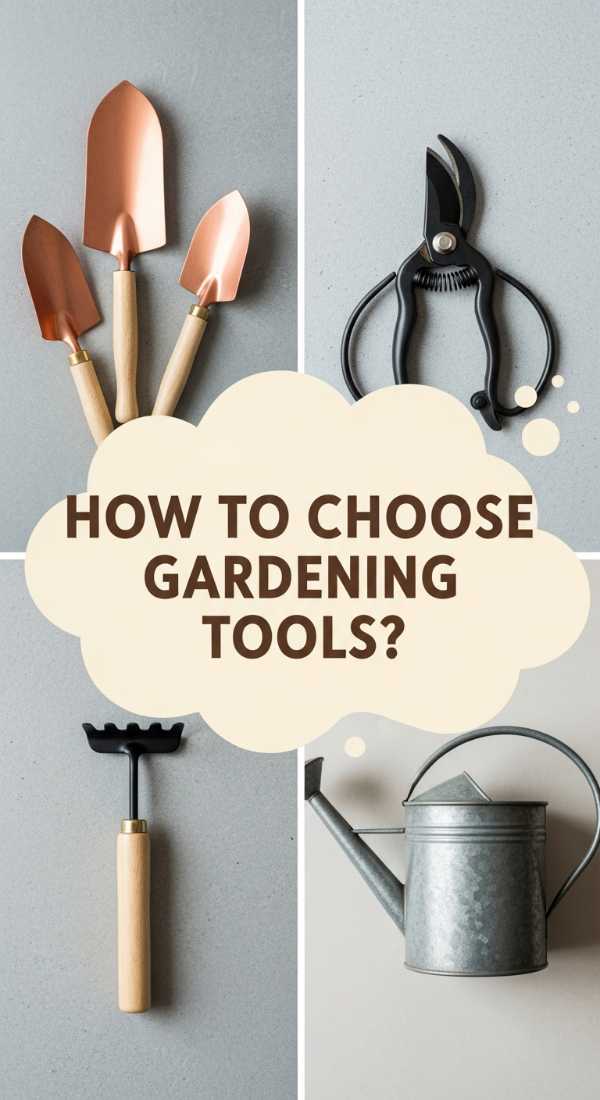
How to Select Quality Tools for an Effortless Planting Routine

Why we love this
There is a quiet, meditative joy in using a tool that is perfectly balanced and expertly crafted. High-quality garden tools aren’t just equipment; they are heirlooms that tell the story of every season you’ve spent in the dirt. We love the feel of cold, forged steel and the warmth of a smooth ash wood handle that has been oiled to perfection. When your tools work in harmony with your movements, the physical act of gardening becomes a rhythmic dance rather than a struggle, leaving you feeling energized rather than exhausted.
Essential Elements:
- Forged carbon steel hand trowel and transplanter
- Bypass pruners with replaceable blades
- A long-handled stainless steel spade
- Linseed oil for wood maintenance
- A sharpening stone or diamond file
How to make it
- Test the ‘heft’ and balance of any hand tool before purchasing; a well-designed tool should feel like an extension of your forearm, with the center of gravity near the palm.
- Choose ‘Bypass’ pruners over ‘Anvil’ styles for living plants, as the scissor-like action creates a clean cut that heals faster, whereas anvils can crush delicate stems.
- Maintain wood handles by sanding them lightly at the end of every season and rubbing in a generous coat of food-grade linseed oil to prevent cracking and splintering.
- Keep a sharpening stone in your garden kit; a 15-degree angle on your blades ensures that you use 30% less force during pruning and digging tasks, protecting your joints.
- Store tools in a bucket filled with sand and a small amount of mineral oil; plunging the metal ends into the sand after use cleans them and provides a protective oil coating.
How to Curate Backyard Spaces for a Serene Personal Sanctuary
Why we love this
A true sanctuary is a place where the world’s noise fades into the background, replaced by the gentle rustle of ornamental grasses and the soothing drip of a stone fountain. This is about creating ‘rooms’ in your garden—pockets of privacy draped in climbing jasmine where the air feels cooler and the light is dappled. We love the emotional shift that happens when you step onto a hidden stone path; it’s an invitation to breathe deeper, let your shoulders drop, and reconnect with your inner stillness in a space designed specifically for your peace.
Essential Elements:
- Natural stone or reclaimed wood focal point (bench or fountain)
- Privacy screens made of bamboo or tall evergreens
- Soft, textured outdoor textiles (throws and rugs)
- A wind chime with a deep, melodic tone
- Night-blooming jasmine or Moonflowers for fragrance
How to make it
- Identify the ‘Zone of Silence’ in your yard—the area furthest from street noise or neighbors—and mark this as the heart of your sanctuary for seating.
- Layer your planting levels, using tall ‘anchor’ plants like Thuja for privacy, mid-level shrubs for texture, and low-growing groundcovers to soften the edges of paths.
- Incorporate a water feature, even a small solar-powered birdbath, to provide ‘white noise’ that masks ambient neighborhood sounds and attracts peaceful local birds.
- Choose a monochromatic or analogous color scheme (all whites and greens, or blues and purples) to create a visual sense of calm that doesn’t overstimulate the eyes.
- Design the path to your sanctuary with intentional curves or ‘stepping stones’ that force you to slow your pace and mindfully transition into the relaxation zone.
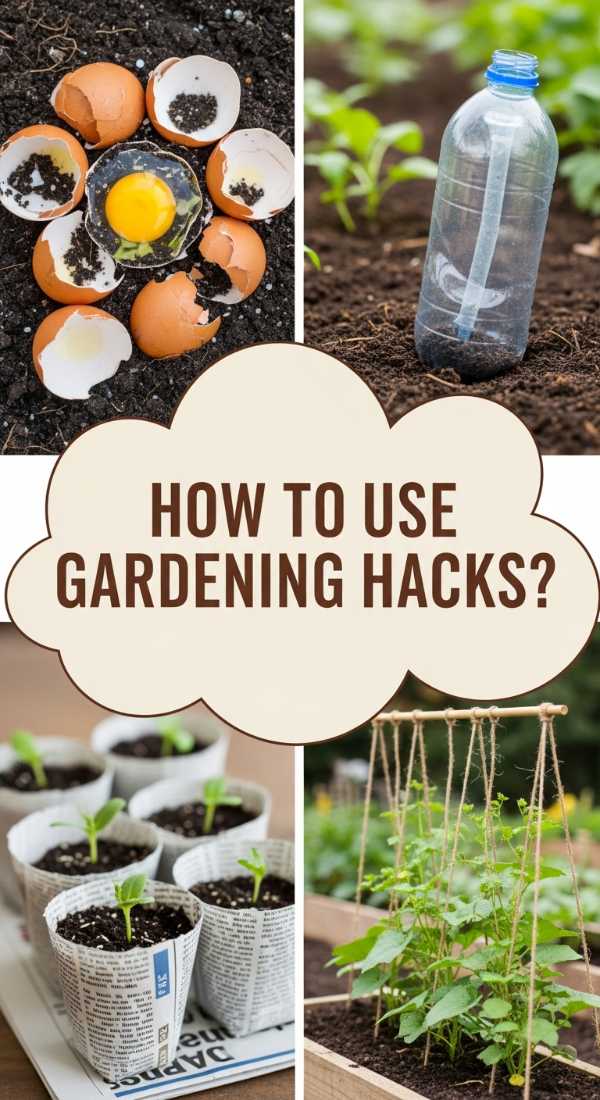
How to Repurpose Household Items for a Budget Friendly Garden
Why we love this
There is a brilliant, creative satisfaction in seeing a discarded object through the lens of potential. Repurposing is the ultimate ‘eco-chic’ move, turning vintage tea tins into succulent planters or old wooden pallets into a sophisticated vertical herb garden. It gives your space a storied, bohemian soul that can’t be bought at a big-box store. We love the quirky charm of a galvanized bucket turned into a rose planter, or the way an old ladder can become a multi-leveled stage for a collection of terracotta pots, each with its own history.
Essential Elements:
- Old wooden pallets (heat-treated, marked ‘HT’)
- Vintage tins, colanders, or galvanized buckets
- Non-toxic outdoor paint or wood stain
- A power drill with masonry and wood bits
- Landscape fabric for lining porous containers
How to make it
- Check for safety markings on wooden pallets; only use those marked ‘HT’ (Heat Treated) to ensure they haven’t been treated with harmful chemical pesticides like methyl bromide.
- Drill multiple 1/2 inch drainage holes in the bottom of any repurposed container—whether it’s a tin box or a plastic tub—to prevent root rot from standing water.
- Line wire baskets or wooden crates with landscape fabric before adding soil; this allows water to drain through while keeping the soil and nutrients inside the container.
- Sanitize used containers with a solution of one part bleach to nine parts water to kill any lingering fungi or bacteria before introducing new plants.
- Elevate repurposed pots using ‘pot feet’ or even flat stones to ensure air can circulate underneath, which prevents moisture from damaging your deck or patio surfaces.
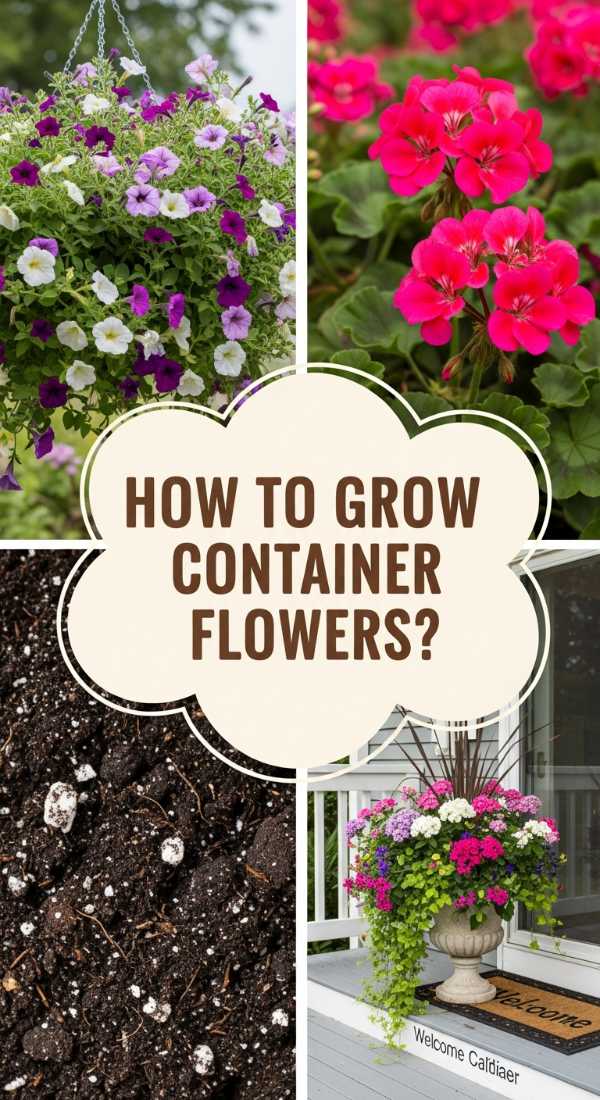
How to Arrange Potted Florals for a Stunning Seasonal Display
[IMAGE_10]
Why we love this
Potted floral arrangements are the ‘jewelry’ of the garden—they provide the finishing touch of sparkle and color that ties the whole space together. We love the ‘Thriller, Filler, Spiller’ method, which creates a professional, high-end look with lush textures and cascading blooms that spill over the sides like silk. The scent of fresh petunias and sweet alyssum floating from a container near your front door provides an instant mood lift, welcoming you home with a vibrant, living celebration of the current season.
Essential Elements:
- The ‘Thriller’ (a tall focal plant like Canna Lily or Grass)
- The ‘Filler’ (mounding plants like Geraniums or Lantana)
- The ‘Spiller’ (trailing plants like Sweet Potato Vine or Lobelia)
- Slow-release organic flower food
- High-quality potting mix with perlite
How to make it
- Select a container that is at least 12-14 inches in diameter to provide enough ‘root room’ for multiple plants to thrive together without competing for space.
- Fill the container with a high-quality potting soil (never garden soil, which is too heavy) and mix in a tablespoon of slow-release organic fertilizer granules.
- Plant your ‘Thriller’ slightly off-center for a more dynamic, designer look; this is the tall plant that provides the vertical architecture of the arrangement.
- Surround the thriller with ‘Fillers,’ packing them close enough that their leaves touch, which creates a lush, full appearance and helps the soil retain moisture.
- Tuck your ‘Spillers’ around the very edge of the pot, angling them slightly outward so they immediately begin to drape over the rim, softening the hard edges of the container.
The Final Flourish
Transforming your backyard into a sustainable paradise is a journey of a thousand small, beautiful steps. It’s about more than just plants; it’s about creating a lifestyle that honors the earth and provides a sanctuary for your soul. As you implement these eco-chic strategies, remember that a garden is never ‘finished’—it is a living conversation between you and nature. Embrace the mud, celebrate the blooms, and enjoy every moment of your sustainable retreat.