
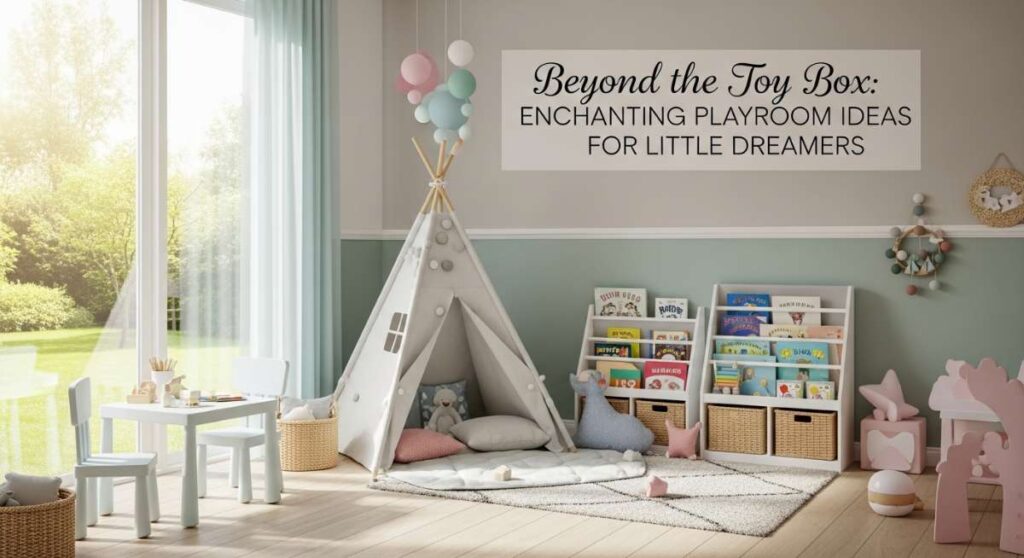
Beyond the Toy Box: Enchanting Playroom Ideas for Little Dreamers
There is a specific kind of magic that exists in the spaces we build for our children. It’s in the way the morning light catches the dust motes dancing over a half-finished Lego castle, or the scent of cedar wood warming under the summer sun. As parents, we aren’t just decorating rooms; we are curate-ing the backdrop of their most precious memories. We are building the stages where their first grand adventures will take place, from daring mountain climbs on a backyard frame to quiet tea parties in a sun-drenched corner.
Creating a ‘dreamy’ play space is about more than just aesthetics; it is about fostering a sense of wonder and safety. When we move beyond the plastic clutter and focus on intentional, soulful design, we invite our little ones to dream bigger and play deeper. Whether you have a sprawling backyard or a cozy apartment nook, these ideas are designed to spark that flicker of childhood enchantment that stays with them long after they’ve outgrown their favorite toys.
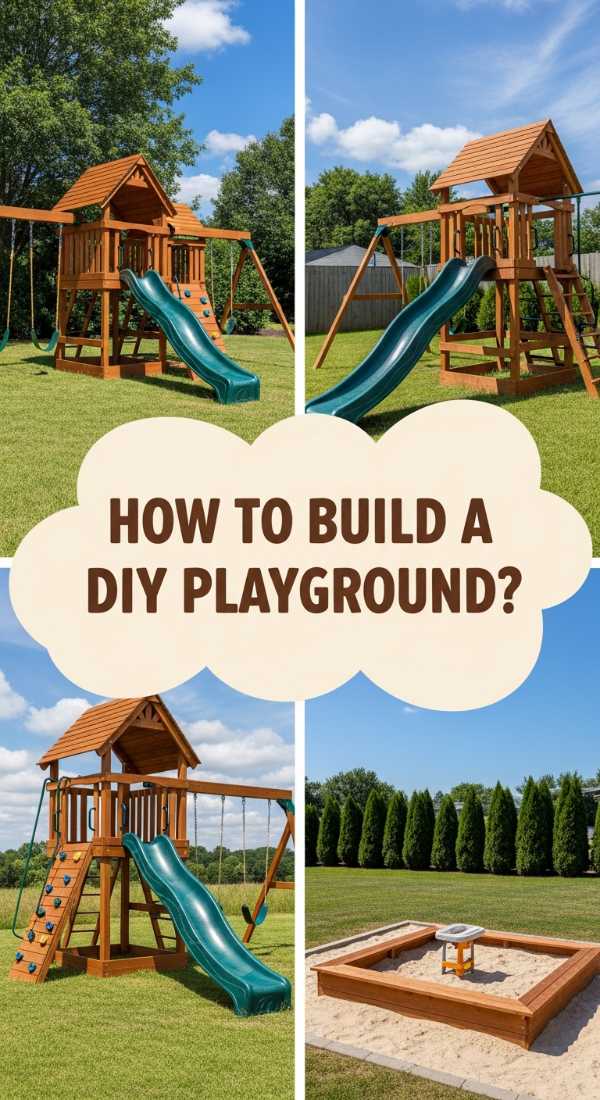
How to Build a DIY Playground for Endless Summer Fun
Why we love this
There is nothing quite like the smell of fresh-cut lumber and the tactile satisfaction of smooth, sanded wood under a child’s bare feet during a golden July afternoon. This DIY playground setup brings a sense of accomplishment and artisan charm to your backyard, trading bright, hollow plastics for the grounding weight of sustainable timber. We love the way the structure feels like a living part of the garden, weathering beautifully over time while providing a sturdy anchor for swinging, sliding, and soaring into the summer breeze.
Essential Elements:
- Pressure-treated or cedar 4×4 posts
- Heavy-duty swing hangers and galvanized chains
- A high-grade UV-resistant resin slide
- Stainless steel hardware and carriage bolts
- Play-grade wood chips or rubber mulch for a soft landing
How to make it
- Begin by clearing a level 20×20 foot area, ensuring you are at least 6 feet away from any fences or structures for safety. Use a string line and stakes to mark the footprint perfectly square.
- Dig post holes to a depth of 24 inches (or below your local frost line). Position your vertical 4×4 support beams, using a spirit level to ensure they are perfectly vertical before pouring quick-set concrete into the holes.
- Allow the concrete to cure for at least 48 hours. Once set, install the horizontal header beam using heavy-duty carriage bolts, ensuring the beam is level to prevent uneven wear on swing bearings.
- Attach the swing hangers by drilling pilot holes to prevent the wood from splitting. Tighten the bolts until the washers are flush with the timber, then clip on your swings and check for a smooth, silent range of motion.
- Mount the slide platform using deck screws, ensuring all edges are sanded to a buttery-smooth finish. Apply a non-toxic, water-based sealant to the entire structure to protect against the elements and prevent splinters.
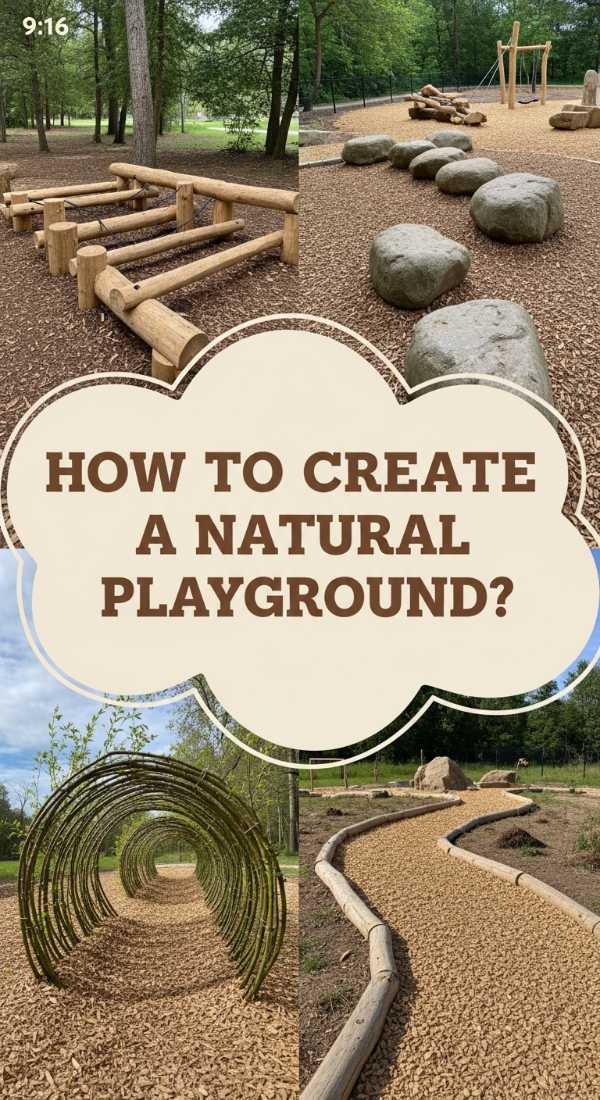
How to Create a Natural Outdoor Playground for Organic Playtime
Why we love this
This approach celebrates the raw, unbridled beauty of the earth, swapping rigid structures for the winding curves of willow branches and the cool, damp touch of river stones. It smells of damp moss and pine needles, creating a sensory-rich environment where children can feel the textures of the natural world against their skin. We love how an organic playground encourages ‘open-ended’ play, where a fallen log isn’t just a balance beam—it’s a dragon’s spine or a bridge over a rushing canyon, fostering a deep, primal connection to nature.
Essential Elements:
- Large, smooth boulders for climbing and seating
- A living willow tunnel or ‘fedge’ (fence-hedge)
- Stepping stones or cross-sections of fallen logs (tree cookies)
- A hollowed-out log for crawling and hiding
- Native grasses and pollinator-friendly shrubs
How to make it
- Design your layout following the natural topography of your yard. Use existing slopes for ‘mound slides’ rather than building tall towers, which integrates the play area into the landscape seamlessly.
- Source your natural materials from local landscape suppliers. Select ‘river boulders’ that have been tumbled smooth to avoid sharp edges, and position them firmly in the soil so they cannot tip or roll.
- Plant a living willow tunnel by pushing long, flexible willow rods 10 inches into the ground in two parallel rows. Arch the tops over and tie them together with twine; they will take root and leaf out, creating a magical green hallway.
- Create a ‘balance path’ using tree cookies (slices of logs). Dig shallow divots for each slice so they sit flush with the ground, preventing tripping hazards while providing a textured walking surface.
- Fill the interstitial spaces with ‘creeping thyme’ or clover. These hardy groundcovers release a sweet, herbaceous aroma when stepped on, adding a beautiful olfactory layer to the play experience.
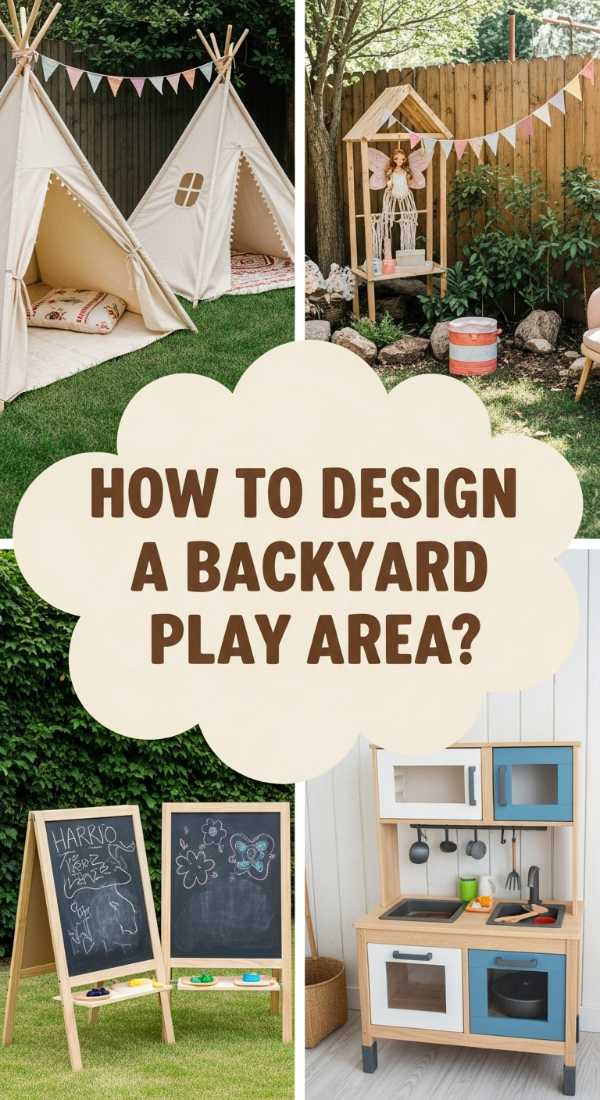
How to Design a Backyard Play Area for Kids to Spark Imagination
Why we love this
Imagination is a delicate thing, and it flourishes best in spaces that feel like a stage waiting for its actors. This design focuses on ‘theatrical’ elements—soft linen curtains catching the breeze, a small wooden stage for impromptu performances, and hidden nooks that feel like secret kingdoms. We love the visual softness of this setup, which uses muted tones and natural fabrics to create a serene environment where the mind can wander far beyond the physical boundaries of the fence.
Essential Elements:
- A simple wooden A-frame tent or ‘tented’ deck
- Weather-proof outdoor cushions and floor pillows
- A low-profile wooden stage or platform
- Solar-powered fairy lights for evening enchantment
- A weather-resistant trunk filled with ‘loose parts’ (fabrics, sticks, shells)
How to make it
- Build a simple A-frame structure using light timber. Drape it with heavy-weight outdoor canvas or drop cloths, securing the fabric with copper upholstery tacks for a vintage, curated look.
- Construct a low 4×4 foot stage using deck boards. Sand the surface excessively—start with 80-grit and finish with 220-grit for a professional, silk-like finish that is safe for bare knees and hands.
- Install a series of hooks around the play area. Use these to hang ‘imagination kits’—baskets containing magnifying glasses, old maps, or colorful capes that kids can grab easily.
- String warm-white LED fairy lights along the roofline or through nearby tree branches. Ensure the wires are tucked away safely, providing a soft, amber glow that extends playtime into the twilight hours.
- Set up a ‘curtain’ system using an outdoor tension rod and linen panels. This allows children to create their own ‘theater’ or private sanctuary by simply drawing the fabric closed.
How to Assemble an Indoor Playground for Rainy Day Adventures
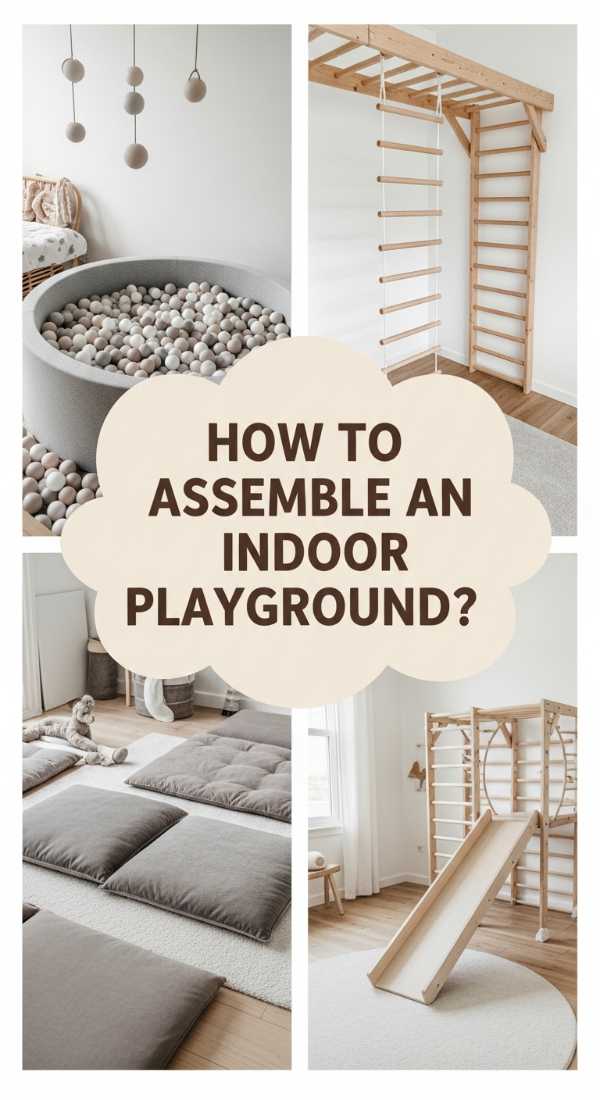
Why we love this
When the sky turns gray and the rain begins to drum against the windowpanes, having an indoor sanctuary for movement is a complete game-changer. This indoor playground is a masterclass in clean lines and soft textures, utilizing light-colored Birch plywood and plush foam mats that feel like walking on a cloud. We love how this setup transforms a spare corner into a high-energy zone that still feels sophisticated and calm, allowing for physical release without sacrificing the aesthetic of your home.
Essential Elements:
- A wall-mounted Swedish ladder or ‘Stall bar’
- High-density foam landing mats with vegan leather covers
- A ceiling-mounted sensory swing or silk hammock
- Modular climbing triangles (Pikler style)
- Magnetic wall tiles or a chalkboard feature wall
How to make it
- Identify a load-bearing wall for your Swedish ladder. Use a stud finder to locate the vertical supports behind the drywall and secure the ladder using heavy-duty lag bolts, ensuring it is rock-solid for climbing.
- If installing a ceiling swing, you must find a ceiling joist. Drill a pilot hole and screw in a heavy-duty forged steel eye bolt. Test the weight capacity personally before allowing a child to use it.
- Layout modular foam mats to create a dedicated ‘soft zone.’ Choose mats with a hidden zipper design to prevent scratches and ensure they have a non-slip backing for safety on hardwood floors.
- Arrange the Pikler triangle and any sliding ramps to create a ‘flow’ that moves from the wall ladder to the floor, encouraging a continuous obstacle course circuit.
- Finish the space with a dedicated storage ‘bin’ for soft play items. Use felt or wicker baskets to keep the sensory toys organized while maintaining the warm, blogger-chic aesthetic.
How to Craft Outdoor Kids Play Area Ideas for Active Lifestyles
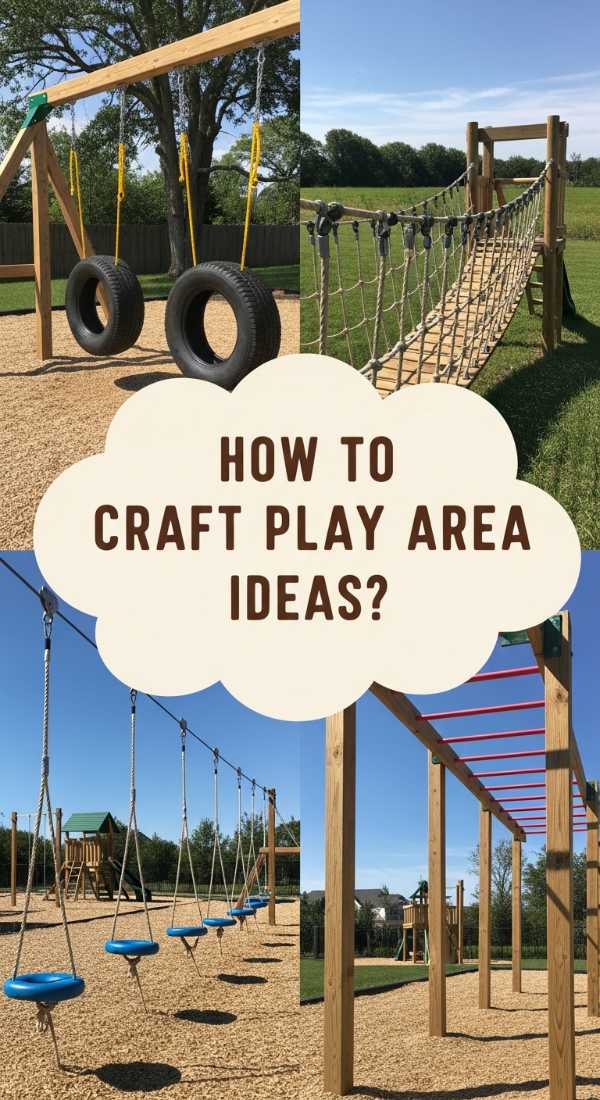
Why we love this
For the family that is always on the move, this play area is a high-octane tribute to physical agility and strength. It’s the feeling of cool metal monkey bars, the rhythmic ‘thwack’ of a ball against a rebounder, and the rush of adrenaline as they conquer a climbing wall. We love this design because it treats play as an athletic pursuit, offering challenges that grow with the child while maintaining a sleek, modern look that fits perfectly into a contemporary backyard.
Essential Elements:
- Powder-coated steel monkey bars
- A textured climbing wall with professional-grade holds
- A horizontal ‘ninja’ line or slackline
- Rubberized safety tiles for high-impact zones
- A basketball hoop or integrated sports net
How to make it
- Build a vertical climbing wall using 3/4-inch exterior grade plywood. Paint the plywood with a sand-infused outdoor paint to create a ‘stone-like’ grip texture that isn’t slippery when damp.
- Install T-nuts on the back of the plywood before mounting it to a 4×4 frame. This allows you to move and rearrange the climbing holds periodically, keeping the ‘route’ challenging and fresh.
- Secure the monkey bars at a height that is challenging but accessible. Use ‘anti-wrap’ hangers to ensure the motion is fluid and doesn’t create jarring friction for small hands.
- Anchor a slackline between two sturdy trees using tree-pro protectors to prevent bark damage. Tension the line using a heavy-duty ratchet system until it has a slight ‘bounce’ but remains firm.
- Define the boundaries of the ‘active zone’ with dark charcoal rubber tiles. These provide a professional look and superior shock absorption compared to traditional mulch or grass.
How to Style Kids Backyard Ideas for a Whimsical Garden Escape
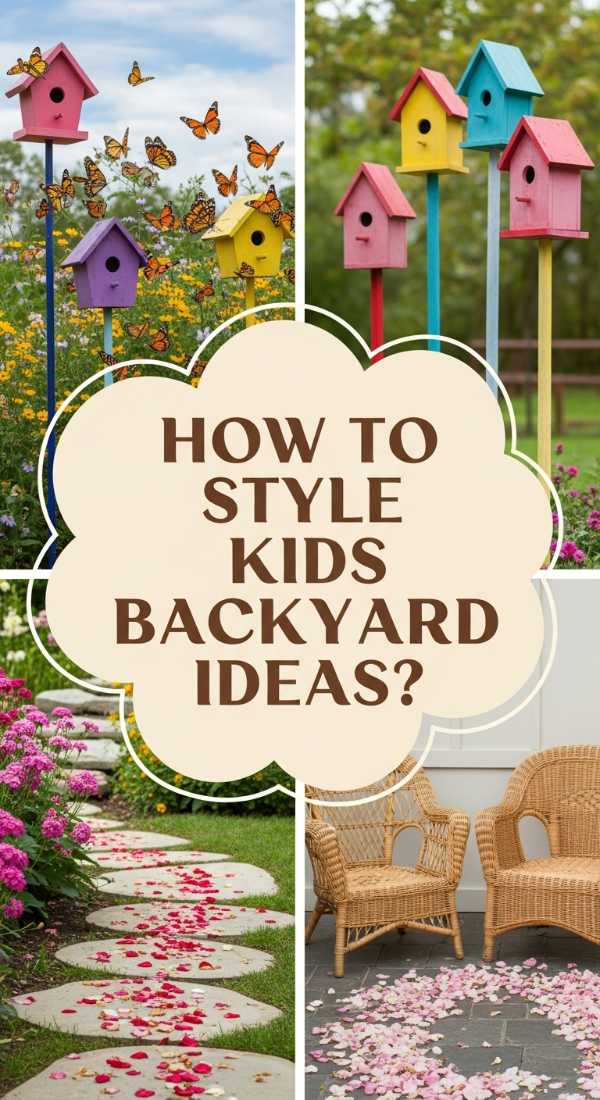
Why we love this
This is the secret garden of our dreams, a place where the air smells of blooming lavender and the only sounds are the humming of bees and the tinkling of wind chimes. We love the sheer romance of a whimsical garden escape, where play happens among the flower beds and under the dappled shade of a pergola. It’s a space that feels timeless and enchanted, inviting children to slow down, observe a ladybug, and lose themselves in a world of floral magic and pastel hues.
Essential Elements:
- A miniature ‘potting shed’ or playhouse with window boxes
- Gravel pathways lined with aromatic herbs
- A birdbath or small, bubbling stone fountain
- Pastel-painted wooden furniture
- Climbing roses or jasmine for vertical greenery
How to make it
- Paint a standard wooden playhouse in a soft, muted palette like sage green or dusty rose. Add ‘shutters’ and a tiny flower box under the window filled with hardy petunias or pansies.
- Create a ‘sensory path’ using pea gravel. Line the edges with lavender and rosemary—when the children run past, their clothes will brush the herbs, releasing a calming, spa-like fragrance into the air.
- Install a small, solar-powered water feature. The sound of trickling water provides a soothing backdrop for play and attracts birds and butterflies for nature observation.
- Hang vintage-style wind chimes and colored glass suncatchers from the eaves of the playhouse to catch the light and create a kaleidoscope of colors on the grass.
- Construct a small ‘tea party’ area using a weather-treated wooden table and chairs. Set the table with durable enamelware that looks like heirloom china but can withstand the rigors of outdoor play.
How to Optimize a Playground Backyard for Maximum Joy in Small Spaces

Why we love this
A small yard shouldn’t mean small dreams. We love the clever, vertical thinking of this playground design, which maximizes every square inch with multi-functional elements. It feels like a boutique urban oasis—clean, organized, and surprisingly spacious. By using wall-mounted features and fold-down structures, you create a high-value play zone that leaves plenty of room for the grownups to enjoy their coffee nearby. It’s all about the ‘jewel box’ effect: small, precious, and perfectly polished.
Essential Elements:
- Wall-mounted chalkboards or water walls
- A ‘vertical’ garden that doubles as a play screen
- Fold-away sand table or workbench
- Hanging ‘nest’ chairs that can be tucked away
- Compact, multi-tier play tower with a small footprint
How to make it
- Utilize your fence as a primary play surface. Mount a large piece of exterior-grade chalkboard or a ‘water wall’ made of PVC pipes and funnels directly to the fence posts to save floor space.
- Build a sand table with a heavy-duty hinged lid. When closed, it serves as a flat surface for crafts or picnicking; when open, it’s a sensory treasure chest.
- Select a play tower that emphasizes vertical height over horizontal width. Look for designs that include a ‘clubhouse’ underneath the slide platform to utilize the space twice.
- Install ‘nest’ swings on a single point swivel. This allows the swing to rotate in a small radius rather than swinging out widely, making it much safer for tight quarters.
- Use bright, light colors for the fencing and structures to make the small space feel airy and open. White-washed wood or light grey stains work wonders for visual expansion.
How to Encourage Kids Outdoor Play for Creative Sensory Growth
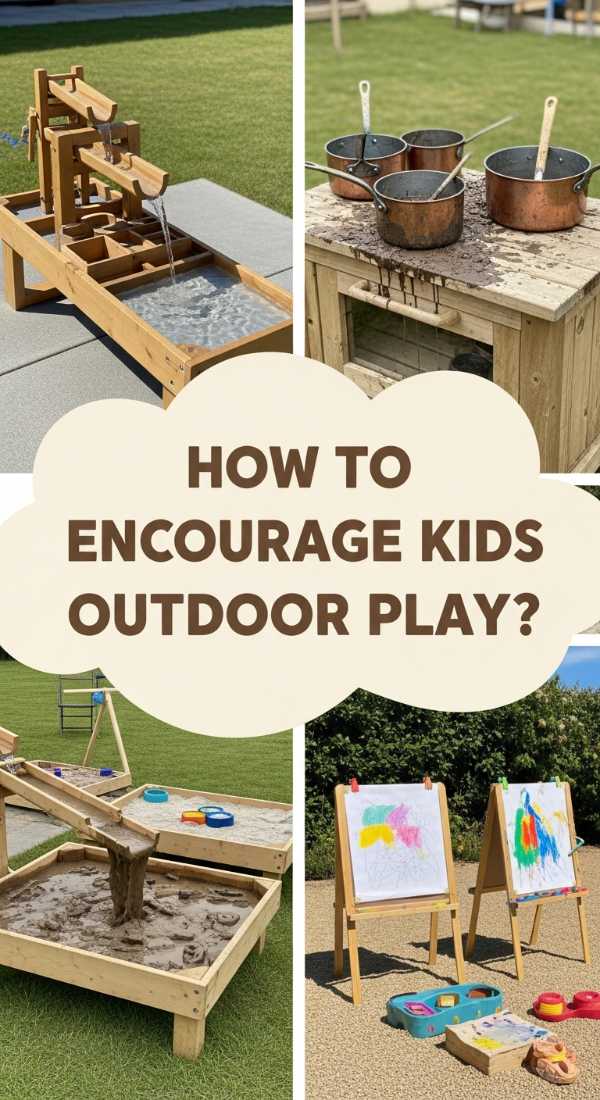
Why we love this
There is a unique joy in the ‘messy’ side of childhood—the squelch of mud between fingers, the gritty texture of dry sand, and the bright splash of water in a basin. This sensory-focused playground is a haven for tactile exploration. We love how it prioritizes the *feeling* of play, using natural materials like mud, sand, and water to stimulate brain development and creative problem-solving. It’s a space where ‘don’t get dirty’ is a forgotten rule, replaced by the wonderful, earthy aroma of a productive mud kitchen.
Essential Elements:
- A dedicated ‘Mud Kitchen’ with a real (unhooked) sink
- A large, deep sandpit with a wooden perimeter
- A DIY ‘Water Wall’ with various tubes and containers
- Baskets of ‘sensory treasures’ like smooth pinecones and sea glass
- A sturdy outdoor rug for a defined ‘mess-free’ transition zone
How to make it
- Construct a mud kitchen using upcycled wooden pallets. Install a stainless steel bowl as a ‘sink’ and add old knobs and hooks for hanging ‘utensils’ like whisks and ladles.
- Dig a 12-inch deep pit for the sand area. Line it with landscape fabric to allow for drainage while preventing weeds from growing up through the sand. Use ‘play sand’ which is washed and graded for safety.
- Build a ‘nature table’—a low shelf where kids can display their finds. This encourages them to categorize and curate their outdoor ‘collections,’ from interesting rocks to fallen feathers.
- Create a ‘sound station’ by hanging old pots, pans, and metal pipes from a wooden frame. Provide wooden mallets so children can experiment with different pitches and rhythms.
- Establish a ‘wash station’ nearby with a simple garden hose and a soft towel rack. This makes the transition from ‘sensory play’ back to ‘indoor life’ smooth and stress-free for everyone.
How to Construct a DIY Kids Playground for Safe and Sustainable Fun
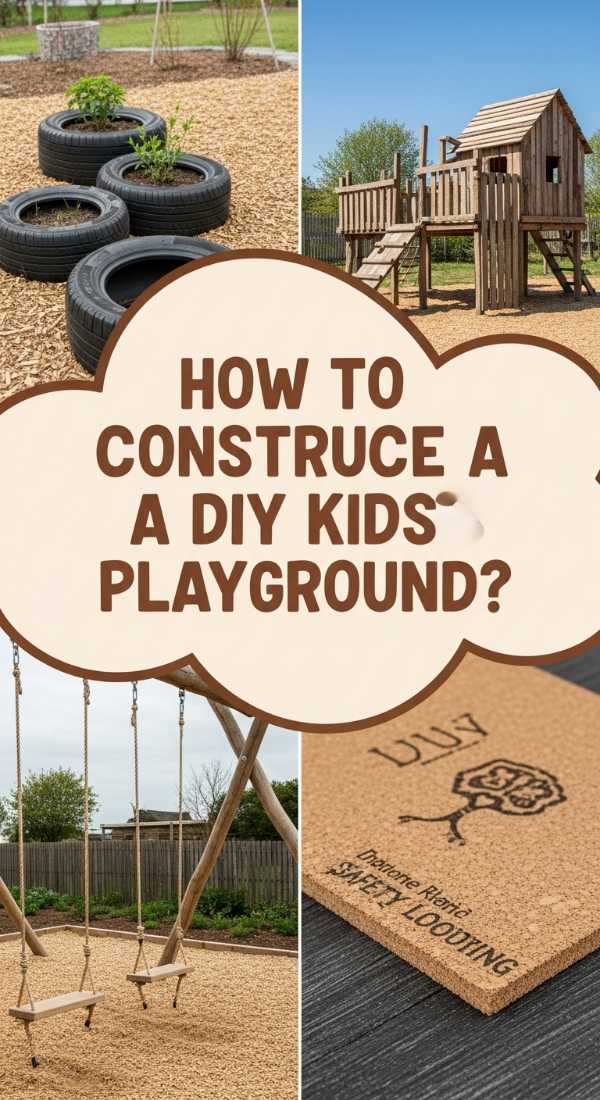
Why we love this
In a world of fast-furniture, there is something deeply grounding about a playground built with longevity and the planet in mind. This design uses sustainably sourced cedar—which naturally resists rot and insects without the need for harsh chemicals—and eco-friendly finishes that smell of linseed oil and beeswax. We love the peace of mind that comes with knowing every bolt is tightened to perfection and every material is safe for both the children and the earth. It’s a sturdy, soulful legacy for your backyard.
Essential Elements:
- FSC-certified Cedar or Redwood timber
- Non-toxic, VOC-free wood stains or oils
- Recycled rubber or organic hemp rope
- Heavy-duty ground anchors (auger style)
- Solar-powered accent lighting
How to make it
- Select ‘Heartwood’ cedar for any ground-contact posts, as it contains the highest concentration of natural preservative oils. Pre-drill every hole to avoid any structural micro-fractures in the timber.
- Use a countersink bit so that all screw heads sit slightly below the surface of the wood. Fill these holes with a mixture of wood glue and sawdust for a perfectly flush, snag-free finish.
- Apply a high-quality, plant-based oil finish using a wide brush. Work the oil into the grain until the wood stops ‘drinking,’ which creates a deep, lustrous barrier against moisture and UV rays.
- Secure the base of the playground using 18-inch steel auger anchors. Twist them into the ground and bolt them to the frame; this prevents the structure from ‘walking’ or tipping during vigorous play.
- Choose ‘soft-grip’ swing chains—these are galvanized chains coated in a thick, eco-friendly plastisol that prevents little fingers from getting pinched and provides a comfortable, warm grip.
How to Plan a Kids Outdoor Play Area for Thrilling Heights and Views
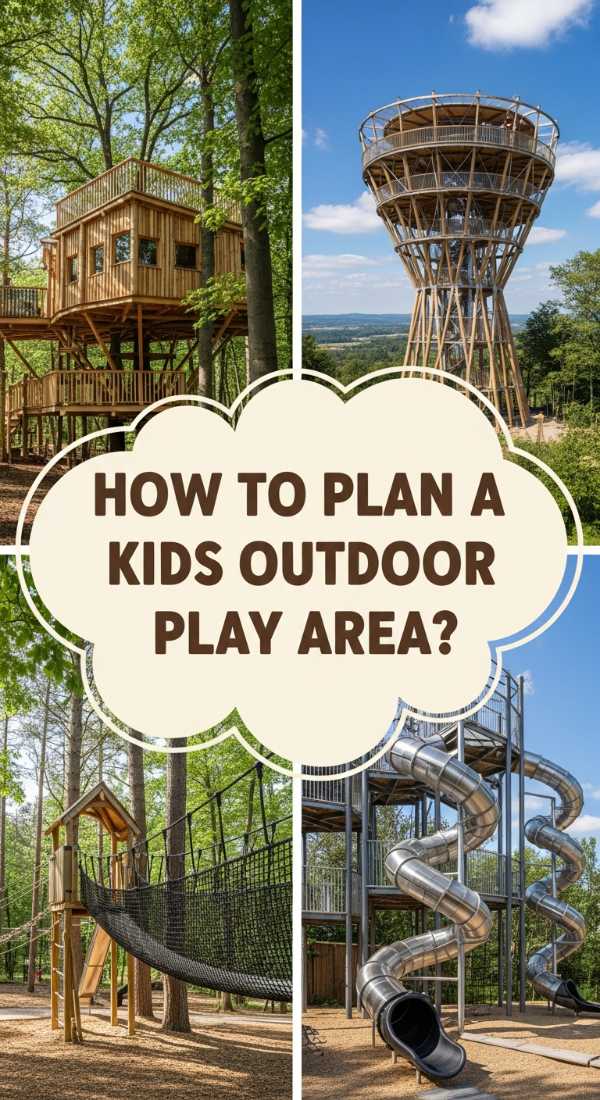
Why we love this
There is a reason every child dreams of a treehouse. Being ‘up high’ changes your perspective on the world, making the familiar backyard feel like a vast, unexplored kingdom. This design focuses on elevation—the thrill of the climb and the serenity of the lookout. We love the way an elevated play area creates a ‘secret’ world above the grass, where kids can peer through telescopes and feel the wind in their hair. It’s a space that honors the adventurous spirit, offering a literal and metaphorical ‘higher ground’ for play.
Essential Elements:
- An elevated platform or ‘crow’s nest’
- A fixed telescope or binoculars mount
- A sturdy wooden ladder or climbing net access
- A long, enclosed ‘tunnel’ slide for a fast descent
- Safety railings that exceed standard height requirements
How to make it
- Determine the ‘safe height’ for your platform based on your child’s age; 5 to 7 feet is usually the ‘sweet spot’ for a thrilling but manageable view. Ensure the support posts are 6×6 timber for maximum stability.
- Build the platform with ‘joist hangers’ for superior structural integrity. The floor should be solid, with gaps no wider than 1/8 inch to prevent small items (or toes) from getting caught.
- Install a wrap-around railing that is at least 36 inches high. Use vertical spindles spaced no more than 3.5 inches apart to ensure no one can slip through.
- Mount a ‘periscope’ or telescope at the highest point. Ensure it is fixed on a swivel base so children can scan the horizon safely without leaning over the railings.
- Add a ‘bucket and pulley’ system. This allows children to haul ‘supplies’ (snacks, books, or toys) from the ground to the crow’s nest, adding a functional and fun mechanical element to the height experience.
Conclusion: Crafting the Magic of Childhood
As we close the gate on our backyard tour, remember that the most beautiful thing about these play spaces isn’t the expensive timber or the perfectly curated colors—it’s the life that happens within them. Whether you choose a minimalist indoor gym or a sprawling whimsical garden, the goal remains the same: to create a sanctuary where your little dreamers feel empowered to explore. These spaces are an investment in their development, their confidence, and most importantly, their joy. So, pick up that hammer, grab a bag of lavender seeds, or clear out that spare corner. Your child’s next great adventure is just waiting for a place to begin.