

The Lazy Girl’s Guide to the Most Viral Food Board on the Internet
We’ve all been there—scrolling through our feeds at 11 PM, eyes glazed over as we watch impossibly perfect charcuterie boards and multi-course meals unfold. It’s aesthetic, sure, but the thought of spending four hours in the kitchen after a long day of work? Absolutely not. I wanted something that looked like a Pinterest dream but felt like a warm hug, requiring minimal effort but yielding maximum ‘wow’ factor. That’s how the Viral Simple Food Board was born; it’s the ultimate hack for the girl who loves to host but also loves her couch.
This board isn’t just about food; it’s about a mood. It’s that golden hour glow hitting a bowl of fresh pasta, the smell of basil lingering in the air, and the sound of laughter over a shared platter. It’s lazy, it’s luxurious, and it’s exactly what your soul needs this season. Below, I’m breaking down every single element you need to create the food board that has been living rent-free in everyone’s head, from zesty summer sides to the perfect spring brunch bites.
How to make summer pasta?
Why we love this
There is nothing quite like the silken texture of a lemon-butter pasta sauce coating every single strand of al dente spaghetti. As you toss the hot pasta, the aroma of freshly zested lemons and cracked black pepper fills the kitchen, instantly transporting you to a seaside terrace in Positano. Each bite is a delicate balance of bright citrus acidity and the rich, creamy weight of high-quality butter, finished with the sharp, salty punch of Pecorino Romano. It’s light enough for a humid July evening yet satisfying enough to feel like a proper indulgence.
Ingredients
- 1 lb Spaghetti or Linguine
- 3 large lemons (zested and juiced)
- 1/2 cup unsalted grass-fed butter
- 1 cup grated Pecorino Romano
- Fresh cracked black pepper
- Handful of fresh basil leaves
- Sea salt for pasta water
How to make it
- Bring a large pot of heavily salted water to a rolling boil. Use about 1 tablespoon of salt per gallon; it should taste like the sea.
- Drop your pasta and cook until ‘al dente’—usually 2 minutes less than the package instructions. This ensures the pasta has a firm bite and won’t get mushy when tossed in the sauce.
- While the pasta cooks, melt the butter in a wide skillet over medium-low heat. Do not let it brown; you want a gentle melt to preserve the creamy milk solids.
- Whisk the lemon juice and half of the zest into the butter. The mixture will slightly emulsify.
- Before draining the pasta, reserve 1 full cup of starchy pasta water. This is the ‘liquid gold’ that binds the sauce.
- Transfer the pasta directly into the skillet with the butter and lemon. Turn the heat to medium.
- Slowly add the reserved pasta water and the grated cheese while tossing constantly with tongs. The friction and starch will create a glossy, creamy sauce.
- Garnish with the remaining zest, pepper, and torn basil before serving immediately on your board.
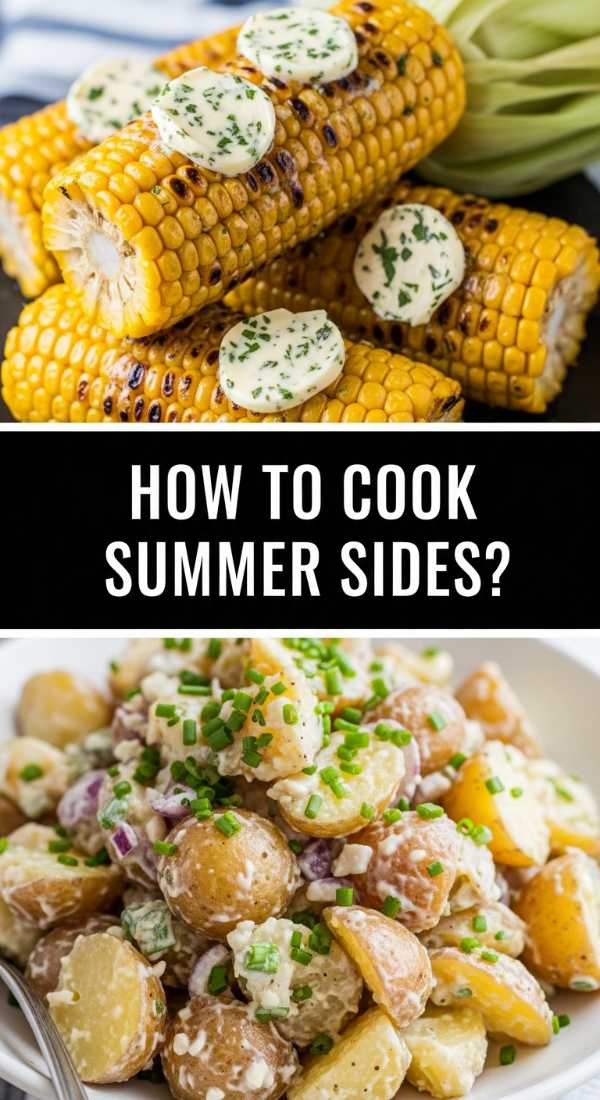
How to cook summer sides?

Why we love this
Summer sides are all about celebrating the crunch and sweetness of produce at its peak, and nothing does that better than charred corn off the cob. Imagine the smoky scent of a grill combined with the cooling sensation of lime-infused crema and the crumbly, salty texture of cotija cheese. Every spoonful offers a burst of sweet juice followed by the subtle heat of smoked paprika, making it the perfect vibrant companion to any main dish. It feels like a celebration of sunshine on a plate, messy in the best way possible.
Ingredients
- 4 ears of fresh sweet corn
- 2 tbsp olive oil
- 1/4 cup Mexican Crema or sour cream
- 1/4 cup crumbled Cotija cheese
- 1 tsp smoked paprika
- Fresh cilantro, chopped
- Lime wedges
How to make it
- Preheat your grill or a heavy cast-iron skillet to medium-high heat. You want it screaming hot to achieve a deep char without overcooking the interior of the kernels.
- Brush the shucked corn with olive oil and place directly on the heat source. Rotate every 2-3 minutes.
- Look for deep brown or blackened spots on all sides—this should take about 10-12 minutes total. The kernels should look plump but toasted.
- Remove from heat and let cool for 2 minutes. Stand the corn upright in a large bowl and use a sharp knife to shave the kernels off the cob in long strips.
- Drizzle the crema over the warm corn, then sprinkle with the smoked paprika and Cotija cheese.
- The residual heat from the corn will slightly melt the cheese, creating a cohesive, flavorful side.
- Finish with a heavy squeeze of lime and a handful of cilantro for that essential herbaceous finish.
How to bake summer desserts?

Why we love this
A rustic berry galette is the epitome of the ‘lazy girl’ aesthetic because it embraces imperfection while looking incredibly sophisticated. The crust is flakey and buttery, shattering with a satisfying snap to reveal a bubbling, jammy center of macerated strawberries and blueberries. The aroma of caramelized sugar and warm pastry is intoxicating, and when served warm with a scoop of cold vanilla bean ice cream, the contrast of temperatures is pure bliss. It’s sweet, tart, and beautifully unrefined.
Ingredients
- 1 pre-made refrigerated pie crust (for the lazy hack!)
- 2 cups mixed berries (strawberries, blueberries, raspberries)
- 1/4 cup granulated sugar
- 1 tbsp cornstarch
- 1 tsp vanilla extract
- 1 egg (for wash)
- Turbinado sugar for topping
How to make it
- Preheat your oven to 400°F (200°C) and line a baking sheet with parchment paper to prevent the juices from sticking.
- In a medium bowl, gently toss the berries with the granulated sugar, cornstarch, and vanilla. Let them sit for 5 minutes; the cornstarch is vital as it thickens the juices so your crust doesn’t get soggy.
- Unroll the pie crust onto the parchment paper. Don’t worry if the edges aren’t perfect; that’s the charm.
- Mound the berry mixture in the center of the crust, leaving a 2-inch border all the way around.
- Fold the edges of the crust inward over the berries, pleating as you go. The center should remain open.
- Whisk the egg with a splash of water and brush the pastry edges. Sprinkle generously with turbinado sugar for a crunchy, glittery finish.
- Bake for 25-30 minutes until the crust is deep golden brown and the berry juices are thick and bubbling.
- Allow it to cool for at least 15 minutes before sliding it onto your food board; this helps the fruit filling set.
How to use sourdough discard?

Why we love this
Sourdough discard crackers are the savory, crunchy snack you didn’t know your food board was missing. They have that signature fermented tang that lingers on the palate, perfectly complemented by a heavy dusting of sea salt and dried rosemary. The texture is incredibly light and crisp, almost like a gourmet flatbread, making them the ideal vessel for soft cheeses or hummus. There is something so satisfying about turning what would be waste into the most talked-about item on your platter.
Ingredients
- 1 cup sourdough discard (unfed)
- 1/4 cup all-purpose flour
- 2 tbsp melted butter
- 1 tbsp dried rosemary
- 1 tsp flaky sea salt
- 1/2 tsp garlic powder
How to make it
- Preheat your oven to 325°F (165°C). Lower heat is better here to dehydrate the crackers without burning the delicate discard.
- In a small bowl, mix the discard, melted butter, flour, and garlic powder until a smooth, spreadable paste forms.
- Line a baking sheet with a silicone mat or high-quality parchment paper. Pour the mixture into the center.
- Using an offset spatula, spread the mixture as thin as possible—ideally about 1/16th of an inch. If it’s too thick, they will be chewy rather than crunchy.
- Sprinkle the rosemary and flaky salt evenly over the top.
- Bake for 10 minutes, then remove from the oven. Use a pizza cutter to score the dough into squares or rectangles. This ensures clean breaks later.
- Return to the oven for another 20-25 minutes. Watch for a golden-brown hue across the entire surface.
- Let them cool completely on the pan; they will crisp up significantly as they reach room temperature.
How to make pesto pasta?

Why we love this
Pesto pasta is a sensory explosion of bright green herbs, toasted nuts, and sharp cheese that feels like a garden party in your mouth. The sauce should be thick and vibrant, clinging to the grooves of the pasta to ensure every mouthful is packed with the peppery bite of fresh basil. The richness of the pine nuts and olive oil creates a velvety mouthfeel that is broken up by the occasional grain of coarse salt or zest. It’s a classic for a reason—it’s refreshing, aromatic, and undeniably chic.
Ingredients
- 12 oz Trofie or Fusilli pasta
- 2 cups packed fresh basil leaves
- 1/3 cup toasted pine nuts
- 2 garlic cloves
- 1/2 cup extra virgin olive oil
- 1/2 cup grated Parmesan cheese
- Squeeze of lemon juice
How to make it
- Boil your pasta in salted water until al dente. Reserve 1/2 cup of the pasta water before draining.
- For the pesto, place basil, toasted pine nuts, and garlic in a food processor. Pulse until coarsely chopped—do not over-process or the basil will oxidize and turn brown.
- With the motor running on low, slowly stream in the olive oil until a thick paste forms.
- Transfer the mixture to a bowl and stir in the Parmesan cheese and lemon juice by hand. Stirring the cheese in manually preserves its texture.
- Place the cooked pasta in a large mixing bowl. Add the pesto and a few splashes of the reserved pasta water.
- Toss vigorously. The heat of the pasta should be just enough to warm the pesto without cooking the basil, which keeps the color bright green.
- If the sauce is too thick, add more pasta water one tablespoon at a time until it reaches a silky consistency.
How to make spring brunch?

Why we love this
A spring brunch board centered around smoked salmon and herbed cream cheese is the ultimate sophisticated-yet-easy hosting move. The cool, silky texture of the salmon melts against the crunch of a toasted bagel or cucumber slice, while the tang of capers and pickled red onions provides a sharp, vinegar-forward contrast. It’s visually stunning with its palette of soft pinks, vibrant greens, and creamy whites, evoking the feeling of a crisp April morning. It’s light, protein-packed, and allows guests to build their own perfect bite.
Ingredients
- 8 oz high-quality smoked salmon (Lox)
- 1 block whipped cream cheese
- 2 tbsp fresh dill, chopped
- 1 tbsp capers, drained
- 1/2 red onion, thinly sliced
- 1 English cucumber, sliced into rounds
- Mini bagels or sourdough crostini
How to make it
- Prepare your ‘herbed cream cheese’ by folding the chopped dill and a pinch of black pepper into the whipped cream cheese. Using whipped cheese makes it easier for guests to spread without breaking their crackers.
- Arrange the smoked salmon slices in loose ribbons on one side of the board. This makes it easy for guests to grab a single portion.
- Place the cream cheese in a small decorative bowl in the center.
- Cluster the ‘bright’ elements—the capers, red onions, and cucumber slices—around the salmon.
- Toast your bagels or crostini until just golden but still slightly chewy in the center. Professional tip: keep them warm by wrapping them in a clean linen napkin on the board.
- Garnish the entire section with extra sprigs of dill and lemon wedges for squeezing over the salmon, which cuts through the richness of the fish.
How to decorate spring cookies?

Why we love this
Decorating cookies with pressed edible flowers is like creating miniature pieces of art that you can actually eat. The cookies themselves are buttery and soft, with a subtle hint of vanilla that doesn’t compete with the floral notes. When you bite in, you get a delicate crunch from the dried petals followed by the smooth, sweet melt of the royal icing. It’s a whimsical, cottage-core inspired treat that adds an ethereal beauty to any food board, making it feel curated and special without requiring professional piping skills.
Ingredients
- 1 dozen baked sugar cookies (round)
- 1 cup powdered sugar
- 2 tbsp milk
- 1/2 tsp vanilla extract
- Dried edible flowers (pansies, violas, or lavender)
How to make it
- Ensure your cookies are completely cool. If they are even slightly warm, the icing will run off the edges.
- Make a simple ‘flood icing’ by whisking the powdered sugar, milk, and vanilla until smooth. It should be the consistency of thick honey.
- Use a spoon to drop a small amount of icing onto the center of each cookie, then use the back of the spoon to spread it toward the edges.
- While the icing is still wet (this is crucial!), gently press a single edible flower or a few petals into the center of the cookie.
- Use a toothpick to gently adjust the petals so they lie flat against the icing.
- Allow the cookies to sit undisturbed for at least 2 hours. The icing needs to harden completely so the flowers are ‘locked’ in place.
- Once dry, stack them on your board for a stunning vertical display of spring colors.
How to make summer soup?

Why we love this
Chilled Golden Gazpacho is the ultimate refreshing ‘soup’ for a summer board, served in small shooters or bowls. It’s a vibrant, sunny yellow blend of heirloom tomatoes and yellow bell peppers that tastes like a garden in a glass. The texture is smooth yet slightly pulpy, with a refreshing chill that provides an instant cooling effect on a hot day. With a hint of garlic and a splash of sherry vinegar, it has a sophisticated depth of flavor that is surprisingly complex for a dish that requires zero cooking.
Ingredients
- 4 large yellow heirloom tomatoes
- 2 yellow bell peppers (seeded)
- 1 small cucumber (peeled)
- 1 clove garlic
- 2 tbsp sherry vinegar
- 1/4 cup extra virgin olive oil
- Salt and white pepper to taste
How to make it
- Roughly chop the tomatoes, peppers, and cucumber. Don’t worry about precision since everything is being blended.
- Place all the vegetables and the garlic into a high-speed blender.
- Add the sherry vinegar and a generous pinch of salt. Blend on high until completely liquefied.
- While the blender is running on low, slowly drizzle in the olive oil. This creates a light emulsion and gives the soup a silky, luxurious mouthfeel.
- Taste and adjust seasoning. White pepper is preferred here to keep the golden color pristine.
- Pass the soup through a fine-mesh strainer into a pitcher to remove any stray skins or seeds for a truly professional, smooth finish.
- Chill in the refrigerator for at least 3 hours. Gazpacho must be served ice-cold to be truly refreshing.
- Pour into small glass jars for the board and garnish with a drop of olive oil and a tiny basil leaf.
How to grill juicy chicken?

Why we love this
Juicy grilled chicken is the protein anchor of the viral food board, providing a smoky, savory contrast to the lighter fruits and vegetables. When done right, the skin is perfectly charred and crisp, while the meat inside remains incredibly tender and dripping with herbaceous juices. The aroma of lemon, garlic, and charred poultry is universally appetizing, making everyone reach for a slice. It’s simple, rustic, and when sliced thinly, it becomes the perfect ‘pick-up’ food for guests to pair with pesto or sides.
Ingredients
- 1.5 lbs chicken thighs (boneless, skin-on for maximum flavor)
- 1/4 cup olive oil
- 3 cloves garlic, smashed
- 1 tbsp fresh oregano, chopped
- 1 tsp red pepper flakes
- Zest of 1 lemon
- 1 tsp kosher salt
How to make it
- Marinate the chicken in the olive oil, garlic, oregano, red pepper, lemon zest, and salt for at least 30 minutes (or up to 4 hours). The salt is key to breaking down proteins for a juicier result.
- Preheat your grill to medium-high (about 400°F). Ensure the grates are clean and lightly oiled to prevent sticking.
- Place chicken thighs skin-side down first. This allows the fat to render and the skin to become crispy.
- Grill for 6-7 minutes without moving them. You want those distinct grill marks and a natural release from the grate.
- Flip the chicken and cook for another 5-6 minutes. Use a meat thermometer to check for an internal temperature of 165°F (74°C).
- Remove the chicken from the grill and place on a cutting board. **Crucial Step:** Let it rest for a full 5-8 minutes. This allows the juices to redistribute so they don’t run out when you slice it.
- Slice into 1/2 inch strips and fan them out on the board, garnishing with grilled lemon halves.
How to bake spring cakes?
[IMAGE_10]
Why we love this
A Strawberry Rhubarb Loaf Cake is the perfect spring finale, offering a moist, tender crumb studded with tart bursts of rhubarb and sweet pockets of roasted strawberry. The cake is dense yet fluffy, with a golden-brown crust that smells of vanilla and butter. As you slice into it, the pink hues of the fruit create a beautiful marbled effect that looks stunning on a wooden board. It’s the kind of cake that feels homemade in the best way possible—not too sweet, but deeply comforting and bursting with seasonal flair.
Ingredients
- 1.5 cups all-purpose flour
- 1 cup granulated sugar
- 1/2 cup unsalted butter (softened)
- 2 large eggs
- 1/2 cup Greek yogurt (for moisture)
- 1 cup diced rhubarb
- 1 cup sliced strawberries
- 1 tsp baking powder
- 1 tsp vanilla bean paste
How to make it
- Preheat your oven to 350°F (175°C) and grease a standard loaf pan. Line it with a parchment ‘sling’ for easy removal.
- In a large bowl, cream the butter and sugar together for at least 3 minutes until light and fluffy. This aeration is what makes the cake tender.
- Add the eggs one at a time, followed by the vanilla bean paste and Greek yogurt. Mix until just combined.
- Whisk the flour and baking powder together, then fold into the wet ingredients by hand. Do not overmix, or the cake will be tough.
- Gently fold in the rhubarb and strawberries. The tartness of the rhubarb balances the sweetness of the batter perfectly.
- Pour the batter into the pan and smooth the top. You can place a few extra slices of fruit on top for a more decorative look.
- Bake for 50-60 minutes. A skewer inserted into the center should come out clean or with just a few moist crumbs.
- Cool in the pan for 10 minutes, then lift out using the parchment sling and cool completely on a wire rack before slicing for your board.
Conclusion
Creating the ‘Viral Simple Food Board’ is less about being a master chef and more about being a curator of good vibes and fresh flavors. By mixing these warm, seasonal dishes with a few ‘lazy girl’ hacks, you create an experience that feels abundant, thoughtful, and effortlessly chic. Whether you’re hosting a backyard sun-drenched dinner or a cozy spring brunch, these recipes are designed to let you spend less time over the stove and more time making memories with your favorite people. Now, grab a board, start assembling, and don’t forget to take a photo before everyone dives in!
FAQ
Can I make these dishes in advance? Yes! Most of the cold elements like the gazpacho and the cakes actually taste better the next day. The pasta and grilled chicken are best served fresh, but you can prep the ingredients hours ahead.
What if I can’t find rhubarb? You can easily substitute rhubarb with extra strawberries or even tart Granny Smith apples for a similar flavor profile in the spring cake.
How do I keep the board looking fresh? Keep your ‘wet’ ingredients like dips and soups in bowls to prevent them from soaking into the bread and crackers. Add the fresh herbs at the very last second to prevent wilting.