

The Aesthetic Edit: 10 Viral Decor Trends Taking Over Your Feed
Have you ever scrolled through your feed and felt that sudden, sharp spark of inspiration? You know the one—where a single image of a sun-drenched patio or a perfectly iced cookie makes you want to drop everything and recreate that magic in your own home. Our living spaces are more than just four walls; they are the canvas upon which we paint the stories of our lives, the quiet sanctuaries where we recharge, and the vibrant stages where we celebrate our biggest milestones.
Lately, the digital world has been buzzing with a return to intentionality and ‘dopamine decor.’ It’s about more than just following a trend; it’s about crafting environments that evoke a specific feeling, whether that’s the rustic warmth of a family Easter brunch or the high-glamour excitement of a prom send-off. In this edit, I’m pulling back the curtain on the ten viral trends that are currently dominating our feeds, offering you a step-by-step guide to bringing these aesthetic dreams into your reality.
How to Create a Refreshing Outdoor Sanctuary for Total Relaxation

Why we love this
There is something deeply restorative about an outdoor space that feels like a natural extension of your living room. We adore this trend because it prioritizes sensory wellness: the gentle rustle of pampas grass in a ceramic vase, the soft glow of amber string lights reflecting off glass lanterns, and the plush, velvety touch of weather-resistant floor cushions. It’s an invitation to disconnect from the digital noise and reconnect with the rhythm of nature, smelling the damp earth after a light rain and feeling the cool evening breeze against your skin while wrapped in a chunky knit throw.
Essential Elements:
- Weather-resistant sectional or floor cushions
- Outdoor-rated string lights (Edison bulbs)
- A variety of potted plants (ferns, lavender, and jasmine)
- Neutral-toned outdoor rug
- Citronella candles in aesthetic ceramic holders
- Sheer linen curtains for privacy and shade
How to make it
- Begin by defining your zone with a large, neutral-toned outdoor rug; this acts as the anchor for your sanctuary and provides a soft surface for bare feet.
- Arrange your seating—whether a modular sectional or a cluster of oversized floor pillows—around a central focal point like a low coffee table or a smokeless fire pit.
- Install sheer linen curtains using a tension rod or outdoor-rated hardware to create a ‘room’ feeling; this adds a romantic, breezy movement to the space.
- Layer your lighting by stringing Edison bulbs overhead in a zig-zag pattern, ensuring they are draped with enough slack to look effortless rather than rigid.
- Incorporate greenery at varying heights: use tall planters for privacy screens and smaller terracotta pots on table surfaces to bring the lushness of a garden right to your seat.
- Finish the space with tactile accents like fringe-edged throw blankets and weather-proof pillows in earthy tones like sage, terracotta, and sand.
How to Design a Stunning Graduation Cap for Eternal Memories
Why we love this
A graduation cap is a tiny, square billboard for your soul and your hard-earned success. This trend is all about maximalist storytelling, blending delicate textures with bold typography to celebrate a journey that was uniquely yours. We love the way cardstock layers create depth, and how the scent of fresh floral adhesives mixes with the sparkle of hand-placed rhinestones. It’s a tactile souvenir of a pivotal life moment that looks just as beautiful in a shadow box years later as it does walking across that stage under the bright stadium lights.
Essential Elements:
- High-quality glitter cardstock
- 3D paper flowers or silk blooms
- Self-adhesive pearls and rhinestones
- Custom vinyl lettering or gold leaf stickers
- Heavy-duty craft glue or a hot glue gun
- Themed charms (tassels, books, or world maps)
How to make it
- Trace the outline of your cap onto a piece of sturdy cardstock to create a removable template; this prevents you from damaging the fabric of the cap itself during the design process.
- Center your main quote or message using vinyl stickers, ensuring the letters are spaced evenly and aligned horizontally by using a ruler as a guide.
- Begin layering 3D elements from the corners inward; start with larger silk flowers or cardstock cutouts to build volume and height.
- Fill in the gaps between larger elements with clusters of self-adhesive pearls and rhinestones, focusing on the edges of the cap to catch the light beautifully.
- Secure any heavy charms or ‘year’ tags near the center button, making sure the button remains accessible so you can still attach your tassel.
- Allow the glue to cure for at least 24 hours in a cool, dry place to ensure nothing shifts when you finally flip that tassel during the ceremony.
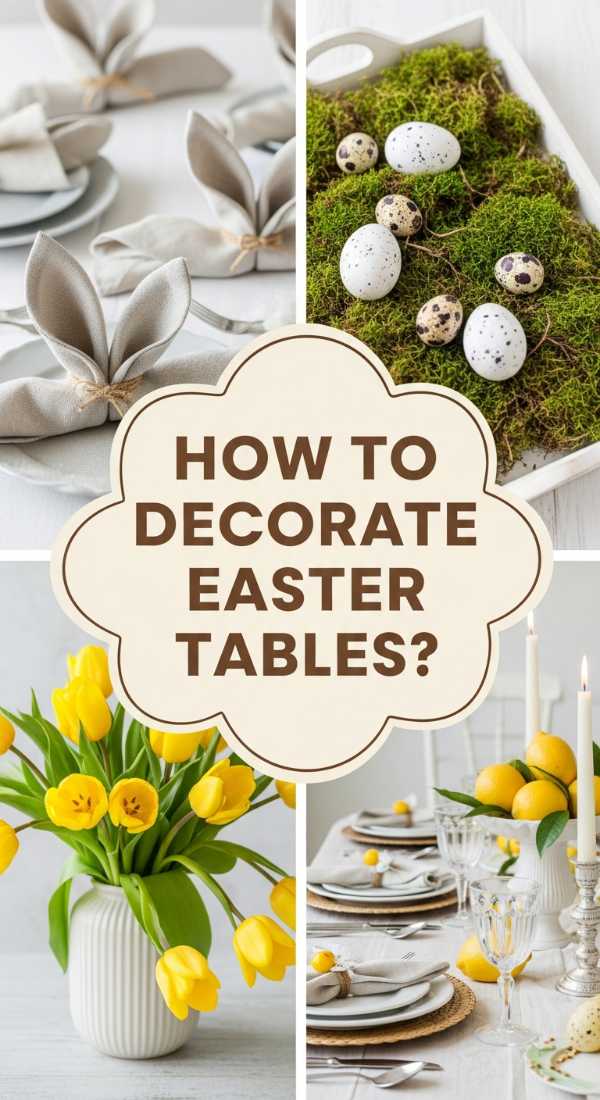
How to Arrange a Whimsical Easter Table for Every Family Gathering
Why we love this
Easter tablescapes are moving away from the plastic-heavy designs of the past and toward an organic, ‘secret garden’ aesthetic that feels timeless and sophisticated. We are obsessed with the combination of soft moss runners, hand-painted ceramic bunnies, and the delicate fragrance of sweet peas and tulips. This look celebrates the renewal of spring, where the table feels like a living meadow. Imagine the sound of clinking crystal against the backdrop of children’s laughter, all while the soft pastel palette creates a serene atmosphere for a long, leisurely family meal.
Essential Elements:
- Preserved moss table runner
- Mismatched vintage china or pastel stoneware
- Linen napkins with decorative bunny ear rings
- Taper candles in varying spring hues
- Fresh seasonal floral arrangements
- Hand-dyed wooden or ceramic eggs
How to make it
- Lay down a preserved moss runner as your base to immediately give the table an earthy, woodland feel; if moss isn’t available, a soft sage green linen runner works beautifully.
- Set each place with layered plates—start with a large dinner plate and top with a smaller, scalloped salad plate in a contrasting pastel shade.
- Fold your linen napkins into a long rectangle and secure them with a decorative ring or a simple piece of twine tucked with a sprig of fresh lavender.
- Place your centerpieces at varying heights; use three small floral arrangements instead of one large one to allow for easy eye contact and conversation across the table.
- Tuck small ceramic bunnies and hand-dyed eggs into the folds of the moss runner to create ‘surprises’ for your guests to discover as they dine.
- Add tall, slender taper candles in glass holders to provide a soft, flattering glow that warms up the pastel colors as the afternoon sun fades.
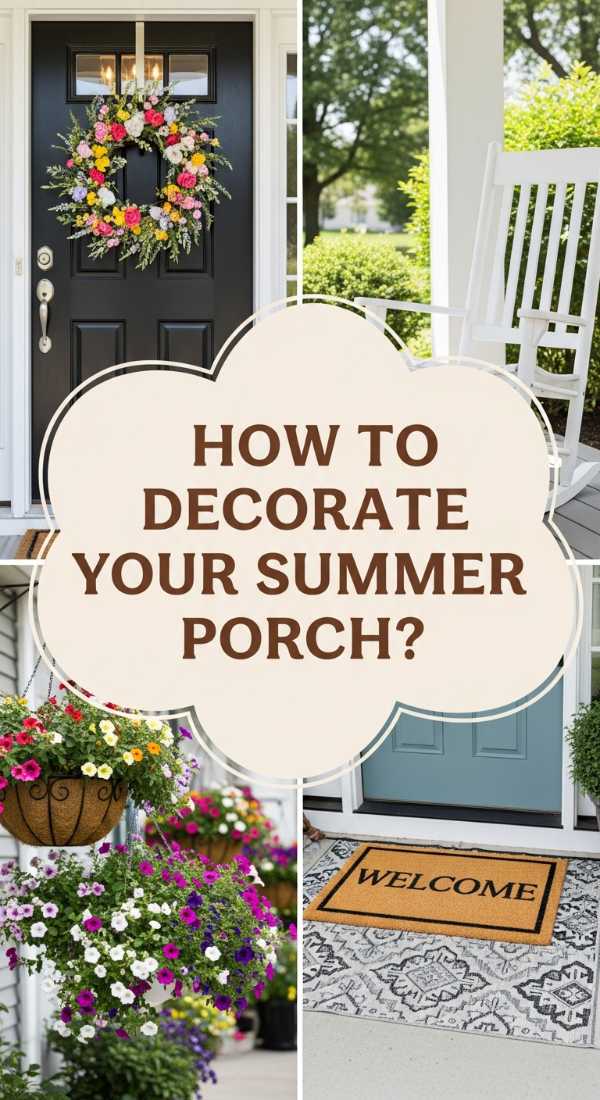
How to Style a Breezy Summer Porch for Ultimate Curb Appeal
Why we love this
The summer porch is your home’s first impression, and the current trend is all about ‘elevated coastal’ vibes. We love this look for its ability to feel both polished and profoundly relaxing, like a luxury seaside resort. It’s the feeling of smooth wicker under your hands, the sight of vibrant blue hydrangeas poping against a white railing, and the rhythmic creak of a rocking chair. It transforms a transition space into a destination, inviting neighbors to stop by for a glass of iced tea and creating a welcoming aura that starts before you even step through the front door.
Essential Elements:
- Weatherproof wicker or rattan furniture
- Oversized outdoor planters (blue and white ginger jars are viral!)
- Layered doormats (a patterned rug under a jute mat)
- A seasonal wreath with lemon or eucalyptus accents
- Potted ferns and blooming hydrangeas
- Ceiling fan or stylish standing fan
How to make it
- Start with the ‘base layer’ of your porch by layering a large, navy-and-white striped outdoor rug underneath a natural coir doormat for a textured, designer look.
- Position two high-quality wicker chairs or a porch swing at an angle that encourages conversation while leaving a clear path to the front door.
- Flank the front door with oversized ceramic planters; fill them with ‘thrillers’ (tall spikes), ‘fillers’ (bushy ferns), and ‘spillers’ (vines like ivy) for a professional florist look.
- Hang a lightweight, airy wreath featuring faux lemons or olive branches to add a pop of Mediterranean-inspired color to your entryway.
- Add outdoor throw pillows in crisp white or ocean blue, ensuring they are made of UV-resistant fabric to prevent fading in the summer sun.
- Install low-voltage path lighting leading up to the porch to ensure your hard work is visible and inviting even after the sun goes down.
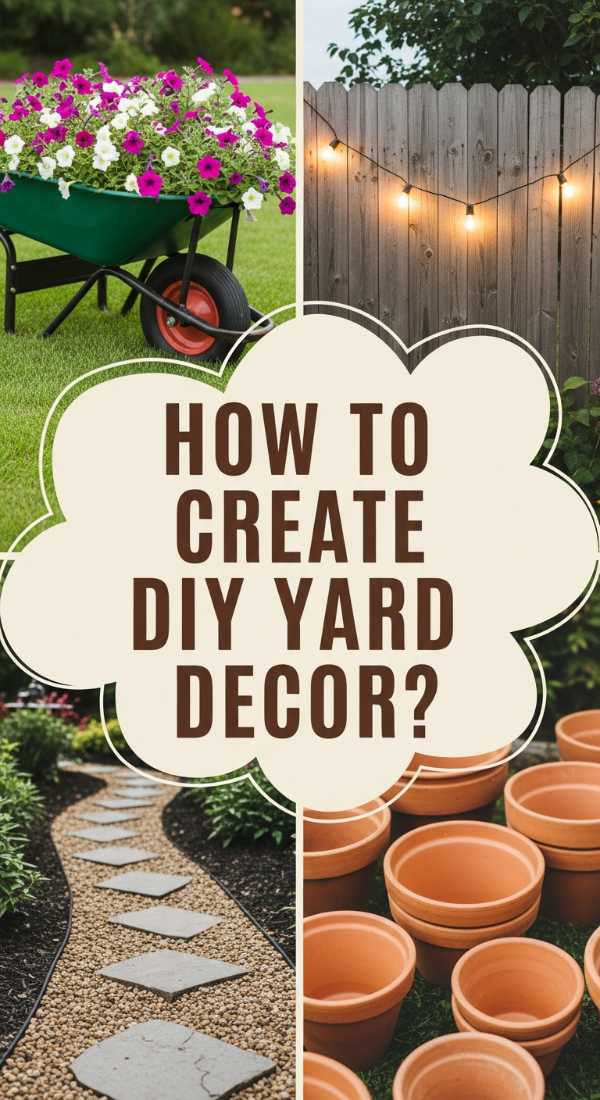
How to Build a Charming Garden Space for Peace of Mind

Why we love this
This trend focuses on ‘slow gardening’—creating a space that is as much about the gardener’s mental health as it is about the plants. We love the tactile experience of turning rich, dark soil, the therapeutic repetition of weeding, and the rewarding visual of a well-organized potting station. It’s a space that smells of crushed mint and damp cedar, where the world slows down. This aesthetic isn’t about perfectly manicured lawns; it’s about charming, slightly wild corners where wildflowers and herbs mingle in a way that feels intentional yet effortless.
Essential Elements:
- Raised cedar garden beds
- Pea gravel or flagstone pathways
- A dedicated potting bench with vintage tools
- A bird bath or small solar-powered water feature
- Climbing trellises for roses or sweet peas
- Solar-powered lantern stakes
How to make it
- Map out your garden zones using stakes and string to ensure you have clear pathways (at least 2 feet wide) between your planting beds.
- Construct raised beds using untreated cedar; fill them with a high-quality mix of compost, peat moss, and vermiculite for the ultimate nutrient-rich growing environment.
- Install a simple flagstone path or pour a layer of pea gravel to keep the area mud-free and provide a satisfying ‘crunch’ underfoot as you walk through your sanctuary.
- Add a vertical element with a wooden or metal trellis, planting fast-growing climbers like jasmine or climbing roses to add height and fragrance.
- Set up a small seating nook—even just a single wrought-iron chair—next to a water feature where you can sit and enjoy the sounds of nature.
- Place solar-powered lanterns along the path and tucked into the foliage to create a magical, glowing landscape at twilight.
How to Host a Dreamy Mother’s Day Brunch for Celebrating Her

Why we love this
Mother’s Day brunch has become a viral sensation because it’s the ultimate expression of care through aesthetics. We love the softness of this trend: the clink of vintage teacups, the sight of a tiered pastry stand filled with pastel macarons, and the scent of a dozen ‘Mother’s Day’ roses. It’s about creating a ‘soft landing’ for the woman who does it all, providing a space that feels curated, feminine, and deeply appreciative. The focus is on small, thoughtful details—like a personalized menu or a single stem at every place setting—that make the occasion feel truly monumental.
Essential Elements:
- Lace or embroidered tablecloth
- Tiered serving platters
- Personalized place cards or menus
- A dedicated ‘Mimosa or Mocktail’ bar
- Fresh floral centerpieces in varying heights
- Soft instrumental playlist
How to make it
- Set the mood by laying a delicate lace or vintage-inspired floral tablecloth over your dining surface to instantly soften the room.
- Create a ‘wow’ factor with a tiered serving stand as the centerpiece, layering it with mini quiches, scones, and fresh berries for a high-tea aesthetic.
- Set up a beverage station on a side table with chilled carafes of juice, sparkling water, and champagne, garnished with bowls of edible flowers and fresh mint leaves.
- Print or hand-write personalized menus for each guest, placing them on top of the plates with a single dried flower bud for a boutique-hotel feel.
- Arrange a large, loose bouquet of peonies or ranunculus in the center of the table, keeping them low enough so that they don’t block the view of the person sitting across from you.
- Dim the overhead lights and rely on natural window light supplemented by a few white unscented pillar candles to keep the atmosphere airy and light.
How to Plan a Magical Prom Send Off for the Most Glamorous Night

Why we love this
The ‘send-off’ has become almost as important as the dance itself. This trend is all about high-octane glamour and creating a Hollywood-red-carpet moment in a backyard or living room. We love the dramatic contrast of gold accents against lush greenery and the sheer joy that comes with a champagne (or sparkling cider) toast. It’s a sensory explosion of shimmering sequins, the pop of a cork, and the flash of cameras, all designed to make the students feel like the stars of their own movie before they head off to the big event.
Essential Elements:
- A ‘pampas grass’ or floral photo backdrop
- Gold-rimmed glassware or coupes
- A personalized welcome sign
- Balloon arches in sophisticated colors (black, gold, or pearl)
- Appetizer station with ‘mess-free’ finger foods
- Red carpet or a clean, aesthetic walkway
How to make it
- Create a dedicated photo zone by setting up a circular metal frame and covering it with a mix of pampas grass, silk flowers, and balloons in your school’s colors.
- Position your lighting carefully; use softbox lights or ring lights hidden behind the decor to ensure every photo is ‘social media ready’ without harsh shadows.
- Set out a tray of gold-rimmed coupes filled with a signature sparkling drink, garnished with a single raspberry or a sprig of rosemary for a sophisticated touch.
- Provide a ‘refresh station’ nearby with high-end hairspray, safety pins, and lint rollers to help with any last-minute wardrobe or hair emergencies.
- Lay down a clean white or red runner leading from the house to the car to protect dresses and tuxedos from grass or dirt while providing a ‘runway’ feel.
- Play an upbeat, trendy playlist to keep the energy high and the pre-prom nerves at bay while the parents and students mingle.
How to Bake Adorable Easter Cookies for Sweet Spring Vibes

Why we love this
Baking for Easter has evolved into a viral art form thanks to the ‘flooding’ technique in royal icing. We love this trend because it combines the buttery, comforting scent of shortbread with the meticulous, meditative process of decorating. There is a profound satisfaction in seeing a tray of plain cookies transform into a collection of soft-hued carrots, speckled eggs, and fluffy bunnies. The result is almost too pretty to eat, but the snap of the royal icing and the soft, citrusy zest of the cookie beneath make it an irresistible spring treat that delights both kids and adults.
Essential Elements:
- High-quality butter sugar cookie dough
- Royal icing (stiff and flooding consistencies)
- Gel food coloring in pastel shades
- Fine-tip piping bags and scribes
- Edible gold luster dust
- Easter-themed cookie cutters
How to make it
- Prepare your sugar cookie dough and chill it for at least 2 hours before rolling; this prevents the shapes from spreading in the oven and ensures crisp edges.
- Once baked and completely cooled, outline your shapes using a ‘stiff’ consistency royal icing; this creates a ‘dam’ that holds the liquid icing in place.
- Thin out your remaining icing with a few drops of water to create ‘flood’ icing; carefully fill the centers of your outlines and use a scribe tool to pop any air bubbles.
- While the icing is still wet, add ‘speckles’ by flicking a brush dipped in cocoa powder mixed with vanilla extract for a realistic robin’s egg effect.
- Let the base layer dry for at least 12 hours before adding 3D details like bunny tails or carrot tops with more stiff-consistency icing.
- For a final touch of viral-worthy glam, mix edible gold luster dust with a drop of vodka and paint the edges of your egg cookies to make them shimmer.
How to Elevate Your Patio Table for Chic Outdoor Dining

Why we love this
This trend is all about ‘alfresco elegance’—taking the sophistication of an indoor dinner party and moving it under the stars. We love the juxtaposition of raw, natural textures like jute and wood with the refined sparkle of glassware and the warmth of candlelight. It smells like grilled herbs and citrus-infused water. When you elevate your patio table, you’re not just eating outside; you’re creating an immersive experience where the sunset acts as your backdrop and the flickering candles provide a rhythm for the evening’s conversation.
Essential Elements:
- Woven jute or seagrass placemats
- Acrylic or heavy-duty glassware (to prevent breakage)
- Cloth napkins in a neutral linen or bold pattern
- Centerpiece of potted herbs or lemons in a bowl
- Taper or pillar candles in hurricane vases
- String lights or a patio umbrella with built-in LEDs
How to make it
- Start with a clean slate by wiping down your patio table and adding a textured runner or large woven placemats to protect the surface and add warmth.
- Use ‘indoor-looking’ outdoor dinnerware—melamine has come a long way and now often mimics the look of heavy stoneware or ceramic without the risk of breaking.
- Create a low-profile centerpiece by filling a shallow wooden bowl with fresh lemons and sprigs of eucalyptus; it’s beautiful, affordable, and smells amazing.
- Place candles inside glass hurricane vases; this is a crucial step for outdoor dining to prevent the breeze from blowing out your flames.
- Tie your napkins with a simple piece of leather cord or a wooden bead ring to keep the ‘natural’ aesthetic consistent across the entire table.
- Hang a few oversized paper lanterns or battery-operated pendant lights from your umbrella ribs to create a focused ‘glow’ over the dining area as night falls.
How to Craft an Inviting Classroom Door for Inspiring Young Minds
[IMAGE_10]
Why we love this
The viral classroom door trend is more than just a craft project; it’s a portal of positivity for students. We love how teachers are using bright, saturated colors and 3D paper engineering to create themes that range from ‘Space Exploration’ to ‘Wild About Learning.’ It’s the sound of students gasping in delight on Monday morning and the feeling of a community being built before they even cross the threshold. This trend celebrates the magic of education through visual storytelling, making every child feel seen and excited to learn.
Essential Elements:
- Large rolls of butcher paper (base color)
- Cardstock or construction paper for 3D elements
- A high-quality adhesive (hot glue or heavy-duty mounting tape)
- Laminating sheets for durability
- Battery-operated fairy lights (optional for ‘wow’ factor)
- Inclusive messaging or student names on cutouts
How to make it
- Measure your door carefully, including the handle and any windows, and cut a large piece of butcher paper to serve as your background canvas.
- Choose a focal point—like a large tree, a rocket ship, or a giant book—and construct it out of layered cardstock to give it a 3D effect that ‘pops’ off the door.
- Incorporate your students’ names by writing them on smaller cutouts (like leaves, stars, or hearts) and scattering them around the main image to foster a sense of belonging.
- Use a border—either a pre-made scalloped edge or a hand-cut pattern—to frame the entire door and give it a finished, professional look.
- Ensure the door handle remains functional by cutting a precise hole or flap in the paper, reinforcing the edges with clear packing tape to prevent tearing.
- If allowed, tuck a string of battery-operated fairy lights behind some of the 3D elements to make the door glow and catch the eye of everyone walking down the hallway.
Conclusion
Whether you’re transforming a tiny corner of your patio or planning a milestone celebration, these viral trends remind us that our environments have the power to change our mood and inspire our days. Aesthetics aren’t just about looks; they are about the care and intention we pour into the places and moments that matter most. So, pick the trend that speaks to your heart, gather your supplies, and start creating—your most beautiful life is just one project away.
FAQ Section
Q: How do I choose which trend to start with?
A: Start with the one that solves a current ‘pain point’ or matches an upcoming event. If your porch feels neglected, start there. If you have a holiday coming up, go with the tablescape or cookies!
Q: Are these decor trends expensive to recreate?
A: Not at all! Most of these rely on clever styling and DIY elements. You can often find ‘aesthetic’ items at thrift stores or discount retailers by looking for specific textures and colors rather than brand names.
Q: How can I make these looks last longer?
A: For outdoor spaces, investing in UV-protectant sprays for fabrics and high-quality sealants for wood will make a huge difference. For indoor crafts, laminating paper elements helps them withstand wear and tear.