
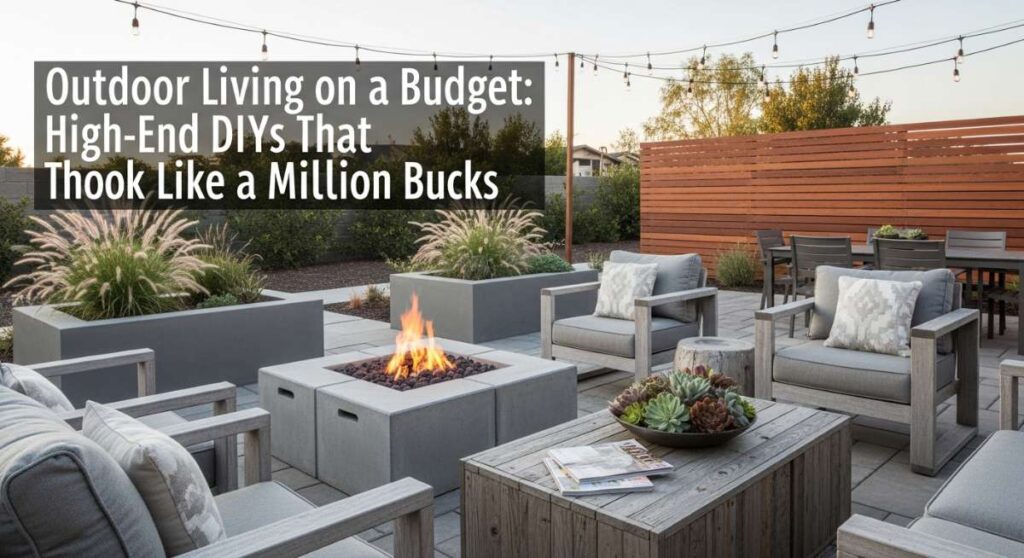
Have you ever scrolled through those glossy architectural magazines or clicked through a luxury home tour on social media and felt that tiny pang of envy? We’ve all been there—imagining ourselves sipping a crisp glass of lemonade on a designer wrap-around porch or gathering eggs from a coop that looks more like a French cottage than a farm building. But here is the secret I’ve learned after years of trial, error, and a lot of sawdust: you don’t need a seven-figure bank account to live a high-end lifestyle. You just need a little vision, a few weekend hours, and the willingness to get your hands a bit dirty.
Creating a home that feels like a sanctuary is about more than just the price tag; it’s about the soul you pour into every corner. Whether it’s the way the light hits your newly styled deck or the satisfaction of seeing your front garden bloom into a riot of color, these projects are designed to elevate your daily experience. Today, I’m sharing ten of my favorite high-end DIYs that will transform your space from basic to breathtaking, proving that a ‘million-dollar look’ is often just a creative project away.
How to Build a Dreamy Chicken Haven for Fresh Morning Eggs

Why we love this
There is something profoundly soul-soothing about the gentle, rhythmic clucking of happy hens and the earthy, sweet aroma of fresh cedar shavings under the morning sun. This ‘cluck-ingham palace’ isn’t just a utility structure; it’s a centerpiece that adds a rustic, European-farmhouse charm to your backyard. Imagine walking out in your slippers to collect warm, pastel-colored eggs from a nesting box that smells of dried lavender and clean straw, feeling the soft texture of reclaimed wood under your fingertips while the morning dew still clings to the grass. It turns a chore into a daily ritual of connection with nature.
Essential Elements:
- Pressure-treated lumber for the structural frame
- Reclaimed cedar siding or shiplap for the exterior walls
- Hardware cloth (not chicken wire!) for predator-proofing
- Corrugated metal or cedar shingle roofing
- Vintage-style window frames and black iron hinges
- Nesting boxes lined with organic straw and dried herbs
How to make it
- Start by leveling your ground and building a 4×6 foot base frame using 4×4 pressure-treated posts, ensuring every corner is perfectly square using a speed square.
- Construct the wall frames on a flat surface using 2×4 studs spaced 16 inches apart, leaving precise openings for a full-sized human door and a smaller chicken pop-door.
- Install the hardware cloth by stapling it to the interior of the frame using heavy-duty 1-inch staples every 2 inches; bury the bottom of the mesh 12 inches into the ground to prevent burrowing predators.
- Apply your cedar siding starting from the bottom, overlapping each board by at least an inch to ensure water runoff, and secure them with galvanized siding nails.
- Install the roof rafters at a 30-degree pitch to allow for snow and rain shed, then screw down your corrugated metal panels using roofing screws with rubber washers to prevent leaks.
- Build the nesting boxes at least 12 inches off the ground, ensuring they have a hinged lid on the exterior for easy egg collection without entering the coop.
- Finish with a coat of low-VOC exterior stain in a soft sage or classic white, and add a decorative window box filled with marigolds to deter flies.
How to Design Lush Front Flower Beds for Instant Curb Appeal
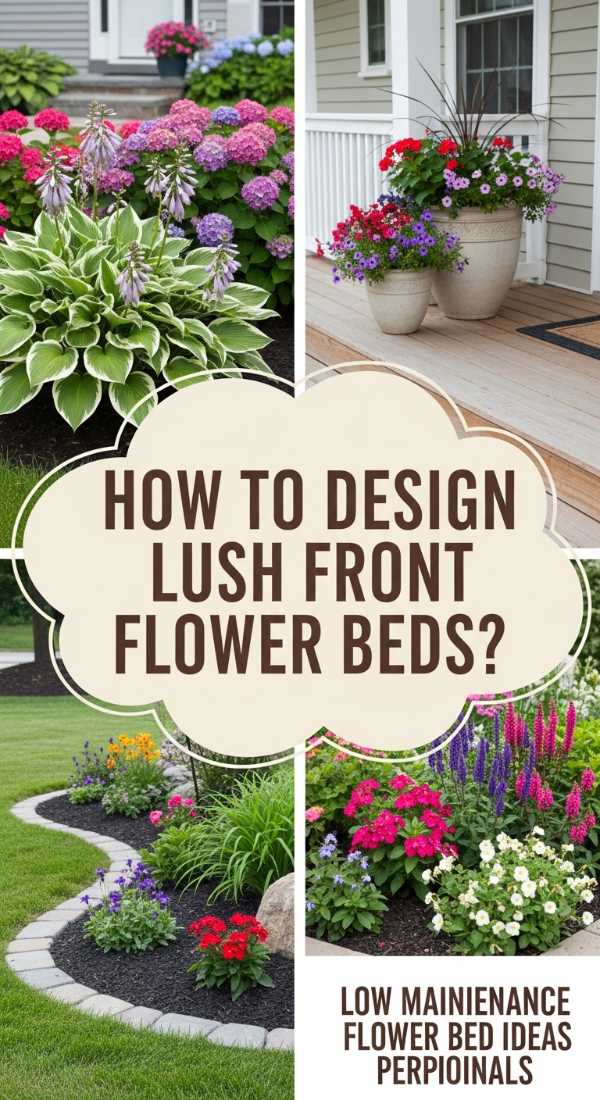
Why we love this
Walking up to a home framed by lush, layered flower beds feels like receiving a warm hug before you even reach the front door. The visual impact of deep greens contrasted with vibrant floral pops creates an immediate sense of luxury and care that neighbors will notice instantly. We love the sensory experience of walking past fragrant jasmine or roses, feeling the cooling mist of a morning watering session, and seeing the delicate movement of ornamental grasses in the breeze. It transforms a flat, boring lawn into a living gallery that changes its masterpiece with every passing season.
Essential Elements:
- Dark hardwood mulch for a high-contrast, professional finish
- A mix of ‘Thriller, Filler, and Spiller’ plants
- Natural stone or brick edging
- Evergreen shrubs for year-round structure
- Slow-release organic fertilizer
How to make it
- Define your bed shape by using a garden hose to create soft, flowing curves rather than rigid straight lines, which looks more high-end and organic.
- Remove all grass within the perimeter using a flat-edged spade, then till the soil to a depth of 8 inches, mixing in three inches of rich organic compost to ensure nutrient-dense ground.
- Position your ‘Thriller’ plants (like tall ornamental grasses or upright hydrangeas) at the back or center, then place ‘Fillers’ (like hostas or salvia) around them, and ‘Spillers’ (like creeping phlox) near the edges.
- Before planting, keep everything in their nursery pots and step back to the street to check the visual balance and height variations.
- Dig holes twice as wide as the root ball, tease the roots gently to encourage outward growth, and plant so the crown is level with the soil surface.
- Apply a 3-inch thick layer of dark mulch, keeping it a few inches away from the stems of the plants to prevent rot and allow for proper air circulation.
- Install a simple drip irrigation line hidden under the mulch to ensure deep, consistent watering that keeps the garden looking lush even in the height of summer heat.
How to Create a Cozy Outdoor Oasis for Summer Evenings
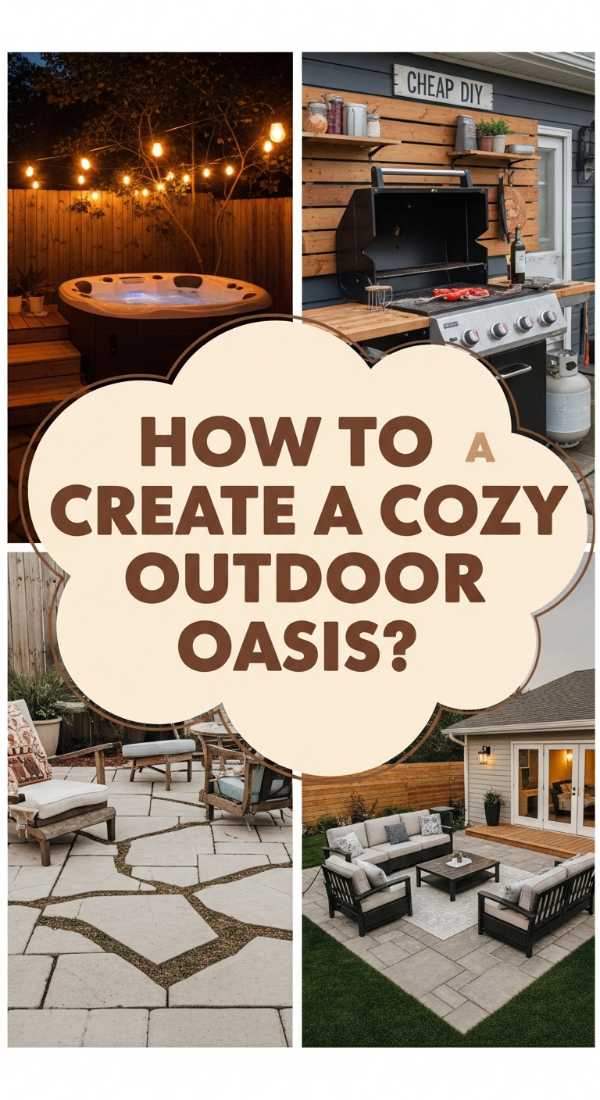
Why we love this
There is a magical window of time just as the sun dips below the horizon when an outdoor oasis becomes the most coveted room in the house. This project is all about layering textures—the softness of weather-resistant linens against the rugged warmth of a stone fire pit. We love the amber glow of Edison bulbs strung overhead, the faint scent of woodsmoke mingling with night-blooming jasmine, and the sound of ice clinking in a glass. It’s a space that invites deep conversation and lingering long after the stars come out, making every evening feel like a high-end vacation in your own backyard.
Essential Elements:
- Weatherproof area rug with a bold geometric or natural jute texture
- String lights (G40 globe lights provide the best ambiance)
- A central fire feature (propane or wood-burning)
- Plush outdoor cushions and throw blankets
- Potted oversized palms or fiddle leaf figs
How to make it
- Define the perimeter of your oasis using an outdoor rug; this acts as the ‘anchor’ and makes the space feel like a defined room rather than just furniture on grass.
- Arrange your seating in a conversational U-shape or circle, ensuring every seat has access to a surface for a drink or a book.
- Install 8-foot wooden 4×4 posts in heavy planters filled with concrete to act as anchors for your string lights if you don’t have existing trees or structures.
- Zig-zag the string lights across the space at varying heights, using stainless steel guide wire to prevent the lights from sagging over time.
- Place a fire pit in the center, ensuring a minimum of 3 feet of clearance from all furniture for safety and comfortable legroom.
- Layer in ‘soft goods’ like outdoor-rated velvet pillows and acrylic knit throws that add the tactile richness usually found only in high-end interior lounges.
- Add a final touch with a Bluetooth outdoor speaker hidden among the plants to provide a low-volume acoustic backdrop.
How to Achieve Realistic Pantry Organization for Stress Free Cooking

Why we love this
While often hidden behind closed doors, a perfectly organized pantry is the engine room of a high-end lifestyle, turning the chaotic scramble of dinner prep into a serene, tactile experience. There is a specific joy in the ‘clink’ of a glass lid closing and the visual harmony of uniform jars lined up like soldiers. We love the clean, minimalist aesthetic of decanted grains and pastas, the scent of dried bay leaves and cinnamon sticks in the air, and the ease of knowing exactly where every ingredient lives. It reduces mental load and makes the act of cooking feel like a professional chef’s performance rather than a frantic search.
Essential Elements:
- Uniform glass airtight canisters in various sizes
- Woven hyacinth or wire baskets for bulk items
- Customized minimalist labels (clear or white matte)
- Tiered bamboo risers for canned goods
- Lazy Susans for oils and vinegars
How to make it
- Empty the entire pantry and wipe down shelves with a mild vinegar solution to remove any dust or lingering food scents.
- Group your items into ‘zones’: Baking, Breakfast, Grains, Snacks, and Dinner Essentials to determine how many containers of each size you actually need.
- Decant all dry goods (flour, sugar, pasta, cereal) into glass jars; this not only looks beautiful but also keeps food fresh and prevents pests.
- Apply labels at the exact same height on every jar using a ruler for a precision look that mimics high-end professional organizing services.
- Use tiered risers for cans so you can see every label at a glance, preventing the ‘lost can of beans’ at the back of the shelf.
- Place heavier, less-used items in woven baskets on the bottom shelves and frequently grabbed snacks in accessible wire bins at eye level.
- Install motion-sensor LED strip lighting under each shelf to illuminate the ‘work zone’ and give the pantry a high-end, custom-cabinetry feel.
How to Build a Magical Outdoor Play Zone for Endless Childhood Wonder
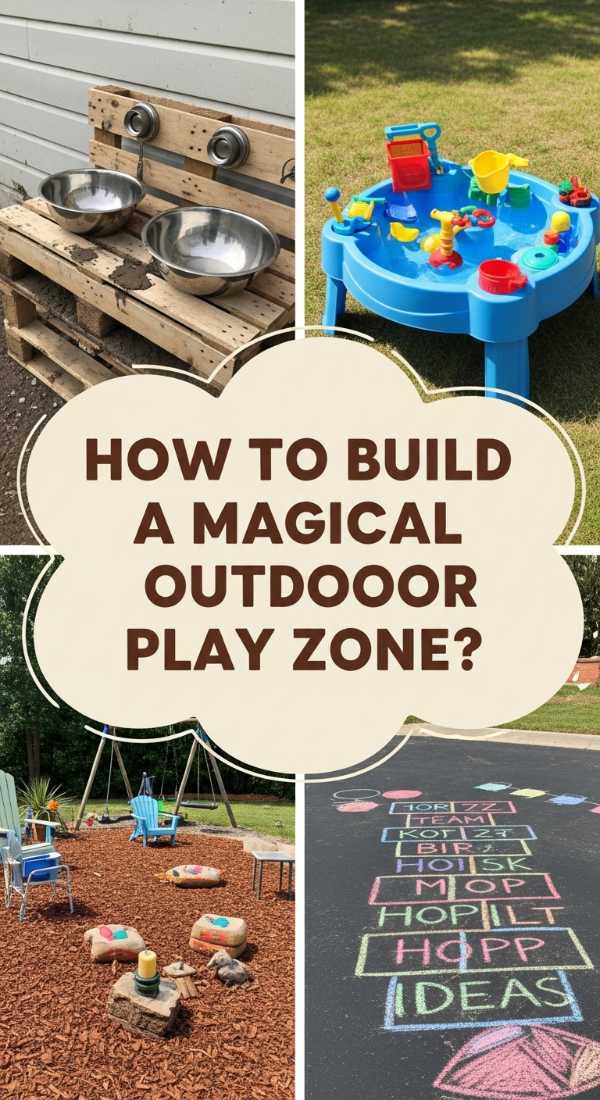
Why we love this
A truly great outdoor play zone isn’t just a plastic slide in a yard; it’s an immersive environment that sparks the imagination and feels like an extension of the home’s design. We love the tactile sensation of smooth-sanded cedar, the smell of fresh wood chips, and the sight of a child lost in a world of make-believe. By using natural materials and a sophisticated color palette, you create a space that looks like a custom-designed park. It’s where the sound of laughter meets the beauty of a well-kept garden, proving that kid-friendly spaces can be just as stylish as adult ones.
Essential Elements:
- Cedar lumber (naturally rot-resistant and beautiful)
- Black powder-coated hardware and brackets
- Rubber mulch or pea gravel for a soft landing zone
- Heavy-duty canvas for a play-fort roof
- Climbing holds in muted, earthy tones
How to make it
- Excavate a 10×12 foot area to a depth of 4 inches and line it with heavy-duty landscape fabric to prevent weeds and ensure proper drainage.
- Construct a basic 4×4-foot platform using 4×4 posts and 2×6 floor joists, ensuring the structure is anchored 2 feet into the ground with concrete.
- Install a ‘climbing wall’ side using a sheet of 3/4-inch exterior grade plywood, painted in a modern charcoal or navy, and bolt on the climbing holds in a zig-zag pattern.
- Build a simple A-frame swing set attachment using a 4×4 top beam and heavy-duty iron swing hangers, ensuring all bolts are tightened and recessed for safety.
- Add a ‘mud kitchen’ at the base with a small stainless steel sink and wooden knobs to encourage sensory play.
- Fill the excavated area with 4 inches of premium cedar mulch or smooth pea gravel to provide a professional, clean finish that mimics high-end playgrounds.
- Finish the wood with a clear UV-protectant sealant to maintain the natural honey color of the cedar and prevent graying over time.
How to Master Rock Landscaping for a Sophisticated Natural Look
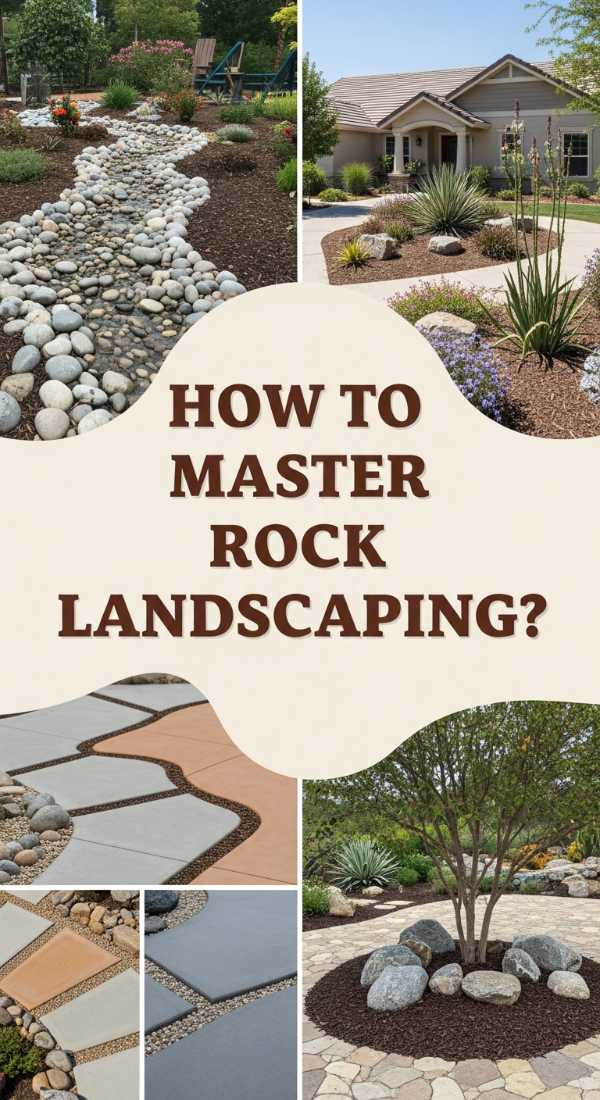
Why we love this
Rock landscaping offers a timeless, structural elegance that requires almost zero maintenance while providing maximum visual impact. We love the way different textures—from the smooth, cool surface of river rocks to the jagged, sparkling edges of crushed granite—interact with the light throughout the day. There is something incredibly grounding about the weight and permanence of stone. It creates a ‘Zen’ atmosphere where the crunch of gravel underfoot and the sight of boulders nestled among ferns make your backyard feel like a high-end spa retreat or a wild, pristine mountain side.
Essential Elements:
- Large ‘anchor’ boulders (at least 2-3 feet wide)
- River rocks in varying shades of grey and tan
- Landscape fabric (commercial grade)
- Drought-tolerant plants like succulents or grasses
- Steel or heavy-duty plastic edging
How to make it
- Start by sketching a design that mimics a natural dry creek bed or a mountain outcrop; avoid symmetry as nature is rarely perfectly balanced.
- Lay down a heavy-duty, non-woven landscape fabric over the entire area, overlapping seams by 6 inches and securing with 6-inch garden staples.
- Place your largest ‘anchor’ boulders first; bury the bottom 1/3 of the boulder in the ground so it looks like it has been there for centuries rather than just sitting on top of the soil.
- Install your edging to keep the rocks contained, opting for a hidden steel edge for a modern, seamless look.
- Pour your smaller river rocks or gravel around the boulders, varying the depth to create a natural, undulating terrain.
- Cut ‘X’ shapes into the fabric to plant drought-resistant species like Blue Fescue or Agave, which provide a soft green contrast to the hard stone.
- Use a leaf blower on a low setting once a week to keep the rock bed free of debris, maintaining that crisp, high-end aesthetic year-round.
How to Transform a Ranch Exterior for Modern Curb Appeal
![]()
Why we love this
The classic ranch home is a blank canvas just waiting for a modern glow-up. We love the transition from a dated, tired facade to a sharp, high-contrast exterior that stops traffic. There is a tactile thrill in the smoothness of new matte-black hardware and the crisp lines of freshly painted trim against white siding. This transformation is about more than just paint; it’s about giving an older home a new identity that feels contemporary, expensive, and intentional. It’s the ultimate DIY ‘mic drop’ that adds massive value and a sense of pride every time you pull into your driveway.
Essential Elements:
- High-quality exterior paint (Matte or Satin finish)
- Modern black house numbers and mailboxes
- Cedar slats for a decorative accent wall or porch ceiling
- Updated lighting fixtures (go for oversized lanterns)
- Power washer and high-grit sandpaper
How to make it
- Begin with a deep clean: power wash the entire exterior to remove oxidation, dirt, and spider webs, allowing it to dry for 48 hours before proceeding.
- Scrape away any peeling paint and sand the surfaces smooth, then apply a high-adhesion primer to any bare wood or masonry.
- Choose a modern ‘Swiss Coffee’ white for the body and a deep ‘Iron Ore’ black for the trim and shutters to create that sought-after high-contrast look.
- Spray the paint using an airless sprayer for a factory-smooth finish, overlapping each pass by 50% to avoid visible lines or ‘tiger stripes.’
- Replace dated gold or silver hardware with matte black oversized handles and contemporary font house numbers.
- Install a horizontal cedar slat accent wall near the front door to introduce warmth and a custom architectural detail that breaks up the long lines of the ranch.
- Swap out old porch lights for large, modern lanterns that are at least 1/4 the height of the door to ensure they don’t look undersized.
How to Style a Nostalgic Teen Room for Ultimate Retro Vibes

Why we love this
A nostalgic teen room is a masterclass in ‘cool’—it’s where the 70s, 80s, and 90s collide with modern comfort. We love the tactile mix of velvet bean bags, the neon hum of a localized light sign, and the glossy finish of a curated vinyl collection. It’s a space that feels deeply personal and expressive, filled with textures that invite you to kick back and listen to music for hours. The aesthetic is all about ‘vibes’—that perfect balance of mood lighting, retro patterns, and a sense of effortless style that looks like it belongs in a trendy boutique hotel.
Essential Elements:
- Record player and a wall-mounted vinyl display
- Lava lamps or neon LED signs
- Velvet or corduroy textiles in mustard, rust, or teal
- Checkered or bold floral area rugs
- Polaroid photo wall with fairy lights
How to make it
- Start with a neutral base color on the walls, like a soft cream, to allow the colorful retro elements to pop without overwhelming the senses.
- Create a ‘vinyl wall’ by installing simple wooden ledge shelves; display records with the most iconic cover art at eye level to act as rotating gallery art.
- Introduce ‘mood zones’ using lighting: place a warm-toned floor lamp in a reading corner and a colorful neon sign above the bed for a cool evening glow.
- Mix and match patterns by sticking to a consistent color palette; for example, pair a mustard checkered rug with a rust-colored velvet duvet cover.
- Set up a dedicated ‘creative corner’ with a vintage-style desk and an analog camera collection to encourage off-screen hobbies.
- Use a large corkboard or a wire grid to display a curated collection of Polaroids, ticket stubs, and art prints, secured with aesthetic washi tape.
- Add a faux-fur or chunky knit throw to the bed to provide that final layer of cozy texture that makes the room feel high-end and lived-in.
How to Craft Budget Friendly Garden Art for a Unique Backyard

Why we love this
Garden art is the jewelry of the outdoor world; it adds personality, whimsy, and a focal point where you least expect it. We love the way a piece of handcrafted art catches the afternoon sun—the shimmering of a glass mosaic or the soft patina of weathered copper. There is a deep satisfaction in turning everyday objects into something that looks like it was plucked from a high-end art gallery or a secret English garden. It’s about the play of light, the sound of wind chimes, and the discovery of beauty tucked behind a leafy hosta, making your backyard feel like a curated experience.
Essential Elements:
- Terracotta pots in various sizes
- Copper tubing or wire
- Glass gems or tumbled sea glass
- Weather-resistant adhesive (E6000 or similar)
- Reclaimed metal or wood scraps
How to make it
- Create a ‘stacked pot’ sculpture by threading a rebar stake through the drainage holes of 5-6 terracotta pots of decreasing size, tilting them at alternating angles for a whimsical look.
- Design a glass mosaic gazing ball by taking an old bowling ball or smooth stone and gluing glass gems in a tight pattern using outdoor-rated adhesive.
- Once the glue has set for 24 hours, apply a sanded grout over the gems, wipe clean with a damp sponge, and seal with a clear waterproof sealer.
- Build a copper wind chime using half-inch copper tubing cut into varying lengths; sand the edges smooth and drill small holes at the top for fishing line.
- Hang the tubes from a circular piece of driftwood, ensuring they are close enough to ‘clink’ together in a light breeze for a melodic, high-end sound.
- Paint simple geometric patterns on large flat river stones using outdoor acrylics to act as ‘hidden’ art pieces along a garden path.
- Place your art pieces in ‘sightlines’—areas where you naturally look when sitting on your porch or looking out a window—to maximize their visual impact.
How to Enhance Your Deck Area for the Ultimate Hangout Spot

Why we love this
Your deck should feel like an extension of your living room, not just an outdoor platform. We love the feeling of bare feet on warm, smooth wood and the plush comfort of an outdoor sofa that rivals your indoor one. This project is about creating ‘zones’ for lounging, dining, and sunbathing, all tied together with high-end finishes. The scent of grilled food, the sight of lush planters, and the cooling breeze of a well-placed fan turn a simple deck into the heart of the home. It’s the ultimate setting for summer BBQs and quiet morning coffees alike.
Essential Elements:
- Outdoor-rated sectional or club chairs
- Privacy screens (slatted wood or faux-leaf)
- Built-in planters or oversized ceramic pots
- A high-quality outdoor rug
- Dimmable deck post lighting
How to make it
- Thoroughly clean and restain your deck with a semi-transparent stain that highlights the wood grain while providing a sophisticated, uniform color.
- Install vertical privacy screens on the sides facing neighbors using 1×2 cedar slats spaced half an inch apart; this creates an intimate feel without blocking all the light.
- Zone the space: place a dining table near the house for easy food transport and a lounge area further out to maximize the view.
- Add a ‘living wall’ using a trellis and climbing vines like Clematis or Star Jasmine to provide fragrance and a lush green backdrop.
- Install low-voltage LED cap lights on your deck posts to provide a soft, high-end glow that outlines the space safely at night.
- Use oversized ceramic planters in a single color (like matte navy or charcoal) to house large focal plants like Japanese Maples or Boxwoods.
- Finish the space with a large cantilever umbrella that provides adjustable shade and adds a sense of vertical scale and luxury to the layout.
The Art of Living Well Outdoors
Transforming your home into a high-end sanctuary doesn’t require a professional design team or a massive budget—it just takes a bit of inspiration and the courage to start. Each of these projects, from the cluck of a chicken haven to the glow of a modern ranch exterior, adds a layer of richness to your daily life. Remember, the ‘million-dollar look’ is really about the attention to detail and the love you put into your surroundings. So grab your tools, head outside, and start building the life (and the yard) you’ve always dreamed of.
Frequently Asked Questions
Q: What is the most cost-effective way to start these projects?
A: Focus on ‘high-impact’ changes first, like paint and lighting. These are relatively inexpensive but provide the biggest visual shift for every dollar spent.
Q: Do I need professional tools to achieve these looks?
A: Most of these can be done with basic power tools like a miter saw, a drill, and a sander. For larger projects, you can often rent specialized tools from a local home improvement store.
Q: How do I maintain these DIY projects over time?
A: Regular cleaning and annual sealing are key. Applying a fresh coat of UV-protectant or checking for loose screws once a season will keep your high-end DIYs looking brand new for years.