
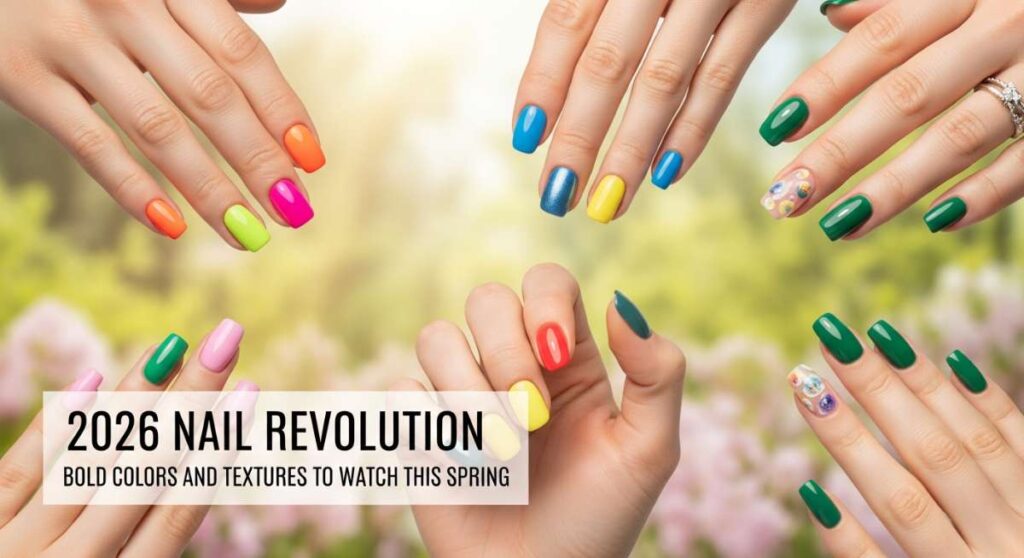
2026 Nail Revolution: Bold Colors and Textures to Watch This Spring
Oh, my sweet loves, can you feel it? There’s a new whisper in the breeze, a gentle shift into the vibrant, soul-stirring energy of Spring 2026. After a long winter of cozy knits and dark cocoa tones, it’s finally time to let our hands tell a new story. I’ve been sitting here with my morning tea, watching the light hit my vanity, and I just knew I had to share this magic with you all. Our nails are more than just a manicure; they are the softest way we express our inner glow to the world.
This season is all about a beautiful contradiction—where the softest pastels meet the boldest, most electric textures. It’s about finding that ‘cloud-soft embrace’ in your aesthetic while daring to try something that feels entirely new. Whether you’re a minimalist at heart or someone who loves a little maximalist sparkle, I’ve curated the ultimate guide to the trends that are going to define our beautiful 2026 journey together. Let’s dive in, besties!
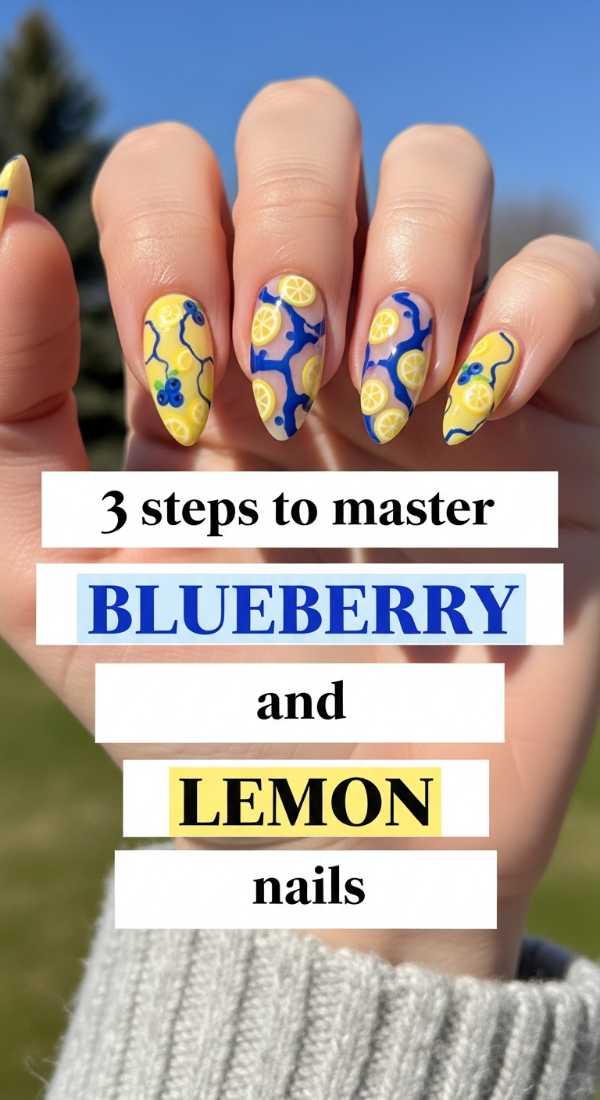
3 Steps to Master Blueberry and Lemon Nails
Why to love these Nails:
Imagine picking fresh fruit in a sun-drenched orchard; that’s exactly what these blueberry and lemon nails feel like. It’s that perfect mix of zesty energy and calm, cool blue that just feels like a soft morning hug for your hands. It’s the ultimate ‘clean girl’ aesthetic with a fruity twist for 2026.
Essential Items:
- Pale Lemon Yellow Polish
- Dusty Blueberry Blue Polish
- Ultra-fine nail art brush
- Glossy top coat
How to Prepare:
- Apply a sheer nude base to provide a clean canvas for your fruit colors.
- Use a dotting tool to create small clusters of two blueberries or a tiny lemon oval on accent nails.
- Paint a delicate green leaf connecting the fruits to bring the botanical look to life.
Budget Range
- Essie ‘Silly Billy’ Yellow – $10.00
- OPI ‘It’s a Boy!’ Blue – $11.50
- Detail Brush Set from Amazon – $8.00
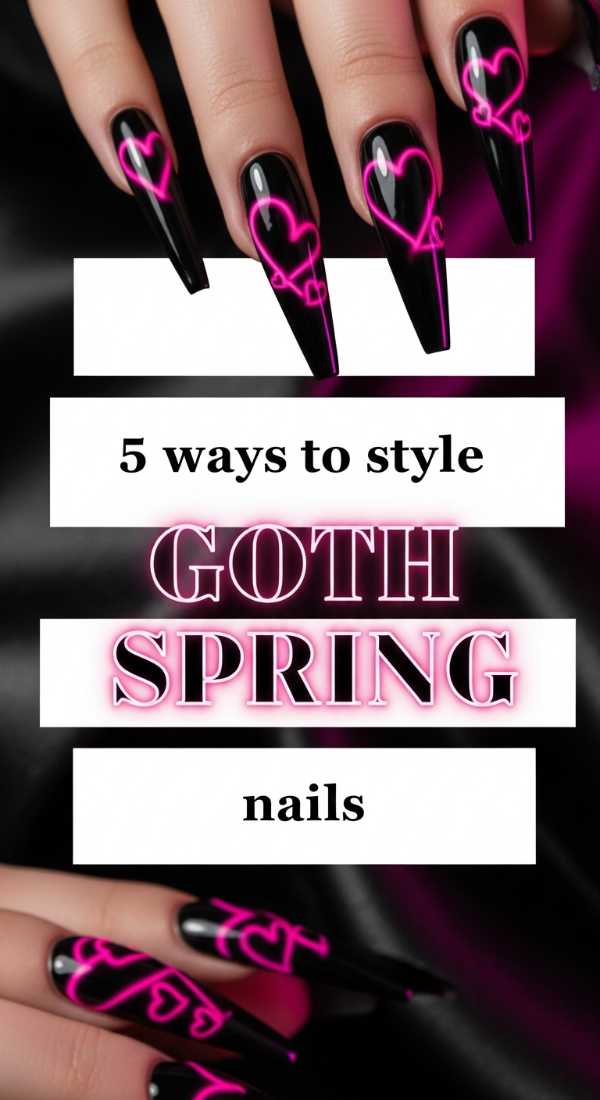
5 Ways to Style Goth Spring Nails
Why to love these Nails:
Who says spring has to be all sunshine and rainbows? Goth spring is for my loves who find beauty in the shadows even when the flowers are blooming. It’s sophisticated, moody, and adds a touch of mystery to those floaty floral dresses we all love to wear.
Essential Items:
- Sheer Black ‘Jelly’ Polish
- Silver metallic liner
- Dried pressed flowers
- Matte top coat
How to Prepare:
- Layer one coat of black jelly polish for a translucent, smoky effect.
- Style 1: Add a silver moon at the base of the nail.
- Style 2: Encapsulate a single dark purple dried flower under a clear builder gel.
- Style 3: Create a ‘negative space’ heart in the center of a black matte nail.
Budget Range
- Cirque Colors ‘Jade Jelly’ Black – $12.50
- Manucurist Silver Liner – $14.00
- Dried Flower Wheel – $6.00
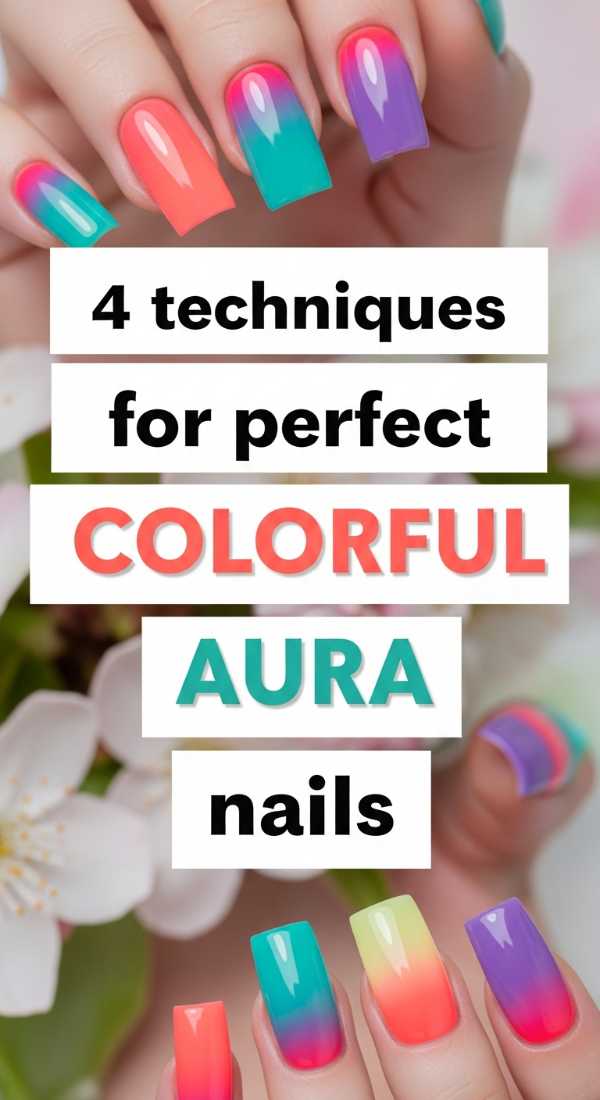
4 Techniques for Perfect Colorful Aura Nails
Why to love these Nails:
Aura nails are like wearing your soul’s energy right on your fingertips. This spring, we are moving away from single-tone auras and embracing a kaleidoscopic explosion of color. It’s dreamy, it’s ethereal, and it makes every hand movement feel like a magical gesture.
Essential Items:
- Makeup sponges (small pieces)
- At least three contrasting pastel polishes
- White polish for the base
- Acetone for blending
How to Prepare:
- Sponge technique: Dab a small circle of color in the center of a wet base to let it bleed outward.
- Airbrush technique: Use a portable mini-airbrush for the smoothest gradient transition.
- Blooming gel technique: Drop color onto wet blooming gel and watch it expand naturally.
- Eyeshadow technique: Buff pigment powders into a tacky top coat for a soft-focus glow.
Budget Range
- Holo Taco ‘Pink Fizz’ – $13.00
- Portable Nail Airbrush Kit – $35.00
- Born Pretty Aura Pigment Palette – $15.00
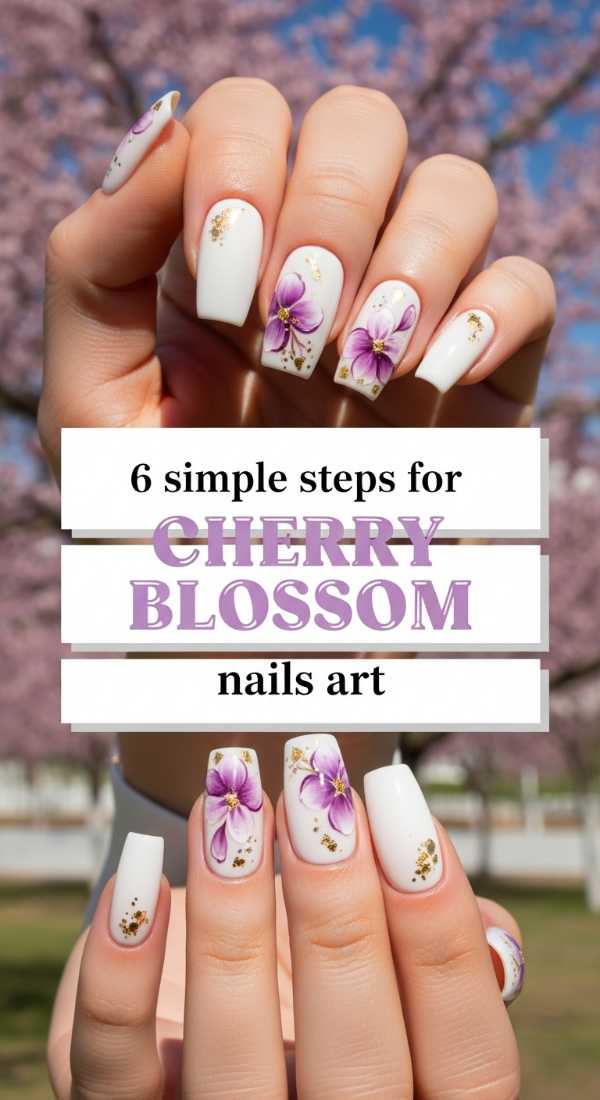
6 Simple Steps for Cherry Blossom Nails Art
Why to love these Nails:
Cherry blossoms are the heartbeat of spring, aren’t they? There is something so fleeting and precious about them. Putting them on your nails is like carrying a little piece of the season’s first bloom with you wherever you go. It’s timeless, romantic, and incredibly feminine.
Essential Items:
- Soft pink polish
- White acrylic paint or polish
- Tiny brown liner for branches
- Gold leaf flakes
How to Prepare:
- Paint a soft, sheer pink base coat.
- Draw thin, shaky brown lines to mimic natural tree branches.
- Dot five tiny white petals in clusters along the branches.
- Add a tiny pink dot in the center of each flower for depth.
- Place a single gold leaf flake near the blossoms for a ‘sunlight’ effect.
- Seal with a high-shine top coat.
Budget Range
- Zoya ‘Dot’ Soft Pink – $12.00
- Apple Barrel Acrylic Paint (Small) – $1.50
- Nail Art Gold Flakes – $5.00
7 Minutes to Get Spring Chrome Nails
Why to love these Nails:
We are all busy queens, and sometimes we need glam in a flash! Spring chrome is all about that ‘pearlized’ look—think the inside of a seashell. It’s fast, high-impact, and looks like you spent hours at a high-end salon in Tokyo.
Essential Items:
- No-wipe top coat
- Pearlescent chrome powder
- Sponge applicator
- LED Lamp
How to Prepare:
- Apply your base color and cure for 30 seconds.
- Apply no-wipe top coat and cure for only 15-20 seconds (keep it slightly ‘grabby’).
- Rub the chrome powder vigorously until a mirror finish appears.
- Dust off excess and seal with a final top coat.
Budget Range
- Daily Charme ‘Unicorn’ Chrome – $18.00
- SUNUV LED Lamp – $25.00
- OPI Top Coat – $11.00
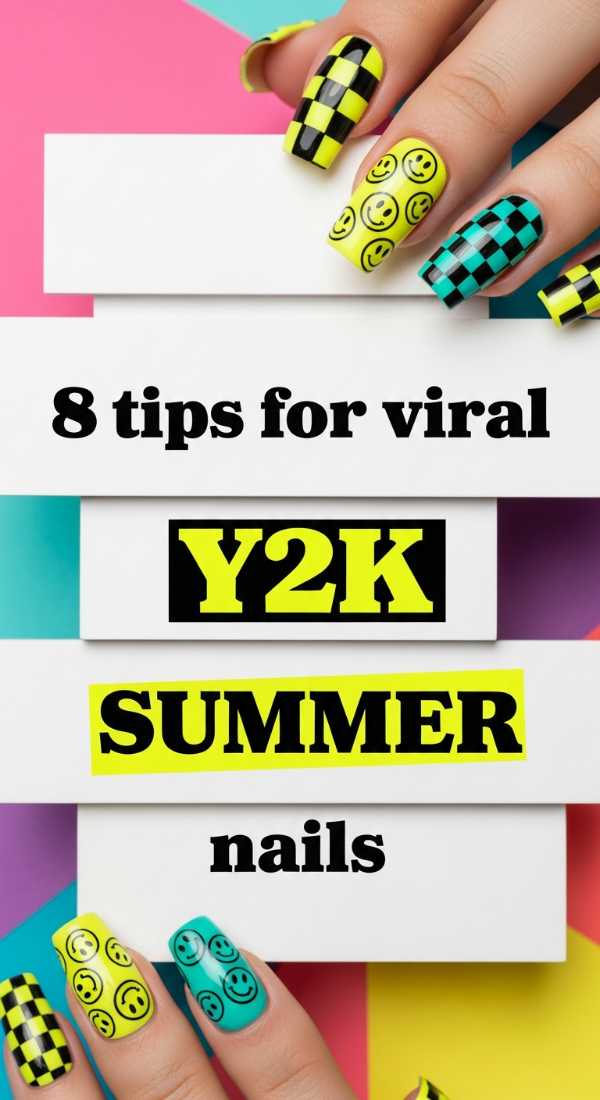
8 Tips for Viral Y2K Summer Nails
Why to love these Nails:
The nostalgia is real, loves! We are heading into a summer of 2000s revival that is all about fun, playfulness, and not taking ourselves too seriously. These nails are loud, proud, and absolutely perfect for your summer festival photos.
Essential Items:
- Neon pink and green polishes
- 3D nail charms (butterflies, hearts)
- Silver glitter
- Nail glue
How to Prepare:
- Tip 1: Mix mismatched patterns (stars on one finger, checkers on another).
- Tip 2: Use 3D gummy bear charms for a pop-art feel.
- Tip 3: Layer silver glitter over neon colors.
- Tip 4: Incorporate ‘bubble’ textures using clear builder gel.
- Tip 5: Use French tips but make them electric blue.
- Tip 6: Add tiny rhinestones at the cuticle.
- Tip 7: Try ‘water drop’ effects using thick top coat.
- Tip 8: Keep the shape long and square for that true Y2K vibe.
Budget Range
- Lights Lacquer ‘Britney’ Pink – $13.00
- Y2K Charm Bulk Pack – $9.00
- IBD Hard Gel (for bubbles) – $14.00
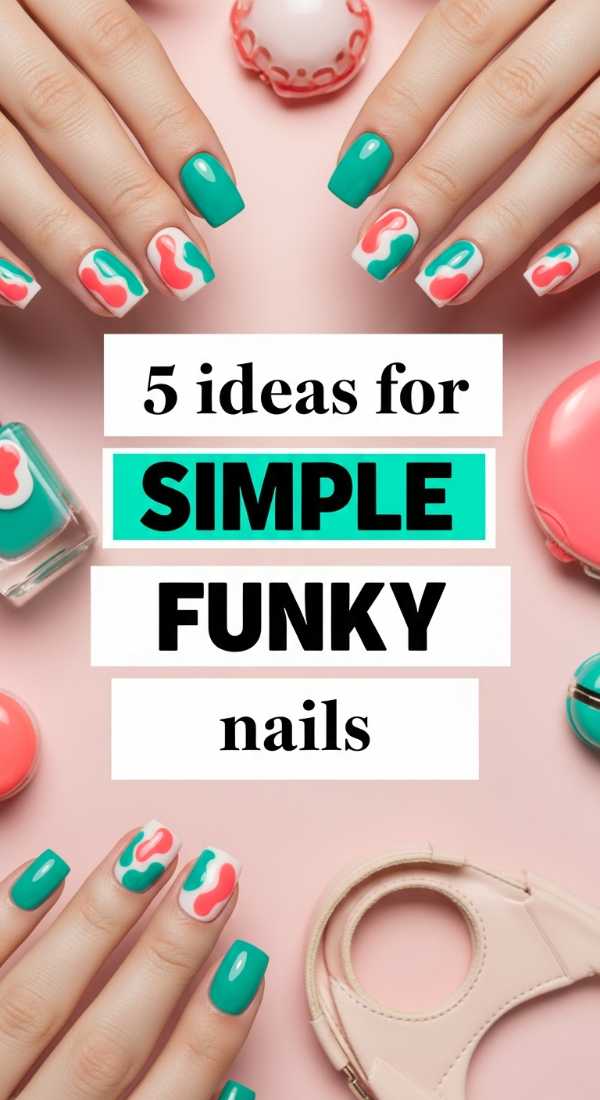
5 Ideas for Simple Funky Nails
Why to love these Nails:
Sometimes we want to be a little weird, but make it fashion! Funky nails are for the creative souls who love abstract shapes and unexpected color combos. It’s like a mini modern art gallery on your hands that sparks conversation every time you pay for your latte.
Essential Items:
- Matte and Glossy top coats
- Primary color polishes
- Striping tape
- Wavy nail stickers
How to Prepare:
- Idea 1: The ‘Drip’—paint a solid base and add contrasting ‘drips’ coming from the tip.
- Idea 2: Geometric Chaos—random triangles in different colors on each nail.
- Idea 3: The Half-and-Half—one side matte, one side glossy in the same color.
- Idea 4: Squiggle Life—one single neon squiggle across a naked nail.
- Idea 5: Mismatched Hands—warm tones on the left, cool tones on the right.
Budget Range
- Sally Hansen Insta-Dri Set – $15.00
- Nail Art Striping Tape – $4.00
- Essie Matte About You – $10.00
3 Secrets to Cute Bumble Bee Nails
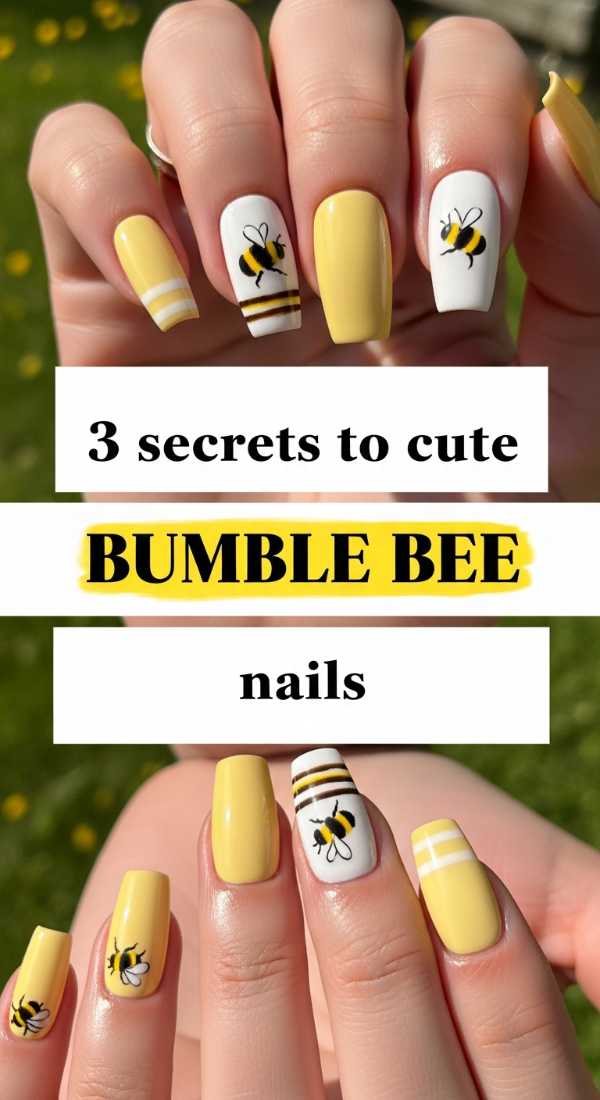
Why to love these Nails:
Save the bees, but make it cute! These nails are a sweet nod to nature’s hardest workers. They bring an instant smile to your face and are surprisingly sophisticated when done with a minimalist touch. It’s pure sunshine bottled up.
Essential Items:
- Honey yellow polish
- Black precision liner
- Gold shimmer polish
- Dotting tool
How to Prepare:
- Secret 1: Use a ‘honeycomb’ stencil for a subtle background texture.
- Secret 2: Create the bee body with two small dots—one yellow, one black.
- Secret 3: Use a toothpick to drag out tiny white ‘wings’ from the black dot.
Budget Range
- Orly ‘Golden Afternoon’ – $12.00
- HoneyComb Nail Stencil – $7.00
- Black Nail Art Pen – $9.00
6 Steps to Achieve Milky Lavender Nails
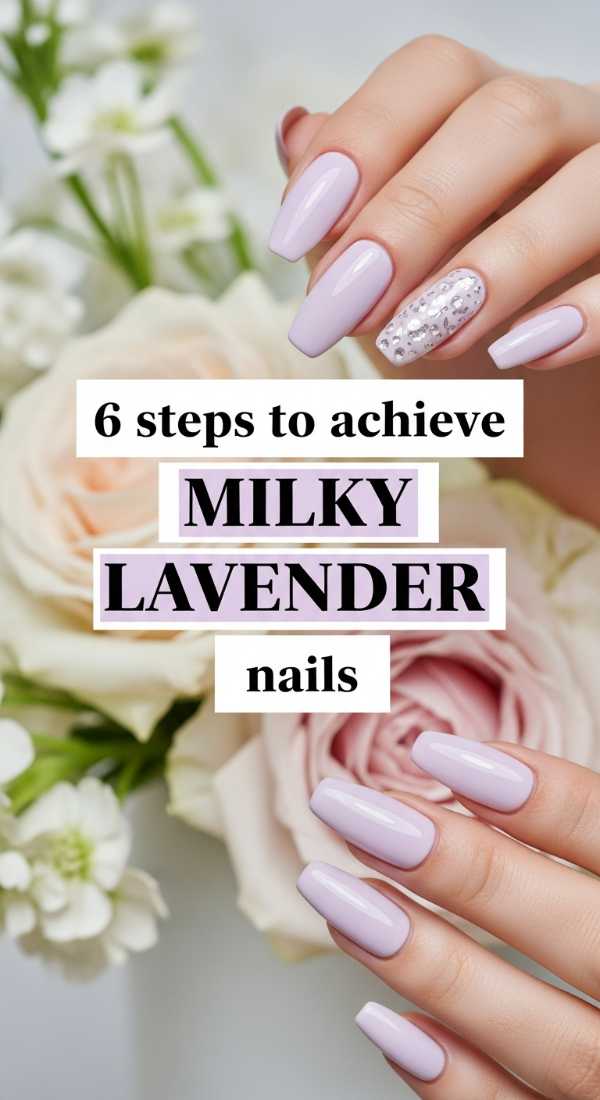
Why to love these Nails:
Milky lavender is the ‘it’ color of 2026. It’s softer than a traditional lilac and has a creamy, dream-like quality that looks stunning on every skin tone. It’s the visual equivalent of a lavender latte on a rainy afternoon.
Essential Items:
- Lavender polish
- Sheer white ‘Milky’ polish
- Mixing palette
- Wide brush
How to Prepare:
- Start with a clean, buffed nail to ensure the sheer color is even.
- Apply one coat of solid lavender.
- While wet, layer a coat of milky white on top.
- Use a clean brush to gently swirl the two for a ‘marble’ milk effect.
- Apply a second thin coat of milky white to soften the look.
- Finish with a high-gloss top coat to give it that ‘squishy’ look.
Budget Range
- Olive & June ‘Lavender Clove’ – $9.00
- DND ‘Milky White’ Gel – $13.00
- Glass Mixing Palette – $10.00
4 Ways to Design Tuscan Nails 2000s
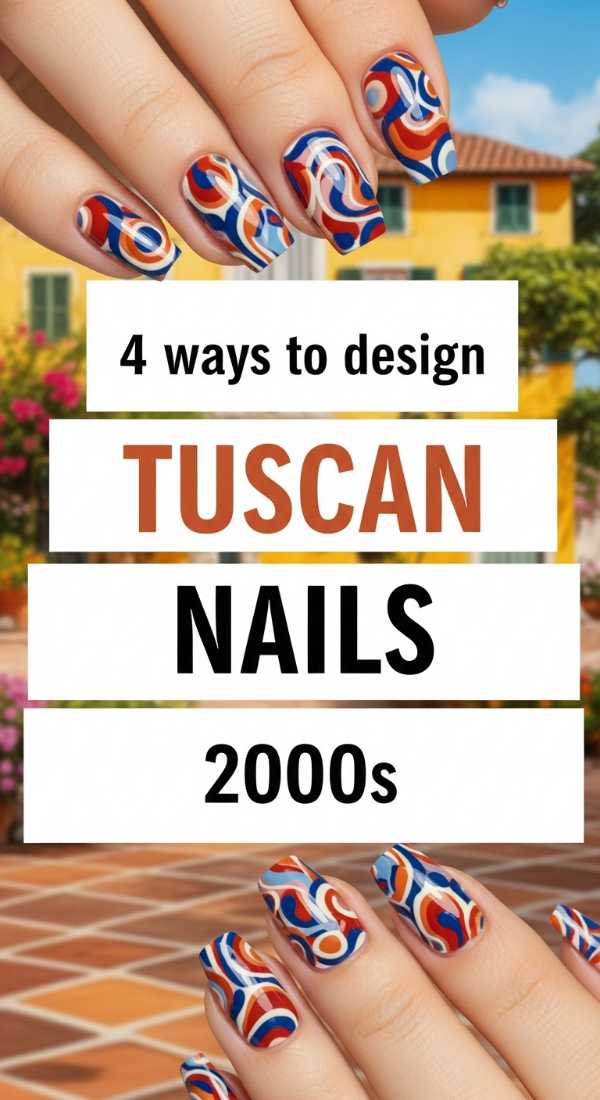
Why to love these Nails:
Think ‘Under the Tuscan Sun’ meets the early 2000s glam. We’re talking terracotta tones, olive greens, and gold accents. It’s a very specific, earthy kind of luxury that feels grounded yet incredibly chic for the warmer months.
Essential Items:
- Terracotta orange polish
- Sage or Olive green polish
- Gold leaf or gold foil
- Matte top coat
How to Prepare:
- The Earthy Ombre: Blend terracotta into a creamy beige.
- The Mosaic: Use small squares of different earth tones to create a tile look.
- The Gilded Olive: Paint nails sage green and add gold foil at the cuticles.
- The Matte Tuscan: Finish a warm orange set with a matte top coat for a ceramic feel.
Budget Range
- CND ‘Brazen’ Terracotta – $15.00
- Essie ‘Win Me Over’ Sage – $10.00
- Gold Leaf Sheet – $6.00
Conclusion: Your Spring Glow-Up Awaits
My beautiful loves, I hope this guide sparks a little fire in your creative heart! Spring 2026 is our time to bloom, to experiment, and to embrace every version of ourselves—from the dark and moody to the bright and bubbly. Remember, there are no rules in art, and your nails are the most personal canvas you have. So, grab your favorite polish, put on some lo-fi beats, and give yourself the gift of a fresh manicure. You deserve to feel magic right down to your fingertips. I can’t wait to see which look you choose first! Tag me in your photos, besties!