

Your Guide to the Viral Minimalist Food Board Everyone Loves
There is something inherently magical about a shared meal that doesn’t feel like a chore to prepare. Lately, my social feeds have been overflowing with the ‘Minimalist Food Board’ trend, and honestly, I am here for it. It’s not just about the food; it’s about that golden hour glow hitting a spread of perfectly cooked staples, the sound of laughter over the clinking of forks, and the effortless beauty of simple ingredients done right. This board is designed to bring everyone together around a table filled with textures and aromas that feel like a warm hug.
We’ve all had those evenings where we want the ‘wow’ factor without the stress of a five-course plated dinner. This guide is your roadmap to creating a viral-worthy spread that balances comfort with culinary finesse. From the sizzle of garlic in a hot pan to the satisfying crunch of a perfectly toasted sandwich, every element here is designed to be a showstopper. Let’s dive into the recipes that will make your next gathering absolutely unforgettable.
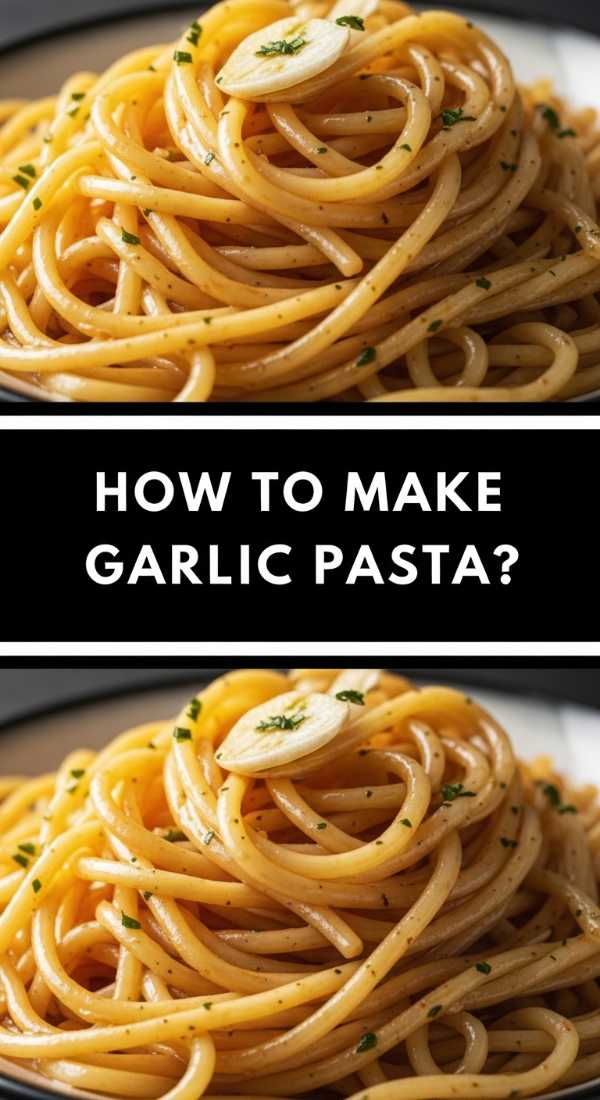
How to make garlic pasta?
Why we love this
There is nothing quite like the silky, golden strands of pasta coated in a luxurious emulsion of extra virgin olive oil and toasted garlic. As the garlic softens and browns, it releases a nutty, sweet aroma that fills the kitchen, promising a bite that is both pungent and comforting. The addition of fresh parsley adds a burst of herbal brightness, while the subtle heat from red pepper flakes creates a gentle tingle on the tongue that keeps you reaching for one more forkful. It is the ultimate minimalist comfort food, proving that simple ingredients can create a world-class experience.
Ingredients
- 1/2 lb Spaghetti or Linguine
- 6 cloves Garlic, thinly sliced
- 1/2 cup Extra Virgin Olive Oil
- 1 tsp Red Pepper Flakes
- Fresh Parsley, chopped
- Salt and Black Pepper
- Reserved Pasta Water
How to make it
- Bring a large pot of heavily salted water to a rolling boil; the water should taste like the sea to properly season the pasta from the inside out.
- Add the pasta and cook until just shy of al dente, usually about 2 minutes less than the package instructions, as it will finish cooking in the sauce.
- While the pasta cooks, place a large skillet over medium-low heat and add the olive oil and sliced garlic. It is crucial to start with a cold pan to slowly infuse the oil without burning the garlic.
- Cook the garlic, stirring frequently, until it turns a light golden tan; if it turns dark brown, it will be bitter, so watch it like a hawk.
- Add the red pepper flakes to the oil for 30 seconds to toast them, then ladle in about 1/2 cup of the starchy pasta water to stop the garlic from browning further.
- Transfer the pasta directly into the skillet using tongs, tossing vigorously over medium heat to create a glossy, emulsified sauce that clings to every strand.
- Finish with a generous handful of fresh parsley and a final drizzle of oil before serving warm.
How to get crispy potatoes?

Why we love this
The perfect crispy potato is a masterclass in textural contrast: a glass-like, golden exterior that shatters upon impact, revealing a center that is as light and fluffy as a cloud. As they roast, the scent of rosemary and shimmering fat creates an irresistible earthy perfume that signals home-cooked perfection. Every bite offers a satisfying saltiness and a deep, caramelized flavor that pairs beautifully with any dip or protein on your board. They are the humble stars of the show, providing a rustic elegance that everyone gravitates toward first.
Ingredients
- 2 lbs Yukon Gold Potatoes
- 3 tbsp Duck Fat or Extra Virgin Olive Oil
- 2 sprigs Fresh Rosemary
- 4 cloves Garlic, smashed
- Flaky Sea Salt
- 1/2 tsp Baking Soda
How to make it
- Peel and cut your potatoes into 1.5-inch chunks, ensuring they are relatively uniform for even cooking.
- Boil a pot of water with a generous pinch of salt and 1/2 teaspoon of baking soda; the soda breaks down the potato’s starch, creating more surface area for maximum crunch.
- Simmer the potatoes for about 10 minutes until the outsides are softened but the centers are still firm.
- Drain the potatoes and let them steam dry in the colander for 2 minutes, then shake them vigorously to roughen up the edges until they look ‘fuzzy.’
- Preheat your oven to 425°F (220°C) and heat a baking sheet with your oil or fat until it is shimmering hot.
- Carefully spread the potatoes onto the hot tray in a single layer, tossing to coat, and roast for 20 minutes before flipping.
- Add the smashed garlic and rosemary during the last 10 minutes of roasting to prevent them from burning, then finish with flaky salt once they are deep mahogany brown and incredibly loud when tapped.
How to cook honey chicken?

Why we love this
This honey chicken is the definition of ‘sticky-sweet perfection,’ offering a glossy glaze that coats the palate with notes of wildflower honey and savory soy. The aroma of searing poultry combined with the caramelizing sugars creates a scent that is both nostalgic and deeply appetizing. As you bite through the slightly charred, crispy skin, the succulent juices of the meat mingle with the sauce, creating a balanced harmony of flavors. It’s a dish that feels indulgent yet clean, making it a centerpiece that looks as beautiful as it tastes under the ambient dinner lights.
Ingredients
- 1 lb Chicken Thighs, bite-sized pieces
- 1/4 cup Honey
- 2 tbsp Soy Sauce
- 1 tbsp Apple Cider Vinegar
- 1 tsp Grated Ginger
- 2 cloves Garlic, minced
- Sesame seeds for garnish
How to make it
- Pat the chicken pieces completely dry with paper towels; any moisture will steam the meat rather than searing it to a golden brown.
- Season the chicken with salt and pepper and heat a skillet over medium-high heat with a tablespoon of neutral oil until it just begins to smoke.
- Add the chicken in a single layer, working in batches if necessary, and sear for 5-6 minutes until a deep golden crust forms on all sides.
- While the chicken sears, whisk together the honey, soy sauce, vinegar, ginger, and garlic in a small bowl until the honey is fully incorporated.
- Lower the heat to medium and pour the sauce over the chicken, stirring constantly as the liquid begins to bubble and reduce.
- Continue cooking for 3-4 minutes until the sauce transforms into a thick, syrupy glaze that clings tightly to the meat without pooling.
- Remove from heat immediately once the glaze is dark and glossy, then garnish with sesame seeds for a nutty finish.
How to sear juicy steak?

Why we love this
A perfectly seared steak is a sensory triumph, characterized by a dark, savory crust known as the Maillard reaction that houses a tender, ruby-red interior. The smell of rendered beef fat and foaming butter basted with thyme is enough to make anyone’s mouth water instantly. Each slice should feel butter-tender, releasing a rich, umami-packed juice that enriches everything else on the board. It provides a grounding, decadent element to the meal, offering a sense of celebration and craft that elevates the entire dining experience to something truly special.
Ingredients
- 1 lb Ribeye or New York Strip (1.5 inches thick)
- 2 tbsp Unsalted Butter
- 3 sprigs Fresh Thyme
- 2 cloves Garlic, crushed
- High-smoke point oil (Avocado or Grapeseed)
- Kosher Salt and Coarse Black Pepper
How to make it
- Remove the steak from the fridge at least 45 minutes before cooking to bring it to room temperature; this ensures the center cooks evenly with the exterior.
- Pat the steak extremely dry and season aggressively with salt and pepper on all sides, including the fat cap.
- Heat a heavy cast-iron skillet over high heat until it is screaming hot and the oil is shimmering and just starting to smoke.
- Lay the steak away from you in the pan and press down slightly to ensure maximum contact; sear undisturbed for 3 minutes to develop a thick crust.
- Flip the steak and immediately add the butter, garlic, and thyme to the pan, allowing the butter to foam and brown.
- Tilt the pan and use a large spoon to continuously baste the steak with the aromatic butter for another 2-3 minutes until it reaches an internal temperature of 130°F for medium-rare.
- Transfer the steak to a warm plate and let it rest for a full 10 minutes before slicing against the grain to keep all those precious juices inside.
How to roast perfect salmon?

Why we love this
Salmon prepared this way is a celebration of delicate textures and vibrant, clean flavors that brighten up any food board. The fish becomes incredibly tender, with large, moist flakes that practically melt in your mouth, contrasted by a light, herbaceous crust. The aroma is fresh and citrusy, thanks to the lemon slices that caramelize under the heat, infusing the flesh with a zesty sweetness. It’s a lighter protein option that feels sophisticated and nourishing, providing a beautiful pop of coral color that makes the entire spread look professionally styled.
Ingredients
- 1 Large Salmon Fillet (Skin-on)
- 2 tbsp Olive Oil
- 1 Lemon, thinly sliced
- 1 tbsp Fresh Dill, chopped
- 1/2 tsp Smoked Paprika
- Salt and Pepper
How to make it
- Preheat your oven to 400°F (200°C) and line a baking sheet with parchment paper to prevent sticking and make cleanup easy.
- Place the salmon fillet on the sheet and pat the skin and flesh dry with a paper towel; dry skin leads to a better texture.
- Drizzle the olive oil over the fish and rub it in, then season evenly with salt, pepper, and a dusting of smoked paprika for a hint of warmth.
- Layer the lemon slices across the top of the fillet like shingles; this protects the delicate protein from the direct heat and infuses it with moisture.
- Roast for 12-15 minutes, depending on the thickness; the salmon is done when it is opaque throughout and flakes easily when poked with a fork.
- For a professional finish, look for an internal temperature of 125°F-130°F for a moist, medium center.
- Remove from the oven and garnish with fresh dill immediately while the residual heat wakes up the herb’s essential oils.
How to prepare beef tacos?

Why we love this
Beef tacos bring a vibrant, festive energy to the table, with their bold spices and customizable layers of freshness. The aroma of cumin, chili, and toasted corn tortillas creates an intoxicating scent that promises a fiesta of flavors in every bite. There is a satisfying play between the warm, savory beef and the cool, crisp toppings like lime-drenched onions or creamy avocado. They are the ultimate interactive food, encouraging guests to build their own perfect bite and engage with the meal in a tactile, joyful way that embodies the spirit of the minimalist board.
Ingredients
- 1 lb Ground Beef (80/20 lean-to-fat ratio)
- 1 Small Onion, finely diced
- 2 tbsp Tomato Paste
- 1 tsp Cumin, 1 tsp Chili Powder, 1/2 tsp Garlic Powder
- Corn Tortillas
- Fresh Cilantro and Lime Wedges
How to make it
- Heat a large skillet over medium-high heat and add the ground beef, breaking it apart into small crumbles with a wooden spoon.
- Cook until the beef is browned and slightly crispy on the edges, then drain off all but one tablespoon of the rendered fat for flavor.
- Stir in the diced onions and cook for 3 minutes until translucent, then add the tomato paste and spices, toasting them for 60 seconds to unlock their oils.
- Pour in 1/4 cup of water or beef broth, scraping the bottom of the pan to release the flavorful browned bits (fond), and simmer until the liquid has reduced to a thick sauce.
- While the meat rests, char your corn tortillas directly over a gas flame for 10 seconds per side or in a dry pan until they are soft and smelling of toasted corn.
- Keep the tortillas warm in a clean kitchen towel until ready to serve.
- Fill each tortilla with a generous scoop of the seasoned beef and finish with a squeeze of lime to cut through the richness.
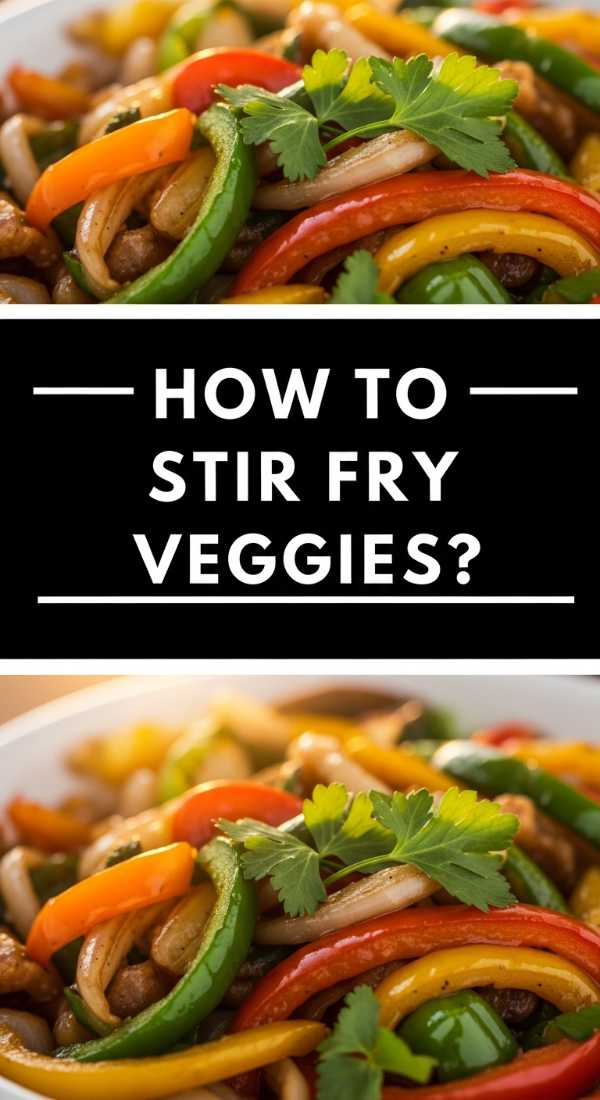
How to stir fry veggies?
Why we love this
A great stir fry is all about ‘wok hei’—the breath of the wok—which imparts a subtle smoky char while keeping the vegetables incredibly crisp and vibrant. The colors of snap peas, bell peppers, and carrots pop against the board, offering a visual and nutritional balance to the richer meats. The scent of toasted sesame oil and ginger floating through the air is sharp and inviting, promising a bite that is full of snap and zing. It’s a testament to how high heat and quick timing can transform simple garden produce into a sophisticated, flavor-packed side dish.
Ingredients
- 2 cups Mixed Veggies (Broccoli, Peppers, Snap Peas, Carrots)
- 2 tbsp Neutral Oil
- 1 tbsp Soy Sauce
- 1 tsp Toasted Sesame Oil
- 2 cloves Garlic, grated
- 1 tsp Honey
How to make it
- Prepare all your vegetables beforehand by cutting them into uniform, bite-sized pieces; stir-frying happens so fast you won’t have time to chop once you start.
- Whisk the soy sauce, sesame oil, honey, and garlic in a small bowl to create a quick finishing sauce.
- Get your wok or a large stainless steel skillet extremely hot over high heat until a drop of water evaporates instantly on contact.
- Add the neutral oil and swirl to coat, then toss in the heartiest vegetables first (like carrots and broccoli) and toss constantly for 2 minutes.
- Add the softer vegetables (peppers and snap peas) and continue to stir-fry for another 1-2 minutes until they are blistered but still have a firm ‘snap’ when bitten.
- Pour the sauce around the edges of the pan so it sizzles and caramelizes as it runs down to the veggies.
- Toss everything for 30 seconds until the sauce forms a thin, savory film, then remove from the heat immediately to prevent wilting.
How to bake loaded nachos?

Why we love this
Loaded nachos are the quintessential crowd-pleaser, offering a mountain of crunchy chips fused together by rivers of molten, bubbly cheese. The aroma of toasted corn and spicy jalapeños baking in the oven is the universal signal that the party has started. Every chip is a treasure hunt, seeking out the perfect balance of salty beans, sharp cheddar, and cool dollops of sour cream. It’s a messy, indulgent, and glorious addition to the board that brings out the inner child in everyone, reminding us that food should be fun and shared without hesitation.
Ingredients
- 1 bag Thick-cut Tortilla Chips
- 2 cups Shredded Sharp Cheddar and Monterey Jack
- 1/2 cup Black Beans, rinsed
- Pickled Jalapeños
- 1/2 cup Pico de Gallo
- Sour Cream and Guacamole for serving
How to make it
- Preheat your oven to 400°F (200°C) and line a large sheet pan with parchment paper or foil.
- The secret to great nachos is the layering: start with a base layer of chips, then top with half the cheese and half the beans.
- Add a second layer of chips and the remaining cheese and beans; this ensures there are no ‘sad chips’ left at the bottom without toppings.
- Bake for 8-10 minutes until the cheese is fully melted and starting to turn golden and bubbly at the edges.
- Remove from the oven and immediately top with the cold ingredients: the pico de gallo and pickled jalapeños.
- Drizzle the sour cream over the top in a zig-zag pattern for that viral-worthy aesthetic look.
- Serve immediately while the cheese is still stretchy and the chips are warm and crisp.
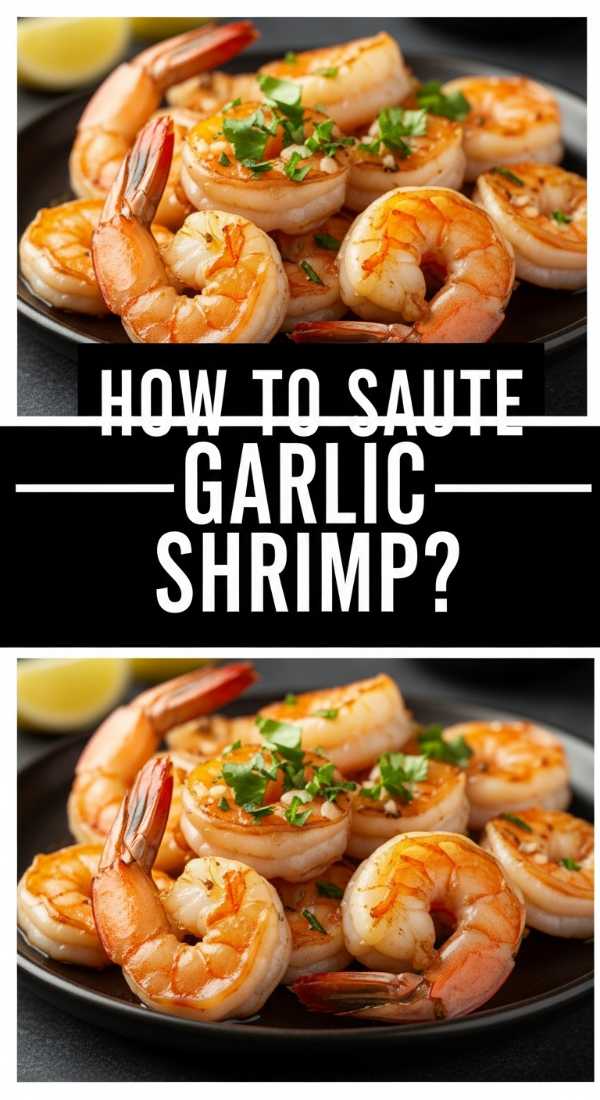
How to saute garlic shrimp?
Why we love this
Garlic shrimp are like little jewels on the food board, offering a snappy, firm texture and a sweet, briny flavor that feels light and elegant. The combination of sizzling butter, garlic, and a splash of lemon creates a sauce that is so delicious you’ll want to soak up every drop with a piece of crusty bread. The aroma is quintessential coastal dining—fresh, garlicky, and bright. It provides a luxurious seafood element to the spread that takes only minutes to prepare but leaves a lasting impression of effortless sophistication and culinary skill.
Ingredients
- 1 lb Large Shrimp, peeled and deveined
- 3 tbsp Unsalted Butter
- 4 cloves Garlic, minced
- 1/2 tsp Red Pepper Flakes
- Zest and Juice of half a Lemon
- Fresh Chives, chopped
How to make it
- Ensure your shrimp are completely thawed and patted dry with a paper towel; moisture is the enemy of a good sear.
- Season the shrimp lightly with salt and pepper.
- In a large skillet, melt the butter over medium-high heat until the foaming subsides and it starts to smell slightly nutty.
- Add the shrimp in a single layer, making sure they don’t overlap; cook for 90 seconds without moving them until the bottoms turn pink and opaque.
- Flip the shrimp and immediately add the minced garlic and red pepper flakes to the center of the pan.
- Cook for another 60-90 seconds, tossing the shrimp in the garlic butter as it browns, until they form a ‘C’ shape; if they curl into an ‘O,’ they are overcooked.
- Remove from heat, stir in the lemon zest, juice, and chives, and serve immediately with the pan juices drizzled over the top.
How to toast pesto sandwiches?

Why we love this
A toasted pesto sandwich is a symphony of crunch and creaminess, featuring golden, buttery bread that gives way to a heart of melting mozzarella and herbaceous basil. The scent of warm pine nuts and garlic from the pesto is deeply comforting, while the steam that rises when you pull the halves apart is pure food-bloggers’ gold. It’s a handheld delight that packs a punch of flavor, bridging the gap between a snack and a meal. It adds a wonderful structural element to the board, offering a warm, carb-heavy anchor that everyone loves to grab and enjoy.
Ingredients
- 4 slices Sourdough or Ciabatta
- 1/4 cup Basil Pesto
- 4 oz Fresh Mozzarella, sliced
- 2 thin slices Tomato
- 2 tbsp Salted Butter, softened
How to make it
- Spread a generous layer of pesto on the inside of each slice of bread, ensuring you reach all the way to the crusts.
- Layer the mozzarella and tomato slices on two of the pieces, then top with the remaining slices to close the sandwiches.
- Liberally butter the outside of the bread from edge to edge; butter provides better color and flavor than oil for toasting.
- Heat a non-stick skillet or griddle over medium-low heat; a lower temperature is key to melting the cheese before the bread burns.
- Place the sandwiches in the pan and weight them down with a heavy plate or a second skillet to ensure even contact and a ‘pressed’ texture.
- Cook for 3-4 minutes per side until the bread is a deep, uniform golden brown and the cheese is visibly oozing from the sides.
- Let the sandwiches rest for one minute before slicing diagonally to keep the fillings from sliding out.
The Art of the Minimalist Board
Creating this viral food board is about more than just following recipes; it’s about the joy of assembly and the beauty of simplicity. When you arrange these dishes together, you’re creating a tapestry of flavors that invites people to linger, talk, and savor. Remember to use a large wooden board or a clean marble slab as your canvas, tucking in some fresh herbs or lemon wedges for that final aesthetic touch. Whether it’s a casual weeknight or a special celebration, this spread proves that when you cook with heart and focus on the basics, the results are always extraordinary.