

There is a specific kind of magic that happens when you walk into a space that feels like a warm hug. It’s that viral ‘Cozy Core’ aesthetic we’ve all been scrolling through—a blend of soft textures, nostalgic touches, and a home that feels lived-in yet curated. This movement isn’t just about buying new things; it’s about creating a sanctuary that reflects your soul and invites you to slow down and savor the little moments.
Mastering this dreamy home vibe is all about the layers. It’s the way the light hits a textured wall, the scent of fresh cedar in the garden, and the tactile joy of running your hands over a smooth, organized pantry shelf. Whether you are looking to revamp your curb appeal or create a sanctuary for your kids, these projects are designed to infuse your life with that elusive, viral-worthy glow that makes every day feel like a slow Sunday morning.
How to Design Enchanting Front Yard Landscapes for Instant Curb Appeal

Why we love this
There is nothing quite like the sensory experience of a garden that feels like a secret entryway to a storybook. Imagine the heady, sweet aroma of blooming lavender and jasmine wafting through the air as you walk toward your front door, the soft crunch of gravel beneath your feet, and the visual feast of varied heights and textures. This approach to landscaping isn’t just about plants; it’s about creating an emotional transition from the busy world outside to the peaceful sanctuary of your home through lush greenery and soft, romantic lines.
Essential Elements:
- Native perennial flowers for year-round color
- Layered heights (shrubs, mid-sized blooms, and groundcover)
- Natural stone or brick edging
- Soft ambient path lighting
- A focal point like a birdbath or vintage bench
How to make it
- Begin by sketching a ‘planting map’ that follows the natural curves of your walkway, ensuring you place taller shrubs in the back and shorter groundcovers at the front.
- Prepare the soil by tilling to a depth of at least 8 inches and mixing in organic compost to ensure rich drainage and nutrient availability for your new roots.
- Install your edging first using a mallet to secure stone or brick, creating a crisp boundary between the lawn and the garden beds.
- Place your plants while they are still in their nursery pots to check the spacing; ensure you leave enough room for their full-grown width to prevent overcrowding.
- Dig holes twice as wide as the root ball, gently tease the roots out if they are bound, and plant them at the same depth they were in the pot.
- Apply a 2-inch layer of cedar mulch across the bed to retain moisture and suppress weeds, giving it that finished, professional look.
How to Create Inspiring Elementary Art Rooms for Young Creative Minds

Why we love this
Walking into a well-designed art room should feel like walking into a rainbow of possibilities. The air is filled with the faint, nostalgic scent of beeswax crayons and fresh paper, while the walls hum with the vibrant energy of student masterpieces. It’s a space where organized chaos meets pure inspiration, using tactile surfaces like smooth wooden tables and soft rug corners to ground the boundless imagination of children, making them feel safe to experiment, fail, and ultimately create something beautiful.
Essential Elements:
- Open shelving with clear bins for color-coded supplies
- Large-scale drying racks
- Natural light or warm-toned overhead lighting
- A ‘gallery wall’ with clips for easy rotation of art
- Washable, durable work surfaces
How to make it
- Divide the room into ‘creative zones’ such as a wet station for painting, a dry station for drawing, and a sensory zone for clay or playdough.
- Install wall-mounted pegboards to keep scissors, tape, and brushes within sight and reach, using hooks that are easy for small hands to navigate.
- Label every single bin with both words and pictures; this promotes independence and ensures the ‘clean-up song’ actually results in a tidy room.
- Set up a dedicated ‘Inspiration Station’ featuring books, natural objects like shells and pinecones, and various textures for students to touch and study.
- Ensure safety by placing heavy items on lower shelves and creating wide walkways to prevent accidental spills when students are moving between stations.
How to Build a Chic Above Ground Pool Bar for Endless Summer Fun

Why we love this
There is a distinct, sun-drenched joy in leaning against a smooth wooden bar as the water ripples behind you and the scent of coconut lime spritzers fills the air. This pool bar transforms a standard above-ground pool into a high-end resort experience, offering a tactile contrast between the cool water and the warm, grainy texture of treated timber. It’s the ultimate setting for golden hour conversations, where the sound of laughter mingles with the gentle splashing of water, creating a core summer memory every single day.
Essential Elements:
- Pressure-treated 4×4 posts and 2×4 framing
- Cedar or composite decking for the bar top
- Weatherproof bar stools
- Outdoor-rated sealant or stain
- Built-in ice bucket or cooler nook
How to make it
- Measure the height of your pool’s top rail; your bar should sit about 2-4 inches above this to allow for a comfortable arm rest without interfering with the pool liner.
- Build a sturdy rectangular frame using 4×4 posts for the corners and 2×4 cross-beams, securing them with heavy-duty exterior deck screws.
- Level the ground beneath the bar area thoroughly; use concrete pavers or a gravel base to ensure the bar doesn’t sink or tilt over time.
- Attach the bar top planks, leaving a 1/8 inch gap between boards to allow for wood expansion and water drainage during rain or splashes.
- Sand all surfaces with 80-grit then 120-grit sandpaper until the wood is buttery smooth to the touch, preventing splinters for bare-skinned guests.
- Apply two coats of high-quality UV-resistant outdoor stain, allowing 24 hours of drying time between coats to ensure a deep, protective finish.
How to Style a Nostalgic Y2K Teen Room for the Ultimate Retro Vibe

Why we love this
Step back into a world of bubblegum pink, holographic glints, and the comforting glow of a lava lamp. This aesthetic is a sensory explosion—the plush feel of a faux-fur rug, the smooth plastic of an inflatable chair, and the visual clutter of magazine collages that feel like a physical manifestation of teenage dreams. It’s a nostalgic retreat that prioritizes fun and self-expression over minimalism, wrapping you in a cocoon of bright colors and retro tech that feels both energetic and strangely cozy.
Essential Elements:
- Beaded curtains for the doorway
- Inflatable or butterfly chairs
- Neon signs and fairy lights
- Holographic or metallic accents
- CD wall art or vintage posters
How to make it
- Choose a high-contrast color palette, such as hot pink and lime green or sky blue and silver, and apply this to the bedding and curtains first.
- Create a ‘Wall of Fame’ by tiling vintage magazine pages or printed aesthetic photos across an entire accent wall using removable adhesive putty.
- Swap out standard white light bulbs for color-changing smart bulbs to achieve that signature purple or blue evening glow.
- Incorporate various textures by layering a shag rug over a standard carpet and adding velvet or faux-fur throw pillows to the bed.
- Display tech-cessories like an old clear-cased phone or a portable CD player on the nightstand to anchor the Y2K theme.
How to Construct Modern Wood Planter Boxes for a Lush Garden Sanctuary
Why we love this
There is a profound satisfaction in the smell of fresh soil and the clean, architectural lines of modern cedar planters against a backdrop of wild green leaves. These boxes provide a structured home for your favorite herbs and blooms, offering a tactile experience that ranges from the rough bark of the wood to the velvety softness of sage leaves. They turn a simple patio into a lush, multi-dimensional sanctuary where the rhythm of gardening becomes a meditative daily ritual for the soul.
Essential Elements:
- Cedar or Redwood (naturally rot-resistant)
- Corrosion-resistant screws
- Landscape fabric liner
- Drainage gravel and high-quality potting mix
- Power drill and miter saw
How to make it
- Cut your wood into four side panels and a bottom base, ensuring the bottom has pre-drilled drainage holes (at least 1/2 inch wide) every six inches.
- Assemble the walls using a corner clamp to keep them perfectly square, then drive screws through the faces into the interior corner supports.
- Staple landscape fabric to the inside of the box; this is a critical step to keep the soil inside while allowing excess water to filter out cleanly.
- If building a large box, add a center cross-brace to the interior to prevent the weight of the wet soil from bowing the wood outward over time.
- Fill the bottom two inches with coarse gravel for drainage, then top with a mix of compost, peat moss, and perlite for the ultimate growing medium.
- Place your planters in their final location before filling with soil, as they will become extremely heavy once the plants are watered.
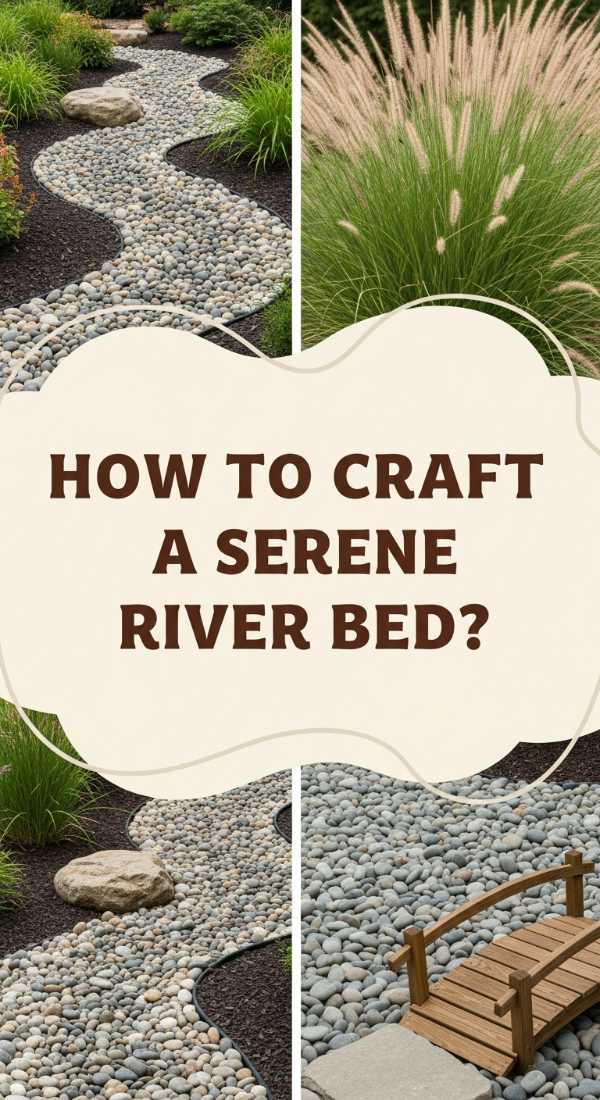
How to Craft a Serene Rock River Bed for a Peaceful Backyard Retreat
Why we love this
A dry creek bed is a masterpiece of texture and movement without the maintenance of a real stream. We love the way the different shades of grey, tan, and blue river stones shimmer when they catch the afternoon sun, mimicking the fluid flow of water through your landscape. It creates a grounding, earthy aroma after a light rain and provides a visual ‘path’ for the eye to follow, turning a stagnant backyard corner into a dynamic and tranquil scene that feels like a slice of a mountain retreat.
Essential Elements:
- Rounded river rocks in various sizes (pea gravel to large boulders)
- Heavy-duty landscape fabric
- Trenching shovel
- Steel rake
- Accent plants like ornamental grasses or ferns
How to make it
- Mark out a natural, meandering path using a garden hose to visualize the ‘flow’ of the river through your yard.
- Dig a shallow trench about 6 to 12 inches deep, making it slightly wider at the ‘curves’ to mimic how real water erodes land.
- Lay down heavy-duty landscape fabric to prevent weeds, securing it with garden staples every 12 inches along the edges.
- Place your largest ‘anchor’ boulders first at the bends of the river to create a realistic, structural foundation.
- Fill in the remaining areas with medium-sized river stones, then use small pea gravel to fill the gaps, ensuring no fabric is visible.
- Tuck drought-tolerant plants like Hostas or Blue Fescue along the ‘banks’ to soften the edges and integrate the rock bed into the surrounding garden.
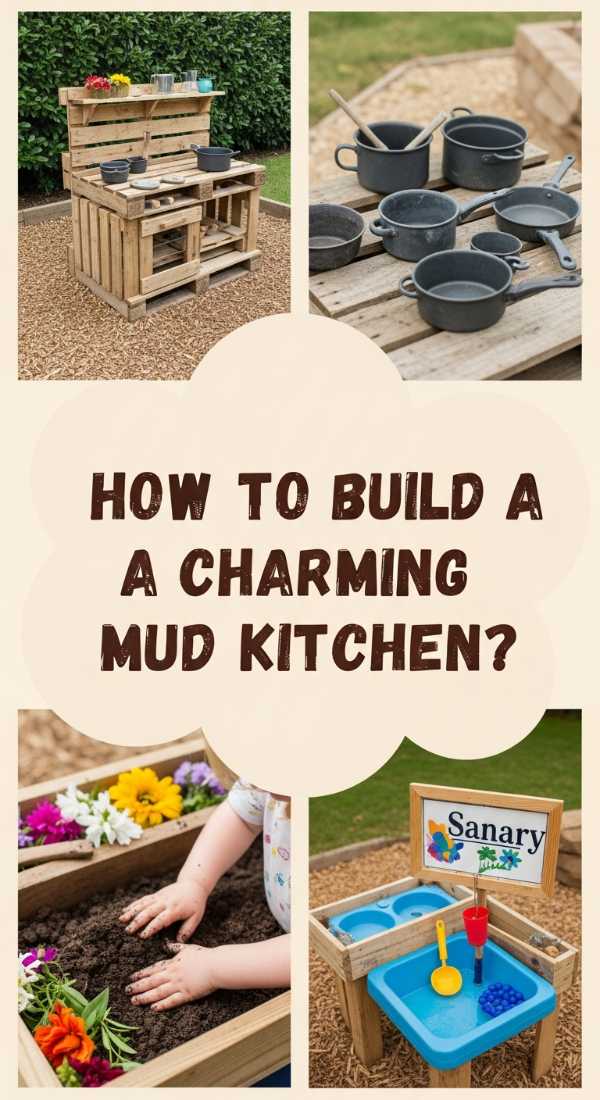
How to Build a Charming Pallet Mud Kitchen for Magical Outdoor Play
Why we love this
There is nothing more evocative of childhood than the scent of damp earth and the messy, creative joy of ‘mud pie’ making. A pallet mud kitchen brings a rustic, tactile charm to the backyard, offering a sensory playground where wood, water, and soil collide. We love the sturdy, weathered feel of the reclaimed wood and the clinking sound of old metal pots and pans hanging from hooks, inviting children to dive into a world of unscripted, imaginative play that smells like summer rain and pine needles.
Essential Elements:
- Two heat-treated (HT marked) wooden pallets
- Old stainless steel sink or plastic basins
- Variety of old kitchen utensils and pots
- Outdoor wood screws and sandpaper
- Outdoor chalkboard paint for the ‘menu’
How to make it
- Ensure your pallets are marked ‘HT’ (Heat Treated) rather than ‘MB’ (Methyl Bromide) for safety, as kids will be playing directly on these surfaces.
- Sand every inch of the pallet wood aggressively, starting with 60-grit and finishing with 120-grit until there is zero risk of splinters.
- Use one pallet as the vertical backboard and the other (disassembled and rebuilt) as the ‘countertop’ and base, securing them with long structural screws.
- Jigsaw a hole in the countertop that is slightly smaller than the lip of your sink or basin, then drop the basin in so it sits flush.
- Attach a shelf to the backboard for storing ‘ingredients’ like acorns, flower petals, and pinecones.
- Finish with a coat of clear outdoor sealant or a fun pop of bright, non-toxic exterior paint to protect the wood from the elements.
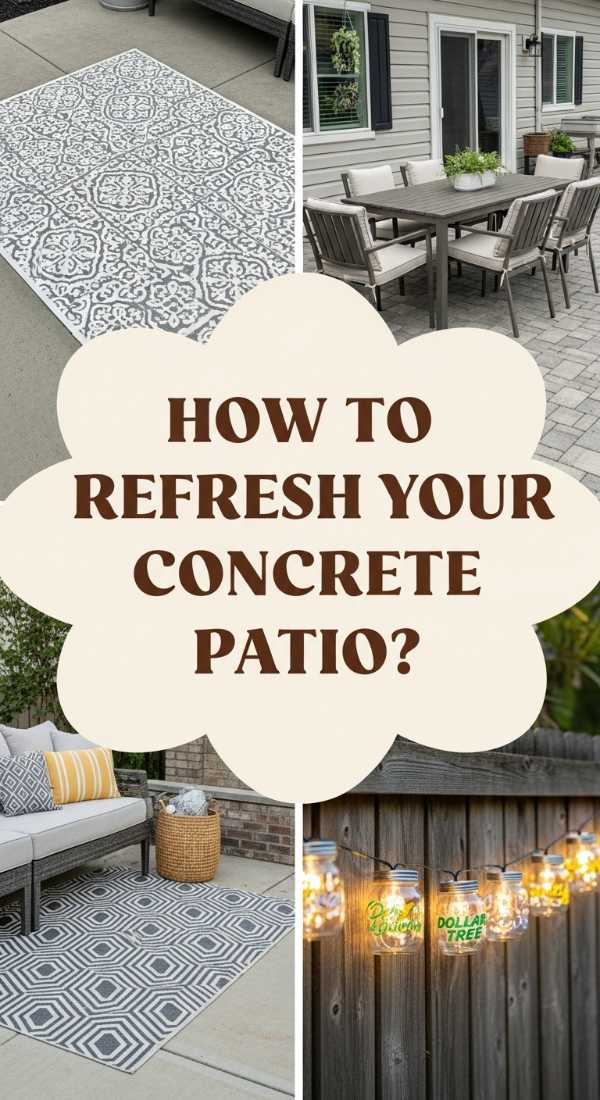
How to Refresh Your Concrete Slab Patio for a High End Designer Look

Why we love this
That cold, grey concrete slab in your backyard is actually a blank canvas waiting for a high-fashion transformation. By adding a faux-tile stencil or a sophisticated epoxy finish, you create a surface that feels smooth and cool underfoot, resembling an expensive Mediterranean terrace. We love the way a fresh patio design anchors the outdoor furniture, making the entire space feel like an extension of your indoor living room, complete with the clean, fresh scent of newly applied masonry paint and the promise of sunset dinners.
Essential Elements:
- Concrete cleaner and degreaser
- Concrete primer and specialized porch/patio paint
- Large scale pattern stencil
- Small foam roller and painter’s tape
- Clear anti-slip concrete sealer
How to make it
- Power wash the concrete to remove all dirt and loose debris; if there are oil stains, use a heavy-duty degreaser and a stiff scrub brush.
- Patch any cracks with concrete filler and let it cure completely; a smooth surface is essential for the stencil to look professional.
- Apply a base coat of porch and patio paint in your chosen ‘grout’ color, using a long-handle roller for even coverage, and let it dry for 24 hours.
- Secure your stencil in one corner using painter’s tape; use a ‘dry’ foam roller (dip in paint and roll most of it off on a paper towel) to prevent bleeding under the stencil.
- Repeat the pattern across the patio, cleaning the stencil every 3-4 uses to prevent paint buildup from blurring the crisp lines.
- Once fully dry, roll on two coats of clear sealer with an anti-slip additive to protect your hard work from foot traffic and weather.
How to Achieve Realistic Pantry Organization for a Stress Free Kitchen

Why we love this
An organized pantry is a sensory delight for the home cook—the uniform click of airtight lids, the visual harmony of glass jars lined up by height, and the faint, appetizing aroma of dried spices and grains. It’s about more than just aesthetics; it’s the feeling of calm that washes over you when you can see exactly what you have. This system turns a daily chore into a moment of zen, where the tactile smoothness of glass and the clarity of custom labels make preparing a meal feel like a curated experience rather than a frantic search.
Essential Elements:
- Uniform glass or BPA-free plastic canisters
- Woven baskets for bulky items
- Tiered shelves for canned goods
- Custom labels or a paint pen
- Lazy Susans for oils and vinegars
How to make it
- Empty the entire pantry and check expiration dates; wipe down the shelves with a vinegar-based cleaner to remove any crumbs or sticky spots.
- Categorize your items into groups like ‘Baking,’ ‘Breakfast,’ ‘Snacks,’ and ‘Grains’ to determine how many containers of each size you actually need.
- Decant dry goods like flour, sugar, and pasta into your clear canisters; this not only looks better but also keeps food fresh for significantly longer.
- Place frequently used items at eye level and tuck back-stock or heavy appliances on the bottom shelves to keep the visual field clean.
- Use ‘The Rule of Three’ for your baskets—group three identical baskets together to create a cohesive, designer look that hides ‘ugly’ packaging.
- Apply labels to the front of every container at the same height; consistency in label placement is the secret to that viral, professional-looking pantry.
How to Paint Vibrant Shed Murals for a Whimsical Garden Statement
[IMAGE_10]
Why we love this
Turning a boring backyard shed into a giant piece of art is the ultimate expression of the ‘Cozy Core’ lifestyle. The smell of fresh exterior paint mixed with the garden air is intoxicating, and the result is a visual explosion of color that dances behind your flower beds. It’s a way to infuse your personality into the landscape, creating a focal point that feels playful and bold. Every time you glance out the window, that mural serves as a vibrant reminder that home is a place for creativity and joy.
Essential Elements:
- Exterior-grade acrylic paints
- Variety of brushes (from wide rollers to fine detail brushes)
- Chalk for sketching the design
- UV-resistant clear topcoat
- Painter’s tape and drop cloths
How to make it
- Clean the shed surface with soap and water, and lightly sand any peeling wood or metal to ensure the paint adheres perfectly.
- Apply a high-quality exterior primer; this acts as the ‘canvas’ for your mural and prevents the wood’s natural oils from bleeding through the paint.
- Use a piece of chalk to sketch your design onto the shed; chalk is forgiving and can be wiped away with a damp rag until your proportions are perfect.
- Paint your background colors first using a roller or large brush, then work your way forward to the smaller, more detailed elements of the mural.
- Wait for each color to dry before adding overlapping details to prevent ‘muddying’ the colors; keep a bucket of water nearby to keep brushes fresh.
- Apply a UV-resistant clear sealer over the entire mural once it has cured for 48 hours; this prevents the sun from fading your vibrant masterpiece.
Creating Your Own Cozy Sanctuary
In the end, the ‘Cozy Core’ aesthetic is less about following a set of strict rules and more about embracing the projects that bring you personal joy. Whether you’re painting a mural on your shed or organizing your spices into tiny glass jars, the goal is to create a space that feels like a true reflection of your heart. These DIY transformations are the building blocks of a home that doesn’t just look good on camera—it feels good to live in. So, grab your paintbrushes and your garden gloves, and start building your own dreamy, viral-worthy sanctuary today.